
Service Manual
Page 37
...Components). The wax motors are loose. 16008373-01 © 1998 Maytag Corporation SECTION 3. Clothes Wet: Possibly due to OFF? "Thumping...yes, then excessive suds may possibly be from loose lower front weight mounting bolts or a loose bolt securing the driven... Replace the belt. Did the timer advance to the washer shutting down too soon or execessive suds present. Ussually ..."flat" spot. The technician should fully seat the door into the shroud evenly prior to tightening the hinge...remove the excess flash and remount the boot gasket. Check the belt for a weak spot on the...
...Components). The wax motors are loose. 16008373-01 © 1998 Maytag Corporation SECTION 3. Clothes Wet: Possibly due to OFF? "Thumping...yes, then excessive suds may possibly be from loose lower front weight mounting bolts or a loose bolt securing the driven... Replace the belt. Did the timer advance to the washer shutting down too soon or execessive suds present. Ussually ..."flat" spot. The technician should fully seat the door into the shroud evenly prior to tightening the hinge...remove the excess flash and remount the boot gasket. Check the belt for a weak spot on the...
Service Manual
Page 56
... Troubleshooting. Remove the wires from around the inside perimeter of the gasket (Figure 5-9). 16008373-01 © 1998 Maytag Corporation SECTION 5. Remove light. 4. CABINET ASSEMBLY 5 - 4 Thus, allowing the rotating gear to the door, the wax motor is overridden and the sliding gear is exposed....door open, unsnap the boot gasket from the lock switches, wax motor and light fixture. 3. Two switches in the extended position and entry into the washer is securely locked. This will return to the tub cover, spin basket, sump area and etc.. REMOVAL 1. Remove the front...
... Troubleshooting. Remove the wires from around the inside perimeter of the gasket (Figure 5-9). 16008373-01 © 1998 Maytag Corporation SECTION 5. Remove light. 4. CABINET ASSEMBLY 5 - 4 Thus, allowing the rotating gear to the door, the wax motor is overridden and the sliding gear is exposed....door open, unsnap the boot gasket from the lock switches, wax motor and light fixture. 3. Two switches in the extended position and entry into the washer is securely locked. This will return to the tub cover, spin basket, sump area and etc.. REMOVAL 1. Remove the front...

Service Manual
Page 66
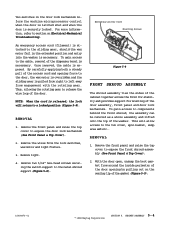
... the shroud. Remove the front panel, top cover and front shroud (See Front Panel, Top and Front Shroud Removal). 3. DOOR BOOT The door boot rubber gasket provides a seal between the outer tub assembly and the front shroud. OUTER TUB & SPINNER ASSEMBLY © 1998 Maytag Corporation 7-1 The three rear... two hold down brackets (See Figure 5-6) or one of the two front support springs, grasp the hook of the washer. Carefully remove the wire loop from inside the spin basket. 3. Locking Tabs Boot Gasket Door Shroud 16008373-01 Figure 7-1 SECTION 7. OUTER TUB & SPINNER ASSEMBLY Warning...
... the shroud. Remove the front panel, top cover and front shroud (See Front Panel, Top and Front Shroud Removal). 3. DOOR BOOT The door boot rubber gasket provides a seal between the outer tub assembly and the front shroud. OUTER TUB & SPINNER ASSEMBLY © 1998 Maytag Corporation 7-1 The three rear... two hold down brackets (See Figure 5-6) or one of the two front support springs, grasp the hook of the washer. Carefully remove the wire loop from inside the spin basket. 3. Locking Tabs Boot Gasket Door Shroud 16008373-01 Figure 7-1 SECTION 7. OUTER TUB & SPINNER ASSEMBLY Warning...
Service Manual
Page 67
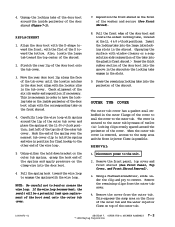
...clock position, just left of the top rib of the six rib marks and reposition if necessary. Reposition the front shroud on top of the washer and secure (See Front Shroud). 8. This exposes the sump area on the floor of the outer tub and the water injector flume on...169; 1998 Maytag Corporation REMOVAL 1. Pull the front edge of the shroud. Press the remaining locking tabs into the plastic front shroud.) Press the thick rubber section of the door boot onto the tub cover. 3. Remove the cover from the outer tub cover. 4. OUTER TUB COVER The outer tub cover has a gasket seal embedded...
...clock position, just left of the top rib of the six rib marks and reposition if necessary. Reposition the front shroud on top of the washer and secure (See Front Shroud). 8. This exposes the sump area on the floor of the outer tub and the water injector flume on...169; 1998 Maytag Corporation REMOVAL 1. Pull the front edge of the shroud. Press the remaining locking tabs into the plastic front shroud.) Press the thick rubber section of the door boot onto the tub cover. 3. Remove the cover from the outer tub cover. 4. OUTER TUB COVER The outer tub cover has a gasket seal embedded...


