Quick Reference
Page 1
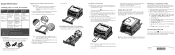
... software application, select File Æ Print. c Click the Paper tab. The top edge of the tray. Using the manual feeder The manual feeder can only feed one sheet of print media at the front of the sheet with the flap side face down . See Loading paper or other Envelopes * Tray 2 not available on the printer operator panel to view the printer driver settings. Forcing the media causes jams. • Insert envelopes with the logo should be placed at a time...
... software application, select File Æ Print. c Click the Paper tab. The top edge of the tray. Using the manual feeder The manual feeder can only feed one sheet of print media at the front of the sheet with the flap side face down . See Loading paper or other Envelopes * Tray 2 not available on the printer operator panel to view the printer driver settings. Forcing the media causes jams. • Insert envelopes with the logo should be placed at a time...
Quick Reference
Page 2
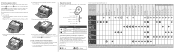
To clear a paper jam: 1 If you are closed, and then press Continue to resume printing. If you have questions about the light sequences, see the publications CD. Ready / Power Saver Busy Waiting Flushing / Resolution reduced Not ready (printer is offline) Close door Load media Load manual feeder Print side two of a duplex job Toner low Photoconductor kit life warning Replace photoconductor Replace photoconductor kit (printer hard stop) Unsupported print cartridge Change cartridge invalid refill Cartridge region mismatch Cancel job / Reset printer Service error Printer error * Paper jam ...
To clear a paper jam: 1 If you are closed, and then press Continue to resume printing. If you have questions about the light sequences, see the publications CD. Ready / Power Saver Busy Waiting Flushing / Resolution reduced Not ready (printer is offline) Close door Load media Load manual feeder Print side two of a duplex job Toner low Photoconductor kit life warning Replace photoconductor Replace photoconductor kit (printer hard stop) Unsupported print cartridge Change cartridge invalid refill Cartridge region mismatch Cancel job / Reset printer Service error Printer error * Paper jam ...
User's Guide
Page 5
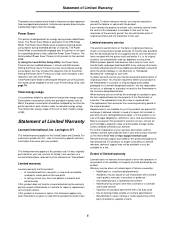
... printer is the sum of each mode in the previous table represent time-averaged measurements. By Using the Local Printer Setup Utility, the Power Saver Timeout can be disabled from new parts, or new and serviceable used for a fee. Setting the Power Saver Timeout to the United States and Canada. The total printer energy usage is designed with Lexmark user's guides, manuals, instructions or guidance • Unsuitable physical or operating environment • Maintenance...
... printer is the sum of each mode in the previous table represent time-averaged measurements. By Using the Local Printer Setup Utility, the Power Saver Timeout can be disabled from new parts, or new and serviceable used for a fee. Setting the Power Saver Timeout to the United States and Canada. The total printer energy usage is designed with Lexmark user's guides, manuals, instructions or guidance • Unsuitable physical or operating environment • Maintenance...

User's Guide
Page 13
....lexmark.com. Installing the Local Printer Settings Utility 1 Launch the drivers CD. 2 Click Install Printer Software. 3 Select the Custom install path. 4 Under Tools, select Local Printer Settings Utility. 5 Click Finish to complete the installation. Note: A PPD for the printer. a Insert the drivers CD. Macintosh Installing optional printer software If you want to use any of the other selections, or until you make changes to change settings such as Toner Darkness, Power Saver, Default Paper Size, and Default Paper Type. Creating a queue in a downloadable software...
....lexmark.com. Installing the Local Printer Settings Utility 1 Launch the drivers CD. 2 Click Install Printer Software. 3 Select the Custom install path. 4 Under Tools, select Local Printer Settings Utility. 5 Click Finish to complete the installation. Note: A PPD for the printer. a Insert the drivers CD. Macintosh Installing optional printer software If you want to use any of the other selections, or until you make changes to change settings such as Toner Darkness, Power Saver, Default Paper Size, and Default Paper Type. Creating a queue in a downloadable software...
User's Guide
Page 43
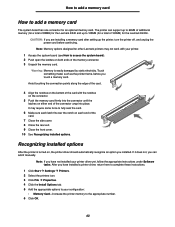
... installing a memory card after setting up to 128MB (for an optional memory card. How to add a memory card How to add a memory card The system board has one connector for a total of the card. 7 Close the side cover. 8 Close the rear exit. 9 Close the front cover. 10 See Recognizing installed options. It may not work with the notches on each end of 160MB) for the Lexmark E240 and up the printer, turn the printer...
... installing a memory card after setting up to 128MB (for an optional memory card. How to add a memory card How to add a memory card The system board has one connector for a total of the card. 7 Close the side cover. 8 Close the rear exit. 9 Close the front cover. 10 See Recognizing installed options. It may not work with the notches on each end of 160MB) for the Lexmark E240 and up the printer, turn the printer...
User's Guide
Page 72
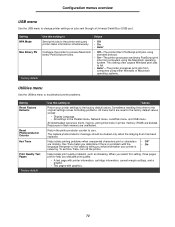
The replace photoconductor message should be cleared only when the imaging drum has been replaced. Setting NPA Mode Mac Binary PS * Factory default Use this setting to Values Send print jobs to the printer and query printer status information simultaneously. • Off • On • Auto* Configure the printer to the factory default values except: • Display Language. • All settings in the Parallel menu, Network menu, LocalTalk menu, and USB menu. Sometimes resetting the printer to the original settings solves formatting problems. All menu items are deleted...
The replace photoconductor message should be cleared only when the imaging drum has been replaced. Setting NPA Mode Mac Binary PS * Factory default Use this setting to Values Send print jobs to the printer and query printer status information simultaneously. • Off • On • Auto* Configure the printer to the factory default values except: • Display Language. • All settings in the Parallel menu, Network menu, LocalTalk menu, and USB menu. Sometimes resetting the printer to the original settings solves formatting problems. All menu items are deleted...
User's Guide
Page 74
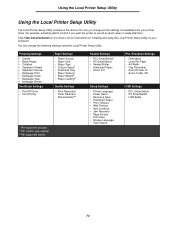
...; • Paper Loading‡ Quality Settings • Print Resolution • Toner Darkness • PictureGrade™ * Per supported sources † Per custom type number ‡ Per supported media Parallel Settings • PCL SmartSwitch • PS SmartSwitch • Parallel Buffer • Advanced Status • Honor Init PCL Emulation Settings • Orientation • Lines Per Page • A4 Width • Tray Renumber* • Auto CR after LF • Auto LF after CR Setup Settings • Printer Language • Power Saver...
...; • Paper Loading‡ Quality Settings • Print Resolution • Toner Darkness • PictureGrade™ * Per supported sources † Per custom type number ‡ Per supported media Parallel Settings • PCL SmartSwitch • PS SmartSwitch • Parallel Buffer • Advanced Status • Honor Init PCL Emulation Settings • Orientation • Lines Per Page • A4 Width • Tray Renumber* • Auto CR after LF • Auto LF after CR Setup Settings • Printer Language • Power Saver...
User's Guide
Page 85
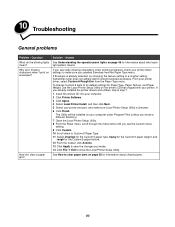
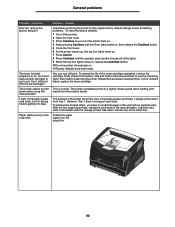
... port, and make sure you made. 14 Click File Æ Exit to smooth-textured envelopes. The Utility will be installed on your printer driver, select Custom 6-Rough Env from the Paper Type menu. Sometimes toner does not adhere well to close the Local Printer Setup Utility. If you see voids (missing characters) when printing envelopes, check your printer. 10 Troubleshooting General problems Problem / Question What do I print on envelopes? Why am I missing characters when I clear a paper jam? If Envelope...
... port, and make sure you made. 14 Click File Æ Exit to smooth-textured envelopes. The Utility will be installed on your printer driver, select Custom 6-Rough Env from the Paper Type menu. Sometimes toner does not adhere well to close the Local Printer Setup Utility. If you see voids (missing characters) when printing envelopes, check your printer. 10 Troubleshooting General problems Problem / Question What do I print on envelopes? Why am I missing characters when I clear a paper jam? If Envelope...
User's Guide
Page 86
... output bin. 86 However, Tray 1 does not support card stock. I want to send both pages of the print job as you can still print. Paper stacks poorly in yet. Repeat this procedure multiple times. General problems Problem / Question How do I still print with the top of the sheet first. Can I restore the factory defaults? To extend the life of the toner cartridge somewhat, remove the cartridge, firmly shake it from the manual feeder. The printer sometimes prints...
... output bin. 86 However, Tray 1 does not support card stock. I want to send both pages of the print job as you can still print. Paper stacks poorly in yet. Repeat this procedure multiple times. General problems Problem / Question How do I still print with the top of the sheet first. Can I restore the factory defaults? To extend the life of the toner cartridge somewhat, remove the cartridge, firmly shake it from the manual feeder. The printer sometimes prints...
User's Guide
Page 87
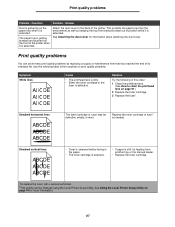
... The toner cartridge or fuser may be changed using the Local Printer Setup Utility. Print quality problems Problem / Question Solution / Answer Dust is gathering on the paper tray when it is extended. This protects the paper tray from the environment as well as needed. Replace the toner cartridge or fuser* as keeping the tray from another tray or the manual feeder. • Replace the toner cartridge. *To replace the fuser, call a service technician. †This setting can solve many print quality problems by replacing a supply or maintenance...
... The toner cartridge or fuser may be changed using the Local Printer Setup Utility. Print quality problems Problem / Question Solution / Answer Dust is gathering on the paper tray when it is extended. This protects the paper tray from the environment as well as needed. Replace the toner cartridge or fuser* as keeping the tray from another tray or the manual feeder. • Replace the toner cartridge. *To replace the fuser, call a service technician. †This setting can solve many print quality problems by replacing a supply or maintenance...
User's Guide
Page 88
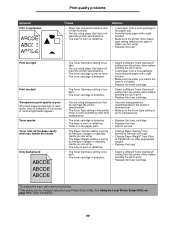
... moisture due to print. • Replace the toner cartridge. *To replace the fuser, call a service technician. †This setting can be changed using the Local Printer Setup Utility. See Using the Local Printer Setup Utility on toner. • The toner cartridge is defective. • The Toner Darkness setting is too dark. • The toner cartridge is defective. • Select a different Toner Darkness† setting from the printer driver before sending the job to print. • Load paper from a new package. •...
... moisture due to print. • Replace the toner cartridge. *To replace the fuser, call a service technician. †This setting can be changed using the Local Printer Setup Utility. See Using the Local Printer Setup Utility on toner. • The toner cartridge is defective. • The Toner Darkness setting is too dark. • The toner cartridge is defective. • Select a different Toner Darkness† setting from the printer driver before sending the job to print. • Load paper from a new package. •...
User's Guide
Page 89
... Local Printer Setup Utility. Replace the toner cartridge. *To replace the fuser, call a service technician. †This setting can be changed using . • Replace the toner cartridge. Remove and then reinsert the toner cartridge. (Print only appears on page 74 for the paper size loaded in the feeder. • Move the guides in the tray. Blank pages The toner cartridge is defective. Set the Form Size to A4. See Using the Local Printer Setup Utility on one side of the page.) Incorrect margins The Form Size setting in the printer driver...
... Local Printer Setup Utility. Replace the toner cartridge. *To replace the fuser, call a service technician. †This setting can be changed using . • Replace the toner cartridge. Remove and then reinsert the toner cartridge. (Print only appears on page 74 for the paper size loaded in the feeder. • Move the guides in the tray. Blank pages The toner cartridge is defective. Set the Form Size to A4. See Using the Local Printer Setup Utility on one side of the page.) Incorrect margins The Form Size setting in the printer driver...
User's Guide
Page 90
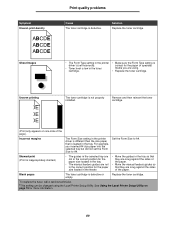
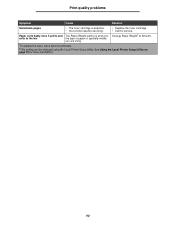
... Using the Local Printer Setup Utility on page 74 for service. Print quality problems Symptom Cause Solution Solid black pages • The toner cartridge is wrong for Change Paper Weight† to the bin the type of paper or specialty media you are using. *To replace the fuser, call a service technician. †This setting can be changed using the Local Printer Setup Utility. Paper curls badly once it prints and The Paper Weight setting is defective. • Your printer requires servicing. • Replace the toner cartridge...
... Using the Local Printer Setup Utility on page 74 for service. Print quality problems Symptom Cause Solution Solid black pages • The toner cartridge is wrong for Change Paper Weight† to the bin the type of paper or specialty media you are using. *To replace the fuser, call a service technician. †This setting can be changed using the Local Printer Setup Utility. Paper curls badly once it prints and The Paper Weight setting is defective. • Your printer requires servicing. • Replace the toner cartridge...
User's Guide
Page 94
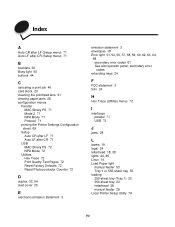
... (Setup menu) 71 B booklets 36 Busy light 50 buttons 44 C canceling a print job 40 card stock 20 cleaning the printhead lens 91 clearing paper jams 28 configuration menus Parallel MAC Binary PS 71 Mode 2 71 NPA Mode 71 Protocol 71 printing the Printer Settings Configuration sheet 69 Setup Auto CR after LF 71 Auto LF after CR 71 USB MAC Binary PS 72 NPA Mode 72 Utilities Hex Trace 72 Print Quality Test Pages 72 Reset Factory Defaults 72 Reset Photoconductor Counter 72 D duplex 33, 54 dust cover...
... (Setup menu) 71 B booklets 36 Busy light 50 buttons 44 C canceling a print job 40 card stock 20 cleaning the printhead lens 91 clearing paper jams 28 configuration menus Parallel MAC Binary PS 71 Mode 2 71 NPA Mode 71 Protocol 71 printing the Printer Settings Configuration sheet 69 Setup Auto CR after LF 71 Auto LF after CR 71 USB MAC Binary PS 72 NPA Mode 72 Utilities Hex Trace 72 Print Quality Test Pages 72 Reset Factory Defaults 72 Reset Photoconductor Counter 72 D duplex 33, 54 dust cover...
User's Guide
Page 95
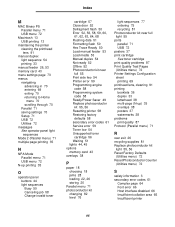
... Resetting printer 58 Restoring factory defaults 58 secondary error codes 61 Service error 59 Toner low 54 Unsupported toner cartridge 56 Waiting 51 lights 44, 45 options memory card 43 overlays 38 P paper 18 choosing 18 jams 28 loading 22, 26 storing 20 Parallel menu 71 photoconductor kit changing 82 level 76 light sequences 77 ordering 75 recycling 81 Photoconductor kit near full light 55 ports parallel 71 USB 72 posters 37 print cartridge See toner cartridge print quality problems 87 Print Quality Test Pages (Utilities menu) 72 Printer Settings Configuration sheet printing 69...
... Resetting printer 58 Restoring factory defaults 58 secondary error codes 61 Service error 59 Toner low 54 Unsupported toner cartridge 56 Waiting 51 lights 44, 45 options memory card 43 overlays 38 P paper 18 choosing 18 jams 28 loading 22, 26 storing 20 Parallel menu 71 photoconductor kit changing 82 level 76 light sequences 77 ordering 75 recycling 81 Photoconductor kit near full light 55 ports parallel 71 USB 72 posters 37 print cartridge See toner cartridge print quality problems 87 Print Quality Test Pages (Utilities menu) 72 Printer Settings Configuration sheet printing 69...
Service Manual
Page 114
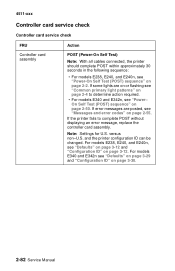
... "Messages and error codes" on page 3-12. For models E340 and E342n see "Defaults" on page 3-29 and "Configuration ID" on page 2-4 to complete POST without displaying an error message, replace the controller card assembly. Note: Settings for U.S. and the printer configuration ID can be changed. On Self Test (POST) sequence" on page 2-2. If the printer fails to determine action required. • For models E340 and E342n, see "Power- versus non-U.S. 4511-xxx Controller card service check Controller card service check FRU Controller card...
... "Messages and error codes" on page 3-12. For models E340 and E342n see "Defaults" on page 3-29 and "Configuration ID" on page 2-4 to complete POST without displaying an error message, replace the controller card assembly. Note: Settings for U.S. and the printer configuration ID can be changed. On Self Test (POST) sequence" on page 2-2. If the printer fails to determine action required. • For models E340 and E342n, see "Power- versus non-U.S. 4511-xxx Controller card service check Controller card service check FRU Controller card...
Service Manual
Page 124
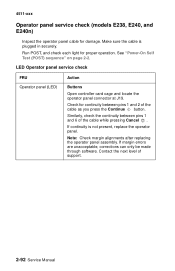
... panel service check FRU Operator panel (LED) Action Buttons Open controller card cage and locate the operator panel connector at J19. Check for continuity between pins 1 and 6 of the cable while pressing Cancel . Contact the next level of the cable as you press the Continue button. See "Power-On Self Test (POST) sequence" on page 2-2. If margin errors are unacceptable, corrections can only be made through software. Run POST, and check each light...
... panel service check FRU Operator panel (LED) Action Buttons Open controller card cage and locate the operator panel connector at J19. Check for continuity between pins 1 and 6 of the cable while pressing Cancel . Contact the next level of the cable as you press the Continue button. See "Power-On Self Test (POST) sequence" on page 2-2. If margin errors are unacceptable, corrections can only be made through software. Run POST, and check each light...
Service Manual
Page 140
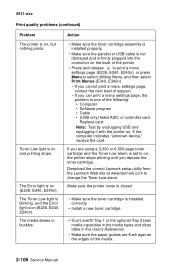
... Tray 1 or the optional Tray 2 (see media capacities in the media types and sizes table in the User's Reference). • Make sure the paper guides are using a 3,000 or 6,000 page toner cartridge and the Toner Low alarm is set to change the Toner Low alarm. Download the correct Lexmark setup utility from the Lexmark Web site at www.lexmark.com to on . Replace card. If you can print a menu settings page, the problem is one of support. - If you replace the toner cartridge. The Toner Low light is blinking, and the Error light...
... Tray 1 or the optional Tray 2 (see media capacities in the media types and sizes table in the User's Reference). • Make sure the paper guides are using a 3,000 or 6,000 page toner cartridge and the Toner Low alarm is set to change the Toner Low alarm. Download the correct Lexmark setup utility from the Lexmark Web site at www.lexmark.com to on . Replace card. If you can print a menu settings page, the problem is one of support. - If you replace the toner cartridge. The Toner Low light is blinking, and the Error light...
Service Manual
Page 172
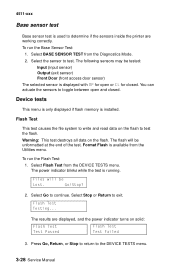
.../Stop? 2. The results are working correctly. To run the Flash Test: 1. Select BASE SENSOR TEST from the Utilities menu. Select Flash Test from the DEVICE TESTS menu. Files will be unformatted at the end of the test. The flash will be tested: Input (input sensor) Output (exit sensor) Front Door (front access door sensor) The selected sensor is displayed with OP for open and closed . The power indicator blinks while the test is installed. Select Stop or Return to the DEVICE TESTS menu. 3-28 Service Manual...
.../Stop? 2. The results are working correctly. To run the Flash Test: 1. Select BASE SENSOR TEST from the Utilities menu. Select Flash Test from the DEVICE TESTS menu. Files will be unformatted at the end of the test. The flash will be tested: Input (input sensor) Output (exit sensor) Front Door (front access door sensor) The selected sensor is displayed with OP for open and closed . The power indicator blinks while the test is installed. Select Stop or Return to the DEVICE TESTS menu. 3-28 Service Manual...
Service Manual
Page 250
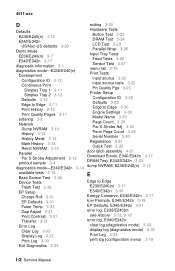
... Page Count 3-29 Serial Number 3-30 Registration 3-21 Quick Test 3-22 Parallel door latch assembly 4-21 Par S Strobe Adjustment 3-12 printout sample 3-4 Download Emuls, E340/E342n 3-17 DRAM Test, E340/E342n 3-24 diagnostics mode-E340/E342n 3-14 dump NVRAM, E238/E240(n) 3-13 available tests 3-19 Base Sensor Test 3-28 Device Tests Flash Test 3-28 EP Setup Charge Roll 3-31 EP Defaults 3-31 Fuser Temp 3-31 Gap Adjust 3-31 Print Contrast 3-31 Transfer 3-31 Error Log Clear...
... Page Count 3-29 Serial Number 3-30 Registration 3-21 Quick Test 3-22 Parallel door latch assembly 4-21 Par S Strobe Adjustment 3-12 printout sample 3-4 Download Emuls, E340/E342n 3-17 DRAM Test, E340/E342n 3-24 diagnostics mode-E340/E342n 3-14 dump NVRAM, E238/E240(n) 3-13 available tests 3-19 Base Sensor Test 3-28 Device Tests Flash Test 3-28 EP Setup Charge Roll 3-31 EP Defaults 3-31 Fuser Temp 3-31 Gap Adjust 3-31 Print Contrast 3-31 Transfer 3-31 Error Log Clear...


