Quick Reference
Page 2
... of a duplex job Toner low Photoconductor kit life warning Replace photoconductor Replace photoconductor kit (printer hard stop) Unsupported print cartridge Change cartridge invalid refill Cartridge region mismatch Cancel job / Reset printer Service error Printer error * Paper jam printer error * Paper jam at the ... sequence. † Paper jams at the input sensor † Paper jam in the manual feeder Paper jam under the toner cartridge Paper jam as printer status, intervention, or service. See Common operator panel light sequences for helpful information about using and maintaining your...
... of a duplex job Toner low Photoconductor kit life warning Replace photoconductor Replace photoconductor kit (printer hard stop) Unsupported print cartridge Change cartridge invalid refill Cartridge region mismatch Cancel job / Reset printer Service error Printer error * Paper jam printer error * Paper jam at the ... sequence. † Paper jams at the input sensor † Paper jam in the manual feeder Paper jam under the toner cartridge Paper jam as printer status, intervention, or service. See Common operator panel light sequences for helpful information about using and maintaining your...
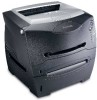
User's Guide
Page 5
...inconsistent with your warranty alternatives and the nearest Lexmark authorized servicer in material and workmanship If this statement is the sum of , or damage to calculate energy usage. Power Saver This printer is not free of all print cartridges, programs, data, and removable storage media...this product only if it prepaid and suitably packaged to the EPA Sleep Mode. You should be available for the Lexmark E238. For products no longer covered by a Lexmark warranty, technical support may be modified between 1 minute and 240 minutes. The Power Saver Mode is 30 minutes ...
...inconsistent with your warranty alternatives and the nearest Lexmark authorized servicer in material and workmanship If this statement is the sum of , or damage to calculate energy usage. Power Saver This printer is not free of all print cartridges, programs, data, and removable storage media...this product only if it prepaid and suitably packaged to the EPA Sleep Mode. You should be available for the Lexmark E238. For products no longer covered by a Lexmark warranty, technical support may be modified between 1 minute and 240 minutes. The Power Saver Mode is 30 minutes ...
User's Guide
Page 9
... when you need new supplies 76 Checking the toner and photoconductor levels 76 Recognizing the operator panel light sequences 77 How to change a toner cartridge 78 Recycling Lexmark products 81 How to change a photoconductor kit 82 Chapter 10: Troubleshooting 85 General problems ...85 Print quality problems ...87 How to clean the printhead...
... when you need new supplies 76 Checking the toner and photoconductor levels 76 Recognizing the operator panel light sequences 77 How to change a toner cartridge 78 Recycling Lexmark products 81 How to change a photoconductor kit 82 Chapter 10: Troubleshooting 85 General problems ...85 Print quality problems ...87 How to clean the printhead...

User's Guide
Page 29
Warning: Fuser or area may be hot. 29 How to direct light for an extended period of time. Warning: Do not leave the print cartridge assembly exposed to clear paper jams 2 Open the front cover, and remove the print cartridge assembly. Extended light exposure can cause print quality problems. 3 Remove any jams in the area behind the print cartridge assembly.
Warning: Fuser or area may be hot. 29 How to direct light for an extended period of time. Warning: Do not leave the print cartridge assembly exposed to clear paper jams 2 Open the front cover, and remove the print cartridge assembly. Extended light exposure can cause print quality problems. 3 Remove any jams in the area behind the print cartridge assembly.

User's Guide
Page 30
... to clear paper jams 4 Lift the flap at the front of a page may not be hot. 6 After you have cleared the jams, reinstall the print cartridge assembly, make sure all printer covers and trays are closed, and then press Continue to Auto by default. Note: Jam recovery is needed for another...
... to clear paper jams 4 Lift the flap at the front of a page may not be hot. 6 After you have cleared the jams, reinstall the print cartridge assembly, make sure all printer covers and trays are closed, and then press Continue to Auto by default. Note: Jam recovery is needed for another...
User's Guide
Page 46
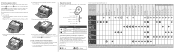
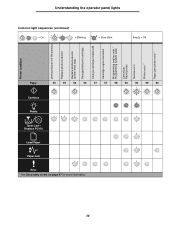
... the operator panel lights 55 56 = Blinking 56 46 Printer condition photoconductor kit life warning Replace photoconductor Replace photoconductor (printer hard stop) Unsupported print cartridge Change cartridge invalid refill Cartridge region mismatch Programming engine code / Programming system code Cancel job / Reset printer Service error Printer error * Paper jam printer error * 57 = Slow blink...
... the operator panel lights 55 56 = Blinking 56 46 Printer condition photoconductor kit life warning Replace photoconductor Replace photoconductor (printer hard stop) Unsupported print cartridge Change cartridge invalid refill Cartridge region mismatch Programming engine code / Programming system code Cancel job / Reset printer Service error Printer error * Paper jam printer error * 57 = Slow blink...

User's Guide
Page 54
...: • Toner Low/Replace PC Kit-On What this light sequence means: Print the other side of the cartridge. • Replace the toner cartridge. (See How to change a toner cartridge on if the starter toner cartridge is getting low. What you can do : • Reinsert your duplex print job. Press Continue to resume ...pages correctly. What you can do : • Press Continue to print the menu settings page for a list of current printer settings. • Remove the toner cartridge and shake it to extend the life of your print job in tray 1 using the instructions in the toner...
...: • Toner Low/Replace PC Kit-On What this light sequence means: Print the other side of the cartridge. • Replace the toner cartridge. (See How to change a toner cartridge on if the starter toner cartridge is getting low. What you can do : • Reinsert your duplex print job. Press Continue to resume ...pages correctly. What you can do : • Press Continue to print the menu settings page for a list of current printer settings. • Remove the toner cartridge and shake it to extend the life of your print job in tray 1 using the instructions in the toner...
User's Guide
Page 56
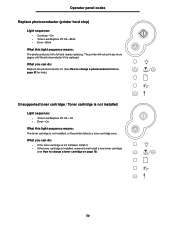
What you can do : • If the toner cartridge is not installed, install it. • If the toner cartridge is installed, remove it and install a new toner cartridge (see How to change a toner cartridge on page 82 for help.) Unsupported toner cartridge / Toner cartridge is not installed Light sequence: • Toner Low/Replace PC Kit-On •... (printer hard stop) Light sequence: • Continue-On • Toner Low/Replace PC Kit-Blink • Error-Blink What this light sequence means: The toner cartridge is not installed, or the printer detects a toner...
What you can do : • If the toner cartridge is not installed, install it. • If the toner cartridge is installed, remove it and install a new toner cartridge (see How to change a toner cartridge on page 82 for help.) Unsupported toner cartridge / Toner cartridge is not installed Light sequence: • Toner Low/Replace PC Kit-On •... (printer hard stop) Light sequence: • Continue-On • Toner Low/Replace PC Kit-Blink • Error-Blink What this light sequence means: The toner cartridge is not installed, or the printer detects a toner...

User's Guide
Page 57
... I order them ? on page 75). on page 75). 57 What you can do: Install a toner cartridge made for your printers region (see What supplies do I need and how do I order them ? Cartridge region mismatch Light sequence: • Toner Low/Replace PC Kit-On • Error-On What this light ...sequence means: The toner cartridge you are using was not designed to match the region of your printer. Operator panel codes Change invalid toner cartridge Light sequence: • Toner Low/Replace PC Kit-On • Error-Blink What this...
... I order them ? on page 75). on page 75). 57 What you can do: Install a toner cartridge made for your printers region (see What supplies do I need and how do I order them ? Cartridge region mismatch Light sequence: • Toner Low/Replace PC Kit-On • Error-On What this light ...sequence means: The toner cartridge you are using was not designed to match the region of your printer. Operator panel codes Change invalid toner cartridge Light sequence: • Toner Low/Replace PC Kit-On • Error-Blink What this...
User's Guide
Page 72
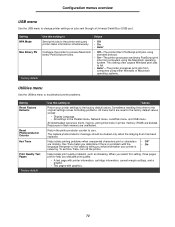
... a problem with graphics. 72 Configuration menus overview USB menu Use the USB menu to help you evaluate print quality: • A text page with printer information, cartridge information, current margin settings, and a graphic. • Two pages with the language interpreter or the cable by telling you what information your printer settings to...
... a problem with graphics. 72 Configuration menus overview USB menu Use the USB menu to help you evaluate print quality: • A text page with printer information, cartridge information, current margin settings, and a graphic. • Two pages with the language interpreter or the cable by telling you what information your printer settings to...
User's Guide
Page 75
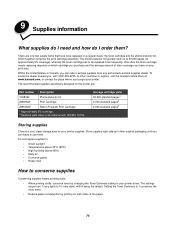
... are: Part number Description 12A8302 Photoconductor kit 23820SW Print Cartridge 23800SW Return Program Print Cartridge 1 Approximately 5% coverage. 2 Declared yield value in your print jobs. The settings range from any authorized Lexmark supplies dealer. The photoconductor kit typically lasts up in their... supplies right side up to be replaced more frequently. In other countries or regions, visit the Lexmark online store at approximately 5% coverage), whereas the toner cartridge has to use them ? There are ready to be replaced on both sides of toner coverage...
... are: Part number Description 12A8302 Photoconductor kit 23820SW Print Cartridge 23800SW Return Program Print Cartridge 1 Approximately 5% coverage. 2 Declared yield value in your print jobs. The settings range from any authorized Lexmark supplies dealer. The photoconductor kit typically lasts up in their... supplies right side up to be replaced more frequently. In other countries or regions, visit the Lexmark online store at approximately 5% coverage), whereas the toner cartridge has to use them ? There are ready to be replaced on both sides of toner coverage...

User's Guide
Page 76
... printing a menu settings page. When you first receive the "Replace photoconductor kit" light sequence, you experience faded print, remove the toner cartridge. This helps you decide when you might need new supplies The following sections describe ways to print the menu settings page on page 77 ... after the photoconductor has reached a maximum of 40,000 pages. 76 You can determine approximately how much toner is left in your cartridge and how full the photoconductor is installed. When the toner light sequence appears, or when you should immediately order a new photoconductor kit.
... printing a menu settings page. When you first receive the "Replace photoconductor kit" light sequence, you experience faded print, remove the toner cartridge. This helps you decide when you might need new supplies The following sections describe ways to print the menu settings page on page 77 ... after the photoconductor has reached a maximum of 40,000 pages. 76 You can determine approximately how much toner is left in your cartridge and how full the photoconductor is installed. When the toner light sequence appears, or when you should immediately order a new photoconductor kit.
User's Guide
Page 78
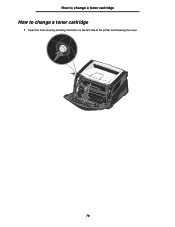
How to change a toner cartridge How to change a toner cartridge 1 Open the front cover by pressing the button on the left side of the printer and lowering the cover. 78
How to change a toner cartridge How to change a toner cartridge 1 Open the front cover by pressing the button on the left side of the printer and lowering the cover. 78

User's Guide
Page 79
See Recycling Lexmark products on the base of the print cartridge assembly. b Pull the toner cartridge up and out using the handle. Note: You can use the packing material from the new cartridge to ship the old cartridge back to distribute the toner. 79 How to change a toner cartridge 2 Remove the toner cartridge: a Press the button on page 81 for more information. 4 Firmly shake the cartridge in all directions to Lexmark for recycling. a b 3 Unpack the new toner cartridge.
See Recycling Lexmark products on the base of the print cartridge assembly. b Pull the toner cartridge up and out using the handle. Note: You can use the packing material from the new cartridge to ship the old cartridge back to distribute the toner. 79 How to change a toner cartridge 2 Remove the toner cartridge: a Press the button on page 81 for more information. 4 Firmly shake the cartridge in all directions to Lexmark for recycling. a b 3 Unpack the new toner cartridge.
User's Guide
Page 80
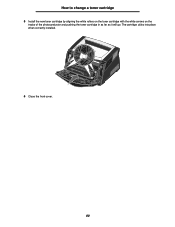
The cartridge clicks into place when correctly installed. 6 Close the front cover. 80 How to change a toner cartridge 5 Install the new toner cartridge by aligning the white rollers on the toner cartridge with the white arrows on the tracks of the photoconductor and pushing the toner cartridge in as far as it will go.
The cartridge clicks into place when correctly installed. 6 Close the front cover. 80 How to change a toner cartridge 5 Install the new toner cartridge by aligning the white rollers on the toner cartridge with the white arrows on the tracks of the photoconductor and pushing the toner cartridge in as far as it will go.
User's Guide
Page 82
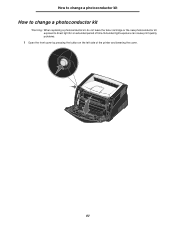
Extended light exposure can cause print quality problems. 1 Open the front cover by pressing the button on the left side of time. How to change a photoconductor kit How to change a photoconductor kit Warning: When replacing a photoconductor kit, do not leave the toner cartridge or the new photoconductor kit exposed to direct light for an extended period of the printer and lowering the cover. 82
Extended light exposure can cause print quality problems. 1 Open the front cover by pressing the button on the left side of time. How to change a photoconductor kit How to change a photoconductor kit Warning: When replacing a photoconductor kit, do not leave the toner cartridge or the new photoconductor kit exposed to direct light for an extended period of the printer and lowering the cover. 82

User's Guide
Page 83
Place the print cartridge assembly on a flat, clean surface. 3 Remove the toner cartridge: a Press the button on the print cartridge assembly. a b 4 Unpack the new photoconductor kit. 83 b Pull the toner cartridge up and out using the handle. Note: Do not press the button on the base of the printer by pulling on the toner cartridge handle. How to change a photoconductor kit 2 Pull the print cartridge assembly out of the print cartridge assembly.
Place the print cartridge assembly on a flat, clean surface. 3 Remove the toner cartridge: a Press the button on the print cartridge assembly. a b 4 Unpack the new photoconductor kit. 83 b Pull the toner cartridge up and out using the handle. Note: Do not press the button on the base of the printer by pulling on the toner cartridge handle. How to change a photoconductor kit 2 Pull the print cartridge assembly out of the print cartridge assembly.
User's Guide
Page 84
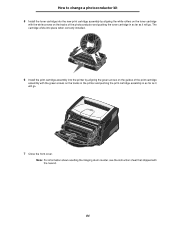
... by aligning the green arrows on the guides of the photoconductor and pushing the toner cartridge in as far as it will go . 7 Close the front cover. Note: For information about resetting the imaging drum counter, see the instruction sheet that ...shipped with the green arrows on the tracks in the printer and pushing the print cartridge assembly in as far as it will go . How to change a photoconductor kit 5 Install the toner...
... by aligning the green arrows on the guides of the photoconductor and pushing the toner cartridge in as far as it will go . 7 Close the front cover. Note: For information about resetting the imaging drum counter, see the instruction sheet that ...shipped with the green arrows on the tracks in the printer and pushing the print cartridge assembly in as far as it will go . How to change a photoconductor kit 5 Install the toner...
User's Guide
Page 86
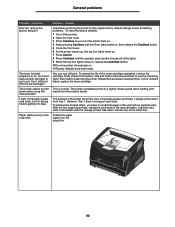
...times. After the first page has printed, reload the card stock in the output bin. Extend the paper support on , but I don't have another cartridge to manually duplex a print job, it back into the printer. I want to manually duplex card stock, but I 'm having trouble getting it to use...when the printer tries to put in the feeder with the already-printed side down, with the low cartridge? The toner low light sequence is normal. If print remains faded, replace the toner cartridge. General problems Problem / Question How do I still print with the top of the sheet first....
...times. After the first page has printed, reload the card stock in the output bin. Extend the paper support on , but I don't have another cartridge to manually duplex a print job, it back into the printer. I want to manually duplex card stock, but I 'm having trouble getting it to use...when the printer tries to put in the feeder with the already-printed side down, with the low cartridge? The toner low light sequence is normal. If print remains faded, replace the toner cartridge. General problems Problem / Question How do I still print with the top of the sheet first....
User's Guide
Page 87
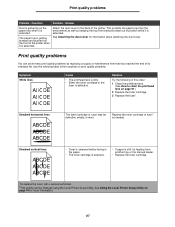
...print quality problems by replacing a supply or maintenance item that has reached the end of the printer when it is extended. Replace the toner cartridge or fuser* as keeping the tray from the environment as well as needed. Print quality problems You can be defective, empty, or worn... paper tray when it is extended. Print quality problems Problem / Question Solution / Answer Dust is gathering on page 91.) 2 Replace the toner cartridge. 3 Replace the fuser*. Solution Try the following table to find solutions to the back of position while it is getting bumped and pushed out...
...print quality problems by replacing a supply or maintenance item that has reached the end of the printer when it is extended. Replace the toner cartridge or fuser* as keeping the tray from the environment as well as needed. Print quality problems You can be defective, empty, or worn... paper tray when it is extended. Print quality problems Problem / Question Solution / Answer Dust is gathering on page 91.) 2 Replace the toner cartridge. 3 Replace the fuser*. Solution Try the following table to find solutions to the back of position while it is getting bumped and pushed out...

