Quick Reference
Page 1
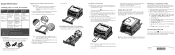
...media. Note: Load letterhead paper with the print side facing down on the publications CD for specialty media, such as shown. © 2005 Lexmark International, Inc., All rights reserved. The printer Load Paper light blinks when it automatically engages. The type of print media you loaded. c ... Select the size of the stack on a level surface. Canceling a print job Press and release Cancel on the application) to view the printer driver settings. cards) To help prevent jams: • Flex all print media comes out the rear exit. Straighten the edges of the specialty media ...
...media. Note: Load letterhead paper with the print side facing down on the publications CD for specialty media, such as shown. © 2005 Lexmark International, Inc., All rights reserved. The printer Load Paper light blinks when it automatically engages. The type of print media you loaded. c ... Select the size of the stack on a level surface. Canceling a print job Press and release Cancel on the application) to view the printer driver settings. cards) To help prevent jams: • Flex all print media comes out the rear exit. Straighten the edges of the specialty media ...
User's Guide
Page 3
...the user is approved under the terms of IEC 60825-1. Electronic emission notices Federal Communications Commission (FCC) compliance information statement The Lexmark E238, Machine Type 4511, has been tested and found to laser radiation above . Unauthorized changes or modifications could help you any human... the product and easily accessible. Laser notice The printer is certified as Lexmark part number 1329605 for parallel attach or 12A2405 for the Lexmark modified GNU licensed software, launch the drivers CD that could cause you can radiate radio frequency energy and, if ...
...the user is approved under the terms of IEC 60825-1. Electronic emission notices Federal Communications Commission (FCC) compliance information statement The Lexmark E238, Machine Type 4511, has been tested and found to laser radiation above . Unauthorized changes or modifications could help you any human... the product and easily accessible. Laser notice The printer is certified as Lexmark part number 1329605 for parallel attach or 12A2405 for the Lexmark modified GNU licensed software, launch the drivers CD that could cause you can radiate radio frequency energy and, if ...

User's Guide
Page 7
... Limited Warranty 5 Chapter 1: Printer overview 10 Chapter 2: Installing software for local printing 12 Before installing printer software 12 Windows ...12 Installing printer software using the drivers CD 12 Installing printer software through the Add Printer Wizard 12 Installing optional printer software 13 Macintosh ...13 Creating a queue in Print Center / Printer Setup...
... Limited Warranty 5 Chapter 1: Printer overview 10 Chapter 2: Installing software for local printing 12 Before installing printer software 12 Windows ...12 Installing printer software using the drivers CD 12 Installing printer software through the Add Printer Wizard 12 Installing optional printer software 13 Macintosh ...13 Creating a queue in Print Center / Printer Setup...

User's Guide
Page 12
... systems. If the operating system is the letter of the printer software on the Lexmark Web site at www.lexmark.com. 2 Installing software for local printing Before installing printer software A local printer is a printer attached to a computer using the drivers CD: • Windows Server 2003 • Windows Server 2003 x64 • Windows XP...
... systems. If the operating system is the letter of the printer software on the Lexmark Web site at www.lexmark.com. 2 Installing software for local printing Before installing printer software A local printer is a printer attached to a computer using the drivers CD: • Windows Server 2003 • Windows Server 2003 x64 • Windows XP...

User's Guide
Page 13
... capabilities of a printer to complete the installation. f On the Easy Install screen, click Install. Installing the Local Printer Settings Utility 1 Launch the drivers CD. 2 Click Install Printer Software. 3 Select the Custom install path. 4 Under Tools, select Local Printer Settings Utility. 5 Click Finish to the..., a printer configuration utility, gives you the ability to set them up. h Click Close when installation is installed on the Lexmark Web site at www.lexmark.com. Creating a queue in Print Center / Printer Setup Utility (Mac OS X). c Click Continue on the Welcome screen and...
... capabilities of a printer to complete the installation. f On the Easy Install screen, click Install. Installing the Local Printer Settings Utility 1 Launch the drivers CD. 2 Click Install Printer Software. 3 Select the Custom install path. 4 Under Tools, select Local Printer Settings Utility. 5 Click Finish to the..., a printer configuration utility, gives you the ability to set them up. h Click Close when installation is installed on the Lexmark Web site at www.lexmark.com. Creating a queue in Print Center / Printer Setup Utility (Mac OS X). c Click Continue on the Welcome screen and...

User's Guide
Page 14
... Sun Solaris and Red Hat. f On the Easy Install screen, click Install. All the printer driver packages support local printing using Lexmark printers in UNIX and Linux environments. Visit the Lexmark Web site at www.lexmark.com. UNIX/Linux 4 Do one of the following : • If the USB-attached printer... is turned on. 6 Select the name of supported UNIX and Linux platforms. 14 All the necessary files are available on the drivers CD and on the Lexmark Web site at www.lexmark.com for use . 8 Click Create, and click Save. 9 Specify a printer name, and click Save. The printer appears...
... Sun Solaris and Red Hat. f On the Easy Install screen, click Install. All the printer driver packages support local printing using Lexmark printers in UNIX and Linux environments. Visit the Lexmark Web site at www.lexmark.com. UNIX/Linux 4 Do one of the following : • If the USB-attached printer... is turned on. 6 Select the name of supported UNIX and Linux platforms. 14 All the necessary files are available on the drivers CD and on the Lexmark Web site at www.lexmark.com for use . 8 Click Create, and click Save. 9 Specify a printer name, and click Save. The printer appears...

User's Guide
Page 31
... job: 1 From the computer software application, select File Æ Print. 2 Click Properties (or Options, Printer, or Setup, depending on the application) to view the printer driver settings. 3 Click the Paper tab. 4 Select Manual paper from the Paper tray drop-down list. 5 Select the appropriate Paper size and type. 6 Click OK. 7 Click...
... job: 1 From the computer software application, select File Æ Print. 2 Click Properties (or Options, Printer, or Setup, depending on the application) to view the printer driver settings. 3 Click the Paper tab. 4 Select Manual paper from the Paper tray drop-down list. 5 Select the appropriate Paper size and type. 6 Click OK. 7 Click...

User's Guide
Page 33
You can use Tray 1 or the 550-sheet tray to print the first side of the duplex job, only use Tray 1 to view the printer driver settings. 3 From the Page Layout tab, select 2-sided printing. 4 Select either Long Edge or Short Edge. 5 Select 2-sided printing. 6 Click the Paper tab. 7 Select the ...
You can use Tray 1 or the 550-sheet tray to print the first side of the duplex job, only use Tray 1 to view the printer driver settings. 3 From the Page Layout tab, select 2-sided printing. 4 Select either Long Edge or Short Edge. 5 Select 2-sided printing. 6 Click the Paper tab. 7 Select the ...

User's Guide
Page 35
... results differ depending on the Multipage Order value you would like the paper to print multiple page images on the application) to view the printer driver settings. 3 From the Page Layout tab, select the number of the page images, and whether a border is used to have.
... results differ depending on the Multipage Order value you would like the paper to print multiple page images on the application) to view the printer driver settings. 3 From the Page Layout tab, select the number of the page images, and whether a border is used to have.

User's Guide
Page 36
... used. 1 From the computer software application, select File Æ Print. 2 Click Properties (or Options, Printer, or Setup, depending on the application) to view the printer driver settings. 3 From the Page Layout tab, click More Page Layout Options. 4 Click Booklet.
... used. 1 From the computer software application, select File Æ Print. 2 Click Properties (or Options, Printer, or Setup, depending on the application) to view the printer driver settings. 3 From the Page Layout tab, click More Page Layout Options. 4 Click Booklet.

User's Guide
Page 37
... image. 1 From the computer software application, select File Æ Print. 2 Click Properties (or Options, Printer, or Setup, depending on the application) to view the printer driver settings. 3 From the Page Layout tab, click More Page Layout Options. 4 Click Poster. 5 Select the poster size you want by choosing the number of pages...
... image. 1 From the computer software application, select File Æ Print. 2 Click Properties (or Options, Printer, or Setup, depending on the application) to view the printer driver settings. 3 From the Page Layout tab, click More Page Layout Options. 4 Click Poster. 5 Select the poster size you want by choosing the number of pages...
User's Guide
Page 38
... computer software application, select File Æ Print. 2 Click Properties (or Options, Printer, or Setup, depending on the application) to view the printer driver settings. 3 Click the Other Options tab. 4 Click Overlay. 5 Select which pages receive the overlay. 6 Select the overlay to use. 7 Select ...application, select File Æ Print. 3 Click Properties (or Options, Printer, or Setup, depending on the application) to view the printer driver settings. 4 Click the Paper tab. 5 Select Letterhead from the current job is properly loaded according to the printer. For information about how ...
... computer software application, select File Æ Print. 2 Click Properties (or Options, Printer, or Setup, depending on the application) to view the printer driver settings. 3 Click the Other Options tab. 4 Click Overlay. 5 Select which pages receive the overlay. 6 Select the overlay to use. 7 Select ...application, select File Æ Print. 3 Click Properties (or Options, Printer, or Setup, depending on the application) to view the printer driver settings. 4 Click the Paper tab. 5 Select Letterhead from the current job is properly loaded according to the printer. For information about how ...

User's Guide
Page 39
How to print using an overlay or a watermark Using a watermark 1 From the computer software application, select File Æ Print. 2 Click Properties (or Options, Printer, or Setup, depending on the application) to view the printer driver settings. 3 Click the Other Options tab. 4 Click Watermark. 5 Select which pages receive the watermark. 6 Select the watermark to use. 7 Select whether to place the watermark on top of or underneath the page image in the Watermark placement area. 8 Click OK. 39
How to print using an overlay or a watermark Using a watermark 1 From the computer software application, select File Æ Print. 2 Click Properties (or Options, Printer, or Setup, depending on the application) to view the printer driver settings. 3 Click the Other Options tab. 4 Click Watermark. 5 Select which pages receive the watermark. 6 Select the watermark to use. 7 Select whether to place the watermark on top of or underneath the page image in the Watermark placement area. 8 Click OK. 39
User's Guide
Page 43
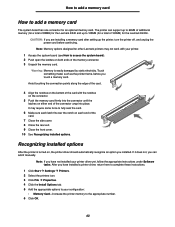
...After you are installing a memory card after setting up to 128MB (for a total of 160MB) for the Lexmark E240n. CAUTION: If you have not installed your printer driver yet, follow the appropriate instructions under Software tasks. Warning: Memory is turned on both ends of the memory ... metal, such as the printer frame, before continuing. Note: Memory options designed for an optional memory card. Note: If you have installed a printer driver, return here to complete these instructions. 1 Click Start Æ Settings Æ Printers. 2 Select the printers icon. 3 Click File Æ ...
...After you are installing a memory card after setting up to 128MB (for a total of 160MB) for the Lexmark E240n. CAUTION: If you have not installed your printer driver yet, follow the appropriate instructions under Software tasks. Warning: Memory is turned on both ends of the memory ... metal, such as the printer frame, before continuing. Note: Memory options designed for an optional memory card. Note: If you have installed a printer driver, return here to complete these instructions. 1 Click Start Æ Settings Æ Printers. 2 Select the printers icon. 3 Click File Æ ...

User's Guide
Page 54
... the other side of your print job in tray 1 using the instructions in the toner cartridge is getting low. In addition, the toner in the driver pop-up menu to orient the pages correctly. Note: This light will not come on page 78 for help.) • Press and hold Cancel to...
... the other side of your print job in tray 1 using the instructions in the toner cartridge is getting low. In addition, the toner in the driver pop-up menu to orient the pages correctly. Note: This light will not come on page 78 for help.) • Press and hold Cancel to...
User's Guide
Page 74
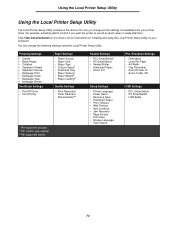
You can change printer settings not available from your printer driver (for instructions on your computer. Click View Documentation on the drivers CD for example, activating Alarm Control if you change the following settings using the Local Printer Setup Utility on installing and using the Local Printer ... SmartSwitch • USB Buffer 74 Using the Local Printer Setup Utility Using the Local Printer Setup Utility The Local Printer Setup Utility, located on the drivers CD, lets you want the printer to sound an alarm when it needs attention).
You can change printer settings not available from your printer driver (for instructions on your computer. Click View Documentation on the drivers CD for example, activating Alarm Control if you change the following settings using the Local Printer Setup Utility on installing and using the Local Printer ... SmartSwitch • USB Buffer 74 Using the Local Printer Setup Utility Using the Local Printer Setup Utility The Local Printer Setup Utility, located on the drivers CD, lets you want the printer to sound an alarm when it needs attention).
User's Guide
Page 75
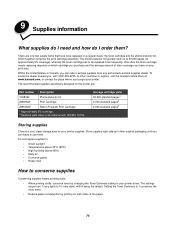
... order Lexmark supplies from 1 (very light) to 10 (very dark), with ISO/IEC 19752. To locate the dealer nearest you have to 1 conserves the most toner. • Reduce paper consumption by changing the Toner Darkness setting in their original packaging until you bought your printer driver. The...and the photoconductor kit, which cartridge you purchase and the average amount of the paper. 75 In other countries or regions, visit the Lexmark online store at approximately 5% coverage), whereas the toner cartridge has to use them ? There are ready to be replaced on both sides...
... order Lexmark supplies from 1 (very light) to 10 (very dark), with ISO/IEC 19752. To locate the dealer nearest you have to 1 conserves the most toner. • Reduce paper consumption by changing the Toner Darkness setting in their original packaging until you bought your printer driver. The...and the photoconductor kit, which cartridge you purchase and the average amount of the paper. 75 In other countries or regions, visit the Lexmark online store at approximately 5% coverage), whereas the toner cartridge has to use them ? There are ready to be replaced on both sides...
User's Guide
Page 85
... default settings for the Custom 6 paper texture. 12 From the toolbar, click Actions. 13 Click Apply to save the changes you already installed the printer drivers and utilities, skip to Custom 6 Paper Type. 11 Select envelope for the Custom 6 paper type, heavy for the Custom 6 paper weight, and rough ...for Paper Type, Paper Texture, and Paper Weight, use the Local Printer Setup Utility on the drivers CD that shipped with your printer driver, select Custom 6-Rough Env from the Paper Type menu. If you made. 14 Click File Æ Exit to clear paper jams...
... default settings for the Custom 6 paper texture. 12 From the toolbar, click Actions. 13 Click Apply to save the changes you already installed the printer drivers and utilities, skip to Custom 6 Paper Type. 11 Select envelope for the Custom 6 paper type, heavy for the Custom 6 paper weight, and rough ...for Paper Type, Paper Texture, and Paper Weight, use the Local Printer Setup Utility on the drivers CD that shipped with your printer driver, select Custom 6-Rough Env from the Paper Type menu. If you made. 14 Click File Æ Exit to clear paper jams...
User's Guide
Page 88
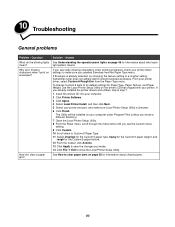
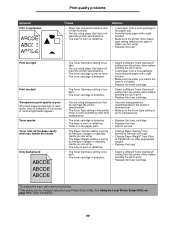
...toner cartridge. • You are using transparencies that do not meet the printer specifications. • The Form Type setting in the printer driver is set to something other than transparency. • Use only transparencies recommended by the printer's manufacturer. • Make sure the Form Type...a different Toner Darkness† setting from a new package. • Avoid textured paper with rough finishes. • Make sure the printer driver paper type setting matches the type of paper you handle the sheets Gray background ABCDE ABCDE ABCDE • The Toner Darkness setting is too ...
...toner cartridge. • You are using transparencies that do not meet the printer specifications. • The Form Type setting in the printer driver is set to something other than transparency. • Use only transparencies recommended by the printer's manufacturer. • Make sure the Form Type...a different Toner Darkness† setting from a new package. • Avoid textured paper with rough finishes. • Make sure the printer driver paper type setting matches the type of paper you handle the sheets Gray background ABCDE ABCDE ABCDE • The Toner Darkness setting is too ...
User's Guide
Page 89
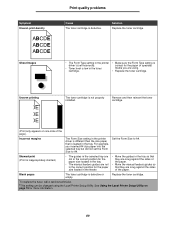
... the toner cartridge. (Print only appears on page 74 for the paper size loaded in the feeder. • Move the guides in the printer driver is different than the size paper that they are snug against the sides of the paper. Set the Form Size to A4. Symptom Uneven print... quality problems Cause The toner cartridge is loaded in the tray. Solution Replace the toner cartridge. • The Form Type setting in the printer driver is set the Form Size to A4. Blank pages The toner cartridge is not properly installed. See Using the Local Printer Setup Utility on one...
... the toner cartridge. (Print only appears on page 74 for the paper size loaded in the feeder. • Move the guides in the printer driver is different than the size paper that they are snug against the sides of the paper. Set the Form Size to A4. Symptom Uneven print... quality problems Cause The toner cartridge is loaded in the tray. Solution Replace the toner cartridge. • The Form Type setting in the printer driver is set the Form Size to A4. Blank pages The toner cartridge is not properly installed. See Using the Local Printer Setup Utility on one...

