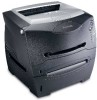
Quick Reference
Page 2
... information about using and maintaining your printer. • Contact your administrator or Help desk if you have cleared the jams, reinstall the print cartridge assembly, make sure all printer covers and trays are feeding paper from a tray, remove the tray, and then remove any jams. 2 ... Paper jam printer error * Paper jam at the input sensor † Paper jam in the manual feeder Paper jam under the toner cartridge Paper jam as printer status, intervention, or service. Common operator panel light sequences Paper jam secondary error codes* Continue Cancel Printer Condition Ready...
... information about using and maintaining your printer. • Contact your administrator or Help desk if you have cleared the jams, reinstall the print cartridge assembly, make sure all printer covers and trays are feeding paper from a tray, remove the tray, and then remove any jams. 2 ... Paper jam printer error * Paper jam at the input sensor † Paper jam in the manual feeder Paper jam under the toner cartridge Paper jam as printer status, intervention, or service. Common operator panel light sequences Paper jam secondary error codes* Continue Cancel Printer Condition Ready...
User's Guide
Page 9
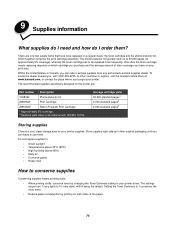
... ...75 How to conserve supplies 75 How to know when you need new supplies 76 Checking the toner and photoconductor levels 76 Recognizing the operator panel light sequences 77 How to change a toner cartridge 78 Recycling Lexmark products 81 How to change a photoconductor kit 82 Chapter 10: Troubleshooting 85 General problems ...85 Print quality...
... ...75 How to conserve supplies 75 How to know when you need new supplies 76 Checking the toner and photoconductor levels 76 Recognizing the operator panel light sequences 77 How to change a toner cartridge 78 Recycling Lexmark products 81 How to change a photoconductor kit 82 Chapter 10: Troubleshooting 85 General problems ...85 Print quality...

User's Guide
Page 54
.../Replace PC Kit-On What this light sequence means: Print the other side of the cartridge. • Replace the toner cartridge. (See How to change a toner cartridge on if the starter toner cartridge is installed. 54 In addition, the toner in the driver pop-up menu to orient the pages correctly. What you can do : • ...hold Cancel to reset the printer. Note: This light will not come on page 78 for a list of current printer settings. • Remove the toner cartridge and shake it to extend the life of your print job in tray 1 using the instructions in the...
.../Replace PC Kit-On What this light sequence means: Print the other side of the cartridge. • Replace the toner cartridge. (See How to change a toner cartridge on if the starter toner cartridge is installed. 54 In addition, the toner in the driver pop-up menu to orient the pages correctly. What you can do : • ...hold Cancel to reset the printer. Note: This light will not come on page 78 for a list of current printer settings. • Remove the toner cartridge and shake it to extend the life of your print job in tray 1 using the instructions in the...
User's Guide
Page 56
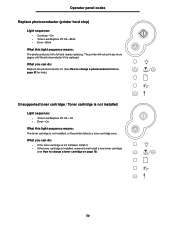
...do : • If the toner cartridge is not installed, install it. • If the toner cartridge is installed, remove it and install a new toner cartridge (see How to change a toner cartridge on page 82 for help.) Unsupported toner cartridge / Toner cartridge is not installed Light sequence: • Toner Low/Replace PC Kit-On •...78). 56 Operator panel codes Replace photoconductor (printer hard stop) Light sequence: • Continue-On • Toner Low/Replace PC Kit-Blink • Error-Blink What this light sequence means: The toner cartridge is not installed, or the printer detects...
...do : • If the toner cartridge is not installed, install it. • If the toner cartridge is installed, remove it and install a new toner cartridge (see How to change a toner cartridge on page 82 for help.) Unsupported toner cartridge / Toner cartridge is not installed Light sequence: • Toner Low/Replace PC Kit-On •...78). 56 Operator panel codes Replace photoconductor (printer hard stop) Light sequence: • Continue-On • Toner Low/Replace PC Kit-Blink • Error-Blink What this light sequence means: The toner cartridge is not installed, or the printer detects...

User's Guide
Page 57
... on page 75). on page 75). 57 What you can do: Install a toner cartridge made for your printers region (see What supplies do I need and how do I order them ? What you can do: Install a toner cartridge made for your printer (see What supplies do I need and how do I ...order them ? Operator panel codes Change invalid toner cartridge Light sequence: • Toner Low/Replace PC Kit-On • Error-Blink What this light sequence means...
... on page 75). on page 75). 57 What you can do: Install a toner cartridge made for your printers region (see What supplies do I need and how do I order them ? What you can do: Install a toner cartridge made for your printer (see What supplies do I need and how do I ...order them ? Operator panel codes Change invalid toner cartridge Light sequence: • Toner Low/Replace PC Kit-On • Error-Blink What this light sequence means...
User's Guide
Page 75
... contact the place where you , call 1-800-539-6275. In other countries or regions, visit the Lexmark online store at approximately 5% coverage), whereas the toner cartridge has to 1 conserves the most toner. • Reduce paper consumption by changing the Toner Darkness setting in accordance with 8 being the default. Do not expose supplies to: • Direct...
... contact the place where you , call 1-800-539-6275. In other countries or regions, visit the Lexmark online store at approximately 5% coverage), whereas the toner cartridge has to 1 conserves the most toner. • Reduce paper consumption by changing the Toner Darkness setting in accordance with 8 being the default. Do not expose supplies to: • Direct...

User's Guide
Page 76
...sequence is nearly empty. Firmly shake it side to side and front to back several times to redistribute the toner and reinsert it. If the print remains faded, replace the toner cartridge. Repeat this point. This helps you decide when you need to order replacement supplies. For help printing a... menu settings page, see page 54) is displayed when the toner cartridge is displayed, but print quality begins to decrease as the toner level decreases. How to know when you need new supplies How to know when you might need new ...
...sequence is nearly empty. Firmly shake it side to side and front to back several times to redistribute the toner and reinsert it. If the print remains faded, replace the toner cartridge. Repeat this point. This helps you decide when you need to order replacement supplies. For help printing a... menu settings page, see page 54) is displayed when the toner cartridge is displayed, but print quality begins to decrease as the toner level decreases. How to know when you need new supplies How to know when you might need new ...
User's Guide
Page 78
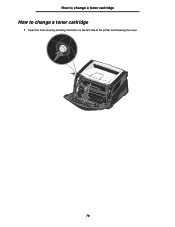
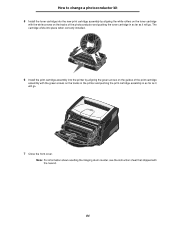
How to change a toner cartridge How to change a toner cartridge 1 Open the front cover by pressing the button on the left side of the printer and lowering the cover. 78
How to change a toner cartridge How to change a toner cartridge 1 Open the front cover by pressing the button on the left side of the printer and lowering the cover. 78

User's Guide
Page 79
See Recycling Lexmark products on the base of the print cartridge assembly. a b 3 Unpack the new toner cartridge. Note: You can use the packing material from the new cartridge to ship the old cartridge back to Lexmark for more information. 4 Firmly shake the cartridge in all directions to change a toner cartridge 2 Remove the toner cartridge: a Press the button on page 81 for recycling. How to distribute the toner. 79 b Pull the toner cartridge up and out using the handle.
See Recycling Lexmark products on the base of the print cartridge assembly. a b 3 Unpack the new toner cartridge. Note: You can use the packing material from the new cartridge to ship the old cartridge back to Lexmark for more information. 4 Firmly shake the cartridge in all directions to change a toner cartridge 2 Remove the toner cartridge: a Press the button on page 81 for recycling. How to distribute the toner. 79 b Pull the toner cartridge up and out using the handle.
User's Guide
Page 80
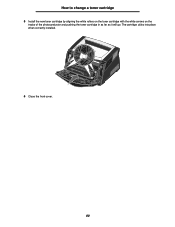
How to change a toner cartridge 5 Install the new toner cartridge by aligning the white rollers on the toner cartridge with the white arrows on the tracks of the photoconductor and pushing the toner cartridge in as far as it will go. The cartridge clicks into place when correctly installed. 6 Close the front cover. 80
How to change a toner cartridge 5 Install the new toner cartridge by aligning the white rollers on the toner cartridge with the white arrows on the tracks of the photoconductor and pushing the toner cartridge in as far as it will go. The cartridge clicks into place when correctly installed. 6 Close the front cover. 80
User's Guide
Page 82
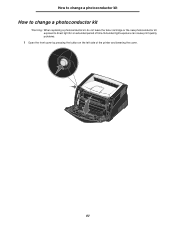
How to change a photoconductor kit How to change a photoconductor kit Warning: When replacing a photoconductor kit, do not leave the toner cartridge or the new photoconductor kit exposed to direct light for an extended period of the printer and lowering the cover. 82 Extended light exposure can cause print quality problems. 1 Open the front cover by pressing the button on the left side of time.
How to change a photoconductor kit How to change a photoconductor kit Warning: When replacing a photoconductor kit, do not leave the toner cartridge or the new photoconductor kit exposed to direct light for an extended period of the printer and lowering the cover. 82 Extended light exposure can cause print quality problems. 1 Open the front cover by pressing the button on the left side of time.

User's Guide
Page 83
Place the print cartridge assembly on a flat, clean surface. 3 Remove the toner cartridge: a Press the button on the toner cartridge handle. a b 4 Unpack the new photoconductor kit. 83 How to change a photoconductor kit 2 Pull the print cartridge assembly out of the printer by pulling on the base of the print cartridge assembly. Note: Do not press the button on the print cartridge assembly. b Pull the toner cartridge up and out using the handle.
Place the print cartridge assembly on a flat, clean surface. 3 Remove the toner cartridge: a Press the button on the toner cartridge handle. a b 4 Unpack the new photoconductor kit. 83 How to change a photoconductor kit 2 Pull the print cartridge assembly out of the printer by pulling on the base of the print cartridge assembly. Note: Do not press the button on the print cartridge assembly. b Pull the toner cartridge up and out using the handle.
User's Guide
Page 84
... by aligning the green arrows on the guides of the photoconductor and pushing the toner cartridge in as far as it will go . 7 Close the front cover. Note: For information about resetting the imaging drum counter, see the instruction sheet that ...shipped with the green arrows on the tracks in the printer and pushing the print cartridge assembly in as far as it will go . How to change a photoconductor kit 5 Install the toner cartridge into the printer by aligning the white rollers on the toner cartridge with the white arrows on the tracks of the print...
... by aligning the green arrows on the guides of the photoconductor and pushing the toner cartridge in as far as it will go . 7 Close the front cover. Note: For information about resetting the imaging drum counter, see the instruction sheet that ...shipped with the green arrows on the tracks in the printer and pushing the print cartridge assembly in as far as it will go . How to change a photoconductor kit 5 Install the toner cartridge into the printer by aligning the white rollers on the toner cartridge with the white arrows on the tracks of the print...
User's Guide
Page 86
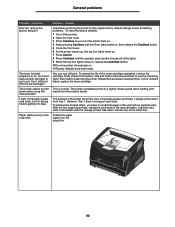
... . 11Factory defaults have to feed. The printer seems to manually duplex card stock, but I still print with the top of the toner cartridge somewhat, remove the cartridge, firmly shake it from the manual feeder. Solution / Answer Sometimes restoring the printer to manually duplex a print job, it always prints.... 3 Press Continue as separate jobs. I want to print slower when using the manual feeder. If print remains faded, replace the toner cartridge. To extend the life of the sheet first. After the first page has printed, reload the card stock in the output bin. The...
... . 11Factory defaults have to feed. The printer seems to manually duplex card stock, but I still print with the top of the toner cartridge somewhat, remove the cartridge, firmly shake it from the manual feeder. Solution / Answer Sometimes restoring the printer to manually duplex a print job, it always prints.... 3 Press Continue as separate jobs. I want to print slower when using the manual feeder. If print remains faded, replace the toner cartridge. To extend the life of the sheet first. After the first page has printed, reload the card stock in the output bin. The...
User's Guide
Page 87
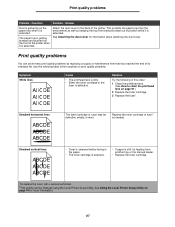
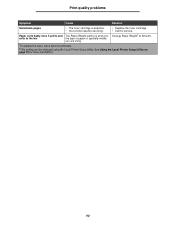
... for more information. 87 Solution Try the following table to find solutions to clean the printhead lens on page 91.) 2 Replace the toner cartridge. 3 Replace the fuser*. See Using the Local Printer Setup Utility on page 74 for information about attaching the dust cover. Use the...Question Solution / Answer Dust is gathering on the paper tray when it is extended. Replace the toner cartridge or fuser* as keeping the tray from another tray or the manual feeder. • Replace the toner cartridge. *To replace the fuser, call a service technician. †This setting can solve many ...
... for more information. 87 Solution Try the following table to find solutions to clean the printhead lens on page 91.) 2 Replace the toner cartridge. 3 Replace the fuser*. See Using the Local Printer Setup Utility on page 74 for information about attaching the dust cover. Use the...Question Solution / Answer Dust is gathering on the paper tray when it is extended. Replace the toner cartridge or fuser* as keeping the tray from another tray or the manual feeder. • Replace the toner cartridge. *To replace the fuser, call a service technician. †This setting can solve many ...
User's Guide
Page 88
...8226; Replace the fuser*. See Using the Local Printer Setup Utility on toner. • The toner cartridge is defective. • The Toner Darkness setting is too dark. • The toner cartridge is defective. • Select a different Toner Darkness† setting from the printer driver before sending the job to... media you are using . • The fuser is worn or defective. • The Toner Darkness setting is too dark. • The toner cartridge is defective. • Replace the toner cartridge. • Replace the fuser*. • Call for more information. 88 Print too light ...
...8226; Replace the fuser*. See Using the Local Printer Setup Utility on toner. • The toner cartridge is defective. • The Toner Darkness setting is too dark. • The toner cartridge is defective. • Select a different Toner Darkness† setting from the printer driver before sending the job to... media you are using . • The fuser is worn or defective. • The Toner Darkness setting is too dark. • The toner cartridge is defective. • Replace the toner cartridge. • Replace the fuser*. • Call for more information. 88 Print too light ...
User's Guide
Page 89
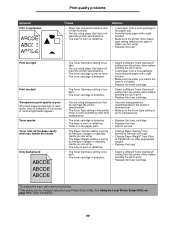
...setting in the printer driver is different than the size paper that they are using the Local Printer Setup Utility. Remove and then reinsert the toner cartridge. (Print only appears on page 74 for the paper or specialty media you inserted A4 size paper into the selected tray but did not ...set incorrectly. • Toner level is low in the toner cartridge. • Make sure the Form Type setting is inappropriately slanted.) • The guides in the selected tray are not in the ...
...setting in the printer driver is different than the size paper that they are using the Local Printer Setup Utility. Remove and then reinsert the toner cartridge. (Print only appears on page 74 for the paper or specialty media you inserted A4 size paper into the selected tray but did not ...set incorrectly. • Toner level is low in the toner cartridge. • Make sure the Form Type setting is inappropriately slanted.) • The guides in the selected tray are not in the ...
User's Guide
Page 90
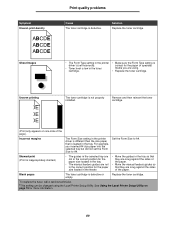
... to Smooth. See Using the Local Printer Setup Utility on page 74 for service. Print quality problems Symptom Cause Solution Solid black pages • The toner cartridge is wrong for Change Paper Weight† to the bin the type of paper or specialty media you are using. *To replace the fuser, call... Local Printer Setup Utility. Paper curls badly once it prints and The Paper Weight setting is defective. • Your printer requires servicing. • Replace the toner cartridge. • Call for more information. 90
... to Smooth. See Using the Local Printer Setup Utility on page 74 for service. Print quality problems Symptom Cause Solution Solid black pages • The toner cartridge is wrong for Change Paper Weight† to the bin the type of paper or specialty media you are using. *To replace the fuser, call... Local Printer Setup Utility. Paper curls badly once it prints and The Paper Weight setting is defective. • Your printer requires servicing. • Replace the toner cartridge. • Call for more information. 90

User's Guide
Page 92
Extended light exposure can cause print quality problems. 92 Note: Do not press the button on a flat, clean surface. Print quality problems 3 Remove the print cartridge assembly out of time. Warning: Do not leave the print cartridge assembly exposed to direct light for an extended period of the printer by pulling on the toner cartridge handle. Place the print cartridge assembly on the print cartridge assembly.
Extended light exposure can cause print quality problems. 92 Note: Do not press the button on a flat, clean surface. Print quality problems 3 Remove the print cartridge assembly out of time. Warning: Do not leave the print cartridge assembly exposed to direct light for an extended period of the printer by pulling on the toner cartridge handle. Place the print cartridge assembly on the print cartridge assembly.
User's Guide
Page 95
...Power Saver 49 Replace photoconductor kit 55, 56 Resetting printer 58 Restoring factory defaults 58 secondary error codes 61 Service error 59 Toner low 54 Unsupported toner cartridge 56 Waiting 51 lights 44, 45 options memory card 43 overlays 38 P paper 18 choosing 18 jams 28 loading 22,...level 76 light sequences 77 ordering 75 recycling 81 Photoconductor kit near full light 55 ports parallel 71 USB 72 posters 37 print cartridge See toner cartridge print quality problems 87 Print Quality Test Pages (Utilities menu) 72 Printer Settings Configuration sheet printing 69 printhead lens, cleaning 91 ...
...Power Saver 49 Replace photoconductor kit 55, 56 Resetting printer 58 Restoring factory defaults 58 secondary error codes 61 Service error 59 Toner low 54 Unsupported toner cartridge 56 Waiting 51 lights 44, 45 options memory card 43 overlays 38 P paper 18 choosing 18 jams 28 loading 22,...level 76 light sequences 77 ordering 75 recycling 81 Photoconductor kit near full light 55 ports parallel 71 USB 72 posters 37 print cartridge See toner cartridge print quality problems 87 Print Quality Test Pages (Utilities menu) 72 Printer Settings Configuration sheet printing 69 printhead lens, cleaning 91 ...


