Get support for Lexmark E260dn

Lexmark E260dn Support Question

Lexmark E260dn Support Question

Find answers below for this question about Lexmark E260dn.
Need a Lexmark E260dn manual? We have 5 online manuals for this item!
Question posted by cburg01 on October 14th, 2011

How To Install Toner Cartridge For E260dn Printer

The person who posted this question about this Lexmark product did not include a detailed explanation. Please use the "Request More Information" button to the right if more details would help you to answer this question.

Current Answers

Answer #1: Posted by LexmarkListens on October 20th, 2011 11:51 AM
This answer was accepted by the poster of the original question.
LexmarkListens

Member since:
July 1st, 2011

Points: 1,410,550
1,080
points
Please follow the steps below.

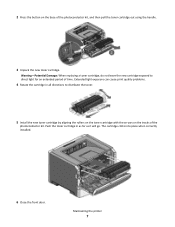
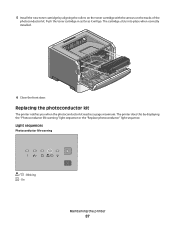
Press the button on the left side of the printer to release and lower the front door. 

Remove the toner cartridge. 


  1. Press the release button on the base of the print cartridge assembly.
  2. Grasp the handle on the toner cartridge. Pull up and out to remove the toner cartridge. Note: The photoconductor unit will remain in the printer. 

Unpack the new toner cartridge.

Lightly shake the toner cartridge in all directions to distribute the toner evenly.

Install the new toner cartridge. Do this by aligning the white rollers on the toner cartridge with the white arrows on the tracks of the photoconductor unit and pushing the toner cartridge in as far as it will go. The cartridge will click into place when correctly installed.

Close the front door and confirm that the new toner cartridge is working correctly by sending a print job to the printer or printing an internal test page.

If you need further assistance please feel free to send us an email on the address provided below or you may contact Lexmark Technical Support.


Lexmark Listens
Phone:
USA: 1-800-539-6275
Canada: (877) 856-5540
UK: 0800 121 4726
South Africa: 0800 981 435

Related Lexmark E260dn Manual Pages

Maintenance Guide - Page 7

...period of the photoconductor kit, and then pull the toner cartridge out using the handle. 3 Unpack the new toner cartridge. Maintaining the printer 7 Warning-Potential Damage: When replacing a toner cartridge, do not leave the new cartridge exposed to distribute the toner. 5 Install the new toner cartridge by aligning the rollers on the toner cartridge with the arrows on the base of time.
Maintenance Guide - Page 10

... rollers on the guides of the unit with the arrows in the printer. Push the unit as far as it clicks into place. 6 Install the unit into the photoconductor kit by aligning the arrows on the toner cartridge with the tracks. Maintaining the printer 10 Warning-Potential Damage: Resetting the photoconductor counter without replacing the...
User Guide - Page 4

...63 Setting Jam Recovery...64 Understanding printer menus 65 Installing the Local Printer Settings Utility...65 Using the Local Printer Settings Utility...66 Using the ...toner cartridges...84 Ordering a photoconductor kit ...85 Replacing supplies...85 Replacing the toner cartridge ...85 Replacing the photoconductor kit ...87 Moving the printer...90 Before moving the printer ...90 Moving the printer...
User Guide - Page 5

...Understanding jam lights and access locations...94 Clearing jams behind the photoconductor kit and toner cartridge 98 Clearing jams from the standard exit bin...100 Clearing jams from Tray ...cartridge...107 32.yy Replace unsupported cartridge ...107 58 Too many flash options installed ...107 58 Too many trays attached ...108 59 Incompatible tray ...108 88 Replace toner ...108 Solving basic printer...
User Guide - Page 62

...Printing 62 The pages include: • An information page that contains information about the printer, the toner cartridge, the margin settings, and the minimum stroke width, and a graphic for evaluating the print ... the printer on page 114. The home menu light sequence appears. - If there are listed under Custom Types. • Under Device Information, verify the amount of memory installed is ...
User Guide - Page 87

... sequence or the "Replace photoconductor" light sequence. The cartridge clicks into place when correctly installed. 6 Close the front door. Blinking - Replacing the photoconductor kit The printer notifies you when the photoconductor kit reaches a page maximum. Push the toner cartridge in as far as it will go. The printer does this by aligning the rollers on the...
User Guide - Page 107

... more of the following: • Remove the toner cartridge, and then reinstall it. • Remove the toner cartridge, and then install a new one. 32.yy Replace unsupported cartridge Remove the toner cartridge, and then install a supported one. 58 Too many flash options installed Try one or more of the following: • Turn the printer off, and then remove extra flash options...
User Guide - Page 108

... outlet. Note: Optional trays lock together when stacked. Check the printer power switch. • The printer cable is turned on . 59 Incompatible tray Only options designed specifically for this printer are correct. Once you have checked each of the following : • Replace the toner cartridge. • Press to continue printing. 58 Too many trays attached...
User Guide - Page 138

... I information, finding 9 installing options in driver 24 printer software 23 installing printer software adding options 24 installing software Local Printer Settings Utility 65 J jam light sequences 94 messages 94 jam recovery setting 64 jams accessing jam areas 93 avoiding 93 jams, clearing 200 98, 100 201 98, 100 233 102 behind photoconductor kit and toner cartridge unit 98...
Service Manual - Page 30

... is offline) Close door or Insert Cartridge 10 z Unsupported Flash Option Installed Cancel job 10 z z z z z z Reset printer Restore factory defaults Invalid engine code 11 z z Invalid network code Resolution reduced while 11 ✷ z z z ✷ z canceling job Toner cartridge region mismatch 12 z z Change cartridge invalid refill Missing or defective print...
Service Manual - Page 36

... the print job. • Press Cancel to clear. 2-10 Lexmark™ E260d, E260dn Any active print jobs are canceled. The printer will automatically reset. Insufficient collation area/Insufficient memory z z Meaning The printer memory is not supported. Action Close the door, install a print cartridge, or install a supported flash option. 4513-220, -230 Close door or insert...
Service Manual - Page 38

Action Remove the toner cartridge, and install a new toner cartridge that matches the region of the installed toner cartridge. The printer will not print any more pages until the photoconductor kit is Off. Action • Press and release Continue to clear the light sequence and continue printing. • Replace the photoconductor kit. 4513-220, -230 Toner cartridge region mismatch/...
Service Manual - Page 44

...enters the printer or in the fuser area under the toner cartridge assembly. ...cartridge, and clear the paper jam. 202: Paper jams as a printed job exits the printer z z z Meaning A paper jam has occurred as the print media is most likely in the manual feeder. The jammed media is exiting the printer. Action Open the rear door, and clear the paper jam. 2-18 Lexmark™ E260d, E260dn...
Service Manual - Page 51

... the printer off. • Remove the toner cartridge, and shake it to the printer. Action Remove the toner cartridge, and install a new toner cartridge that matches the region of the installed toner cartridge. Action Download the valid network code to extend the life, or replace the toner cartridge with a valid toner cartridge. • Replace the toner cartridge. • Turn the printer on...
Service Manual - Page 52

... processing the print job. • Turn the printer off . • Remove the toner cartridge, and replace it is getting low, or a defective toner cartridge has been detected. The option will be ignored. 2-26 Lexmark™ E260d, E260dn Unsupported toner cartridge z z z Meaning The toner cartridge is not supported by the printer. Action Press Continue briefly to too many flash...
Service Manual - Page 80

... correct installation and contamination where contact is more noticeable as the toner cartridge nears end-of the photoconductor causes an all black page. With the printer off, disconnect the LVPS/HVPS cable from a different toner cartridge assembly and developer before proceeding. Clean as necessary. Try a lower setting. 4513-220, -230 Black page Note: Incorrect laser exposure...
Service Manual - Page 82

... fuser for debris, binds, or damage. 4513-220, -230 Light print FRU Toner cartridge (not a FRU) Transfer roll LVPS/HVPS card Action Make sure the toner cartridge and PC Kit are installed correctly and that the laser beam is not blocked. Loss of the proper high voltages can cause toner to transfer to contaminate the transfer roller.
Service Manual - Page 84

..., E260dn Media designed for copiers gives the best quality fusing. If clear, then check for a printhead error on the page. The light displays. Re-initialize the printer by turning it is • Remove the toner cartridge, and gently shake it from side to side to redistribute the toner. • Replace the toner cartridge. • Remove the toner cartridge, and...
Service Manual - Page 86

... paper over the roll to print the job. Replace as necessary. 2-60 Lexmark™ E260d, E260dn Verify grounds on pins 2, 4, and 7 at J15. • If voltages or grounds are ...Place a sheet of the printer. • The printer is waiting for an appropriate command. • Make sure the toner cartridge assembly is installed properly. • Make sure the printer front cover is closed ....
Service Manual - Page 98

... several screws, start all screws before final tightening. • Remove the paper tray and print cartridge before removing other printer parts. The toner cartridge should be protected from light while out of the printer. • Disconnect all external cables from the printer to prevent damage during service. • Unless otherwise stated, reinstall the parts in reverse...

Similar Questions

Ask a New Question
Use the box below to post a new question about this Lexmark product .
Points & Prizes
  • You can earn points for nearly everything you do on HelpOwl.com
  • You can trade in those points for gift cards at leading retailers such as Amazon.com and Walmart
  • It's that simple!
See How it Works
Create a Free Account

Lexmark Manuals

Find free Lexmark E260dn manuals and user guides available at ManualOwl.com. Try out our unique manual viewer allowing you to interact with manuals from directly within your browser!

Lexmark Reviews

View thousands of Lexmark user reviews and customer ratings available at ReviewOwl.com.

Contact Information

Complete Lexmark customer service contact information including steps to reach representatives, hours of operation, customer support links and more from ContactHelp.com.

Scoreboard Ratings

See detailed Lexmark customer service rankings, employee comments and much more from our sister site.

Lexmark Recalls

Find comprehensive Lexmark recall information updated hourly on RecallOwl.com.