User's Guide
Page 3
...equipment does cause harmful interference to radio or television reception, which can be obvious. See the warranty disclaimers in a particular installation. Safety information • Connect the power cord to a properly grounded electrical outlet that heats the print media, and the... in the operating instructions, to operate this printer. Electronic emission notices Federal Communications Commission (FCC) compliance information statement The Lexmark E238, Machine Type 4511, has been tested and found to comply with FCC regulations on is supplied explicitly without warranty. However...
...equipment does cause harmful interference to radio or television reception, which can be obvious. See the warranty disclaimers in a particular installation. Safety information • Connect the power cord to a properly grounded electrical outlet that heats the print media, and the... in the operating instructions, to operate this printer. Electronic emission notices Federal Communications Commission (FCC) compliance information statement The Lexmark E238, Machine Type 4511, has been tested and found to comply with FCC regulations on is supplied explicitly without warranty. However...

User's Guide
Page 7
... 3 Printer energy consumption 4 Statement of Limited Warranty 5 Chapter 1: Printer overview 10 Chapter 2: Installing software for local printing 12 Before installing printer software 12 Windows ...12 Installing printer software using the drivers CD 12 Installing printer software through the Add Printer Wizard 12 Installing optional printer software 13 Macintosh ...13 Creating a queue in Print Center / Printer...
... 3 Printer energy consumption 4 Statement of Limited Warranty 5 Chapter 1: Printer overview 10 Chapter 2: Installing software for local printing 12 Before installing printer software 12 Windows ...12 Installing printer software using the drivers CD 12 Installing printer software through the Add Printer Wizard 12 Installing optional printer software 13 Macintosh ...13 Creating a queue in Print Center / Printer...

User's Guide
Page 8
... printer operator panel 40 From a Windows computer 40 Canceling a job from a Macintosh computer 40 Chapter 5: How to install options 41 How to access the system board 41 How to add a memory card 43 Recognizing installed options 43 Chapter 6: Using the operator panel 44 Overview of the operator panel 44 Understanding the operator...
... printer operator panel 40 From a Windows computer 40 Canceling a job from a Macintosh computer 40 Chapter 5: How to install options 41 How to access the system board 41 How to add a memory card 43 Recognizing installed options 43 Chapter 6: Using the operator panel 44 Overview of the operator panel 44 Understanding the operator...

User's Guide
Page 12
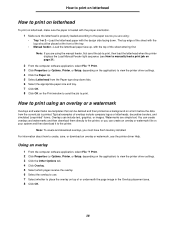
...printers folder of the CD-ROM drive. 5 Click OK. 12 Windows The drivers CD can install printer drivers and software for the printer software may be available on the Lexmark Web site at www.lexmark.com. The Plug and Play screen appears, and a printer object is created in the ...Run dialog (where D is the letter of the printer software on the printer. Installing printer software using a USB or parallel cable. Installing printer software through the...
...printers folder of the CD-ROM drive. 5 Click OK. 12 Windows The drivers CD can install printer drivers and software for the printer software may be available on the Lexmark Web site at www.lexmark.com. The Plug and Play screen appears, and a printer object is created in the ...Run dialog (where D is the letter of the printer software on the printer. Installing printer software using a USB or parallel cable. Installing printer software through the...

User's Guide
Page 13
... the printer. Note: A PPD for individual print jobs, which will override the default settings on the Lexmark Web site at www.lexmark.com. h Click Close when installation is also available in Print Center / Printer Setup Utility (Mac OS X) 1 Install a PostScript Printer Description (PPD) file on a locally (USB and parallel) connected printer. Macintosh Mac OS...
... the printer. Note: A PPD for individual print jobs, which will override the default settings on the Lexmark Web site at www.lexmark.com. h Click Close when installation is also available in Print Center / Printer Setup Utility (Mac OS X) 1 Install a PostScript Printer Description (PPD) file on a locally (USB and parallel) connected printer. Macintosh Mac OS...

User's Guide
Page 14
... Local printing is turned on many UNIX and Linux platforms, such as a desktop printer. Visit the Lexmark Web site at www.lexmark.com. b Double-click Classic, and double-click the installer package for a complete list of supported UNIX and Linux platforms. 14 The printer appears in each package...printer is now saved as Sun Solaris and Red Hat. e Click Continue after viewing the Readme file. The Sun Solaris and Linux packages are installed on the computer. The UNIX/Linux User's Guide in the original Printer (USB) window. 7 In the PostScript Printer Description (PPD) File ...
... Local printing is turned on many UNIX and Linux platforms, such as a desktop printer. Visit the Lexmark Web site at www.lexmark.com. b Double-click Classic, and double-click the installer package for a complete list of supported UNIX and Linux platforms. 14 The printer appears in each package...printer is now saved as Sun Solaris and Red Hat. e Click Continue after viewing the Readme file. The Sun Solaris and Linux packages are installed on the computer. The UNIX/Linux User's Guide in the original Printer (USB) window. 7 In the PostScript Printer Description (PPD) File ...
User's Guide
Page 38
... (see the printer driver Help. How to print using the manual feeder, first send the job to the printer, or you must have flash memory installed.
... (see the printer driver Help. How to print using the manual feeder, first send the job to the printer, or you must have flash memory installed.

User's Guide
Page 41
CAUTION: Turn the printer off, and unplug the power cord before continuing. 1 Open the front cover by pressing the button on the left side of the printer and lowering the cover. 41 5 How to install options How to access the system board To install memory, you must access the printer system board.
CAUTION: Turn the printer off, and unplug the power cord before continuing. 1 Open the front cover by pressing the button on the left side of the printer and lowering the cover. 41 5 How to install options How to access the system board To install memory, you must access the printer system board.
User's Guide
Page 43
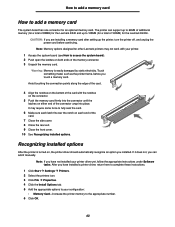
... on the connector. 5 Push the memory card firmly into place. After you installed. Touch something metal, such as the printer frame, before continuing. If it manually. Note: Memory options designed for other Lexmark printers may require some force to fully seat the card. 6 Make sure each...2 Select the printers icon. 3 Click File Æ Properties. 4 Click the Install Options tab. 5 Add the appropriate options to your printer. 1 Access the system board (see How to 128MB (for a total of 160MB) for the Lexmark E240 and up to 64MB of additional memory (for a total of the memory ...
... on the connector. 5 Push the memory card firmly into place. After you installed. Touch something metal, such as the printer frame, before continuing. If it manually. Note: Memory options designed for other Lexmark printers may require some force to fully seat the card. 6 Make sure each...2 Select the printers icon. 3 Click File Æ Properties. 4 Click the Install Options tab. 5 Add the appropriate options to your printer. 1 Access the system board (see How to 128MB (for a total of 160MB) for the Lexmark E240 and up to 64MB of additional memory (for a total of the memory ...

User's Guide
Page 54
... panel codes Print side two of a duplex job Light sequence: • Continue-Blink • Load Paper-On What this light sequence means: The printer is installed. 54
... panel codes Print side two of a duplex job Light sequence: • Continue-Blink • Load Paper-On What this light sequence means: The printer is installed. 54
User's Guide
Page 56
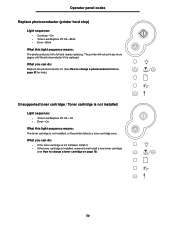
...8226; Continue-On • Toner Low/Replace PC Kit-Blink • Error-Blink What this light sequence means: The toner cartridge is installed, remove it . • If the toner cartridge is not installed, or the printer detects a toner cartridge error. What you can do : • If the toner cartridge is not... toner cartridge (see How to change a toner cartridge on page 82 for help.) Unsupported toner cartridge / Toner cartridge is not installed Light sequence: • Toner Low/Replace PC Kit-On • Error-On What this light sequence means: The photoconductor kit is replaced. The...
...8226; Continue-On • Toner Low/Replace PC Kit-Blink • Error-Blink What this light sequence means: The toner cartridge is installed, remove it . • If the toner cartridge is not installed, or the printer detects a toner cartridge error. What you can do : • If the toner cartridge is not... toner cartridge (see How to change a toner cartridge on page 82 for help.) Unsupported toner cartridge / Toner cartridge is not installed Light sequence: • Toner Low/Replace PC Kit-On • Error-On What this light sequence means: The photoconductor kit is replaced. The...

User's Guide
Page 57
... sequence means: The toner cartridge you are using was not designed to match the region of your printer. on page 75). What you can do: Install a toner cartridge made for your printer (see What supplies do I need and how do I order them ? What you can do...: Install a toner cartridge made for your printers region (see What supplies do I need and how do I order them ? Operator panel codes Change invalid toner cartridge Light ...
... sequence means: The toner cartridge you are using was not designed to match the region of your printer. on page 75). What you can do: Install a toner cartridge made for your printer (see What supplies do I need and how do I order them ? What you can do...: Install a toner cartridge made for your printers region (see What supplies do I need and how do I order them ? Operator panel codes Change invalid toner cartridge Light ...

User's Guide
Page 64
Install additional printer memory (see How to On in the Local Printer Setup Utility. - Operator panel codes Paper jam in Tray 1 Light sequence: • Continue-On &#...
Install additional printer memory (see How to On in the Local Printer Setup Utility. - Operator panel codes Paper jam in Tray 1 Light sequence: • Continue-On &#...

User's Guide
Page 65
... 43). • Press Continue to continue printing the job. • Press Cancel to add a memory card on page 43). 65 What you can do : • Install additional memory (see How to cancel the print job. This may not print correctly.) • Press and release Cancel to cancel the print job. •...; Memory is full. • A page is too complex to print. • A page is shorter than the set page margins. • Memory is in the future: - Install additional printer memory (see How to reset the printer. • To avoid this error in the buffer.
... 43). • Press Continue to continue printing the job. • Press Cancel to add a memory card on page 43). 65 What you can do : • Install additional memory (see How to cancel the print job. This may not print correctly.) • Press and release Cancel to cancel the print job. •...; Memory is full. • A page is too complex to print. • A page is shorter than the set page margins. • Memory is in the future: - Install additional printer memory (see How to reset the printer. • To avoid this error in the buffer.
User's Guide
Page 66
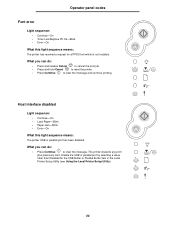
... printer discards any print jobs previously sent. Enable the USB or parallel port by selecting a value other than Disabled for a PPDS font which is not installed. Host interface disabled Light sequence: • Continue-On • Load Paper-Blink • Paper Jam-Blink • Error-On What this light sequence means: The...
... printer discards any print jobs previously sent. Enable the USB or parallel port by selecting a value other than Disabled for a PPDS font which is not installed. Host interface disabled Light sequence: • Continue-On • Load Paper-Blink • Paper Jam-Blink • Error-On What this light sequence means: The...

User's Guide
Page 67
Simplify the print job. Install additional printer memory (see How to clear paper jams on page 43). This occurs when the printer does not know the media size loaded in ...
Simplify the print job. Install additional printer memory (see How to clear paper jams on page 43). This occurs when the printer does not know the media size loaded in ...

User's Guide
Page 73
... settings page: - Verify that the paper trays are correctly listed under "Printer Information." - Verify the amount of paper you installed are configured for the sizes and types of memory installed is not listed under Installed Features, turn off the printer, unplug the power cord, and reinstall the option. - 8 Software tasks How to print...
... settings page: - Verify that the paper trays are correctly listed under "Printer Information." - Verify the amount of paper you installed are configured for the sizes and types of memory installed is not listed under Installed Features, turn off the printer, unplug the power cord, and reinstall the option. - 8 Software tasks How to print...
User's Guide
Page 74
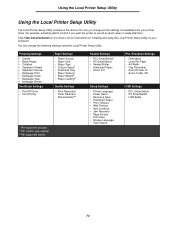
... settings not available from your computer. Using the Local Printer Setup Utility Using the Local Printer Setup Utility The Local Printer Setup Utility, located on installing and using the Local Printer Setup Utility: Finishing Settings • Copies • Blank Pages • Collation • Separator Sheets • Separator Source • Multipage Print...
... settings not available from your computer. Using the Local Printer Setup Utility Using the Local Printer Setup Utility The Local Printer Setup Utility, located on installing and using the Local Printer Setup Utility: Finishing Settings • Copies • Blank Pages • Collation • Separator Sheets • Separator Source • Multipage Print...

User's Guide
Page 76
... several times to decrease as the toner level decreases. For help printing a menu settings page, see page 54) is displayed when the toner cartridge is installed. Note: The Toner low light sequence does not appear if the 1500-page starter print cartridge is nearly empty. Checking the toner and photoconductor levels...
... several times to decrease as the toner level decreases. For help printing a menu settings page, see page 54) is displayed when the toner cartridge is installed. Note: The Toner low light sequence does not appear if the 1500-page starter print cartridge is nearly empty. Checking the toner and photoconductor levels...
User's Guide
Page 80
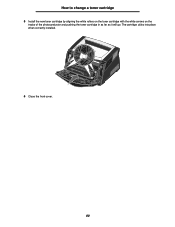
The cartridge clicks into place when correctly installed. 6 Close the front cover. 80 How to change a toner cartridge 5 Install the new toner cartridge by aligning the white rollers on the toner cartridge with the white arrows on the tracks of the photoconductor and pushing the toner cartridge in as far as it will go.
The cartridge clicks into place when correctly installed. 6 Close the front cover. 80 How to change a toner cartridge 5 Install the new toner cartridge by aligning the white rollers on the toner cartridge with the white arrows on the tracks of the photoconductor and pushing the toner cartridge in as far as it will go.


