Quick Reference
Page 1
...When closed, all print media comes out the rear exit. See Loading paper or other Envelopes * Tray 2 not available on the transparency can only feed one sheet of print media at the front of the paper tray. The type of print media you are deposited on all stacks of ... level surface. 3 Load the paper in the tray with the print side facing down . Straighten the edges of the sheet first. d Select your print job as shown. © 2005 Lexmark International, Inc., All rights reserved. Loading the 250-sheet or 550-sheet tray 1 Remove the tray. Overloading may cause jams. 4 ...
...When closed, all print media comes out the rear exit. See Loading paper or other Envelopes * Tray 2 not available on the transparency can only feed one sheet of print media at the front of the paper tray. The type of print media you are deposited on all stacks of ... level surface. 3 Load the paper in the tray with the print side facing down . Straighten the edges of the sheet first. d Select your print job as shown. © 2005 Lexmark International, Inc., All rights reserved. Loading the 250-sheet or 550-sheet tray 1 Remove the tray. Overloading may cause jams. 4 ...
Quick Reference
Page 2
...To Resume printing. Light legend = On = Blinking Continue Ready Toner Low / Replace PC Kit Load Paper Paper Jam Error * When the Error (or Paper Jam) and Continue lights are feeding paper from a tray, remove the tray, and then remove any jams. 2 Open the front cover, and remove the print cartridge assembly....jams in the area behind the print cartridge assembly. 4 Lift the flap at the input sensor can be either after the paper leaves the tray and enters the printer or in the manual feeder. Common operator panel light sequences The operator panel lights mean different things, depending...
...To Resume printing. Light legend = On = Blinking Continue Ready Toner Low / Replace PC Kit Load Paper Paper Jam Error * When the Error (or Paper Jam) and Continue lights are feeding paper from a tray, remove the tray, and then remove any jams. 2 Open the front cover, and remove the print cartridge assembly....jams in the area behind the print cartridge assembly. 4 Lift the flap at the input sensor can be either after the paper leaves the tray and enters the printer or in the manual feeder. Common operator panel light sequences The operator panel lights mean different things, depending...

User's Guide
Page 8
... ...19 Card stock ...20 Tips on storing print media and supplies 20 Storing paper ...20 Storing supplies ...20 Tips on preventing jams 21 How to load the 250-sheet tray 22 Extending the tray for legal or folio size paper 24 How to load the manual feeder 26 How to use the rear exit... 26 How to clear paper jams 28 Chapter 4: Printing tasks 31 How to manually feed a print job...
... ...19 Card stock ...20 Tips on storing print media and supplies 20 Storing paper ...20 Storing supplies ...20 Tips on preventing jams 21 How to load the 250-sheet tray 22 Extending the tray for legal or folio size paper 24 How to load the manual feeder 26 How to use the rear exit... 26 How to clear paper jams 28 Chapter 4: Printing tasks 31 How to manually feed a print job...
User's Guide
Page 10
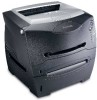
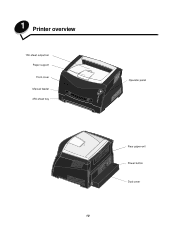
1 Printer overview 150-sheet output bin Paper support Front cover Manual feeder 250-sheet tray Operator panel Rear paper exit Power button Dust cover 10
1 Printer overview 150-sheet output bin Paper support Front cover Manual feeder 250-sheet tray Operator panel Rear paper exit Power button Dust cover 10

User's Guide
Page 16
...Tray 1 (250-sheet tray) Tray 2 (550-sheet tray) Manual feeder Sizes A4, A5, JIS B5, letter, legal, executive, folio, statement, Universal‡ A4, A5, JIS B5, letter, legal, executive, folio, statement, Universal‡ A4, A5, JIS B5, letter, legal, executive, folio, statement, Universal‡ Types Plain paper, transparencies, labels Plain paper, transparencies, labels Plain paper... is recommended. cards) 16 Get the most out of print media can be loaded? Never mix media types within a tray. Manual feeder: 76-216 x 127-356 mm (3.0-8.5 x 5.0-14.0 in.) (includes 3 x 5 in. 3 ...
...Tray 1 (250-sheet tray) Tray 2 (550-sheet tray) Manual feeder Sizes A4, A5, JIS B5, letter, legal, executive, folio, statement, Universal‡ A4, A5, JIS B5, letter, legal, executive, folio, statement, Universal‡ A4, A5, JIS B5, letter, legal, executive, folio, statement, Universal‡ Types Plain paper, transparencies, labels Plain paper, transparencies, labels Plain paper... is recommended. cards) 16 Get the most out of print media can be loaded? Never mix media types within a tray. Manual feeder: 76-216 x 127-356 mm (3.0-8.5 x 5.0-14.0 in.) (includes 3 x 5 in. 3 ...
User's Guide
Page 17
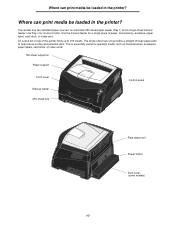
...print media be loaded in the printer? An output bin on top of paper, transparency, envelope, paper label, card stock, or index card. Your printer has two standard paper sources: an automatic 250-sheet paper feeder (Tray 1) and a single-sheet manual feeder. Where can print media be ...is especially useful for most print jobs. Use Tray 1 for specialty media, such as transparencies, envelopes, paper labels, card stock, or index cards 150-sheet output bin Paper support Front cover Manual feeder 250-sheet tray Control panel Rear paper exit Power button Dust cover (some models) ...
...print media be loaded in the printer? An output bin on top of paper, transparency, envelope, paper label, card stock, or index card. Your printer has two standard paper sources: an automatic 250-sheet paper feeder (Tray 1) and a single-sheet manual feeder. Where can print media be ...is especially useful for most print jobs. Use Tray 1 for specialty media, such as transparencies, envelopes, paper labels, card stock, or index cards 150-sheet output bin Paper support Front cover Manual feeder 250-sheet tray Control panel Rear paper exit Power button Dust cover (some models) ...

User's Guide
Page 21
...; Never mix media types within a tray. • Flex, fan, and straighten paper before purchasing large quantities of customized paper, See the Card Stock & Label Guide. 21 light sequence (see Load media on our Lexmark Web site at www.lexmark.com for more information about which paper provides optimum results for a Load Paper page 53) before you need...
...; Never mix media types within a tray. • Flex, fan, and straighten paper before purchasing large quantities of customized paper, See the Card Stock & Label Guide. 21 light sequence (see Load media on our Lexmark Web site at www.lexmark.com for more information about which paper provides optimum results for a Load Paper page 53) before you need...

User's Guide
Page 22
See Extending the tray for legal or folio size paper on a level surface. 22 Note: To load legal or folio size paper, you have to load paper in the 250-sheet tray. 1 Remove the tray. Straighten the edges on page 24 for instructions. 2 Prepare a stack of the paper tray. How to load the 250-sheet tray How to load the 250-sheet tray Follow these instructions to extend the length of paper for loading by flexing and fanning it back and forth.
See Extending the tray for legal or folio size paper on a level surface. 22 Note: To load legal or folio size paper, you have to load paper in the 250-sheet tray. 1 Remove the tray. Straighten the edges on page 24 for instructions. 2 Prepare a stack of the paper tray. How to load the 250-sheet tray How to load the 250-sheet tray Follow these instructions to extend the length of paper for loading by flexing and fanning it back and forth.

User's Guide
Page 24
Extending the tray for legal or folio size paper To load legal or folio size paper, you need to protect the tray while it is extended. 1 Press down on the latch at the back of the printer to extend the paper tray. You should also attach the dust cover on the output bin. How to load the 250-sheet tray 6 Extend the paper support on the back of the tray. 2 Expand the tray until the extender locks into place. 24
Extending the tray for legal or folio size paper To load legal or folio size paper, you need to protect the tray while it is extended. 1 Press down on the latch at the back of the printer to extend the paper tray. You should also attach the dust cover on the output bin. How to load the 250-sheet tray 6 Extend the paper support on the back of the tray. 2 Expand the tray until the extender locks into place. 24

User's Guide
Page 25
How to load the 250-sheet tray Attaching the dust cover The dust cover helps protect the paper tray from the environment as well as keep the tray from being knocked out of the printer by aligning the tabs on the cover to the back of position while it is extended. Attach the dust cover to the holes on the printer, and snap the cover into place. 25
How to load the 250-sheet tray Attaching the dust cover The dust cover helps protect the paper tray from the environment as well as keep the tray from being knocked out of the printer by aligning the tabs on the cover to the back of position while it is extended. Attach the dust cover to the holes on the printer, and snap the cover into place. 25

User's Guide
Page 26
...you experience problems with the stamp area as transparencies, envelopes, labels, card stock, or index cards. 26 Using only the specified print media helps prevent paper jams and print quality problems. Note: We recommend that are not currently loaded in the manual feeder, see What types of print media can only... sides of the print media close to help reduce curling and potential jams. This is especially useful for more information. How to use in the paper tray. For information on acceptable print media to use the rear exit The single-sheet rear exit provides a straight-through...
...you experience problems with the stamp area as transparencies, envelopes, labels, card stock, or index cards. 26 Using only the specified print media helps prevent paper jams and print quality problems. Note: We recommend that are not currently loaded in the manual feeder, see What types of print media can only... sides of the print media close to help reduce curling and potential jams. This is especially useful for more information. How to use in the paper tray. For information on acceptable print media to use the rear exit The single-sheet rear exit provides a straight-through...

User's Guide
Page 31
.... 2 Click Properties (or Options, Printer, or Setup, depending on the application) to view the printer driver settings. 3 Click the Paper tab. 4 Select Manual paper from the Paper tray drop-down list. 5 Select the appropriate Paper size and type. 6 Click OK. 7 Click OK on page 16. The printer displays the Load Manual Feeder light sequence. 8 Place...
.... 2 Click Properties (or Options, Printer, or Setup, depending on the application) to view the printer driver settings. 3 Click the Paper tab. 4 Select Manual paper from the Paper tray drop-down list. 5 Select the appropriate Paper size and type. 6 Click OK. 7 Click OK on page 16. The printer displays the Load Manual Feeder light sequence. 8 Place...

User's Guide
Page 63
What you can do : Clear the paper jam. Paper jams as a printed job exits the printer Light sequence: • Continue-On • Load Paper-On • Paper Jam-On What this light sequence means: A paper jam has occurred as the paper is exiting the paper tray and entering the printer. See How to clear paper jams on page 28 for...
What you can do : Clear the paper jam. Paper jams as a printed job exits the printer Light sequence: • Continue-On • Load Paper-On • Paper Jam-On What this light sequence means: A paper jam has occurred as the paper is exiting the paper tray and entering the printer. See How to clear paper jams on page 28 for...

User's Guide
Page 73
Verify the amount of paper you loaded. 8 Software tasks How to print a test page Windows 1 Click Start Æ Settings Æ Printers. 2 Select your printer. 3 Click File Æ Properties. 4 Click Print ... the menu settings page and network setup page, press the Continue button from the Ready state. • On the menu settings page: - Verify that the paper trays are correctly listed under "Printer Information." -
Verify the amount of paper you loaded. 8 Software tasks How to print a test page Windows 1 Click Start Æ Settings Æ Printers. 2 Select your printer. 3 Click File Æ Properties. 4 Click Print ... the menu settings page and network setup page, press the Continue button from the Ready state. • On the menu settings page: - Verify that the paper trays are correctly listed under "Printer Information." -
User's Guide
Page 87
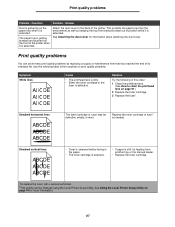
... printer. Print quality problems Problem / Question Solution / Answer Dust is gathering on the paper tray when it is extended. Print quality problems You can be defective, empty, or worn. The paper tray is getting bumped and pushed out the front of position while it is defective. Attach... extended. See Using the Local Printer Setup Utility on page 91.) 2 Replace the toner cartridge. 3 Replace the fuser*. This protects the paper tray from the environment as well as needed. Use the following in this order: 1 Clean the printhead lens. (See How to print quality ...
... printer. Print quality problems Problem / Question Solution / Answer Dust is gathering on the paper tray when it is extended. Print quality problems You can be defective, empty, or worn. The paper tray is getting bumped and pushed out the front of position while it is defective. Attach... extended. See Using the Local Printer Setup Utility on page 91.) 2 Replace the toner cartridge. 3 Replace the fuser*. This protects the paper tray from the environment as well as needed. Use the following in this order: 1 Clean the printhead lens. (See How to print quality ...
User's Guide
Page 88
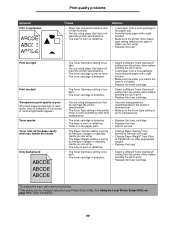
...8224; setting from the printer driver before sending the job to print. • Load paper from a new package. • Avoid textured paper with rough finishes. • Make sure the paper you load in the trays is not damp. • Replace the toner cartridge. • Select a different Toner... • Select a different Toner Darkness† setting from a fresh package in the paper tray. • Avoid textured paper with rough finishes. • Make sure the printer driver paper type setting matches the type of paper or specialty media you are using. • The fuser is worn or defective. &#...
...8224; setting from the printer driver before sending the job to print. • Load paper from a new package. • Avoid textured paper with rough finishes. • Make sure the paper you load in the trays is not damp. • Replace the toner cartridge. • Select a different Toner... • Select a different Toner Darkness† setting from a fresh package in the paper tray. • Avoid textured paper with rough finishes. • Make sure the printer driver paper type setting matches the type of paper or specialty media you are using. • The fuser is worn or defective. &#...

Service Manual
Page 30
... guides in the trays are positioned snugly against the paper or specialty media. • Do not remove paper trays while a job is in any exposed adhesive when the flap is printing. 4511-xxx Tips on the Lexmark Web site at www.lexmark.com for more information about which paper provides optimum results for a Load Paper or Ready light...
... guides in the trays are positioned snugly against the paper or specialty media. • Do not remove paper trays while a job is in any exposed adhesive when the flap is printing. 4511-xxx Tips on the Lexmark Web site at www.lexmark.com for more information about which paper provides optimum results for a Load Paper or Ready light...
Service Manual
Page 58
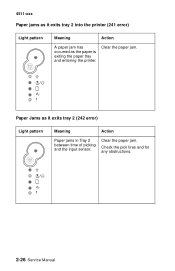
Check the pick tires and for any obstructions. 2-26 Service Manual Clear the paper jam. Clear the paper jam. 4511-xxx Paper jams as the paper is exiting the paper tray and entering the printer. Paper Jams as it exits tray 2 into the printer (241 error) Light pattern Meaning Action A paper jam has occurred as it exits tray 2 (242 error) Light pattern Meaning Action Paper jams in Tray 2 between time of picking and the input sensor.
Check the pick tires and for any obstructions. 2-26 Service Manual Clear the paper jam. Clear the paper jam. 4511-xxx Paper jams as the paper is exiting the paper tray and entering the printer. Paper Jams as it exits tray 2 into the printer (241 error) Light pattern Meaning Action A paper jam has occurred as it exits tray 2 (242 error) Light pattern Meaning Action Paper jams in Tray 2 between time of picking and the input sensor.

Service Manual
Page 180
... removal (E238, E240, and E240n) 1. Push the latches, and pull the cover away from the printer to prevent damage during service. 3. Covers Extender cover removal 1. 4511-xxx Removal procedures Note: 1. Open the front access cover. 2. We recommend disconnecting all screws before removing other printer parts. Remove the toner cartridge and paper tray before...
... removal (E238, E240, and E240n) 1. Push the latches, and pull the cover away from the printer to prevent damage during service. 3. Covers Extender cover removal 1. 4511-xxx Removal procedures Note: 1. Open the front access cover. 2. We recommend disconnecting all screws before removing other printer parts. Remove the toner cartridge and paper tray before...

Service Manual
Page 225
Repair information 4-47 Make sure the new paper feed rollers are captured between the rims of the printer. 3. Remove the rubber paper feed rollers. 4. Turn the printer onto its back. 4511-xxx Paper feed rollers (autocompensator tires) removal 1. Be sure you have removed the paper tray and the toner cartridge. 2. Note: Be careful not to mar the finish of the plastic hub.
Repair information 4-47 Make sure the new paper feed rollers are captured between the rims of the printer. 3. Remove the rubber paper feed rollers. 4. Turn the printer onto its back. 4511-xxx Paper feed rollers (autocompensator tires) removal 1. Be sure you have removed the paper tray and the toner cartridge. 2. Note: Be careful not to mar the finish of the plastic hub.


