
User's Guide
Page 7
... emission notices 3 Printer energy consumption 4 Statement of Limited Warranty 5 Chapter 1: Printer overview 10 Chapter 2: Installing software for local printing 12 Before installing printer software 12 Windows ...12 Installing printer software using the drivers CD 12 Installing printer software through the Add Printer Wizard 12 Installing optional printer software 13 Macintosh ...13...
... emission notices 3 Printer energy consumption 4 Statement of Limited Warranty 5 Chapter 1: Printer overview 10 Chapter 2: Installing software for local printing 12 Before installing printer software 12 Windows ...12 Installing printer software using the drivers CD 12 Installing printer software through the Add Printer Wizard 12 Installing optional printer software 13 Macintosh ...13...

User's Guide
Page 8
... an overlay or a watermark 38 Using an overlay ...38 Using a watermark 39 How to cancel a print job 40 From the printer operator panel 40 From a Windows computer 40 Canceling a job from a Macintosh computer 40 Chapter 5: How to install options 41 How to access the system board 41 How to add a memory...
... an overlay or a watermark 38 Using an overlay ...38 Using a watermark 39 How to cancel a print job 40 From the printer operator panel 40 From a Windows computer 40 Canceling a job from a Macintosh computer 40 Chapter 5: How to install options 41 How to access the system board 41 How to add a memory...
User's Guide
Page 9
... menu ...72 Utilities menu ...72 Chapter 8: Software tasks 73 How to print the menu settings page 73 How to print a test page 73 Windows ...73 Using the Local Printer Setup Utility 74 Chapter 9: Supplies information 75 What supplies do I need and how do I order them 75 Storing... supplies 76 Checking the toner and photoconductor levels 76 Recognizing the operator panel light sequences 77 How to change a toner cartridge 78 Recycling Lexmark products 81 How to change a photoconductor kit 82 Chapter 10: Troubleshooting 85 General problems ...85 Print quality problems ...87 How to clean...
... menu ...72 Utilities menu ...72 Chapter 8: Software tasks 73 How to print the menu settings page 73 How to print a test page 73 Windows ...73 Using the Local Printer Setup Utility 74 Chapter 9: Supplies information 75 What supplies do I need and how do I order them 75 Storing... supplies 76 Checking the toner and photoconductor levels 76 Recognizing the operator panel light sequences 77 How to change a toner cartridge 78 Recycling Lexmark products 81 How to change a photoconductor kit 82 Chapter 10: Troubleshooting 85 General problems ...85 Print quality problems ...87 How to clean...

User's Guide
Page 12
...CD-ROM drive. 5 Click OK. 12 The path should be used to install software on the Lexmark Web site at www.lexmark.com. Updates for the printer software may be available on most Windows operating systems. If the operating system is not supported by the CD, the Add Printer Wizard must...screen. 3 Connect the USB cable, and turn on the printer. You must use the Add Printer Wizard to install printer software: • Windows 95 (USB not supported) • Windows 98 First Edition (USB not supported) 1 Insert the drivers CD. If the CD launches automatically, click Exit. 2 Launch the Add Printer...
...CD-ROM drive. 5 Click OK. 12 The path should be used to install software on the Lexmark Web site at www.lexmark.com. Updates for the printer software may be available on most Windows operating systems. If the operating system is not supported by the CD, the Add Printer Wizard must...screen. 3 Connect the USB cable, and turn on the printer. You must use the Add Printer Wizard to install printer software: • Windows 95 (USB not supported) • Windows 98 First Edition (USB not supported) 1 Insert the drivers CD. If the CD launches automatically, click Exit. 2 Launch the Add Printer...

User's Guide
Page 14
... parallel connection. a Insert the drivers CD. e Click Continue after viewing the Readme file. All the printer driver packages support local printing using Lexmark printers in use , and click Continue. A queue has been created for the printer. b Double-click Classic, and double-click the installer... package for the printer. • If the USB-attached printer does not appear in the original Printer (USB) window. 7 In the PostScript Printer Description (PPD) File section, click Auto Setup. All the necessary files are available on the drivers CD and...
... parallel connection. a Insert the drivers CD. e Click Continue after viewing the Readme file. All the printer driver packages support local printing using Lexmark printers in use , and click Continue. A queue has been created for the printer. b Double-click Classic, and double-click the installer... package for the printer. • If the USB-attached printer does not appear in the original Printer (USB) window. 7 In the PostScript Printer Description (PPD) File section, click Auto Setup. All the necessary files are available on the drivers CD and...
User's Guide
Page 18
...176;F) without discoloring, bleeding, or releasing hazardous emissions. See the Card Stock & Label Guide available on our Lexmark Web site at www.lexmark.com for more information about which paper provides optimum results for laser printers. Check with rough or heavily textured... or vendor to 24 lb bond) grain long. We recommend Lexmark laser printer transparencies: part number 70X7240 for laser printers. Are stuck together - Are damaged in doubt, contact your printing environment. Contain windows, holes, perforations, cutouts, or embossments - Use metal clasps,...
...176;F) without discoloring, bleeding, or releasing hazardous emissions. See the Card Stock & Label Guide available on our Lexmark Web site at www.lexmark.com for more information about which paper provides optimum results for laser printers. Check with rough or heavily textured... or vendor to 24 lb bond) grain long. We recommend Lexmark laser printer transparencies: part number 70X7240 for laser printers. Are stuck together - Are damaged in doubt, contact your printing environment. Contain windows, holes, perforations, cutouts, or embossments - Use metal clasps,...

User's Guide
Page 21
...Have any way - Have metal clasps, string ties, or metal folding bars - light sequence (see Load media on our Lexmark Web site at www.lexmark.com for more information about which paper provides optimum results for a Load Paper page 53) before you need detailed information before ...paper or specialty media. • Do not remove paper trays while a job is in the sealed position • Use only recommended paper. Contain windows, holes, perforations, cutouts, or embossments - Are stuck together - See the Card Stock & Label Guide available on • Before loading transparencies, fan...
...Have any way - Have metal clasps, string ties, or metal folding bars - light sequence (see Load media on our Lexmark Web site at www.lexmark.com for more information about which paper provides optimum results for a Load Paper page 53) before you need detailed information before ...paper or specialty media. • Do not remove paper trays while a job is in the sealed position • Use only recommended paper. Contain windows, holes, perforations, cutouts, or embossments - Are stuck together - See the Card Stock & Label Guide available on • Before loading transparencies, fan...

User's Guide
Page 31
... tab. 4 Select Manual paper from the Paper tray drop-down list. 5 Select the appropriate Paper size and type. 6 Click OK. 7 Click OK on the Print window to send the job to the printer before loading the print media.
... tab. 4 Select Manual paper from the Paper tray drop-down list. 5 Select the appropriate Paper size and type. 6 Click OK. 7 Click OK on the Print window to send the job to the printer before loading the print media.

User's Guide
Page 34
Note: Manual duplex is not available on the Print window. Once the first side of your job prints, the Load Paper light comes on, and the Continue light blinks. 10 Load the paper back into the printer with the already-printed side up and the top of the page toward the front of the document first. The printer prints every other page of the tray. How to print on both sides of the paper (manual duplex) 8 Click OK. 9 Click OK on a Macintosh computer. 34
Note: Manual duplex is not available on the Print window. Once the first side of your job prints, the Load Paper light comes on, and the Continue light blinks. 10 Load the paper back into the printer with the already-printed side up and the top of the page toward the front of the document first. The printer prints every other page of the tray. How to print on both sides of the paper (manual duplex) 8 Click OK. 9 Click OK on a Macintosh computer. 34

User's Guide
Page 35
... whether the images are printed on one page (N-up printing) The Multipage Printing (N-up) setting is used to print multiple page images on the Print window to send the job to have. The positioning depends on . For example, 2-Up means two page images are printed on one page, 4-up means four...
... whether the images are printed on one page (N-up printing) The Multipage Printing (N-up) setting is used to print multiple page images on the Print window to send the job to have. The positioning depends on . For example, 2-Up means two page images are printed on one page, 4-up means four...

User's Guide
Page 36
... The Booklet setting lets you print multiple pages in booklet form without having to re-format your print job is not available on the Print window to send the job to print using the booklet function. You must specify whether or not you want to view the printer driver settings. 3 From...
... The Booklet setting lets you print multiple pages in booklet form without having to re-format your print job is not available on the Print window to send the job to print using the booklet function. You must specify whether or not you want to view the printer driver settings. 3 From...

User's Guide
Page 37
..., select Print crop marks. 7 Select the amount of overlap you print a single image across several pages. Note: Poster prining is not available on the Print window to send the job to have. 8 Click OK twice. 9 Click OK on a Macintosh computer. 37 Once printed, you can combine the pages to create one...
..., select Print crop marks. 7 Select the amount of overlap you print a single image across several pages. Note: Poster prining is not available on the Print window to send the job to have. 8 Click OK twice. 9 Click OK on a Macintosh computer. 37 Once printed, you can combine the pages to create one...
User's Guide
Page 38
... 2-Load the letterhead paper with the design side facing down lists. 6 Select the appropriate paper size and tray. 7 Click OK. 8 Click OK on the Print window to send the job to print. For information about how to the printer. The top edge of the sheet entering first. How to print on...
... 2-Load the letterhead paper with the design side facing down lists. 6 Select the appropriate paper size and tray. 7 Click OK. 8 Click OK on the Print window to send the job to print. For information about how to the printer. The top edge of the sheet entering first. How to print on...

User's Guide
Page 40
... 1 Click Start Æ Settings Æ Printers. 2 Double-click the printer you are printing to. 3 In the printer window, select the print job you want to cancel the job currently printing. Canceling a job from a Macintosh computer Canceling a print job from a computer running Mac OS 9... Print Center or Printer Setup. 2 Double-click the printer you are using to print, the printer icon for your selected printer appears in the printer window. 2 Select the print job you want to cancel a print job A print job can button. The Cancel job light sequence is displayed on your computer. From...
... 1 Click Start Æ Settings Æ Printers. 2 Double-click the printer you are printing to. 3 In the printer window, select the print job you want to cancel the job currently printing. Canceling a job from a Macintosh computer Canceling a print job from a computer running Mac OS 9... Print Center or Printer Setup. 2 Double-click the printer you are using to print, the printer icon for your selected printer appears in the printer window. 2 Select the print job you want to cancel a print job A print job can button. The Cancel job light sequence is displayed on your computer. From...
User's Guide
Page 71
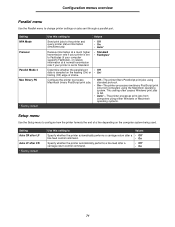
... after LF Auto LF after a carriage return control command. • Off* • On 71 This setting often causes Windows print jobs to fail. • Auto*-The printer processes print jobs from computers using Macintosh binary PostScript print jobs. Configuration ... printer formats the end of strobe. standard protocol. • On-The printer processes raw binary PostScript print jobs from computers using either Windows or Macintosh operating systems. Setup menu Use the Setup menu to Values Specify whether the printer automatically performs a carriage return after a &#...
... after LF Auto LF after a carriage return control command. • Off* • On 71 This setting often causes Windows print jobs to fail. • Auto*-The printer processes print jobs from computers using Macintosh binary PostScript print jobs. Configuration ... printer formats the end of strobe. standard protocol. • On-The printer processes raw binary PostScript print jobs from computers using either Windows or Macintosh operating systems. Setup menu Use the Setup menu to Values Specify whether the printer automatically performs a carriage return after a &#...
User's Guide
Page 72
... deleted. Resources in the Parallel menu, Network menu, LocalTalk menu, and USB menu. This setting often causes Windows print jobs to fail. • Auto*-The printer processes print jobs from computers using either Windows or Macintosh operating systems. Utilities menu Use the Utilities menu to troubleshoot printer problems. Setting Reset Factory Defaults...
... deleted. Resources in the Parallel menu, Network menu, LocalTalk menu, and USB menu. This setting often causes Windows print jobs to fail. • Auto*-The printer processes print jobs from computers using either Windows or Macintosh operating systems. Utilities menu Use the Utilities menu to troubleshoot printer problems. Setting Reset Factory Defaults...

User's Guide
Page 73
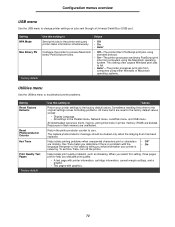
... is correctly listed under Installed Features, turn off the printer, unplug the power cord, and reinstall the option. - 8 Software tasks How to print a test page Windows 1 Click Start Æ Settings Æ Printers. 2 Select your printer. 3 Click File Æ Properties. 4 Click Print Test Page. 73 How to print the menu settings page...
... is correctly listed under Installed Features, turn off the printer, unplug the power cord, and reinstall the option. - 8 Software tasks How to print a test page Windows 1 Click Start Æ Settings Æ Printers. 2 Select your printer. 3 Click File Æ Properties. 4 Click Print Test Page. 73 How to print the menu settings page...

User's Guide
Page 96
... light 54 transparencies 18 tray extending 24 troubleshooting 85 print quality 87 U UNIX 14 USB menu 72 Utilities menu 72 W Waiting light 51 watermarks 38 Windows 12 96
... light 54 transparencies 18 tray extending 24 troubleshooting 85 print quality 87 U UNIX 14 USB menu 72 Utilities menu 72 W Waiting light 51 watermarks 38 Windows 12 96
Service Manual
Page 27
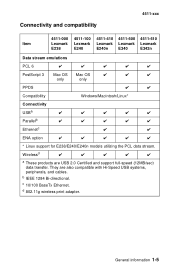
Connectivity and compatibility 4511-xxx Item 4511-000 Lexmark E238 4511-100 Lexmark E240 4511-410 4511-600 Lexmark Lexmark E240n E340 4511-610 Lexmark E342n Data stream emulations PCL 6 ✔ ✔ ✔ ✔ ✔ PostScript 3 Mac OS Mac OS ✔ ✔ ✔ only only PPDS ✔ ✔ Compatibility Windows/Macintosh/Linux* Connectivity USBa ✔ ✔ ✔ ✔...
Connectivity and compatibility 4511-xxx Item 4511-000 Lexmark E238 4511-100 Lexmark E240 4511-410 4511-600 Lexmark Lexmark E240n E340 4511-610 Lexmark E342n Data stream emulations PCL 6 ✔ ✔ ✔ ✔ ✔ PostScript 3 Mac OS Mac OS ✔ ✔ ✔ only only PPDS ✔ ✔ Compatibility Windows/Macintosh/Linux* Connectivity USBa ✔ ✔ ✔ ✔...

Service Manual
Page 30
... a job is in any exposed adhesive when the flap is printing. Have any way - Contain windows, holes, perforations, cutouts, or embossing - Wait for the current printing environment. 4511-xxx Tips on the Lexmark Web site at www.lexmark.com for more information about which paper provides optimum results for a Load Paper or Ready...
... a job is in any exposed adhesive when the flap is printing. Have any way - Contain windows, holes, perforations, cutouts, or embossing - Wait for the current printing environment. 4511-xxx Tips on the Lexmark Web site at www.lexmark.com for more information about which paper provides optimum results for a Load Paper or Ready...


