Quick Reference
Page 1
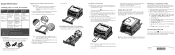
... on the application) to cancel the job currently printing. Canceling a print job Press and release Cancel on ) from your print job as shown. © 2005 Lexmark International, Inc., All rights reserved. Manual feeder: 76-216 x 127-356 mm (3.0-8.5 x 5.0-14.0 in.) (includes 3 x 5 in China 6/05 Note: ...Load letterhead paper with the design side facing down . The printer Load Paper light blinks when it should be loaded. 2 Place a sheet of the tray. When the rear exit door is open, all media is ready for the print...
... on the application) to cancel the job currently printing. Canceling a print job Press and release Cancel on ) from your print job as shown. © 2005 Lexmark International, Inc., All rights reserved. Manual feeder: 76-216 x 127-356 mm (3.0-8.5 x 5.0-14.0 in.) (includes 3 x 5 in China 6/05 Note: ...Load letterhead paper with the design side facing down . The printer Load Paper light blinks when it should be loaded. 2 Place a sheet of the tray. When the rear exit door is open, all media is ready for the print...
Quick Reference
Page 2
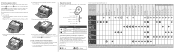
...; Paper jam in the manual feeder Paper jam under the toner cartridge Paper jam as printer status, intervention, or service. Display a secondary error code. Lights that are feeding paper from a tray, remove the tray, and then remove any jams. 2 Open the front cover, and remove the print cartridge assembly..., reinstall the print cartridge assembly, make sure all printer covers and trays are both on their sequence. The Continue button also has a light. Light legend = On = Blinking Continue Ready Toner Low / Replace PC Kit Load Paper Paper Jam Error * When the Error (or Paper Jam) and...
...; Paper jam in the manual feeder Paper jam under the toner cartridge Paper jam as printer status, intervention, or service. Display a secondary error code. Lights that are feeding paper from a tray, remove the tray, and then remove any jams. 2 Open the front cover, and remove the print cartridge assembly..., reinstall the print cartridge assembly, make sure all printer covers and trays are both on their sequence. The Continue button also has a light. Light legend = On = Blinking Continue Ready Toner Low / Replace PC Kit Load Paper Paper Jam Error * When the Error (or Paper Jam) and...

User's Guide
Page 8
... to add a memory card 43 Recognizing installed options 43 Chapter 6: Using the operator panel 44 Overview of the operator panel 44 Understanding the operator panel lights 45 Secondary errors ...47 Operator panel codes ...49 Primary codes ...49 8
... to add a memory card 43 Recognizing installed options 43 Chapter 6: Using the operator panel 44 Overview of the operator panel 44 Understanding the operator panel lights 45 Secondary errors ...47 Operator panel codes ...49 Primary codes ...49 8
User's Guide
Page 9
... 75 How to know when you need new supplies 76 Checking the toner and photoconductor levels 76 Recognizing the operator panel light sequences 77 How to change a toner cartridge 78 Recycling Lexmark products 81 How to change a photoconductor kit 82 Chapter 10: Troubleshooting 85 General problems ...85 Print quality problems ...87 How...
... 75 How to know when you need new supplies 76 Checking the toner and photoconductor levels 76 Recognizing the operator panel light sequences 77 How to change a toner cartridge 78 Recycling Lexmark products 81 How to change a photoconductor kit 82 Chapter 10: Troubleshooting 85 General problems ...85 Print quality problems ...87 How...
User's Guide
Page 11
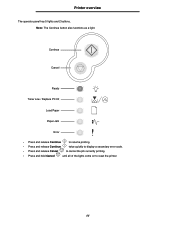
Note: The Continue button also functions as a light. Continue Cancel Ready Toner Low / Replace PC Kit Load Paper Paper Jam Error • Press and release Continue to resume printing. • Press and release Continue twice quickly to display a secondary error code. • Press and release Cancel to cancel the job currently printing. • Press and hold Cancel until all of the lights come on to reset the printer. 11 Printer overview The operator panel has 5 lights and 2 buttons.
Note: The Continue button also functions as a light. Continue Cancel Ready Toner Low / Replace PC Kit Load Paper Paper Jam Error • Press and release Continue to resume printing. • Press and release Continue twice quickly to display a secondary error code. • Press and release Cancel to cancel the job currently printing. • Press and hold Cancel until all of the lights come on to reset the printer. 11 Printer overview The operator panel has 5 lights and 2 buttons.

User's Guide
Page 21
... Card Stock & Label Guide. 21 Contain windows, holes, perforations, cutouts, or embossments - Are damaged in the printer. Have any way - light sequence (see Load media on our Lexmark Web site at www.lexmark.com for more information about which paper provides optimum results for a Load Paper page 53) before you need detailed information...
... Card Stock & Label Guide. 21 Contain windows, holes, perforations, cutouts, or embossments - Are damaged in the printer. Have any way - light sequence (see Load media on our Lexmark Web site at www.lexmark.com for more information about which paper provides optimum results for a Load Paper page 53) before you need detailed information...

User's Guide
Page 28
To clear a paper jam: 1 If you clear the entire paper path when a paper jam occurs. See Secondary error codes on . Press and release Continue twice quickly to clear paper jams When a paper jam occurs, the printer stops and the operator panel Paper Jam and Continue lights come on page 61 for more information. How to clear paper jams How to display the specific secondary error paper jam light sequence. We recommend that you are feeding paper from a tray, remove the tray, and then remove any jams. 28
To clear a paper jam: 1 If you clear the entire paper path when a paper jam occurs. See Secondary error codes on . Press and release Continue twice quickly to clear paper jams When a paper jam occurs, the printer stops and the operator panel Paper Jam and Continue lights come on page 61 for more information. How to clear paper jams How to display the specific secondary error paper jam light sequence. We recommend that you are feeding paper from a tray, remove the tray, and then remove any jams. 28

User's Guide
Page 29
Warning: Fuser or area may be hot. 29 Warning: Do not leave the print cartridge assembly exposed to clear paper jams 2 Open the front cover, and remove the print cartridge assembly. Extended light exposure can cause print quality problems. 3 Remove any jams in the area behind the print cartridge assembly. How to direct light for an extended period of time.
Warning: Fuser or area may be hot. 29 Warning: Do not leave the print cartridge assembly exposed to clear paper jams 2 Open the front cover, and remove the print cartridge assembly. Extended light exposure can cause print quality problems. 3 Remove any jams in the area behind the print cartridge assembly. How to direct light for an extended period of time.

User's Guide
Page 31
... printer and can be loaded? 4 Printing tasks How to manually feed a print job The manual feeder is ready, it will display the Load Manual Feeder light sequence, at the center of the manual feeder, but only to the point where its leading edge can contact the paper guides. 31 To manually... tray drop-down list. 5 Select the appropriate Paper size and type. 6 Click OK. 7 Click OK on page 16. The printer displays the Load Manual Feeder light sequence. 8 Place a sheet of the selected print media, print side facing up, at which point you should load the media.
... printer and can be loaded? 4 Printing tasks How to manually feed a print job The manual feeder is ready, it will display the Load Manual Feeder light sequence, at the center of the manual feeder, but only to the point where its leading edge can contact the paper guides. 31 To manually... tray drop-down list. 5 Select the appropriate Paper size and type. 6 Click OK. 7 Click OK on page 16. The printer displays the Load Manual Feeder light sequence. 8 Place a sheet of the selected print media, print side facing up, at which point you should load the media.

User's Guide
Page 34
How to print on both sides of the paper (manual duplex) 8 Click OK. 9 Click OK on a Macintosh computer. 34 The printer prints every other page of the tray. Note: Manual duplex is not available on the Print window. Once the first side of your job prints, the Load Paper light comes on, and the Continue light blinks. 10 Load the paper back into the printer with the already-printed side up and the top of the page toward the front of the document first.
How to print on both sides of the paper (manual duplex) 8 Click OK. 9 Click OK on a Macintosh computer. 34 The printer prints every other page of the tray. Note: Manual duplex is not available on the Print window. Once the first side of your job prints, the Load Paper light comes on, and the Continue light blinks. 10 Load the paper back into the printer with the already-printed side up and the top of the page toward the front of the document first.
User's Guide
Page 38
... source you are using the manual feeder, first send the job to print, then load the letterhead when the printer displays the Load Manual Feeder light sequence (see the printer driver Help. Typical examples of the sheet entering first. Watermarks are templates that can create an overlay or watermark file on...
... source you are using the manual feeder, first send the job to print, then load the letterhead when the printer displays the Load Manual Feeder light sequence (see the printer driver Help. Typical examples of the sheet entering first. Watermarks are templates that can create an overlay or watermark file on...

User's Guide
Page 40
... to cancel the job currently printing. From the printer operator panel Press and release Cancel to stop printing, and then click Cancel. The Cancel job light sequence is displayed on your selected printer appears in the printer window. 2 Select the print job you want to print, the printer icon for your...
... to cancel the job currently printing. From the printer operator panel Press and release Cancel to stop printing, and then click Cancel. The Cancel job light sequence is displayed on your selected printer appears in the printer window. 2 Select the print job you want to print, the printer icon for your...

User's Guide
Page 44
6 Using the operator panel Overview of the lights come on to cancel the job currently printing. • Press and hold Cancel until all of the operator panel The operator panel has 5 lights and 2 buttons. Note: The Continue button also functions as a light. Continue Cancel Ready Toner Low / Replace PC Kit Load Paper Paper Jam Error • Press and release Continue to resume printing. • Press and release Continue twice quickly to display a secondary error code. • Press and release Cancel to reset the printer. 44
6 Using the operator panel Overview of the lights come on to cancel the job currently printing. • Press and hold Cancel until all of the operator panel The operator panel has 5 lights and 2 buttons. Note: The Continue button also functions as a light. Continue Cancel Ready Toner Low / Replace PC Kit Load Paper Paper Jam Error • Press and release Continue to resume printing. • Press and release Continue twice quickly to display a secondary error code. • Press and release Cancel to reset the printer. 44
User's Guide
Page 45
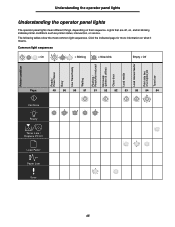
Common light sequences = On = Blinking = Slow blink Empty = Off Printer condition Ready / Power Saver Busy Hex Trace Ready Waiting Flushing / Resolution reduced Not ready (printer is offline) ... 51 51 52 52 53 53 54 54 Continue Ready Toner Low / Replace PC Kit Load Paper Paper Jam Error 45 Understanding the operator panel lights Understanding the operator panel lights The operator panel lights mean different things, depending on , and/or blinking indicate printer conditions such as printer status, intervention, or service...
Common light sequences = On = Blinking = Slow blink Empty = Off Printer condition Ready / Power Saver Busy Hex Trace Ready Waiting Flushing / Resolution reduced Not ready (printer is offline) ... 51 51 52 52 53 53 54 54 Continue Ready Toner Low / Replace PC Kit Load Paper Paper Jam Error 45 Understanding the operator panel lights Understanding the operator panel lights The operator panel lights mean different things, depending on , and/or blinking indicate printer conditions such as printer status, intervention, or service...
User's Guide
Page 46
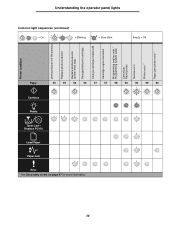
... Ready Toner Low / Replace PC Kit Load Paper Paper Jam Error * See Secondary errors on page 47 for more information. 55 Understanding the operator panel lights 55 56 = Blinking 56 46 Printer condition photoconductor kit life warning Replace photoconductor Replace photoconductor (printer hard stop) Unsupported print cartridge Change cartridge invalid refill...
... Ready Toner Low / Replace PC Kit Load Paper Paper Jam Error * See Secondary errors on page 47 for more information. 55 Understanding the operator panel lights 55 56 = Blinking 56 46 Printer condition photoconductor kit life warning Replace photoconductor Replace photoconductor (printer hard stop) Unsupported print cartridge Change cartridge invalid refill...

User's Guide
Page 47
Press and release Continue twice quickly to go for help. 47 The following table shows what these light sequences mean and where to display the secondary error code light sequence. Understanding the operator panel lights Secondary errors • When the Error and Continue lights are both on, a secondary error has occurred. • When the Paper Jam and Continue lights are both on, a paper jam secondary error has occurred.
Press and release Continue twice quickly to go for help. 47 The following table shows what these light sequences mean and where to display the secondary error code light sequence. Understanding the operator panel lights Secondary errors • When the Error and Continue lights are both on, a secondary error has occurred. • When the Paper Jam and Continue lights are both on, a paper jam secondary error has occurred.

User's Guide
Page 48
Understanding the operator panel lights Secondary Error codes = On = Blinking Paper jam codes Empty = Off Printer condition Paper jam at the input sensor * Paper jam in the manual feeder Paper ...
Understanding the operator panel lights Secondary Error codes = On = Blinking Paper jam codes Empty = Off Printer condition Paper jam at the input sensor * Paper jam in the manual feeder Paper ...

User's Guide
Page 49
Primary codes Ready / Power Saver Light sequence: • Ready-On What this light sequence means: • The printer is ready to change the Power Saver setting, it can only be set from the Local Printer Setup Utility (see ... Utility on page 74). 49 What you can do to clear them. Operator panel codes Operator panel codes Below are explanations of what the primary light sequences, or codes, and secondary error codes mean and what you can do : • Send a print job. • Press Continue to print the menu settings...
Primary codes Ready / Power Saver Light sequence: • Ready-On What this light sequence means: • The printer is ready to change the Power Saver setting, it can only be set from the Local Printer Setup Utility (see ... Utility on page 74). 49 What you can do to clear them. Operator panel codes Operator panel codes Below are explanations of what the primary light sequences, or codes, and secondary error codes mean and what you can do : • Send a print job. • Press Continue to print the menu settings...

User's Guide
Page 50
...hold Cancel to print. What you can do : • Advanced users can do : • Busy: - Hex Trace Ready Light sequence: • Ready-Slow blink What this light sequence means: • The printer is busy receiving and processing data or printing. • The printer is printing a directory,...8226; Printing a directory, a font list, menu settings pages, or Print Quality Test Pages: - Operator panel codes Busy Light sequence: • Ready-Blink What this light sequence means: The printer is in the Ready mode, and Hex Trace is active. Press and hold Cancel to reset ...
...hold Cancel to print. What you can do : • Advanced users can do : • Busy: - Hex Trace Ready Light sequence: • Ready-Slow blink What this light sequence means: • The printer is busy receiving and processing data or printing. • The printer is printing a directory,...8226; Printing a directory, a font list, menu settings pages, or Print Quality Test Pages: - Operator panel codes Busy Light sequence: • Ready-Blink What this light sequence means: The printer is in the Ready mode, and Hex Trace is active. Press and hold Cancel to reset ...

User's Guide
Page 51
...is reduced from 600 dots per inch (dpi) to 300 dpi to reset the printer. Operator panel codes Waiting Light sequence: • Continue-On • Ready-On What this light sequence means: • The printer is flushing corrupted print data. • The printer is waiting until a...memory full error. What you can do : • Wait until it receives additional data. Flushing / Resolution reduced Light sequence: • Ready-Blink • Error-Blink What this light sequence means: The printer is processing data or printing pages, but the resolution of the print buffer. • ...
...is reduced from 600 dots per inch (dpi) to 300 dpi to reset the printer. Operator panel codes Waiting Light sequence: • Continue-On • Ready-On What this light sequence means: • The printer is flushing corrupted print data. • The printer is waiting until a...memory full error. What you can do : • Wait until it receives additional data. Flushing / Resolution reduced Light sequence: • Ready-Blink • Error-Blink What this light sequence means: The printer is processing data or printing pages, but the resolution of the print buffer. • ...


