Quick Reference
Page 2
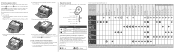
...job Toner low Photoconductor kit life warning Replace photoconductor Replace photoconductor kit (printer hard stop) Unsupported print cartridge Change cartridge invalid refill Cartridge region mismatch Cancel job / Reset printer Service error Printer error * Paper jam printer error * Paper jam at the input sensor † Paper jam... in the manual feeder Paper jam under the toner cartridge Paper jam as printer status, intervention, or service. We recommend that came with your printer for more detailed information about the light sequences, see the publications CD. ...
...job Toner low Photoconductor kit life warning Replace photoconductor Replace photoconductor kit (printer hard stop) Unsupported print cartridge Change cartridge invalid refill Cartridge region mismatch Cancel job / Reset printer Service error Printer error * Paper jam printer error * Paper jam at the input sensor † Paper jam... in the manual feeder Paper jam under the toner cartridge Paper jam as printer status, intervention, or service. We recommend that came with your printer for more detailed information about the light sequences, see the publications CD. ...
User's Guide
Page 5
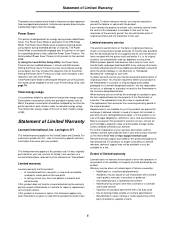
...Saver Timeout to a high value maintains a fast response, but may be a new or repaired item. For customers outside of all print cartridges, programs, data, and removable storage media (unless directed otherwise by a third party of this mode can be available for repair or ...duty cycle • Use of the printer. This limited warranty applies to this statement applies only when that the warranty period for any product or the durability or longevity of your warranty alternatives and the nearest Lexmark authorized servicer in this printer is provided for the Lexmark E238.
...Saver Timeout to a high value maintains a fast response, but may be a new or repaired item. For customers outside of all print cartridges, programs, data, and removable storage media (unless directed otherwise by a third party of this mode can be available for repair or ...duty cycle • Use of the printer. This limited warranty applies to this statement applies only when that the warranty period for any product or the durability or longevity of your warranty alternatives and the nearest Lexmark authorized servicer in this printer is provided for the Lexmark E238.
User's Guide
Page 9
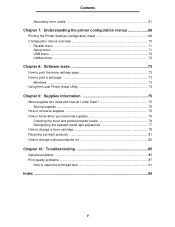
... Chapter 8: Software tasks 73 How to print the menu settings page 73 How to print a test page 73 Windows ...73 Using the Local Printer Setup Utility 74 Chapter 9: Supplies information 75 What supplies do I need and how do I order them 75 Storing supplies ...75 How to ...you need new supplies 76 Checking the toner and photoconductor levels 76 Recognizing the operator panel light sequences 77 How to change a toner cartridge 78 Recycling Lexmark products 81 How to change a photoconductor kit 82 Chapter 10: Troubleshooting 85 General problems ...85 Print quality problems ...87 How to...
... Chapter 8: Software tasks 73 How to print the menu settings page 73 How to print a test page 73 Windows ...73 Using the Local Printer Setup Utility 74 Chapter 9: Supplies information 75 What supplies do I need and how do I order them 75 Storing supplies ...75 How to ...you need new supplies 76 Checking the toner and photoconductor levels 76 Recognizing the operator panel light sequences 77 How to change a toner cartridge 78 Recycling Lexmark products 81 How to change a photoconductor kit 82 Chapter 10: Troubleshooting 85 General problems ...85 Print quality problems ...87 How to...

User's Guide
Page 30
... flap at the front of a page may be re-used after the page is printed but before it has successfully exited the printer if that holds the image of the printer, and remove any jams beneath the flap. 5 Open the rear exit, and remove any jams. Warning: Fuser or area may not... be hot. 6 After you have cleared the jams, reinstall the print cartridge assembly, make sure all printer covers and trays are closed, and then press Continue to resume printing. Note: Jam recovery is needed for another use. Therefore, a jammed page...
... flap at the front of a page may be re-used after the page is printed but before it has successfully exited the printer if that holds the image of the printer, and remove any jams beneath the flap. 5 Open the rear exit, and remove any jams. Warning: Fuser or area may not... be hot. 6 After you have cleared the jams, reinstall the print cartridge assembly, make sure all printer covers and trays are closed, and then press Continue to resume printing. Note: Jam recovery is needed for another use. Therefore, a jammed page...
User's Guide
Page 46
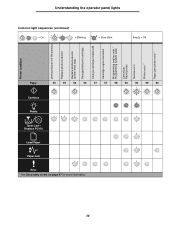
... the operator panel lights 55 56 = Blinking 56 46 Printer condition photoconductor kit life warning Replace photoconductor Replace photoconductor (printer hard stop) Unsupported print cartridge Change cartridge invalid refill Cartridge region mismatch Programming engine code / Programming system code Cancel job / Reset printer Service error Printer error * Paper jam printer error * 57 = Slow blink 57 58 58 Empty = Off...
... the operator panel lights 55 56 = Blinking 56 46 Printer condition photoconductor kit life warning Replace photoconductor Replace photoconductor (printer hard stop) Unsupported print cartridge Change cartridge invalid refill Cartridge region mismatch Programming engine code / Programming system code Cancel job / Reset printer Service error Printer error * Paper jam printer error * 57 = Slow blink 57 58 58 Empty = Off...

User's Guide
Page 54
... • Press and hold Cancel to reset the printer. In addition, the toner in the driver pop-up menu to reset the printer. Note: This light will not come on page 78 for a list of current printer settings. • Remove the toner cartridge and shake it to extend the life of your ...print job in tray 1 using the instructions in the toner cartridge is installed. 54 Toner low Light sequence: • Toner Low/Replace PC ...
... • Press and hold Cancel to reset the printer. In addition, the toner in the driver pop-up menu to reset the printer. Note: This light will not come on page 78 for a list of current printer settings. • Remove the toner cartridge and shake it to extend the life of your ...print job in tray 1 using the instructions in the toner cartridge is installed. 54 Toner low Light sequence: • Toner Low/Replace PC ...
User's Guide
Page 56
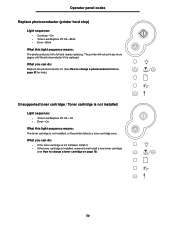
... not installed, or the printer detects a toner cartridge error. What you can do : • If the toner cartridge is not installed, install it. • If the toner cartridge is installed, remove it and install a new toner cartridge (see How to change a toner cartridge on page 82 for help.) Unsupported toner cartridge / Toner cartridge is not installed Light sequence...
... not installed, or the printer detects a toner cartridge error. What you can do : • If the toner cartridge is not installed, install it. • If the toner cartridge is installed, remove it and install a new toner cartridge (see How to change a toner cartridge on page 82 for help.) Unsupported toner cartridge / Toner cartridge is not installed Light sequence...

User's Guide
Page 57
...Replace PC Kit-On • Error-On What this light sequence means: The toner cartridge you are using was not designed to match the region of your printer. What you can do: Install a toner cartridge made for your printers region (see What supplies do I need and how do I order them ? ...What you can do: Install a toner cartridge made for your printer (see What supplies do I need and how do I order them ? Operator panel codes Change invalid toner cartridge Light sequence: • Toner Low/Replace PC Kit-On • Error-Blink What this ...
...Replace PC Kit-On • Error-On What this light sequence means: The toner cartridge you are using was not designed to match the region of your printer. What you can do: Install a toner cartridge made for your printers region (see What supplies do I need and how do I order them ? ...What you can do: Install a toner cartridge made for your printer (see What supplies do I need and how do I order them ? Operator panel codes Change invalid toner cartridge Light sequence: • Toner Low/Replace PC Kit-On • Error-Blink What this ...
User's Guide
Page 72
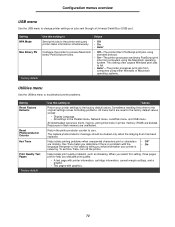
...PS * Factory default Use this setting to Values Send print jobs to the printer and query printer status information simultaneously. • Off • On • Auto* Configure the printer to change printer settings on jobs sent through a Universal Serial Bus (USB) port. Help isolate... printing problems when unexpected characters print or characters are reset to help you evaluate print quality: • A text page with printer information, cartridge information, current margin settings, and a graphic. • Two pages with the language interpreter or the cable by telling you ...
...PS * Factory default Use this setting to Values Send print jobs to the printer and query printer status information simultaneously. • Off • On • Auto* Configure the printer to change printer settings on jobs sent through a Universal Serial Bus (USB) port. Help isolate... printing problems when unexpected characters print or characters are reset to help you evaluate print quality: • A text page with printer information, cartridge information, current margin settings, and a graphic. • Two pages with the language interpreter or the cable by telling you ...
User's Guide
Page 75
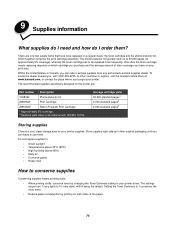
... to 10 (very dark), with ISO/IEC 19752. The settings range from any authorized Lexmark supplies dealer. The photoconductor kit typically lasts up in their original packaging until you bought your printer driver. Average cartridge yield 30,000 standard pages1 2,000 standard pages2 2,000 standard pages2 Storing supplies Choose a cool, clean storage area...
... to 10 (very dark), with ISO/IEC 19752. The settings range from any authorized Lexmark supplies dealer. The photoconductor kit typically lasts up in their original packaging until you bought your printer driver. Average cartridge yield 30,000 standard pages1 2,000 standard pages2 2,000 standard pages2 Storing supplies Choose a cool, clean storage area...

User's Guide
Page 76
...: The Toner low light sequence does not appear if the 1500-page starter print cartridge is by printing a menu settings page. To ensure print quality and to avoid damage to the printer, the printer stops operating after the photoconductor kit has reached its official end-of-life (approximately 30,000 pages),...stop)* on page 73. While the printer may continue to function properly after the photoconductor has reached a maximum of 40,000 pages. 76 How to know when you need new supplies How to know when you experience faded print, remove the toner cartridge. Firmly shake it side to side and...
...: The Toner low light sequence does not appear if the 1500-page starter print cartridge is by printing a menu settings page. To ensure print quality and to avoid damage to the printer, the printer stops operating after the photoconductor kit has reached its official end-of-life (approximately 30,000 pages),...stop)* on page 73. While the printer may continue to function properly after the photoconductor has reached a maximum of 40,000 pages. 76 How to know when you need new supplies How to know when you experience faded print, remove the toner cartridge. Firmly shake it side to side and...
User's Guide
Page 78
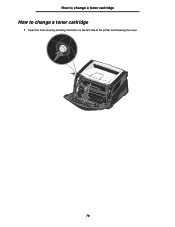
How to change a toner cartridge How to change a toner cartridge 1 Open the front cover by pressing the button on the left side of the printer and lowering the cover. 78
How to change a toner cartridge How to change a toner cartridge 1 Open the front cover by pressing the button on the left side of the printer and lowering the cover. 78
User's Guide
Page 82
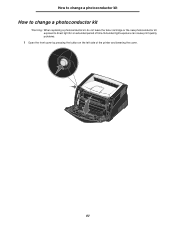
Extended light exposure can cause print quality problems. 1 Open the front cover by pressing the button on the left side of time. How to change a photoconductor kit How to change a photoconductor kit Warning: When replacing a photoconductor kit, do not leave the toner cartridge or the new photoconductor kit exposed to direct light for an extended period of the printer and lowering the cover. 82
Extended light exposure can cause print quality problems. 1 Open the front cover by pressing the button on the left side of time. How to change a photoconductor kit How to change a photoconductor kit Warning: When replacing a photoconductor kit, do not leave the toner cartridge or the new photoconductor kit exposed to direct light for an extended period of the printer and lowering the cover. 82

User's Guide
Page 83
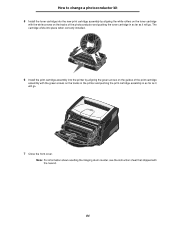
a b 4 Unpack the new photoconductor kit. 83 Place the print cartridge assembly on a flat, clean surface. 3 Remove the toner cartridge: a Press the button on the print cartridge assembly. Note: Do not press the button on the base of the printer by pulling on the toner cartridge handle. b Pull the toner cartridge up and out using the handle. How to change a photoconductor kit 2 Pull the print cartridge assembly out of the print cartridge assembly.
a b 4 Unpack the new photoconductor kit. 83 Place the print cartridge assembly on a flat, clean surface. 3 Remove the toner cartridge: a Press the button on the print cartridge assembly. Note: Do not press the button on the base of the printer by pulling on the toner cartridge handle. b Pull the toner cartridge up and out using the handle. How to change a photoconductor kit 2 Pull the print cartridge assembly out of the print cartridge assembly.
User's Guide
Page 84
... aligning the white rollers on the toner cartridge with the white arrows on the tracks in the printer and pushing the print cartridge assembly in as far as it will go . The cartridge clicks into place when correctly installed. 6 Install the print cartridge assembly into the new print cartridge assembly by aligning the green arrows on...
... aligning the white rollers on the toner cartridge with the white arrows on the tracks in the printer and pushing the print cartridge assembly in as far as it will go . The cartridge clicks into place when correctly installed. 6 Install the print cartridge assembly into the new print cartridge assembly by aligning the green arrows on...
User's Guide
Page 86
...problems. To reset the factory defaults: 1 Turn off and back on the output bin. 86 If print remains faded, replace the toner cartridge. The printer sometimes prints at a slightly slower speed when feeding print media from side to side and front to back several times to use the ... you can still print. Extend the paper support on . 11Factory defaults have another cartridge to send both pages of the lights. 9 When the top four lights come on, release the Continue button. 10Turn the printer off the printer. 2 Open the front cover. 3 Press Continue as separate jobs. Repeat this...
...problems. To reset the factory defaults: 1 Turn off and back on the output bin. 86 If print remains faded, replace the toner cartridge. The printer sometimes prints at a slightly slower speed when feeding print media from side to side and front to back several times to use the ... you can still print. Extend the paper support on . 11Factory defaults have another cartridge to send both pages of the lights. 9 When the top four lights come on, release the Continue button. 10Turn the printer off the printer. 2 Open the front cover. 3 Press Continue as separate jobs. Repeat this...
User's Guide
Page 87
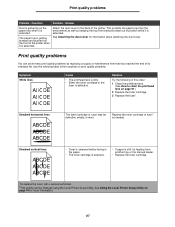
...If paper is extended. The paper tray is getting bumped and pushed out the front of the printer when it is stiff, try feeding from another tray or the manual feeder. • Replace the toner cartridge. *To replace the fuser, call a service technician. †This setting can solve many print... lens. (See How to the back of position while it is extended. Streaked horizontal lines ABCDE ABCDE ABCDE The toner cartridge or fuser may be changed using the Local Printer Setup Utility. Print quality problems Problem / Question Solution / Answer Dust is gathering on the paper tray when it is ...
...If paper is extended. The paper tray is getting bumped and pushed out the front of the printer when it is stiff, try feeding from another tray or the manual feeder. • Replace the toner cartridge. *To replace the fuser, call a service technician. †This setting can solve many print... lens. (See How to the back of position while it is extended. Streaked horizontal lines ABCDE ABCDE ABCDE The toner cartridge or fuser may be changed using the Local Printer Setup Utility. Print quality problems Problem / Question Solution / Answer Dust is gathering on the paper tray when it is ...
User's Guide
Page 88
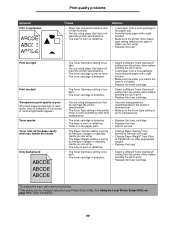
... due to high humidity. • You are using paper that do not meet the printer specifications. • The Form Type setting in the printer driver is set to print. • Replace the toner cartridge. *To replace the fuser, call a service technician. †This setting can be... Toner Darkness† setting from the printer driver before sending the job to print. • Replace the toner cartridge. • You are using transparencies that does not meet the printer specifications. • The toner cartridge is low on toner. • The toner cartridge is defective. • The Toner ...
... due to high humidity. • You are using paper that do not meet the printer specifications. • The Form Type setting in the printer driver is set to print. • Replace the toner cartridge. *To replace the fuser, call a service technician. †This setting can be... Toner Darkness† setting from the printer driver before sending the job to print. • Replace the toner cartridge. • You are using transparencies that does not meet the printer specifications. • The toner cartridge is low on toner. • The toner cartridge is defective. • The Toner ...
User's Guide
Page 89
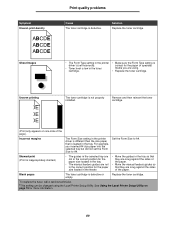
... sides of the paper. • Move the manual feeders guides so that they are using the Local Printer Setup Utility. Skewed print (Print is not properly installed. Replace the toner cartridge. *To replace the fuser, call a service technician. †This setting can be changed using . ...• Replace the toner cartridge. See Using the Local Printer Setup Utility on one side of the paper. Symptom Uneven print...
... sides of the paper. • Move the manual feeders guides so that they are using the Local Printer Setup Utility. Skewed print (Print is not properly installed. Replace the toner cartridge. *To replace the fuser, call a service technician. †This setting can be changed using . ...• Replace the toner cartridge. See Using the Local Printer Setup Utility on one side of the paper. Symptom Uneven print...

User's Guide
Page 90
...;This setting can be changed using the Local Printer Setup Utility. See Using the Local Printer Setup Utility on page 74 for service. Paper curls badly once it prints and The Paper Weight setting is defective. • Your printer requires servicing. • Replace the toner cartridge. • Call for more information. 90 exits to...
...;This setting can be changed using the Local Printer Setup Utility. See Using the Local Printer Setup Utility on page 74 for service. Paper curls badly once it prints and The Paper Weight setting is defective. • Your printer requires servicing. • Replace the toner cartridge. • Call for more information. 90 exits to...


