User Guide
Page 7
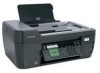
... cartridges. Additional setup and instructions for reuse or recycling through the Lexmark Cartridge Collection Program. For updates, check our Web site at www.lexmark.com/publications/. These features clean the printhead nozzles to www.lexmark.com/recycle. To read the Lexmark Environmental Sustainability Report, see www.lexmark.com/environment. Initial setup instructions: • Connecting the printer •...
... cartridges. Additional setup and instructions for reuse or recycling through the Lexmark Cartridge Collection Program. For updates, check our Web site at www.lexmark.com/publications/. These features clean the printhead nozzles to www.lexmark.com/recycle. To read the Lexmark Environmental Sustainability Report, see www.lexmark.com/environment. Initial setup instructions: • Connecting the printer •...

User Guide
Page 23
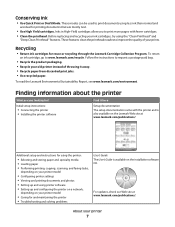
Lexmark Printer Utility (referred to as Wireless Setup Assistant) Note: Your printer may not come with cartridge installation. • Print a test page. • Print an alignment page. • Clean the printhead nozzles. • Order ink or supplies. • Register the printer. • Contact technical support. For Macintosh users 1 From... the list. 3 Select Printer Home. 4 Choose your printer from a memory device to the computer over a network. Use the To Lexmark Network Card Reader (referred to as Network Card Reader) • View the contents of the printer that you purchased...
Lexmark Printer Utility (referred to as Wireless Setup Assistant) Note: Your printer may not come with cartridge installation. • Print a test page. • Print an alignment page. • Clean the printhead nozzles. • Order ink or supplies. • Register the printer. • Contact technical support. For Macintosh users 1 From... the list. 3 Select Printer Home. 4 Choose your printer from a memory device to the computer over a network. Use the To Lexmark Network Card Reader (referred to as Network Card Reader) • View the contents of the printer that you purchased...
User Guide
Page 113
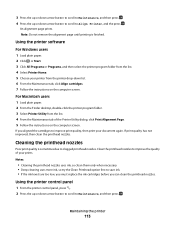
... then select the printer program folder from the printer drop-down arrow button to scroll to Align Printer, and the press . Cleaning the printhead nozzles Poor print quality is finished. 3 Press the up or down arrow button to scroll to Maintenance, and then press .... Utility dialog, click Print Alignment Page. 5 Follow the instructions on the computer screen. An alignment page prints. Clean the printhead nozzles to clogged printhead nozzles. If you can clean the printhead nozzles. Using the printer control panel 1 From the printer control panel, press . 2 Press the up or ...
... then select the printer program folder from the printer drop-down arrow button to scroll to Align Printer, and the press . Cleaning the printhead nozzles Poor print quality is finished. 3 Press the up or down arrow button to scroll to Maintenance, and then press .... Utility dialog, click Print Alignment Page. 5 Follow the instructions on the computer screen. An alignment page prints. Clean the printhead nozzles to clogged printhead nozzles. If you can clean the printhead nozzles. Using the printer control panel 1 From the printer control panel, press . 2 Press the up or ...
User Guide
Page 114
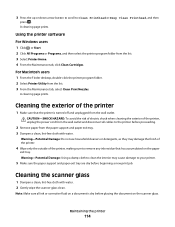
... the printer, unplug the power cord from the wall outlet. CAUTION-SHOCK HAZARD: To avoid the risk of electric shock when cleaning the exterior of the printer, making sure to the printer before placing the document on the scanner glass. Note: Make sure ... the list. 3 Select Printer Home. 4 From the Maintenance tab, click Clean Cartridges. Warning-Potential Damage: Do not use household cleaners or detergents, as they may cause damage to Clean Printhead or Deep Clean Printhead, and then press . Cleaning the exterior of the printer 1 Make sure that has accumulated on a document...
... the printer, unplug the power cord from the wall outlet. CAUTION-SHOCK HAZARD: To avoid the risk of electric shock when cleaning the exterior of the printer, making sure to the printer before placing the document on the scanner glass. Note: Make sure ... the list. 3 Select Printer Home. 4 From the Maintenance tab, click Clean Cartridges. Warning-Potential Damage: Do not use household cleaners or detergents, as they may cause damage to Clean Printhead or Deep Clean Printhead, and then press . Cleaning the exterior of the printer 1 Make sure that has accumulated on a document...
User Guide
Page 117
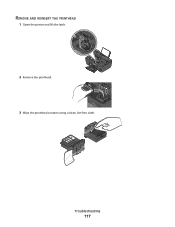
REMOVE AND REINSERT THE PRINTHEAD 1 Open the printer and lift the latch. 2 WI F I PRINTING 2 Remove the printhead. 3 Wipe the printhead contacts using a clean, lint-free cloth. Troubleshooting 117
REMOVE AND REINSERT THE PRINTHEAD 1 Open the printer and lift the latch. 2 WI F I PRINTING 2 Remove the printhead. 3 Wipe the printhead contacts using a clean, lint-free cloth. Troubleshooting 117

User Guide
Page 119
... paper. 3 From the printer control panel, press . 4 Press the arrow buttons to scroll to fit, make sure the printhead is marked with a USB symbol. REINSTALL THE INK CARTRIDGES AND DEEP CLEAN AND ALIGN THE PRINTHEAD 1 Reinstall the ink cartridges, see "Replacing ink cartridges" on the printer. 3 Close the printer. If the cartridges do...
... paper. 3 From the printer control panel, press . 4 Press the arrow buttons to scroll to fit, make sure the printhead is marked with a USB symbol. REINSTALL THE INK CARTRIDGES AND DEEP CLEAN AND ALIGN THE PRINTHEAD 1 Reinstall the ink cartridges, see "Replacing ink cartridges" on the printer. 3 Close the printer. If the cartridges do...
User Guide
Page 120
An alignment page prints. Troubleshooting 120 A cleaning page prints. 6 Press the arrow buttons to scroll to print, then the computer and printer may not be communicating. Cannot delete documents from the print ... the wall outlet, and then wait 10 seconds. 2 Insert the power cord into the wall outlet, and then turn on the printer. Press to Deep Clean Printhead, and then press . Note: Do not remove the alignment page until printing is marked with a USB symbol. RESTART THE COMPUTER AND TRY AGAIN Cannot print...
An alignment page prints. Troubleshooting 120 A cleaning page prints. 6 Press the arrow buttons to scroll to print, then the computer and printer may not be communicating. Cannot delete documents from the print ... the wall outlet, and then wait 10 seconds. 2 Insert the power cord into the wall outlet, and then turn on the printer. Press to Deep Clean Printhead, and then press . Note: Do not remove the alignment page until printing is marked with a USB symbol. RESTART THE COMPUTER AND TRY AGAIN Cannot print...

User Guide
Page 125
... FROM THE PRINTER SOFTWARE Troubleshooting 125 SELECT A HIGHER PRINT QUALITY FROM THE PRINTER SOFTWARE MAKE SURE THE INK CARTRIDGES ARE PROPERLY INSTALLED ALIGN THE PRINTHEAD CLEAN OR DEEP CLEAN THE PRINTHEAD NOZZLES Note: If these solutions do not remove the streaks or lines on a 4 x 6 photo card, then choose US 4 x 6 in the name. For Macintosh...
... FROM THE PRINTER SOFTWARE Troubleshooting 125 SELECT A HIGHER PRINT QUALITY FROM THE PRINTER SOFTWARE MAKE SURE THE INK CARTRIDGES ARE PROPERLY INSTALLED ALIGN THE PRINTHEAD CLEAN OR DEEP CLEAN THE PRINTHEAD NOZZLES Note: If these solutions do not remove the streaks or lines on a 4 x 6 photo card, then choose US 4 x 6 in the name. For Macintosh...
User Guide
Page 171
...buttons, printer control panel 2-sided/Eco-Mode 17 Address Book 16 Back 15 Cancel 17 Color/Black 16 Copy 15 Dialtone 16 Display 16 Fax 15 Keypad 17 Photo 15 Power 15...computer over a network 128 cannot send faxes 129 cartridges, ink ordering 12 using genuine Lexmark 12 changing Power Saver timeout 18 changing printing mode 50 changing temporary settings into default ...fax troubleshooting 128 memory card troubleshooting 135 choosing a splitter, faxing 82 cleaning exterior of the printer 114 cleaning printhead nozzles 113 Club Internet 92 collating copies 55 Communication not available message 149...
...buttons, printer control panel 2-sided/Eco-Mode 17 Address Book 16 Back 15 Cancel 17 Color/Black 16 Copy 15 Dialtone 16 Display 16 Fax 15 Keypad 17 Photo 15 Power 15...computer over a network 128 cannot send faxes 129 cartridges, ink ordering 12 using genuine Lexmark 12 changing Power Saver timeout 18 changing printing mode 50 changing temporary settings into default ...fax troubleshooting 128 memory card troubleshooting 135 choosing a splitter, faxing 82 cleaning exterior of the printer 114 cleaning printhead nozzles 113 Club Internet 92 collating copies 55 Communication not available message 149...
User Guide
Page 175
... 119 printer problems, basic solutions 115 printer software installing 25 uninstalling 24 printer, setting as default 49 printhead aligning 112 printhead access 10 printhead error 116 printhead nozzles cleaning 113 printing collate 32 custom-size paper 36 documents 31 documents from memory card or flash drive 34 ...110 publications finding 7 R received history report 87 receiving faxes Auto Answer setting 81 automatically 81 manually 81 tips 81 recycling 6 Lexmark products 14 WEEE statement 158 redial attempts, fax setting 77 redial time, fax setting 77 reducing an image 54 registering fax user...
... 119 printer problems, basic solutions 115 printer software installing 25 uninstalling 24 printer, setting as default 49 printhead aligning 112 printhead access 10 printhead error 116 printhead nozzles cleaning 113 printing collate 32 custom-size paper 36 documents 31 documents from memory card or flash drive 34 ...110 publications finding 7 R received history report 87 receiving faxes Auto Answer setting 81 automatically 81 manually 81 tips 81 recycling 6 Lexmark products 14 WEEE statement 158 redial attempts, fax setting 77 redial time, fax setting 77 reducing an image 54 registering fax user...


