User Guide
Page 2
... cartridges...12 Replacing ink cartridges...13 Ordering paper and other supplies...14 Recycling Lexmark products...14 Using the printer control panel buttons and menus 15 Using the printer control panel...15 Changing temporary settings into new default settings 17 Changing the Power Saver timeout...18 Saving paper and energy with Eco-Mode...19...
... cartridges...12 Replacing ink cartridges...13 Ordering paper and other supplies...14 Recycling Lexmark products...14 Using the printer control panel buttons and menus 15 Using the printer control panel...15 Changing temporary settings into new default settings 17 Changing the Power Saver timeout...18 Saving paper and energy with Eco-Mode...19...
User Guide
Page 3
......53 Copying a two-sided document...54 Enlarging or reducing images...54 Adjusting copy quality...55 Making a copy lighter or darker...55 Collating copies using the printer control panel...55 Repeating an image on one page...56 Copying multiple pages on one sheet ...56 Making a duplex copy...56 Canceling copy jobs...57... drive or memory card...59 Scanning photos into an editing application...59 Scanning documents into an editing application 61 Scanning directly to e-mail using the printer software 61 Scanning to a PDF...62 Scanning FAQ...63 Canceling scan jobs...64 Faxing 65 Setting up the...
......53 Copying a two-sided document...54 Enlarging or reducing images...54 Adjusting copy quality...55 Making a copy lighter or darker...55 Collating copies using the printer control panel...55 Repeating an image on one page...56 Copying multiple pages on one sheet ...56 Making a duplex copy...56 Canceling copy jobs...57... drive or memory card...59 Scanning photos into an editing application...59 Scanning documents into an editing application 61 Scanning directly to e-mail using the printer software 61 Scanning to a PDF...62 Scanning FAQ...63 Canceling scan jobs...64 Faxing 65 Setting up the...
User Guide
Page 4
...79 Receiving faxes...81 Faxing FAQ...82 Networking 89 Installing the printer on a wireless network...89 Advanced wireless setup...94 Networking FAQ...101 Maintaining the printer 112 Maintaining ink cartridges...112 Cleaning the exterior of the printer...114 Cleaning the scanner glass...114 Troubleshooting 115 Before you ...troubleshoot...115 Using the Service Center to solve printer problems 115 If Troubleshooting does not solve your problem 115 Setup troubleshooting...115 Jams and misfeeds troubleshooting...121 Print ...
...79 Receiving faxes...81 Faxing FAQ...82 Networking 89 Installing the printer on a wireless network...89 Advanced wireless setup...94 Networking FAQ...101 Maintaining the printer 112 Maintaining ink cartridges...112 Cleaning the exterior of the printer...114 Cleaning the scanner glass...114 Troubleshooting 115 Before you ...troubleshoot...115 Using the Service Center to solve printer problems 115 If Troubleshooting does not solve your problem 115 Setup troubleshooting...115 Jams and misfeeds troubleshooting...121 Print ...
User Guide
Page 5
The safety features of the printer, unplug the power cord from the wall outlet and disconnect all cables from the electrical outlet before proceeding. CAUTION-POTENTIAL INJURY: Do not cut, twist, ..., or telephone, during a lightning storm. To avoid injury, use caution when accessing this area for signs of such problems. Remove the power cord from the printer before inspecting it. Do not subject the power cord to a professional service person. If any electrical or cabling connections, such as furniture and walls. Safety...
The safety features of the printer, unplug the power cord from the wall outlet and disconnect all cables from the electrical outlet before proceeding. CAUTION-POTENTIAL INJURY: Do not cut, twist, ..., or telephone, during a lightning storm. To avoid injury, use caution when accessing this area for signs of such problems. Remove the power cord from the printer before inspecting it. Do not subject the power cord to a professional service person. If any electrical or cabling connections, such as furniture and walls. Safety...
User Guide
Page 6
...The "Pages per sheet" feature allows you to print multiple pages on both sides of the paper. About your printer Thank you for choosing this feature sets the printer to automatically print on both sides of the paper (duplex) for copy and fax jobs, and for printing in ...carefully, and make sure you to make sure it better. The Power Saver feature puts the printer in Toolbars, the Print or Print Preview dialog, or the printer display (depending on your printer 6 Wireless/network printers allow you 're satisfied. You can scan documents or photographs and save . Duplexing lets you...
...The "Pages per sheet" feature allows you to print multiple pages on both sides of the paper. About your printer Thank you for choosing this feature sets the printer to automatically print on both sides of the paper (duplex) for copy and fax jobs, and for printing in ...carefully, and make sure you to make sure it better. The Power Saver feature puts the printer in Toolbars, the Print or Print Preview dialog, or the printer display (depending on your printer 6 Wireless/network printers allow you 're satisfied. You can scan documents or photographs and save . Duplexing lets you...
User Guide
Page 7
.... Inks in High-Yield cartridges allow you looking for reuse or recycling through the Lexmark Cartridge Collection Program. Recycling • Return ink cartridges for ? For updates, check our Web site at www.lexmark.com/publications/. Finding information about the printer What are mostly text. • Use High Yield cartridges. About your prints. These...
.... Inks in High-Yield cartridges allow you looking for reuse or recycling through the Lexmark Cartridge Collection Program. Recycling • Return ink cartridges for ? For updates, check our Web site at www.lexmark.com/publications/. Finding information about the printer What are mostly text. • Use High Yield cartridges. About your prints. These...
User Guide
Page 8
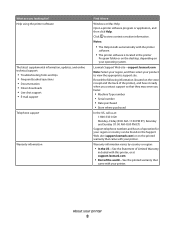
...-sensitive information. About your region or country can be found on the Support Web site (support.lexmark.com) or on the printed warranty that they may serve you looking for your printer 8 What are you faster: • Machine Type number • Serial number • Date... purchased • Store where purchased In the US, call us at support.lexmark.com. • Rest of the world-See the printed warranty that came with your printer. Help using the printer software The latest supplemental information, updates, and online technical support: • Troubleshooting hints and...
...-sensitive information. About your region or country can be found on the Support Web site (support.lexmark.com) or on the printed warranty that they may serve you looking for your printer 8 What are you faster: • Machine Type number • Serial number • Date... purchased • Store where purchased In the US, call us at support.lexmark.com. • Rest of the world-See the printed warranty that came with your printer. Help using the printer software The latest supplemental information, updates, and online technical support: • Troubleshooting hints and...
User Guide
Page 9
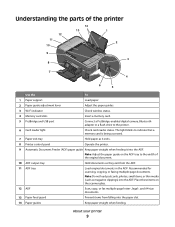
... load postcards, photos, small items, or thin media (such as they exit from falling into the ADF. About your printer 9 Place these items on the ADF tray to the width of the printer 12 11 10 14 13 1 2 9 8 W I F I PRINTING 3 7 WI F I PRINTING 4 6 5 Use the To 1 Paper support Load ... or a flash drive to indicate that a memory card is being accessed. 7 Paper exit tray Hold paper as it exits. 8 Printer control panel Operate the printer. 9 Automatic Document Feeder (ADF) paper guide Keep paper straight when feeding it into the paper slot. 14 Paper guides Keep paper ...
... load postcards, photos, small items, or thin media (such as they exit from falling into the ADF. About your printer 9 Place these items on the ADF tray to the width of the printer 12 11 10 14 13 1 2 9 8 W I F I PRINTING 3 7 WI F I PRINTING 4 6 5 Use the To 1 Paper support Load ... or a flash drive to indicate that a memory card is being accessed. 7 Paper exit tray Hold paper as it exits. 8 Printer control panel Operate the printer. 9 Automatic Document Feeder (ADF) paper guide Keep paper straight when feeding it into the paper slot. 14 Paper guides Keep paper ...

User Guide
Page 10
...copy photos and documents. 3 Power supply with port Connect the printer to a power source. 4 Duplex unit • Print on the printer. Install the printhead. LINE 7 USB port 8 Printhead access 9 Ink cartridge access Connect the printer to the printer and the telephone line. Note: The carrier moves to send ...and receive faxes. Note: Remove the plug to access the port. 6 LINE Port Connect the printer to an active telephone line (through a standard wall jack, DSL filter, or VoIP adapter) to the printhead access area when a printhead is...
...copy photos and documents. 3 Power supply with port Connect the printer to a power source. 4 Duplex unit • Print on the printer. Install the printhead. LINE 7 USB port 8 Printhead access 9 Ink cartridge access Connect the printer to the printer and the telephone line. Note: The carrier moves to send ...and receive faxes. Note: Remove the plug to access the port. 6 LINE Port Connect the printer to an active telephone line (through a standard wall jack, DSL filter, or VoIP adapter) to the printhead access area when a printhead is...

User Guide
Page 11
Use the 10 Scanner unit To • Access the ink cartridges and printhead. • Remove paper jams. About your printer 11
Use the 10 Scanner unit To • Access the ink cartridges and printhead. • Remove paper jams. About your printer 11
User Guide
Page 12
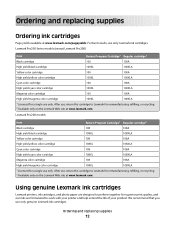
... this cartridge to work with your printer and help extend the life of your product. Ordering and replacing supplies Ordering ink cartridges Page yields available at www.lexmark.com. Lexmark Pro200 Series models (except Lexmark Pro208) Item Black cartridge High yield black cartridge Yellow color cartridge High yield yellow color cartridge Return Program Cartridge1 Regular cartridge2...
... this cartridge to work with your printer and help extend the life of your product. Ordering and replacing supplies Ordering ink cartridges Page yields available at www.lexmark.com. Lexmark Pro200 Series models (except Lexmark Pro208) Item Black cartridge High yield black cartridge Yellow color cartridge High yield yellow color cartridge Return Program Cartridge1 Regular cartridge2...
User Guide
Page 13
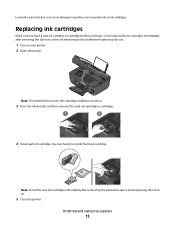
...new ink cartridges immediately after removing the old ones or the ink remaining in the printhead nozzles may dry out. 1 Turn on your printer. 2 Open the printer. WI F I PRINTING Note: The printhead moves to the cartridge installation position. 3 Press the release tab, and then remove the... used ink cartridge or cartridges. 4 Install each ink cartridge. Replacing ink cartridges Make sure you have a new ink cartridge or cartridges before you begin. Lexmark's...
...new ink cartridges immediately after removing the old ones or the ink remaining in the printhead nozzles may dry out. 1 Turn on your printer. 2 Open the printer. WI F I PRINTING Note: The printhead moves to the cartridge installation position. 3 Press the release tab, and then remove the... used ink cartridge or cartridges. 4 Install each ink cartridge. Replacing ink cartridges Make sure you have a new ink cartridge or cartridges before you begin. Lexmark's...
User Guide
Page 15
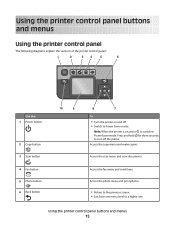
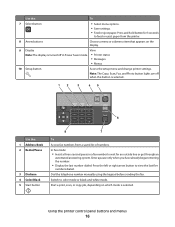
... button 2 Copy button 3 Scan button 4 Fax button 5 Photo button 6 Back button 10 9 8 7 To • Turn the printer on , press to switch to Power Saver mode. Note: When the printer is on and off the printer. Using the printer control panel buttons and menus 15 Access the fax menu and send faxes. Access the scan...
... button 2 Copy button 3 Scan button 4 Fax button 5 Photo button 6 Back button 10 9 8 7 To • Turn the printer on , press to switch to Power Saver mode. Note: When the printer is on and off the printer. Using the printer control panel buttons and menus 15 Access the fax menu and send faxes. Access the scan...
User Guide
Page 16
...8226; Save settings. • Feed or eject paper. Press the left or right arrow button to wait for 3 seconds to color mode or black-and-white mode. Using the printer control panel buttons and menus 16 Dial the telephone number manually using the keypad before sending the fax. Note: The Copy..., Fax, and Photo button lights are off in a fax number to view the last five numbers dialed. Switch to feed or eject paper from the printer. 8 Arrow buttons Choose a menu or submenu item that appears on which mode is selected.. 12 3 45 Eco-Mode Cancel 6 Use the: 1 Address Book ...
...8226; Save settings. • Feed or eject paper. Press the left or right arrow button to wait for 3 seconds to color mode or black-and-white mode. Using the printer control panel buttons and menus 16 Dial the telephone number manually using the keypad before sending the fax. Note: The Copy..., Fax, and Photo button lights are off in a fax number to view the last five numbers dialed. Switch to feed or eject paper from the printer. 8 Arrow buttons Choose a menu or submenu item that appears on which mode is selected.. 12 3 45 Eco-Mode Cancel 6 Use the: 1 Address Book ...
User Guide
Page 17
...8226; Original Size • Copies per Sheet • Content Type • Quality • Original Size • Lighter/Darker • Quality Using the printer control panel buttons and menus 17 In Fax mode: • Enter fax numbers. • Navigate an automated answering system. • Select letters when ...6 2-Sided/Eco-Mode Activate 2-Sided to: • Print on both sides of the paper (duplex). • Change to Power Saver mode after the printer is left idle for ten minutes. • Set screen brightness to low. 7 Cancel button • Cancel a print, copy, scan, or fax job...
...8226; Original Size • Copies per Sheet • Content Type • Quality • Original Size • Lighter/Darker • Quality Using the printer control panel buttons and menus 17 In Fax mode: • Enter fax numbers. • Navigate an automated answering system. • Select letters when ...6 2-Sided/Eco-Mode Activate 2-Sided to: • Print on both sides of the paper (duplex). • Change to Power Saver mode after the printer is left idle for ten minutes. • Set screen brightness to low. 7 Cancel button • Cancel a print, copy, scan, or fax job...
User Guide
Page 18
... the default settings after two minutes of inactivity or after the printer is turned off the printer, but they will return to the factory default settings when a memory card or flash drive is removed. • Layout • Colorized Effect • Photo Size • Quality To change the ...temporary settings into new default settings 1 From the printer control panel, press . 2 Press the up or down arrow button to scroll to Defaults,...
... the default settings after two minutes of inactivity or after the printer is turned off the printer, but they will return to the factory default settings when a memory card or flash drive is removed. • Layout • Colorized Effect • Photo Size • Quality To change the ...temporary settings into new default settings 1 From the printer control panel, press . 2 Press the up or down arrow button to scroll to Defaults,...
User Guide
Page 19
... printing in the Setup menu, then press and hold and , and then press and release to Power Saver mode after ten minutes. • The printer prints on . Initial Setup Complete appears on the display. Saving paper and energy with Eco-Mode The Eco-Mode feature significantly cuts paper usage, reduces.... 4 Press the up or down arrow button to scroll to Use Factory, and then press . 5 When prompted to set the initial settings of your printer, make your selections using Eco-Mode, then the Eco-Mode settings override any changes you have set the Power Saver timeout in Windows and Mac...
... printing in the Setup menu, then press and hold and , and then press and release to Power Saver mode after ten minutes. • The printer prints on . Initial Setup Complete appears on the display. Saving paper and energy with Eco-Mode The Eco-Mode feature significantly cuts paper usage, reduces.... 4 Press the up or down arrow button to scroll to Use Factory, and then press . 5 When prompted to set the initial settings of your printer, make your selections using Eco-Mode, then the Eco-Mode settings override any changes you have set the Power Saver timeout in Windows and Mac...
User Guide
Page 20
... • Linux Fedora 10 (Web only)1 1 The printer driver for this operating system is available only at support.lexmark.com. Using the printer software Minimum system requirements The printer software requires up the printer using the installation software CD, all the necessary software was ...installed. Using the Windows printer software Software installed during initial ...
... • Linux Fedora 10 (Web only)1 1 The printer driver for this operating system is available only at support.lexmark.com. Using the printer software Minimum system requirements The printer software requires up the printer using the installation software CD, all the necessary software was ...installed. Using the Windows printer software Software installed during initial ...
User Guide
Page 21
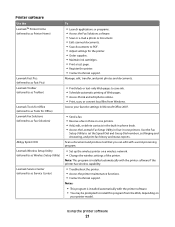
... contacts in the built-in phone book. • Access the Lexmark Fax Setup Utility in four-in-one printers. Access your printer model. Printer software Use the LexmarkTM Printer Home (referred to as Printer Home) Lexmark Fast Pics (referred to as Fast Pics) Lexmark Toolbar (referred to as Toolbar) Lexmark Tools for Office (referred to as Tools for the...
... contacts in the built-in phone book. • Access the Lexmark Fax Setup Utility in four-in-one printers. Access your printer model. Printer software Use the LexmarkTM Printer Home (referred to as Printer Home) Lexmark Fast Pics (referred to as Fast Pics) Lexmark Toolbar (referred to as Toolbar) Lexmark Tools for Office (referred to as Tools for the...
User Guide
Page 22
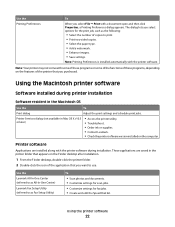
... dialog lets you purchased. These applications are installed along with the printer software during printer installation Software resident in Mac OS X v10.5 or later) • Access the printer utility. • Troubleshoot. • Order ink or supplies. • Contact Lexmark. • Check the printer software version installed on the features of the application that you select...
... dialog lets you purchased. These applications are installed along with the printer software during printer installation Software resident in Mac OS X v10.5 or later) • Access the printer utility. • Troubleshoot. • Order ink or supplies. • Contact Lexmark. • Check the printer software version installed on the features of the application that you select...


