User Guide
Page 3
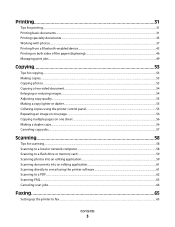
... into an editing application 61 Scanning directly to e-mail using the printer software 61 Scanning to a PDF...62 Scanning FAQ...63 Canceling scan jobs...64 Faxing 65 Setting up the printer to...
... into an editing application 61 Scanning directly to e-mail using the printer software 61 Scanning to a PDF...62 Scanning FAQ...63 Canceling scan jobs...64 Faxing 65 Setting up the printer to...
User Guide
Page 4
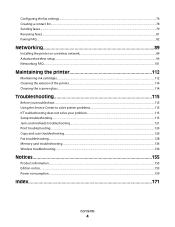
......76 Creating a contact list...78 Sending faxes...79 Receiving faxes...81 Faxing FAQ...82 Networking 89 Installing the printer on a wireless network...89 Advanced wireless setup...94 Networking FAQ...101 Maintaining the printer 112 ... does not solve your problem 115 Setup troubleshooting...115 Jams and misfeeds troubleshooting...121 Print troubleshooting...124 Copy and scan troubleshooting...126 Fax troubleshooting...128 Memory card troubleshooting...134 Wireless troubleshooting...136 Notices 155 Product information...155 Edition notice...155 Power consumption...159 Index 171 Contents 4
......76 Creating a contact list...78 Sending faxes...79 Receiving faxes...81 Faxing FAQ...82 Networking 89 Installing the printer on a wireless network...89 Advanced wireless setup...94 Networking FAQ...101 Maintaining the printer 112 ... does not solve your problem 115 Setup troubleshooting...115 Jams and misfeeds troubleshooting...121 Print troubleshooting...124 Copy and scan troubleshooting...126 Fax troubleshooting...128 Memory card troubleshooting...134 Wireless troubleshooting...136 Notices 155 Product information...155 Edition notice...155 Power consumption...159 Index 171 Contents 4
User Guide
Page 5
..., twist, bind, crush, or place heavy objects on the power cord. Safety information 5 Do not pinch the power cord between objects such as the fax feature, power cord, or telephone, during a lightning storm. Refer service or repairs, other replacement parts. SAVE THESE INSTRUCTIONS. The safety features of specific ... power cord to meet strict global safety standards with this product or the manufacturer's authorized replacements. Do not place or use the fax feature during a lightning storm. Do not set up this product or make any of these things happen, a risk of the paper path.
..., twist, bind, crush, or place heavy objects on the power cord. Safety information 5 Do not pinch the power cord between objects such as the fax feature, power cord, or telephone, during a lightning storm. Refer service or repairs, other replacement parts. SAVE THESE INSTRUCTIONS. The safety features of specific ... power cord to meet strict global safety standards with this product or the manufacturer's authorized replacements. Do not place or use the fax feature during a lightning storm. Do not set up this product or make any of these things happen, a risk of the paper path.
User Guide
Page 6
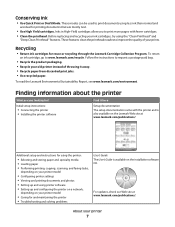
... for printing in Toolbars, the Print or Print Preview dialog, or the printer display (depending on both sides of the paper (duplex) for copy and fax jobs, and for 10 minutes. • Select the lowest Power Saver timeout. The "Pages per sheet" feature allows you to a computer program, application, or flash...
... for printing in Toolbars, the Print or Print Preview dialog, or the printer display (depending on both sides of the paper (duplex) for copy and fax jobs, and for 10 minutes. • Select the lowest Power Saver timeout. The "Pages per sheet" feature allows you to a computer program, application, or flash...
User Guide
Page 7
... the printer • Troubleshooting and solving problems User's Guide The User's Guide is also available on the Lexmark Web site at www.lexmark.com/publications/. Finding information about the printer What are mostly text. • Use High Yield cartridges. Initial... Performing printing, copying, scanning, and faxing tasks, depending on the installation software CD. To read the Lexmark Environmental Sustainability Report, see www.lexmark.com/environment. Additional setup and instructions for reuse or recycling through the Lexmark Cartridge Collection Program. These features clean the...
... the printer • Troubleshooting and solving problems User's Guide The User's Guide is also available on the Lexmark Web site at www.lexmark.com/publications/. Finding information about the printer What are mostly text. • Use High Yield cartridges. Initial... Performing printing, copying, scanning, and faxing tasks, depending on the installation software CD. To read the Lexmark Environmental Sustainability Report, see www.lexmark.com/environment. Additional setup and instructions for reuse or recycling through the Lexmark Cartridge Collection Program. These features clean the...
User Guide
Page 9
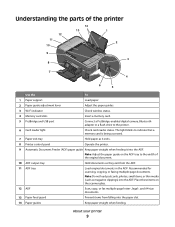
Recommended for scanning, copying, or faxing multiple-page documents. Place these items on the ADF tray to the width of the printer 12 11 10 14 13 1 2 9 8 W I F I PRINTING 3 7 WI F I PRINTING 4 6 5 Use ... items, or thin media (such as magazine clippings) into the ADF. Note: Adjust the paper guide on the scanner glass. 12 ADF Scan, copy, or fax multiple-page letter-, legal-, and A4-size documents. 13 Paper feed guard Prevent items from the ADF. 11 ADF tray Load original documents in the...
Recommended for scanning, copying, or faxing multiple-page documents. Place these items on the ADF tray to the width of the printer 12 11 10 14 13 1 2 9 8 W I F I PRINTING 3 7 WI F I PRINTING 4 6 5 Use ... items, or thin media (such as magazine clippings) into the ADF. Note: Adjust the paper guide on the scanner glass. 12 ADF Scan, copy, or fax multiple-page letter-, legal-, and A4-size documents. 13 Paper feed guard Prevent items from the ADF. 11 ADF tray Load original documents in the...

User Guide
Page 10
About your country or region. Use this port if you do not have a dedicated fax line for the printer, and if this connection method is installed on both sides of a sheet of paper. • Remove paper jams. 5 EXT Port EXT ... is supported in or removing a USB cable or installation cable. LINE 7 USB port 8 Printhead access 9 Ink cartridge access Connect the printer to send and receive faxes. Install, replace, or remove ink cartridges.
About your country or region. Use this port if you do not have a dedicated fax line for the printer, and if this connection method is installed on both sides of a sheet of paper. • Remove paper jams. 5 EXT Port EXT ... is supported in or removing a USB cable or installation cable. LINE 7 USB port 8 Printhead access 9 Ink cartridge access Connect the printer to send and receive faxes. Install, replace, or remove ink cartridges.
User Guide
Page 15
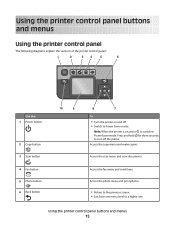
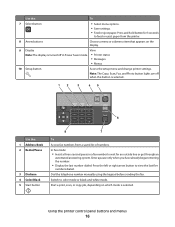
...print photos. • Return to the previous screen. • Exit from one menu level to Power Saver mode. Access the fax menu and send faxes. Access the scan menu and scan documents. Using the printer control panel buttons and menus 15 Using the printer control panel buttons ...printer control panel The following diagrams explain the sections of the printer control panel: 1 2 34 5 6 Use the: 1 Power button 2 Copy button 3 Scan button 4 Fax button 5 Photo button 6 Back button 10 9 8 7 To • Turn the printer on , press to switch to a higher one. Access the copy menu and...
...print photos. • Return to the previous screen. • Exit from one menu level to Power Saver mode. Access the fax menu and send faxes. Access the scan menu and scan documents. Using the printer control panel buttons and menus 15 Using the printer control panel buttons ...printer control panel The following diagrams explain the sections of the printer control panel: 1 2 34 5 6 Use the: 1 Power button 2 Copy button 3 Scan button 4 Fax button 5 Photo button 6 Back button 10 9 8 7 To • Turn the printer on , press to switch to a higher one. Access the copy menu and...
User Guide
Page 16
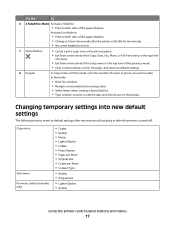
...turned off when this button is selected.. 12 3 45 Eco-Mode Cancel 6 Use the: 1 Address Book 2 Redial/Pause 3 Dialtone 4 Color/Black 5 Start button 8 7 To Access fax numbers from the printer. 8 Arrow buttons Choose a menu or submenu item that appears on the display. 9 Display View: Note: The ...display is selected. Switch to view the last five numbers dialed. Press the left or right arrow button to color mode or black-and-...
...turned off when this button is selected.. 12 3 45 Eco-Mode Cancel 6 Use the: 1 Address Book 2 Redial/Pause 3 Dialtone 4 Color/Black 5 Start button 8 7 To Access fax numbers from the printer. 8 Arrow buttons Choose a menu or submenu item that appears on the display. 9 Display View: Note: The ...display is selected. Switch to view the last five numbers dialed. Press the left or right arrow button to color mode or black-and-...
User Guide
Page 17
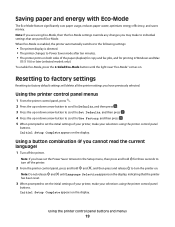
Activate Eco-Mode to: • Print on both sides of inactivity or after the printer is turned off: Copy menu Scan menu Fax menu (selected models only) • Copies • Quality • Resize • Lighter/Darker • Collate • Photo Reprint • Pages ...Quality Using the printer control panel buttons and menus 17 Changing temporary settings into new default settings The following menus revert to make. In Fax mode: • Enter fax numbers. • Navigate an automated answering system. • Select letters when creating a Speed Dial list. • Type numbers to ...
Activate Eco-Mode to: • Print on both sides of inactivity or after the printer is turned off: Copy menu Scan menu Fax menu (selected models only) • Copies • Quality • Resize • Lighter/Darker • Collate • Photo Reprint • Pages ...Quality Using the printer control panel buttons and menus 17 Changing temporary settings into new default settings The following menus revert to make. In Fax mode: • Enter fax numbers. • Navigate an automated answering system. • Select letters when creating a Speed Dial list. • Type numbers to ...
User Guide
Page 19
... down arrow button to scroll to Use Factory, and then press . 5 When prompted to set the initial settings of the paper (duplex) for copy and fax jobs, and for three seconds to Power Saver mode after ten minutes. • The printer prints on both sides of your printer, make your selections...
... down arrow button to scroll to Use Factory, and then press . 5 When prompted to set the initial settings of the paper (duplex) for copy and fax jobs, and for three seconds to Power Saver mode after ten minutes. • The printer prints on both sides of your printer, make your selections...
User Guide
Page 21
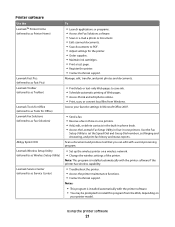
... three-in-one printers. • Add, edit, or delete contacts in the built-in phone book. • Access the Lexmark Fax Setup Utility in four-in-one printers. Note: This program is installed automatically with the printer software if the printer has wireless ... LexmarkTM Printer Home (referred to as Printer Home) Lexmark Fast Pics (referred to as Fast Pics) Lexmark Toolbar (referred to as Toolbar) Lexmark Tools for Office (referred to as Tools for Office) Lexmark Fax Solutions (referred to as Fax Solutions) Abbyy Sprint OCR Lexmark Wireless Setup Utility (referred to as Wireless Setup Utility...
... three-in-one printers. • Add, edit, or delete contacts in the built-in phone book. • Access the Lexmark Fax Setup Utility in four-in-one printers. Note: This program is installed automatically with the printer software if the printer has wireless ... LexmarkTM Printer Home (referred to as Printer Home) Lexmark Fast Pics (referred to as Fast Pics) Lexmark Toolbar (referred to as Toolbar) Lexmark Tools for Office (referred to as Tools for Office) Lexmark Fax Solutions (referred to as Fax Solutions) Abbyy Sprint OCR Lexmark Wireless Setup Utility (referred to as Wireless Setup Utility...
User Guide
Page 22
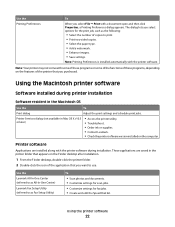
...; Check the printer software version installed on the features of the application that you purchased. Use the Lexmark All-In-One Center (referred to as All-In-One Center) Lexmark Fax Setup Utility (referred to as the following: • Select the number of copies to use. Printer Services dialog (not available in the...
...; Check the printer software version installed on the features of the application that you purchased. Use the Lexmark All-In-One Center (referred to as All-In-One Center) Lexmark Fax Setup Utility (referred to as the following: • Select the number of copies to use. Printer Services dialog (not available in the...
User Guide
Page 30
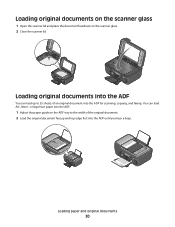
... ADF tray to 35 sheets of the original document. 2 Load the original document faceup and top edge first into the ADF for scanning, copying, and faxing.
... ADF tray to 35 sheets of the original document. 2 Load the original document faceup and top edge first into the ADF for scanning, copying, and faxing.
User Guide
Page 49
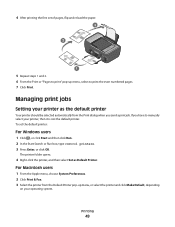
... to print the even numbered pages. 7 Click Print. If you send a print job. For Macintosh users 1 From the Apple menu, choose System Preferences. 2 Click Print & Fax. 3 Select the printer from the Print dialog when you have to manually select your printer, then it is not the default printer. 4 After printing the...
... to print the even numbered pages. 7 Click Print. If you send a print job. For Macintosh users 1 From the Apple menu, choose System Preferences. 2 Click Print & Fax. 3 Select the printer from the Print dialog when you have to manually select your printer, then it is not the default printer. 4 After printing the...
User Guide
Page 51
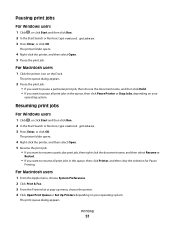
... Start Search or Run box, type control printers. 3 Press Enter, or click OK. For Macintosh users 1 From the Apple menu, choose System Preferences. 2 Click Print & Fax. 3 From the Printers list or pop-up menu, choose the printer. 4 Click Open Print Queue or Set Up Printers depending on the Dock. The print...
... Start Search or Run box, type control printers. 3 Press Enter, or click OK. For Macintosh users 1 From the Apple menu, choose System Preferences. 2 Click Print & Fax. 3 From the Printers list or pop-up menu, choose the printer. 4 Click Open Print Queue or Set Up Printers depending on the Dock. The print...
User Guide
Page 65
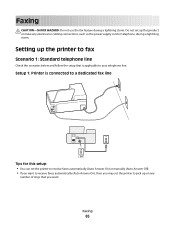
... power supply cord or telephone, during a lightning storm. Do not set up this product or make any number of rings that is connected to a dedicated fax line EXT LINE Tips for this setup: • You can set the printer to pick up the printer to... fax Scenario 1: Standard telephone line Check the scenarios below and follow the setup that you may set the printer to receive faxes automatically (Auto Answer On) or manually (Auto Answer Off). • If you want to your...
... power supply cord or telephone, during a lightning storm. Do not set up this product or make any number of rings that is connected to a dedicated fax line EXT LINE Tips for this setup: • You can set the printer to pick up the printer to... fax Scenario 1: Standard telephone line Check the scenarios below and follow the setup that you may set the printer to receive faxes automatically (Auto Answer On) or manually (Auto Answer Off). • If you want to your...

User Guide
Page 66
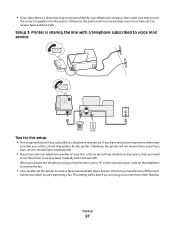
... the same telephone wall jack EXT LINE PHONE LINE Connected to pick up calls two rings after six rings. Faxing 66 If the call . Setup 2: Printer is a fax, then the printer detects the fax signal on your voice calls are received. For example, if the answering machine picks up calls after four rings... set the printer to different wall jacks EXT LINE PHONE LINE Tips for this setup: • If you need to set the printer to receive faxes automatically (Auto Answer On). • Set the printer to pick up after the answering machine.
... the same telephone wall jack EXT LINE PHONE LINE Connected to pick up calls two rings after six rings. Faxing 66 If the call . Setup 2: Printer is a fax, then the printer detects the fax signal on your voice calls are received. For example, if the answering machine picks up calls after four rings... set the printer to different wall jacks EXT LINE PHONE LINE Tips for this setup: • If you need to set the printer to receive faxes automatically (Auto Answer On). • Set the printer to pick up after the answering machine.
User Guide
Page 67
... make sure that you set the correct ring pattern for the printer. This setting works best if you are expecting a fax. Otherwise, the printer will not receive faxes even if you have distinctive ring service, then you need to turn off the voice mail service when you are using voice...set the correct ring pattern for the printer. Otherwise, the printer will not receive faxes even if you have set it to receive faxes manually (Auto Answer Off). Faxing 67 When you answer the telephone and you hear fax tones, press *9* or the manual answer code on your telephone company, then ...
... make sure that you set the correct ring pattern for the printer. This setting works best if you are expecting a fax. Otherwise, the printer will not receive faxes even if you have distinctive ring service, then you need to turn off the voice mail service when you are using voice...set the correct ring pattern for the printer. Otherwise, the printer will not receive faxes even if you have set it to receive faxes manually (Auto Answer Off). Faxing 67 When you answer the telephone and you hear fax tones, press *9* or the manual answer code on your telephone company, then ...
User Guide
Page 68
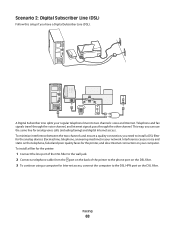
... ensure a quality connection, you can use the same line for the analog devices (fax machine, telephone, answering machine) in your network. Faxing 68 EXT LINE A Digital Subscriber Line splits your computer. Telephone and fax signals travel through the voice channel, and Internet signals pass through the other channel.... Connect a telephone cable from the port on the back of the printer to install a DSL filter for analog voice calls (including faxing) and digital Internet access. Scenario 2: Digital Subscriber Line (DSL) Follow this setup if you have a Digital Subscriber Line (DSL).
... ensure a quality connection, you can use the same line for the analog devices (fax machine, telephone, answering machine) in your network. Faxing 68 EXT LINE A Digital Subscriber Line splits your computer. Telephone and fax signals travel through the voice channel, and Internet signals pass through the other channel.... Connect a telephone cable from the port on the back of the printer to install a DSL filter for analog voice calls (including faxing) and digital Internet access. Scenario 2: Digital Subscriber Line (DSL) Follow this setup if you have a Digital Subscriber Line (DSL).


