User Guide
Page 3
Printing 31 Tips for printing...31 Printing basic documents...31 Printing specialty documents...35 Working with photos...37 Printing from a Bluetooth-enabled device...43 Printing on both sides of the paper (duplexing)...46 Managing print jobs...49 Copying 53 Tips for copying...53 Making copies...53 Copying photos...53 Copying a two-sided document...54 Enlarging or reducing images...
Printing 31 Tips for printing...31 Printing basic documents...31 Printing specialty documents...35 Working with photos...37 Printing from a Bluetooth-enabled device...43 Printing on both sides of the paper (duplexing)...46 Managing print jobs...49 Copying 53 Tips for copying...53 Making copies...53 Copying photos...53 Copying a two-sided document...54 Enlarging or reducing images...
User Guide
Page 4
... Using the Service Center to solve printer problems 115 If Troubleshooting does not solve your problem 115 Setup troubleshooting...115 Jams and misfeeds troubleshooting...121 Print troubleshooting...124 Copy and scan troubleshooting...126 Fax troubleshooting...128 Memory card troubleshooting...134 Wireless troubleshooting...136 Notices 155 Product information...155 Edition notice...155...
... Using the Service Center to solve printer problems 115 If Troubleshooting does not solve your problem 115 Setup troubleshooting...115 Jams and misfeeds troubleshooting...121 Print troubleshooting...124 Copy and scan troubleshooting...126 Fax troubleshooting...128 Memory card troubleshooting...134 Wireless troubleshooting...136 Notices 155 Product information...155 Edition notice...155...
User Guide
Page 6
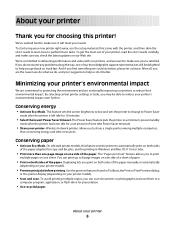
... And if you find something we do, and your suggestions help you get the most out of your printer model). • Preview print jobs before printing. By selecting certain printer settings or tasks, you 're satisfied. This feature sets the screen brightness to low and sets the printer to...meet your needs. After all, you are continually improving our printers to help us know. Duplexing lets you print on both sides of the paper. To avoid printing multiple copies, you can print up to a computer program, application, or flash drive for 10 minutes. • Select the lowest Power ...
... And if you find something we do, and your suggestions help you get the most out of your printer model). • Preview print jobs before printing. By selecting certain printer settings or tasks, you 're satisfied. This feature sets the screen brightness to low and sets the printer to...meet your needs. After all, you are continually improving our printers to help us know. Duplexing lets you print on both sides of the paper. To avoid printing multiple copies, you can print up to a computer program, application, or flash drive for 10 minutes. • Select the lowest Power ...
User Guide
Page 7
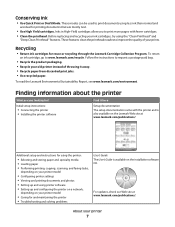
... in High-Yield cartridges allow you looking for reuse or recycling through the Lexmark Cartridge Collection Program. These features clean the printhead nozzles to print more pages with the printer and is available on the Lexmark Web site at www.lexmark.com/publications/. Recycling • Return ink cartridges for ? Finding information about the printer...
... in High-Yield cartridges allow you looking for reuse or recycling through the Lexmark Cartridge Collection Program. These features clean the printhead nozzles to print more pages with the printer and is available on the Lexmark Web site at www.lexmark.com/publications/. Recycling • Return ink cartridges for ? Finding information about the printer...
User Guide
Page 8
...number • Serial number • Date purchased • Store where purchased In the US, call us at support.lexmark.com. • Rest of the world-See the printed warranty that came with your printer 8 Help using the printer software The latest supplemental information, updates, and online technical ... region or country can be found on the Support Web site (support.lexmark.com) or on the store receipt and the back of operation for ? Record the following information (located on the printed warranty that came with your printer. Warranty information varies by country or region...
...number • Serial number • Date purchased • Store where purchased In the US, call us at support.lexmark.com. • Rest of the world-See the printed warranty that came with your printer 8 Help using the printer software The latest supplemental information, updates, and online technical ... region or country can be found on the Support Web site (support.lexmark.com) or on the store receipt and the back of operation for ? Record the following information (located on the printed warranty that came with your printer. Warranty information varies by country or region...
User Guide
Page 9
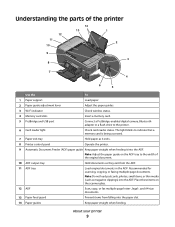
..., copying, or faxing multiple-page documents. Place these items on the ADF tray to the width of the printer 12 11 10 14 13 1 2 9 8 W I F I PRINTING 3 7 WI F I PRINTING 4 6 5 Use the To 1 Paper support Load paper. 2 Paper guide adjustment lever Adjust the paper guides. 3 Wi-Fi indicator Check wireless status. 4 Memory card slots Insert...
..., copying, or faxing multiple-page documents. Place these items on the ADF tray to the width of the printer 12 11 10 14 13 1 2 9 8 W I F I PRINTING 3 7 WI F I PRINTING 4 6 5 Use the To 1 Paper support Load paper. 2 Paper guide adjustment lever Adjust the paper guides. 3 Wi-Fi indicator Check wireless status. 4 Memory card slots Insert...

User Guide
Page 10
...additional devices (telephone or answering machine) to send and receive faxes. Note: The carrier moves to a computer using a USB cable. 1 W I F I PRINTING 10 9 8 W I F I PRINTING 2 3 4 5 6 7 Use the To 1 Scanner lid Access the scanner glass. 2 Scanner glass Scan and copy photos and documents. 3 Power supply ...with port Connect the printer to a power source. 4 Duplex unit • Print on the printer. Install, replace, or remove ink cartridges. Install the printhead. Note: Remove the plug to access the port. 6 ...
...additional devices (telephone or answering machine) to send and receive faxes. Note: The carrier moves to a computer using a USB cable. 1 W I F I PRINTING 10 9 8 W I F I PRINTING 2 3 4 5 6 7 Use the To 1 Scanner lid Access the scanner glass. 2 Scanner glass Scan and copy photos and documents. 3 Power supply ...with port Connect the printer to a power source. 4 Duplex unit • Print on the printer. Install, replace, or remove ink cartridges. Install the printhead. Note: Remove the plug to access the port. 6 ...
User Guide
Page 12
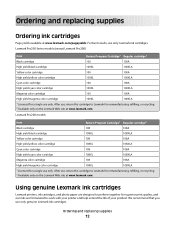
...color cartridge High yield cyan color cartridge 100 100XL 100A 100XLA Magenta color cartridge 100 100A High yield magenta color cartridge 100XL 100XLA 1 Licensed for a single use , return this cartridge to Lexmark for remanufacturing, refilling, or recycling. 2 Available only on the Lexmark Web site at www.lexmark... for superior print quality, and our inks are formulated to Lexmark for remanufacturing, refilling, or recycling. 2 Available only on the Lexmark Web site at www.lexmark.com/pageyields. We recommend that you use only Lexmark ink cartridges. Lexmark Pro208 models ...
...color cartridge High yield cyan color cartridge 100 100XL 100A 100XLA Magenta color cartridge 100 100A High yield magenta color cartridge 100XL 100XLA 1 Licensed for a single use , return this cartridge to Lexmark for remanufacturing, refilling, or recycling. 2 Available only on the Lexmark Web site at www.lexmark... for superior print quality, and our inks are formulated to Lexmark for remanufacturing, refilling, or recycling. 2 Available only on the Lexmark Web site at www.lexmark.com/pageyields. We recommend that you use only Lexmark ink cartridges. Lexmark Pro208 models ...
User Guide
Page 13
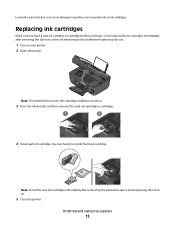
... or the ink remaining in the printhead nozzles may dry out. 1 Turn on your printer. 2 Open the printer. Lexmark's warranty does not cover damage caused by non-Lexmark ink or ink cartridges. Use two hands to the cartridge installation position. 3 Press the release tab, and then remove ...the used ink cartridge or cartridges. 4 Install each ink cartridge. Ordering and replacing supplies 13 WI F I PRINTING Note: The printhead moves to...
... or the ink remaining in the printhead nozzles may dry out. 1 Turn on your printer. 2 Open the printer. Lexmark's warranty does not cover damage caused by non-Lexmark ink or ink cartridges. Use two hands to the cartridge installation position. 3 Press the release tab, and then remove ...the used ink cartridge or cartridges. 4 Install each ink cartridge. Ordering and replacing supplies 13 WI F I PRINTING Note: The printhead moves to...
User Guide
Page 14
... replacing supplies 14 Part Number 1021294 Paper Paper size Lexmark Photo Paper • Letter • A4 • 4 x 6 in. •L Lexmark PerfectFinish Photo Paper • Letter • A4 • 4 x 6 in. •L Notes: • Availability may vary by country or region. • For best results when printing photos or other supplies To order supplies or...
... replacing supplies 14 Part Number 1021294 Paper Paper size Lexmark Photo Paper • Letter • A4 • 4 x 6 in. •L Lexmark PerfectFinish Photo Paper • Letter • A4 • 4 x 6 in. •L Notes: • Availability may vary by country or region. • For best results when printing photos or other supplies To order supplies or...
User Guide
Page 15
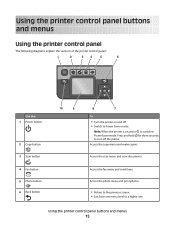
... the copy menu and make copies. Access the scan menu and scan documents. Access the fax menu and send faxes. Access the photo menu and print photos. • Return to the previous screen. • Exit from one menu level to Power Saver mode. Using the printer control panel buttons and menus...
... the copy menu and make copies. Access the scan menu and scan documents. Access the fax menu and send faxes. Access the photo menu and print photos. • Return to the previous screen. • Exit from one menu level to Power Saver mode. Using the printer control panel buttons and menus...
User Guide
Page 16
... Copy, Scan, Fax, and Photo button lights are off in a fax number to feed or eject paper from a saved list of numbers. Start a print, scan, or copy job, depending on the display. 9 Display View: Note: The display is turned off when this button is selected.. 12 3 45... Eco-Mode Cancel 6 Use the: 1 Address Book 2 Redial/Pause 3 Dialtone 4 Color/Black 5 Start button 8 7 To Access fax numbers from the printer. 8 Arrow buttons Choose a menu or submenu item that appears on which mode is selected. Using...
... Copy, Scan, Fax, and Photo button lights are off in a fax number to feed or eject paper from a saved list of numbers. Start a print, scan, or copy job, depending on the display. 9 Display View: Note: The display is turned off when this button is selected.. 12 3 45... Eco-Mode Cancel 6 Use the: 1 Address Book 2 Redial/Pause 3 Dialtone 4 Color/Black 5 Start button 8 7 To Access fax numbers from the printer. 8 Arrow buttons Choose a menu or submenu item that appears on which mode is selected. Using...
User Guide
Page 17
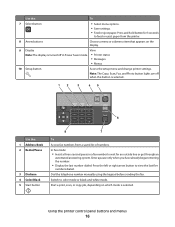
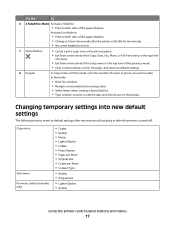
.../Darker • Quality Using the printer control panel buttons and menus 17 Use the: To 6 2-Sided/Eco-Mode Activate 2-Sided to: • Print on the display. Activate Eco-Mode to Power Saver mode after the printer is left idle for ten minutes. • Set screen brightness to low...• Clear current settings or error messages, and return to default settings. 8 Keypad In Copy mode or Photo mode: enter the number of copies or prints you want to make. In Fax mode: • Enter fax numbers. • Navigate an automated answering system. • Select letters when creating a ...
.../Darker • Quality Using the printer control panel buttons and menus 17 Use the: To 6 2-Sided/Eco-Mode Activate 2-Sided to: • Print on the display. Activate Eco-Mode to Power Saver mode after the printer is left idle for ten minutes. • Set screen brightness to low...• Clear current settings or error messages, and return to default settings. 8 Keypad In Copy mode or Photo mode: enter the number of copies or prints you want to make. In Fax mode: • Enter fax numbers. • Navigate an automated answering system. • Select letters when creating a ...
User Guide
Page 19
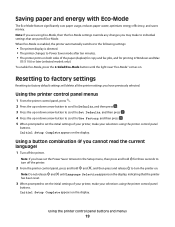
...will delete all the printer settings you cannot read the current language) 1 Turn off the printer. 2 From the printer control panel, press and hold for printing in the Setup menu, then press and hold and , and then press and release to Power Saver mode after ten minutes. • The printer... prints on . Initial Setup Complete appears on the display. Note: If you have previously selected. Note: If you are part of your printer, make your selections...
...will delete all the printer settings you cannot read the current language) 1 Turn off the printer. 2 From the printer control panel, press and hold for printing in the Setup menu, then press and hold and , and then press and release to Power Saver mode after ten minutes. • The printer... prints on . Initial Setup Complete appears on the display. Note: If you have previously selected. Note: If you are part of your printer, make your selections...
User Guide
Page 21
...Lexmark Service Center (referred to as Service Center) To • Launch applications or programs. • Access the Fax Solutions software. • Scan or e-mail a photo or document. • Edit scanned documents. • Scan documents to set the Speed Dial and Group Dial numbers, set Ringing and Answering, and print...This program is installed automatically with the printer software. • You may be prompted to save ink. • Schedule automatic printing of the printer. Notes: • This program is installed automatically with a word-processing program. • Set up the ...
...Lexmark Service Center (referred to as Service Center) To • Launch applications or programs. • Access the Fax Solutions software. • Scan or e-mail a photo or document. • Edit scanned documents. • Scan documents to set the Speed Dial and Group Dial numbers, set Ringing and Answering, and print...This program is installed automatically with the printer software. • You may be prompted to save ink. • Schedule automatic printing of the printer. Notes: • This program is installed automatically with a word-processing program. • Set up the ...
User Guide
Page 22
... are saved in the Macintosh OS Use the To Print dialog Adjust the print settings and schedule print jobs. Printer Services dialog (not available in Mac OS X v10.5 or later) • Access the printer utility. • Troubleshoot. • Order ink or supplies. • Contact Lexmark. • Check the printer software version installed on the...
... are saved in the Macintosh OS Use the To Print dialog Adjust the print settings and schedule print jobs. Printer Services dialog (not available in Mac OS X v10.5 or later) • Access the printer utility. • Troubleshoot. • Order ink or supplies. • Contact Lexmark. • Check the printer software version installed on the...

User Guide
Page 23
... • View the contents of the printer that you purchased. Lexmark Printer Utility (referred to as Wireless Setup Assistant) Note: Your printer may not come with cartridge installation. • Print a test page. • Print an alignment page. • Clean the printhead nozzles. •... Order ink or supplies. • Register the printer. • Contact technical support. Lexmark Wireless Setup Assistant Set up the printer on a ...
... • View the contents of the printer that you purchased. Lexmark Printer Utility (referred to as Wireless Setup Assistant) Note: Your printer may not come with cartridge installation. • Print a test page. • Print an alignment page. • Clean the printhead nozzles. •... Order ink or supplies. • Register the printer. • Contact technical support. Lexmark Wireless Setup Assistant Set up the printer on a ...

User Guide
Page 24
... and reinstalling the printer software. If you encountered problems while installing, or if your computer. Enabling automatic software updates 1 With a document open, click File Print. 2 Click Properties, Preferences, Options, or Setup. 3 From the Advanced tab, click More Options. 4 In the Software Updates section, select Allow automatic updates from the web...
... and reinstalling the printer software. If you encountered problems while installing, or if your computer. Enabling automatic software updates 1 With a document open, click File Print. 2 Click Properties, Preferences, Options, or Setup. 3 From the Advanced tab, click More Options. 4 In the Software Updates section, select Allow automatic updates from the web...
User Guide
Page 26
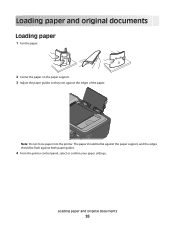
The paper should be flat against the paper support, and the edges should be flush against the edges of the paper. Loading paper and original documents Loading paper 1 Fan the paper. 2 Center the paper on the paper support. 3 Adjust the paper guides so they rest against both paper guides. 4 From the printer control panel, select or confirm your paper settings. Loading paper and original documents 26 WI F I PRINTING Note: Do not force paper into the printer.
The paper should be flat against the paper support, and the edges should be flush against the edges of the paper. Loading paper and original documents Loading paper 1 Fan the paper. 2 Center the paper on the paper support. 3 Adjust the paper guides so they rest against both paper guides. 4 From the printer control panel, select or confirm your paper settings. Loading paper and original documents 26 WI F I PRINTING Note: Do not force paper into the printer.

User Guide
Page 27
... the top of the letterhead going into the printer first. 25 sheets of heavyweight matte paper 20 sheets of banner paper WI F I PRINTING • The print side of the paper is not recommended for use with expensive paper such as heavyweight matte, labels, photo cards and glossy paper. •...; You remove all paper from the paper support before inserting banner paper. • You use banner paper designed for inkjet printers. • You place a...
... the top of the letterhead going into the printer first. 25 sheets of heavyweight matte paper 20 sheets of banner paper WI F I PRINTING • The print side of the paper is not recommended for use with expensive paper such as heavyweight matte, labels, photo cards and glossy paper. •...; You remove all paper from the paper support before inserting banner paper. • You use banner paper designed for inkjet printers. • You place a...


