User Guide
Page 3
Printing 31 Tips for printing...31 Printing basic documents...31 Printing specialty documents...35 Working with photos...37 Printing from a Bluetooth-enabled device...43 Printing on both sides of the paper (duplexing)...46 Managing print jobs...49 Copying 53 Tips for copying...53 Making copies...53 Copying photos...53 Copying a two-sided document...54 Enlarging or reducing images...
Printing 31 Tips for printing...31 Printing basic documents...31 Printing specialty documents...35 Working with photos...37 Printing from a Bluetooth-enabled device...43 Printing on both sides of the paper (duplexing)...46 Managing print jobs...49 Copying 53 Tips for copying...53 Making copies...53 Copying photos...53 Copying a two-sided document...54 Enlarging or reducing images...
User Guide
Page 4
... Using the Service Center to solve printer problems 115 If Troubleshooting does not solve your problem 115 Setup troubleshooting...115 Jams and misfeeds troubleshooting...121 Print troubleshooting...124 Copy and scan troubleshooting...126 Fax troubleshooting...128 Memory card troubleshooting...134 Wireless troubleshooting...136 Notices 155 Product information...155 Edition notice...155...
... Using the Service Center to solve printer problems 115 If Troubleshooting does not solve your problem 115 Setup troubleshooting...115 Jams and misfeeds troubleshooting...121 Print troubleshooting...124 Copy and scan troubleshooting...126 Fax troubleshooting...128 Memory card troubleshooting...134 Wireless troubleshooting...136 Notices 155 Product information...155 Edition notice...155...
User Guide
Page 6
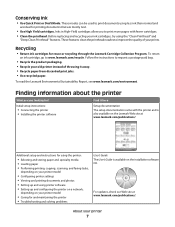
...to reduce your printer, read the User's Guide carefully, and make sure you do , and your printer model). • Preview print jobs before printing. Minimizing your new printer right away, use the setup materials that came with our printers, and we do encounter any problems along the...minimum-power standby mode after the printer is left idle for 10 minutes. • Select the lowest Power Saver timeout. To avoid printing multiple copies, you can print up to a computer program, application, or flash drive for presentation. • Use recycled paper. About your printer Thank you ...
...to reduce your printer, read the User's Guide carefully, and make sure you do , and your printer model). • Preview print jobs before printing. Minimizing your new printer right away, use the setup materials that came with our printers, and we do encounter any problems along the...minimum-power standby mode after the printer is left idle for 10 minutes. • Select the lowest Power Saver timeout. To avoid printing multiple copies, you can print up to a computer program, application, or flash drive for presentation. • Use recycled paper. About your printer Thank you ...
User Guide
Page 7
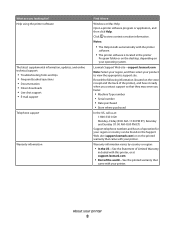
...cartridges for ? To return an ink cartridge, go to print documents using the "Clean Printhead" and "Deep Clean Printhead" features. About your prints. To read the Lexmark Environmental Sustainability Report, see www.lexmark.com/environment. Inks in High-Yield cartridges allow you looking... for reuse or recycling through the Lexmark Cartridge Collection Program. Initial setup instructions: • ...
...cartridges for ? To return an ink cartridge, go to print documents using the "Clean Printhead" and "Deep Clean Printhead" features. About your prints. To read the Lexmark Environmental Sustainability Report, see www.lexmark.com/environment. Inks in High-Yield cartridges allow you looking... for reuse or recycling through the Lexmark Cartridge Collection Program. Initial setup instructions: • ...
User Guide
Page 8
... site-support.lexmark.com Note: Select your region, and then select your product to view context-sensitive information. Warranty information...they may serve you looking for your region or country can be found on the Support Web site (support.lexmark.com) or on the printed warranty that came with your printer. Record the following information (located on the store receipt and the back ... • Serial number • Date purchased • Store where purchased In the US, call us at support.lexmark.com. • Rest of the world-See the printed warranty that came with your printer.
... site-support.lexmark.com Note: Select your region, and then select your product to view context-sensitive information. Warranty information...they may serve you looking for your region or country can be found on the Support Web site (support.lexmark.com) or on the printed warranty that came with your printer. Record the following information (located on the store receipt and the back ... • Serial number • Date purchased • Store where purchased In the US, call us at support.lexmark.com. • Rest of the world-See the printed warranty that came with your printer.
User Guide
Page 9
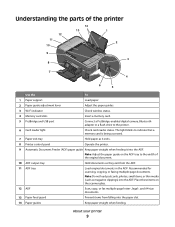
Place these items on the ADF tray to the width of the printer 12 11 10 14 13 1 2 9 8 W I F I PRINTING 3 7 WI F I PRINTING 4 6 5 Use the To 1 Paper support Load paper. 2 Paper guide adjustment lever Adjust the paper guides. 3 Wi-Fi indicator Check wireless status. 4 Memory card slots Insert a ...
Place these items on the ADF tray to the width of the printer 12 11 10 14 13 1 2 9 8 W I F I PRINTING 3 7 WI F I PRINTING 4 6 5 Use the To 1 Paper support Load paper. 2 Paper guide adjustment lever Adjust the paper guides. 3 Wi-Fi indicator Check wireless status. 4 Memory card slots Insert a ...

User Guide
Page 10
... Access the scanner glass. 2 Scanner glass Scan and copy photos and documents. 3 Power supply with port Connect the printer to a power source. 4 Duplex unit • Print on the printer. Install, replace, or remove ink cartridges. Note: Remove the plug to access the port. 6 LINE Port Connect the printer to an active...
... Access the scanner glass. 2 Scanner glass Scan and copy photos and documents. 3 Power supply with port Connect the printer to a power source. 4 Duplex unit • Print on the printer. Install, replace, or remove ink cartridges. Note: Remove the plug to access the port. 6 LINE Port Connect the printer to an active...
User Guide
Page 12
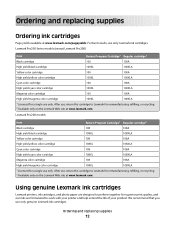
... cartridges, and photo paper are designed to perform together for superior print quality, and our inks are formulated to Lexmark for a single use only. Lexmark Pro200 Series models (except Lexmark Pro208) Item Black cartridge High yield black cartridge Yellow color cartridge High yield yellow color cartridge Return Program Cartridge1 Regular cartridge2 100 100A 100XL 100XLA 100...
... cartridges, and photo paper are designed to perform together for superior print quality, and our inks are formulated to Lexmark for a single use only. Lexmark Pro200 Series models (except Lexmark Pro208) Item Black cartridge High yield black cartridge Yellow color cartridge High yield yellow color cartridge Return Program Cartridge1 Regular cartridge2 100 100A 100XL 100XLA 100...
User Guide
Page 13
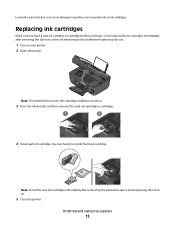
WI F I PRINTING Note: The printhead moves to install the black cartridge. Ordering and replacing supplies 13 Use two hands to the cartridge installation position. 3 Press the release tab, and then remove the used ink cartridge or cartridges. 4 Install each ink cartridge. Lexmark's warranty does not cover damage caused by non-Lexmark ink or ink...
WI F I PRINTING Note: The printhead moves to install the black cartridge. Ordering and replacing supplies 13 Use two hands to the cartridge installation position. 3 Press the release tab, and then remove the used ink cartridge or cartridges. 4 Install each ink cartridge. Lexmark's warranty does not cover damage caused by non-Lexmark ink or ink...
User Guide
Page 14
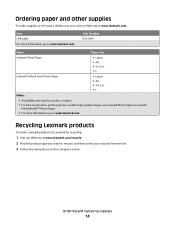
... replacing supplies 14 Part Number 1021294 Paper Paper size Lexmark Photo Paper • Letter • A4 • 4 x 6 in. •L Lexmark PerfectFinish Photo Paper • Letter • A4 • 4 x 6 in. •L Notes: • Availability may vary by country or region. • For best results when printing photos or other supplies To order supplies or...
... replacing supplies 14 Part Number 1021294 Paper Paper size Lexmark Photo Paper • Letter • A4 • 4 x 6 in. •L Lexmark PerfectFinish Photo Paper • Letter • A4 • 4 x 6 in. •L Notes: • Availability may vary by country or region. • For best results when printing photos or other supplies To order supplies or...
User Guide
Page 15
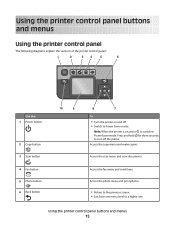
Access the photo menu and print photos. • Return to the previous screen. • Exit from one . Press and hold for three seconds to a higher one menu level to turn off . &#...
Access the photo menu and print photos. • Return to the previous screen. • Exit from one . Press and hold for three seconds to a higher one menu level to turn off . &#...
User Guide
Page 16
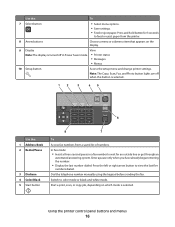
... appears on which mode is selected.. 12 3 45 Eco-Mode Cancel 6 Use the: 1 Address Book 2 Redial/Pause 3 Dialtone 4 Color/Black 5 Start button 8 7 To Access fax numbers from a saved list of numbers. Start a print, scan, or copy job, depending on the display. 9 Display View: Note: The display is turned off when this button... paper. Using the printer control panel buttons and menus 16 Note: The Copy, Scan, Fax, and Photo button lights are off in a fax number to color mode or black-and-white mode.
... appears on which mode is selected.. 12 3 45 Eco-Mode Cancel 6 Use the: 1 Address Book 2 Redial/Pause 3 Dialtone 4 Color/Black 5 Start button 8 7 To Access fax numbers from a saved list of numbers. Start a print, scan, or copy job, depending on the display. 9 Display View: Note: The display is turned off when this button... paper. Using the printer control panel buttons and menus 16 Note: The Copy, Scan, Fax, and Photo button lights are off in a fax number to color mode or black-and-white mode.
User Guide
Page 17
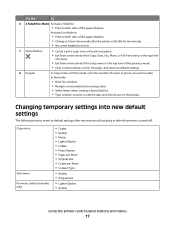
...idle for ten minutes. • Set screen brightness to low. 7 Cancel button • Cancel a print, copy, scan, or fax job in progress. • Exit from a menu level of the Copy, Scan, Fax, Photo,... or File Print menu to the top level of a menu. • Exit from a menu level of the Setup menu ... and return to default settings. 8 Keypad In Copy mode or Photo mode: enter the number of copies or prints you want to : • Print on the display. Use the: To 6 2-Sided/Eco-Mode Activate 2-Sided to make. In Fax mode:...
...idle for ten minutes. • Set screen brightness to low. 7 Cancel button • Cancel a print, copy, scan, or fax job in progress. • Exit from a menu level of the Copy, Scan, Fax, Photo,... or File Print menu to the top level of a menu. • Exit from a menu level of the Setup menu ... and return to default settings. 8 Keypad In Copy mode or Photo mode: enter the number of copies or prints you want to : • Print on the display. Use the: To 6 2-Sided/Eco-Mode Activate 2-Sided to make. In Fax mode:...
User Guide
Page 19
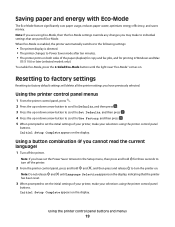
Note: If you are part of the paper (duplex) for copy and fax jobs, and for printing in the Setup menu, then press and hold for three seconds to turn the printer on both sides of Eco-Mode. Note: If you may ... switches to the following settings: • The printer display is dimmed. • The printer changes to Power Saver mode after ten minutes. • The printer prints on . Initial Setup Complete appears on the display. Using a button combination (if you have set the initial settings of your printer, make your selections using...
Note: If you are part of the paper (duplex) for copy and fax jobs, and for printing in the Setup menu, then press and hold for three seconds to turn the printer on both sides of Eco-Mode. Note: If you may ... switches to the following settings: • The printer display is dimmed. • The printer changes to Power Saver mode after ten minutes. • The printer prints on . Initial Setup Complete appears on the display. Using a button combination (if you have set the initial settings of your printer, make your selections using...
User Guide
Page 21
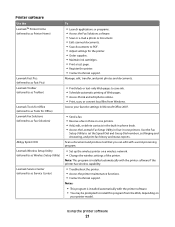
... Picnik and edit photos online. • Print, scan, or convert local files from the Web, depending on a wireless network. • Change the wireless settings of the printer. Using the printer software 21 Printer software Use the LexmarkTM Printer Home (referred to as Printer Home) Lexmark Fast Pics (referred to as Fast Pics...
... Picnik and edit photos online. • Print, scan, or convert local files from the Web, depending on a wireless network. • Change the wireless settings of the printer. Using the printer software 21 Printer software Use the LexmarkTM Printer Home (referred to as Printer Home) Lexmark Fast Pics (referred to as Fast Pics...
User Guide
Page 22
...-In-One Center (referred to as All-In-One Center) Lexmark Fax Setup Utility (referred to as Fax Setup Utility) To • Scan photos and documents. • Customize settings for scan jobs. • Customize settings for the print job, such as the following: • Select the number of the printer that you...
...-In-One Center (referred to as All-In-One Center) Lexmark Fax Setup Utility (referred to as Fax Setup Utility) To • Scan photos and documents. • Customize settings for scan jobs. • Customize settings for the print job, such as the following: • Select the number of the printer that you...

User Guide
Page 23
...tab, click On-line support. 6 From the Web site, select your printer and download the driver. 5 Install additional or optional software. Lexmark Wireless Setup Assistant Set up the printer on a wireless network. (referred to as Wireless Setup Assistant) Note: Your printer may not come ...with cartridge installation. • Print a test page. • Print an alignment page. • Clean the printhead nozzles. • Order ink or supplies. • Register the printer. • Contact...
...tab, click On-line support. 6 From the Web site, select your printer and download the driver. 5 Install additional or optional software. Lexmark Wireless Setup Assistant Set up the printer on a wireless network. (referred to as Wireless Setup Assistant) Note: Your printer may not come ...with cartridge installation. • Print a test page. • Print an alignment page. • Clean the printhead nozzles. • Order ink or supplies. • Register the printer. • Contact...

User Guide
Page 24
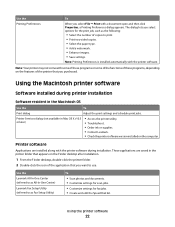
Enabling automatic software updates 1 With a document open, click File Print. 2 Click Properties, Preferences, Options, or Setup. 3 From the Advanced tab, click More Options. 4 In the Software Updates section, select Allow automatic updates from the web ... option when you set up the printer using the installation software CD, all the necessary software was installed. Reinstalling the printer software When you send a print job, then try removing and reinstalling the printer software. If you encountered problems while installing, or if your printer does not appear in complete, restart...
Enabling automatic software updates 1 With a document open, click File Print. 2 Click Properties, Preferences, Options, or Setup. 3 From the Advanced tab, click More Options. 4 In the Software Updates section, select Allow automatic updates from the web ... option when you set up the printer using the installation software CD, all the necessary software was installed. Reinstalling the printer software When you send a print job, then try removing and reinstalling the printer software. If you encountered problems while installing, or if your printer does not appear in complete, restart...
User Guide
Page 26
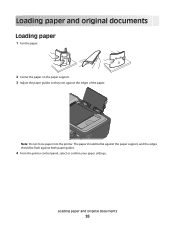
The paper should be flat against the paper support, and the edges should be flush against the edges of the paper. Loading paper and original documents 26 WI F I PRINTING Note: Do not force paper into the printer. Loading paper and original documents Loading paper 1 Fan the paper. 2 Center the paper on the paper support. 3 Adjust the paper guides so they rest against both paper guides. 4 From the printer control panel, select or confirm your paper settings.
The paper should be flat against the paper support, and the edges should be flush against the edges of the paper. Loading paper and original documents 26 WI F I PRINTING Note: Do not force paper into the printer. Loading paper and original documents Loading paper 1 Fan the paper. 2 Center the paper on the paper support. 3 Adjust the paper guides so they rest against both paper guides. 4 From the printer control panel, select or confirm your paper settings.

User Guide
Page 27
... the top of the letterhead going into the printer first. 25 sheets of heavyweight matte paper 20 sheets of banner paper WI F I PRINTING • The print side of the paper is not recommended for use with expensive paper such as heavyweight matte, labels, photo cards and glossy paper. •...; You remove all paper from the paper support before inserting banner paper. • You use banner paper designed for inkjet printers. • You place a...
... the top of the letterhead going into the printer first. 25 sheets of heavyweight matte paper 20 sheets of banner paper WI F I PRINTING • The print side of the paper is not recommended for use with expensive paper such as heavyweight matte, labels, photo cards and glossy paper. •...; You remove all paper from the paper support before inserting banner paper. • You use banner paper designed for inkjet printers. • You place a...


