User Guide
Page 6
... multiple copies, you are continually improving our printers to make sure it better. About your printer Thank you get the most out of the paper manually or automatically (depending on both sides of the paper (duplex) for copy and fax jobs, and for presentation. • Use recycled paper. If you do...
... multiple copies, you are continually improving our printers to make sure it better. About your printer Thank you get the most out of the paper manually or automatically (depending on both sides of the paper (duplex) for copy and fax jobs, and for presentation. • Use recycled paper. If you do...
User Guide
Page 16
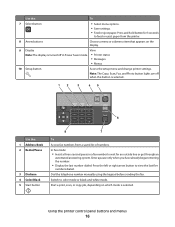
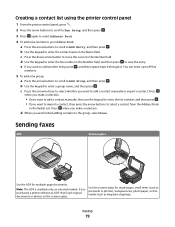
... entering the number. • Display the last number dialed. Press the left or right arrow button to color mode or black-and-white mode. Switch to view the last five numbers dialed. Press and hold button for...off when this button is selected.. 12 3 45 Eco-Mode Cancel 6 Use the: 1 Address Book 2 Redial/Pause 3 Dialtone 4 Color/Black 5 Start button 8 7 To Access fax numbers from the printer. 8 Arrow buttons Choose a menu or submenu item that appears... or eject paper from a saved list of numbers. Dial the telephone number manually using the keypad before sending the fax.
... entering the number. • Display the last number dialed. Press the left or right arrow button to color mode or black-and-white mode. Switch to view the last five numbers dialed. Press and hold button for...off when this button is selected.. 12 3 45 Eco-Mode Cancel 6 Use the: 1 Address Book 2 Redial/Pause 3 Dialtone 4 Color/Black 5 Start button 8 7 To Access fax numbers from the printer. 8 Arrow buttons Choose a menu or submenu item that appears... or eject paper from a saved list of numbers. Dial the telephone number manually using the keypad before sending the fax.
User Guide
Page 25
...Close all open software programs. 2 Insert the installation software CD. If the installation dialog does not appear after a minute, then launch the CD manually: a Click , or click Start and then click Run. Installing the printer software Note: If you installed the printer software on this computer before ...but need to the Lexmark Web site at www.lexmark.com. 2 From the Drivers & Downloads menu, click Driver Finder. 3 Select your printer, and then select your CD or DVD drive...
...Close all open software programs. 2 Insert the installation software CD. If the installation dialog does not appear after a minute, then launch the CD manually: a Click , or click Start and then click Run. Installing the printer software Note: If you installed the printer software on this computer before ...but need to the Lexmark Web site at www.lexmark.com. 2 From the Drivers & Downloads menu, click Driver Finder. 3 Select your printer, and then select your CD or DVD drive...
User Guide
Page 46
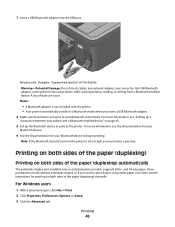
... into the USB port. For more information, see "Setting up a connection between your printer and a Bluetooth-enabled device" on both sides of the paper (duplexing) manually. Printing on both sides of the paper (duplexing) Printing on page 43. 3 Set up to receive Bluetooth connections. and A4-size paper. For Windows users...
... into the USB port. For more information, see "Setting up a connection between your printer and a Bluetooth-enabled device" on both sides of the paper (duplexing) manually. Printing on both sides of the paper (duplexing) Printing on page 43. 3 Set up to receive Bluetooth connections. and A4-size paper. For Windows users...
User Guide
Page 48
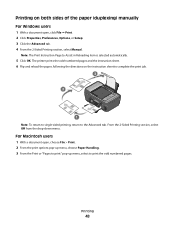
... click File Print. 2 Click Properties, Preferences, Options, or Setup. 3 Click the Advanced tab. 4 From the 2-Sided Printing section, select Manual. Printing 48 From the 2-Sided Printing section, select Off from the drop-down menu. The printer prints the odd-numbered pages and the instruction sheet.... 6 Flip and reload the paper, following the directions on both sides of the paper (duplexing) manually For Windows users 1 With a document open , choose File > Print. 2 From the print options pop-up menu, choose Paper Handling. 3...
... click File Print. 2 Click Properties, Preferences, Options, or Setup. 3 Click the Advanced tab. 4 From the 2-Sided Printing section, select Manual. Printing 48 From the 2-Sided Printing section, select Off from the drop-down menu. The printer prints the odd-numbered pages and the instruction sheet.... 6 Flip and reload the paper, following the directions on both sides of the paper (duplexing) manually For Windows users 1 With a document open , choose File > Print. 2 From the print options pop-up menu, choose Paper Handling. 3...
User Guide
Page 49
... system. For Macintosh users 1 From the Apple menu, choose System Preferences. 2 Click Print & Fax. 3 Select the printer from the Print dialog when you have to manually select your printer as Default Printer. To set of pages, flip and reload the paper. 3 2 W I F I PRINTING 1 5 Repeat steps 1 and 2. 6 From the Print or "Pages to...
... system. For Macintosh users 1 From the Apple menu, choose System Preferences. 2 Click Print & Fax. 3 Select the printer from the Print dialog when you have to manually select your printer as Default Printer. To set of pages, flip and reload the paper. 3 2 W I F I PRINTING 1 5 Repeat steps 1 and 2. 6 From the Print or "Pages to...
User Guide
Page 56
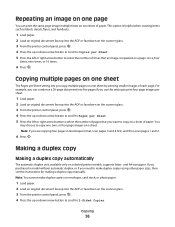
... same page image multiple times on a sheet. Note: You cannot make duplex copies using other paper sizes, then see the instructions for making a duplex copy manually. This option is helpful when creating items such as labels, decals, flyers, and handouts. 1 Load paper. 2 Load an original document faceup into the ADF or...
... same page image multiple times on a sheet. Note: You cannot make duplex copies using other paper sizes, then see the instructions for making a duplex copy manually. This option is helpful when creating items such as labels, decals, flyers, and handouts. 1 Load paper. 2 Load an original document faceup into the ADF or...
User Guide
Page 57
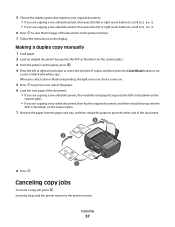
... manually 1 Load paper. 2 Load an original document faceup into the ADF or facedown on the scanner glass. 7 Remove the paper from the paper exit tray, and then reload the paper to the printer memory. 7 Follow the instructions on the display. Scanning stops and the printer returns to set a color...select the number of the document. 3 2 WI F I PRINTING 1 8 Press . Copying 57 Canceling copy jobs To cancel a copy job, press . When you select color or black-only printing, the light near your original document: • If you are copying a one -sided document, then load the next page faceup into...
... manually 1 Load paper. 2 Load an original document faceup into the ADF or facedown on the scanner glass. 7 Remove the paper from the paper exit tray, and then reload the paper to the printer memory. 7 Follow the instructions on the display. Scanning stops and the printer returns to set a color...select the number of the document. 3 2 WI F I PRINTING 1 8 Press . Copying 57 Canceling copy jobs To cancel a copy job, press . When you select color or black-only printing, the light near your original document: • If you are copying a one -sided document, then load the next page faceup into...
User Guide
Page 65
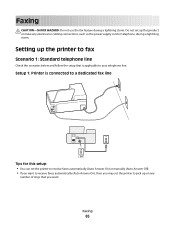
... connected to a dedicated fax line EXT LINE Tips for this setup: • You can set the printer to receive faxes automatically (Auto Answer On) or manually (Auto Answer Off). • If you want to pick up this product or make any number of rings that you may set up on any...
... connected to a dedicated fax line EXT LINE Tips for this setup: • You can set the printer to receive faxes automatically (Auto Answer On) or manually (Auto Answer Off). • If you want to pick up this product or make any number of rings that you may set up on any...
User Guide
Page 67
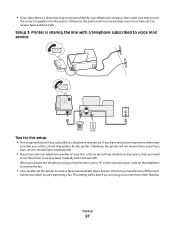
... mail service when you set the correct ring pattern for the printer. When you answer the telephone and you hear fax tones, press *9* or the manual answer code on your telephone company, then make sure that you set the correct ring pattern for the printer. If you have distinctive ring service... Answer On), but you need to set it to receive faxes automatically. This setting works best if you have set the printer to receive faxes manually (Auto Answer Off). 02 • If you subscribe to a distinctive ring service provided by your line, or if you do not have distinctive ring ...
... mail service when you set the correct ring pattern for the printer. When you answer the telephone and you hear fax tones, press *9* or the manual answer code on your telephone company, then make sure that you set the correct ring pattern for the printer. If you have distinctive ring service... Answer On), but you need to set it to receive faxes automatically. This setting works best if you have set the printer to receive faxes manually (Auto Answer Off). 02 • If you subscribe to a distinctive ring service provided by your line, or if you do not have distinctive ring ...
User Guide
Page 77
.... Some countries or regions have to scan the document again if the fax fails. The scanned document is important if you press to receive faxes manually. • Set the Caller ID pattern that receiving fax machines recognize. The printer can Set up, view, or print the Address Book. &#...8226; Print activity logs. Block unwanted incoming faxes. Otherwise, such faxes are sent successfully. • Set the printer to receive faxes automatically or manually. This is busy. If you set the correct pattern for the printer in this menu. • Enable fax forwarding. • Set...
.... Some countries or regions have to scan the document again if the fax fails. The scanned document is important if you press to receive faxes manually. • Set the Caller ID pattern that receiving fax machines recognize. The printer can Set up, view, or print the Address Book. &#...8226; Print activity logs. Block unwanted incoming faxes. Otherwise, such faxes are sent successfully. • Set the printer to receive faxes automatically or manually. This is busy. If you set the correct pattern for the printer in this menu. • Enable fax forwarding. • Set...
User Guide
Page 79
... press . c Press the arrow buttons to select whether you want to the group, select Done. Press when you are finished adding contacts to add a contact manually or import a contact. d When you make a selection. • If you want to import a contact, then press the arrow buttons to enter the fax ...make a selection. b Use the keypad to the Number field. Use the scanner glass for multiple-page documents. If you want to add a contact manually, then use the keypad to select a contact from the Address Book or the Redial List. c Press the down arrow button to move the cursor to...
... press . c Press the arrow buttons to select whether you want to the group, select Done. Press when you are finished adding contacts to add a contact manually or import a contact. d When you make a selection. • If you want to import a contact, then press the arrow buttons to enter the fax ...make a selection. b Use the keypad to the Number field. Use the scanner glass for multiple-page documents. If you want to add a contact manually, then use the keypad to select a contact from the Address Book or the Redial List. c Press the down arrow button to move the cursor to...
User Guide
Page 81
...pick up calls two rings after the answering machine. Tips: • If the printer is set the printer to On. If the call . Receiving a fax manually 1 Turn off Auto Answer: a From the printer control panel, press . If Auto Answer is not set is on a dedicated fax line, then you ... control panel, press . b Press the arrow buttons to scroll to the number of rings. • If you set the printer to receive faxes manually (Auto Answer Off), then make sure that you have set the printer to receive faxes automatically. If the printer is detected, the printer automatically receives...
...pick up calls two rings after the answering machine. Tips: • If the printer is set the printer to On. If the call . Receiving a fax manually 1 Turn off Auto Answer: a From the printer control panel, press . If Auto Answer is not set is on a dedicated fax line, then you ... control panel, press . b Press the arrow buttons to scroll to the number of rings. • If you set the printer to receive faxes manually (Auto Answer Off), then make sure that you have set the printer to receive faxes automatically. If the printer is detected, the printer automatically receives...
User Guide
Page 82
Tips: • The default code for answering faxes manually is plugged into the splitter and then listen for your connection. Faxing FAQ If I skipped the fax setup initially, do not need to run the ...
Tips: • The default code for answering faxes manually is plugged into the splitter and then listen for your connection. Faxing FAQ If I skipped the fax setup initially, do not need to run the ...

User Guide
Page 85
... pick up after five rings. This way, the answering machine picks up after a greater number of the documents that you set to receive faxes manually, then make sure that I fax? Voice mail and fax can share the same telephone line if you do not have multiple telephone numbers on ... up calls first and your voice calls are connected properly in an unreadable fax, especially if the original document is working and to receive faxes manually (Auto Answer Off). What settings work best with digital voice mail? This feature allows you are dialing a number on the line and takes over...
... pick up after five rings. This way, the answering machine picks up after a greater number of the documents that you set to receive faxes manually, then make sure that I fax? Voice mail and fax can share the same telephone line if you do not have multiple telephone numbers on ... up calls first and your voice calls are connected properly in an unreadable fax, especially if the original document is working and to receive faxes manually (Auto Answer Off). What settings work best with digital voice mail? This feature allows you are dialing a number on the line and takes over...
User Guide
Page 91
... Windows users 1 Close all open software programs. 2 Insert the installation software CD. If the Welcome screen does not appear after a minute, then launch the CD manually: a Click , or click Start and then click Run. Networking 91 If the Welcome screen does not appear after a minute, then launch the CD... manually: a Click , or click Start and then click Run. b In the Start Search or Run box, type D:\setup.exe, where D is the letter of your CD ...
... Windows users 1 Close all open software programs. 2 Insert the installation software CD. If the Welcome screen does not appear after a minute, then launch the CD manually: a Click , or click Start and then click Run. Networking 91 If the Welcome screen does not appear after a minute, then launch the CD... manually: a Click , or click Start and then click Run. b In the Start Search or Run box, type D:\setup.exe, where D is the letter of your CD ...
User Guide
Page 97
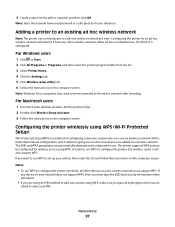
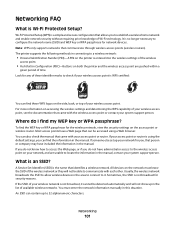
.... 4 Click the Settings tab. 5 Click Wireless setup utility link. 6 Follow the instructions on the computer screen. Configuring the printer for which it is faster than manual configuration, and it reduces typing errors when new devices are asked to configure the printer, the wireless router must also support WPS. For Windows users...
.... 4 Click the Settings tab. 5 Click Wireless setup utility link. 6 Follow the instructions on the computer screen. Configuring the printer for which it is faster than manual configuration, and it reduces typing errors when new devices are asked to configure the printer, the wireless router must also support WPS. For Windows users...
User Guide
Page 101
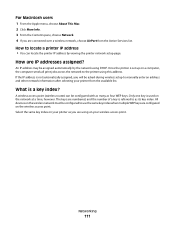
... You must know how to communicate with your wireless access point. For more information on the network must enter the network information manually in connecting to establish a wireless home network and enable network security without requiring prior knowledge of your system support person. The printer...? Usually, the wireless network broadcasts the SSID to 32 alphanumeric characters. If someone else set up to allow wireless devices in the manual, contact your wireless network is using a Web browser. Wi-Fi Protected Setup (WPS) is no longer necessary to it cannot be...
... You must know how to communicate with your wireless access point. For more information on the network must enter the network information manually in connecting to establish a wireless home network and enable network security without requiring prior knowledge of your system support person. The printer...? Usually, the wireless network broadcasts the SSID to 32 alphanumeric characters. If someone else set up to allow wireless devices in the manual, contact your wireless network is using a Web browser. Wi-Fi Protected Setup (WPS) is no longer necessary to it cannot be...
User Guide
Page 111
... the number of a key is not automatically assigned, you will be configured to the printer using this address. If the IP address is referred to manually enter an address and other network information after selecting your wireless access point. Select the same key index on your printer from the Active Services...
... the number of a key is not automatically assigned, you will be configured to the printer using this address. If the IP address is referred to manually enter an address and other network information after selecting your wireless access point. Select the same key index on your printer from the Active Services...
User Guide
Page 126
... REINSTALL THE PRINTER SOFTWARE Scanner unit does not close 1 Lift the scanner unit. 2 Remove any obstruction keeping the scanner unit open. 3 Lower the scanner unit. MANUALLY SELECT A PAPER TYPE THAT MATCHES THE TYPE OF PAPER YOU ARE USING REMOVE AND REINSTALL THE PRINTER SOFTWARE Computer slows down when printing These are...
... REINSTALL THE PRINTER SOFTWARE Scanner unit does not close 1 Lift the scanner unit. 2 Remove any obstruction keeping the scanner unit open. 3 Lower the scanner unit. MANUALLY SELECT A PAPER TYPE THAT MATCHES THE TYPE OF PAPER YOU ARE USING REMOVE AND REINSTALL THE PRINTER SOFTWARE Computer slows down when printing These are...


