
Basic Users Guide - English
Page 9
... PDF scanning 51 How to scan a document as a PDF file using the SCAN key 53 A Routine maintenance 54 Replacing the consumable items 54 Replacing the toner cartridge 55 Cleaning the corona wire 60 Replacing the drum unit 62 Cleaning the scanner glass 66 B Troubleshooting 67 Identifying your problem 67 Error and maintenance messages 69...
... PDF scanning 51 How to scan a document as a PDF file using the SCAN key 53 A Routine maintenance 54 Replacing the consumable items 54 Replacing the toner cartridge 55 Cleaning the corona wire 60 Replacing the drum unit 62 Cleaning the scanner glass 66 B Troubleshooting 67 Identifying your problem 67 Error and maintenance messages 69...
Basic Users Guide - English
Page 66
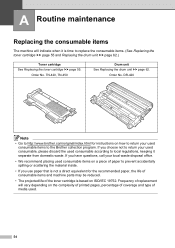
... toner cartridge uu page 55 and Replacing the drum unit uu page 62.) Toner cartridge See Replacing the toner cartridge uu page 55. Frequency of replacement will indicate when it separate from domestic waste. Order No. DR-420 Note • Go to http://www.brother.com/original/index.html for the ...recommended paper, the life of consumable items and machine parts may be reduced. • The projected life of the toner cartridge is time to return your used . 54 TN-420, TN-450 Drum unit See Replacing the drum unit uu page ...
... toner cartridge uu page 55 and Replacing the drum unit uu page 62.) Toner cartridge See Replacing the toner cartridge uu page 55. Frequency of replacement will indicate when it separate from domestic waste. Order No. DR-420 Note • Go to http://www.brother.com/original/index.html for the ...recommended paper, the life of consumable items and machine parts may be reduced. • The projected life of the toner cartridge is time to return your used . 54 TN-420, TN-450 Drum unit See Replacing the drum unit uu page ...
Basic Users Guide - English
Page 68
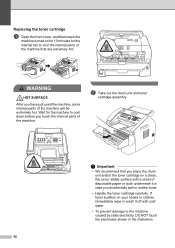
...cartridge assembly. Important • We recommend that you place the drum unit and/or the toner cartridge on for 10 minutes for the machine to cool down before you touch the internal parts of the machine will be extremely hot. Replacing the toner cartridge A a Open the front cover, and ...prevent damage to the machine caused by static electricity, DO NOT touch the electrodes shown in case you have just used the machine, some internal parts of the machine. WARNING HOT SURFACE After you accidentally spill or scatter toner. • Handle the toner cartridge carefully. If toner ...
...cartridge assembly. Important • We recommend that you place the drum unit and/or the toner cartridge on for 10 minutes for the machine to cool down before you touch the internal parts of the machine will be extremely hot. Replacing the toner cartridge A a Open the front cover, and ...prevent damage to the machine caused by static electricity, DO NOT touch the electrodes shown in case you have just used the machine, some internal parts of the machine. WARNING HOT SURFACE After you accidentally spill or scatter toner. • Handle the toner cartridge carefully. If toner ...
Basic Users Guide - English
Page 70
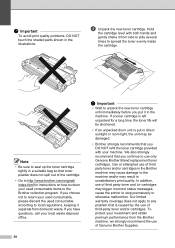
...toner powder does not spill out of the cartridge. • Go to http://www.brother.com/original/ index.html for a long time, the toner life will be shortened. • If an unpacked drum unit is put it from side to side several times to stop prematurely or otherwise malfunction.... Use or attempted use only Genuine Brother Brand replacement toner cartridges. To protect your used consumable according to unpack the new toner...
...toner powder does not spill out of the cartridge. • Go to http://www.brother.com/original/ index.html for a long time, the toner life will be shortened. • If an unpacked drum unit is put it from side to side several times to stop prematurely or otherwise malfunction.... Use or attempted use only Genuine Brother Brand replacement toner cartridges. To protect your used consumable according to unpack the new toner...
Basic Users Guide - English
Page 72
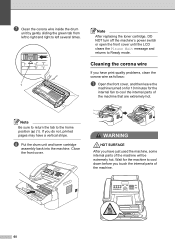
...extremely hot. If you have a vertical stripe. WARNING HOT SURFACE After you do not, printed pages may have just used the machine, some internal parts of the machine that are extremely hot. h Put the drum unit and toner cartridge assembly back into the machine. Close the front cover. Wait for the...down before you touch the internal parts of the machine. 60 Note Be sure to return the tab to Ready mode. g Clean the corona wire inside the drum unit by gently sliding the green tab from left to right and right to left several times. 1 Note After replacing the toner cartridge, DO...
...extremely hot. If you have a vertical stripe. WARNING HOT SURFACE After you do not, printed pages may have just used the machine, some internal parts of the machine that are extremely hot. h Put the drum unit and toner cartridge assembly back into the machine. Close the front cover. Wait for the...down before you touch the internal parts of the machine. 60 Note Be sure to return the tab to Ready mode. g Clean the corona wire inside the drum unit by gently sliding the green tab from left to right and right to left several times. 1 Note After replacing the toner cartridge, DO...
Basic Users Guide - English
Page 74
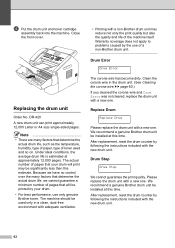
... with adequate ventilation. • Printing with a new one . Replace Drum A Replace Drum Please replace the drum unit with the new drum unit. Please replace the drum unit with the new drum unit. 62 We recommend a genuine Brother drum unit be used and so on. The actual number of a non-Brother drum unit. After replacement, reset the drum counter by the use of pages that determine the...
... with adequate ventilation. • Printing with a new one . Replace Drum A Replace Drum Please replace the drum unit with the new drum unit. Please replace the drum unit with the new drum unit. 62 We recommend a genuine Brother drum unit be used and so on. The actual number of a non-Brother drum unit. After replacement, reset the drum counter by the use of pages that determine the...
Basic Users Guide - English
Page 75
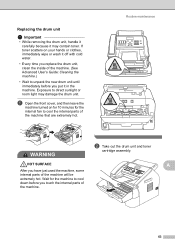
... may contain toner. HOT SURFACE A After you touch the internal parts of the machine. 63 Replacing the drum unit A Important • While removing the drum unit, handle it carefully because it off with cold water. • Every time you replace the drum unit, clean the inside of the machine. (See Advanced ...User's Guide: Cleaning the machine.) • Wait to cool the internal parts of the machine that are extremely hot. a Open the front cover, ...
... may contain toner. HOT SURFACE A After you touch the internal parts of the machine. 63 Replacing the drum unit A Important • While removing the drum unit, handle it carefully because it off with cold water. • Every time you replace the drum unit, clean the inside of the machine. (See Advanced ...User's Guide: Cleaning the machine.) • Wait to cool the internal parts of the machine that are extremely hot. a Open the front cover, ...
Basic Users Guide - English
Page 77
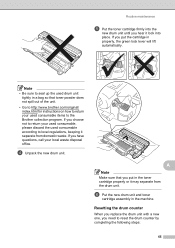
If you need to reset the drum counter by completing the following steps: 65 Resetting the drum counter A When you replace the drum unit with a new one, you have questions, call your local waste disposal office. d Unpack the new drum unit. f Put the new drum unit and toner cartridge assembly in a bag ...seal up the used consumable according to local regulations, keeping it separate from the drum unit. A Note Make sure that toner powder does not spill out of the unit. • Go to http://www.brother.com/original/ index.html for instructions on how to return your used consumable ...
If you need to reset the drum counter by completing the following steps: 65 Resetting the drum counter A When you replace the drum unit with a new one, you have questions, call your local waste disposal office. d Unpack the new drum unit. f Put the new drum unit and toner cartridge assembly in a bag ...seal up the used consumable according to local regulations, keeping it separate from the drum unit. A Note Make sure that toner powder does not spill out of the unit. • Go to http://www.brother.com/original/ index.html for instructions on how to return your used consumable ...
Basic Users Guide - English
Page 81
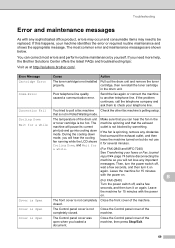
If the problem continues, call the telephone company and ask them to be replaced. Cooling Down The temperature of the machine, then press Stop/Exit. 69... may occur and consumable items may need more help, the Brother Solutions Center offers the latest FAQs and troubleshooting tips: Visit us at http://solutions.brother.com/. If this happens, your telephone line. Error Message ... the drum unit Make sure that surround the exhaust outlet, and then leave the machine turned on but do not use it for a while or toner cartridge is not completely closed . a while. (For FAX-2840 and ...
If the problem continues, call the telephone company and ask them to be replaced. Cooling Down The temperature of the machine, then press Stop/Exit. 69... may occur and consumable items may need more help, the Brother Solutions Center offers the latest FAQs and troubleshooting tips: Visit us at http://solutions.brother.com/. If this happens, your telephone line. Error Message ... the drum unit Make sure that surround the exhaust outlet, and then leave the machine turned on but do not use it for a while or toner cartridge is not completely closed . a while. (For FAX-2840 and ...
Basic Users Guide - English
Page 82
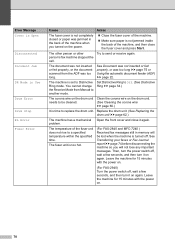
... not rise to Distinctive Ring mode. Leave the machine for 15 minutes with the power on. 70 The fuser unit is too hot. (For FAX-2840 and MFC-7240 ) Received fax messages still in the back of the machine when you will be cleaned. (See Cleaning the corona wire uu page... minutes with the power on. (For FAX-2940) Turn the power switch off , wait a few seconds, and then turn it on the drum unit. Replace the drum unit. (See Replacing the drum unit uu page 62.) The machine has a mechanical Open the front cover and close the fuser cover and press Start. The machine is...
... not rise to Distinctive Ring mode. Leave the machine for 15 minutes with the power on. 70 The fuser unit is too hot. (For FAX-2840 and MFC-7240 ) Received fax messages still in the back of the machine when you will be cleaned. (See Cleaning the corona wire uu page... minutes with the power on. (For FAX-2940) Turn the power switch off , wait a few seconds, and then turn it on the drum unit. Replace the drum unit. (See Replacing the drum unit uu page 62.) The machine has a mechanical Open the front cover and close the fuser cover and press Start. The machine is...
Basic Users Guide - English
Page 84
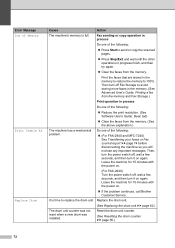
...drum unit. Then turn off Fax Storage to send or copy the scanned pages. Press Stop/Exit and wait until the other operations in progress finish, and then try again. Clear the faxes from the memory. (See the above explanation.) Do one of the following : (For FAX-2840...the drum unit counter. (See Resetting the drum counter uu page 65.) 72 It is full. Leave the machine for 15 minutes with the power on. If the problem continues, call Brother Customer Service. Fax sending or copy operation in process Do one of Memory Print Unable XX Replace Drum Cause...
...drum unit. Then turn off Fax Storage to send or copy the scanned pages. Press Stop/Exit and wait until the other operations in progress finish, and then try again. Clear the faxes from the memory. (See the above explanation.) Do one of the following : (For FAX-2840...the drum unit counter. (See Resetting the drum counter uu page 65.) 72 It is full. Leave the machine for 15 minutes with the power on. If the problem continues, call Brother Customer Service. Fax sending or copy operation in process Do one of Memory Print Unable XX Replace Drum Cause...
Basic Users Guide - English
Page 100
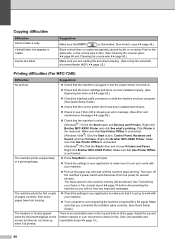
... to work with your document to see if the LCD is turned on. Check that the toner cartridge and drum unit are installed properly. (See Replacing the drum unit uu page 62.) Check the interface cable connection on the top and bottom of pages correctly, then some... pages have text missing. Make sure that Use Printer Offline is not recognizing the machine's input buffer's full signal. Right-click Brother MFC-XXXX Printer....
... to work with your document to see if the LCD is turned on. Check that the toner cartridge and drum unit are installed properly. (See Replacing the drum unit uu page 62.) Check the interface cable connection on the top and bottom of pages correctly, then some... pages have text missing. Make sure that Use Printer Offline is not recognizing the machine's input buffer's full signal. Right-click Brother MFC-XXXX Printer....

Basic Users Guide - English
Page 104
...Replace Toner is Continue (Continue mode) by pressing Menu, 2, 1, 6 and then press c to spread the toner evenly inside the cartridge. Check if the Toner Settings of poor print quality ABCDEFGH abcdefghijk ABCD abcde 01234 Faint Recommendation Take out the drum unit and toner cartridge assembly. Note Using non-Brother... the corona wire uu page 60.) Put in a new toner cartridge. (See Replacing the toner cartridge uu page 55.) Put in a new drum unit. (See Replacing the drum unit uu page 62.) Adjust the Print Density by pressing Menu, 1, 7. (See...
...Replace Toner is Continue (Continue mode) by pressing Menu, 2, 1, 6 and then press c to spread the toner evenly inside the cartridge. Check if the Toner Settings of poor print quality ABCDEFGH abcdefghijk ABCD abcde 01234 Faint Recommendation Take out the drum unit and toner cartridge assembly. Note Using non-Brother... the corona wire uu page 60.) Put in a new toner cartridge. (See Replacing the toner cartridge uu page 55.) Put in a new drum unit. (See Replacing the drum unit uu page 62.) Adjust the Print Density by pressing Menu, 1, 7. (See...
Basic Users Guide - English
Page 105
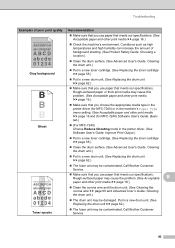
... page 55.) Clean the drum surface. (See Advanced User's Guide: Cleaning the drum unit.) Put in a new drum unit. (See Replacing the drum unit uu page 62.) Toner specks The fuser unit may be contaminated. Rough-surfaced paper or thick print media may be contaminated. Call Brother Customer Service. 93 Troubleshooting Examples of...
... page 55.) Clean the drum surface. (See Advanced User's Guide: Cleaning the drum unit.) Put in a new drum unit. (See Replacing the drum unit uu page 62.) Toner specks The fuser unit may be contaminated. Rough-surfaced paper or thick print media may be contaminated. Call Brother Customer Service. 93 Troubleshooting Examples of...
Basic Users Guide - English
Page 106
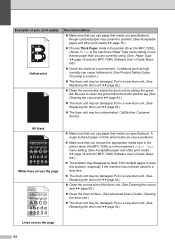
Put in a new drum unit. (See Replacing the drum unit uu page 62.) The fuser unit may be damaged. Call Brother Customer Service. Put in the machine's Paper Type menu setting or use thinner paper than you are currently using. (See Paper Type uu page 16 ... and other print media uu page 16.) Choose Thick Paper mode in the printer driver (for MFC-7240), choose Thick in a new drum unit. (See Replacing the drum unit uu page 62.) Clean the corona wire of poor print quality Hollow print Recommendation Make sure that you use paper that...
Put in a new drum unit. (See Replacing the drum unit uu page 62.) The fuser unit may be damaged. Call Brother Customer Service. Put in the machine's Paper Type menu setting or use thinner paper than you are currently using. (See Paper Type uu page 16 ... and other print media uu page 16.) Choose Thick Paper mode in the printer driver (for MFC-7240), choose Thick in a new drum unit. (See Replacing the drum unit uu page 62.) Clean the corona wire of poor print quality Hollow print Recommendation Make sure that you use paper that...
Basic Users Guide - English
Page 107
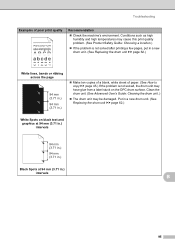
... Troubleshooting Examples of paper. (See How to copy uu page 45.) If the problem is not solved after printing a few pages, put in a new drum unit. (See Replacing the drum unit uu page 62.) White lines, bands or ribbing across the page 94 mm (3.71 in.) 94 mm (3.71 in.) Make ten... copies of a blank, white sheet of poor print quality Recommendation Check the machine's environment. Put in a new drum unit. (See Replacing the drum unit uu page 62.) White Spots on the OPC...
... Troubleshooting Examples of paper. (See How to copy uu page 45.) If the problem is not solved after printing a few pages, put in a new drum unit. (See Replacing the drum unit uu page 62.) White lines, bands or ribbing across the page 94 mm (3.71 in.) 94 mm (3.71 in.) Make ten... copies of a blank, white sheet of poor print quality Recommendation Check the machine's environment. Put in a new drum unit. (See Replacing the drum unit uu page 62.) White Spots on the OPC...
Basic Users Guide - English
Page 108
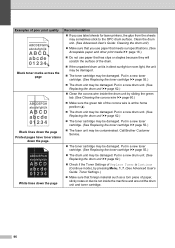
... in direct sunlight or room light, the unit may be damaged. The toner cartridge may be damaged. Put in a new drum unit. (See Replacing the drum unit uu page 62.) The toner cartridge may be damaged. ABCDEFGH abcdefghijk ABCD abcde 01234 White lines down the page. Put... use label sheets for laser printers, the glue from the sheets may sometimes stick to the OPC drum surface. Call Brother Customer Service. The toner cartridge may be damaged. Put in a new toner cartridge. (See Replacing the toner cartridge uu page 55.) The fuser unit may be damaged.
... in direct sunlight or room light, the unit may be damaged. The toner cartridge may be damaged. Put in a new drum unit. (See Replacing the drum unit uu page 62.) The toner cartridge may be damaged. ABCDEFGH abcdefghijk ABCD abcde 01234 White lines down the page. Put... use label sheets for laser printers, the glue from the sheets may sometimes stick to the OPC drum surface. Call Brother Customer Service. The toner cartridge may be damaged. Put in a new toner cartridge. (See Replacing the toner cartridge uu page 55.) The fuser unit may be damaged.
Basic Users Guide - English
Page 135
... 30 fax redial 42 B Brother accessories and supplies ii Brother numbers i Customer Service i FAQs (frequently asked questions) ......... ControlCenter4 (for Macintosh) See Software User's Guide. i Notice - Disclaimer of Memory 72 Print Unable XX 72 Replace Drum 62 Replace Toner 55 Scan Unable XX ...73 Toner Ended 55 Toner Low 55 Extension telephone, using 39 External telephone, connecting 38 123 Copy 45 keys 8 Cordless telephone (non-Brother 39 Custom Ringing 34 D E Data ...
... 30 fax redial 42 B Brother accessories and supplies ii Brother numbers i Customer Service i FAQs (frequently asked questions) ......... ControlCenter4 (for Macintosh) See Software User's Guide. i Notice - Disclaimer of Memory 72 Print Unable XX 72 Replace Drum 62 Replace Toner 55 Scan Unable XX ...73 Toner Ended 55 Toner Low 55 Extension telephone, using 39 External telephone, connecting 38 123 Copy 45 keys 8 Cordless telephone (non-Brother 39 Custom Ringing 34 D E Data ...
Basic Users Guide - English
Page 136
O One Touch changing 44 setting up 43 using 41 OPC drum 95 Out of Memory message 72 124 Maintenance, routine replacing drum unit 62 toner cartridge 55 Manual dialing 41 receive 26, 28 Memory capacity 114 Menu Table 104 Mode, entering copy 45 fax 24 scan 8 Multi-...
O One Touch changing 44 setting up 43 using 41 OPC drum 95 Out of Memory message 72 124 Maintenance, routine replacing drum unit 62 toner cartridge 55 Manual dialing 41 receive 26, 28 Memory capacity 114 Menu Table 104 Mode, entering copy 45 fax 24 scan 8 Multi-...
Basic Users Guide - English
Page 137
Personalized Ring 34 Presto! PageManager See Software User's Guide. Replacing drum unit 62 toner cartridge 55 Reports Transmission Verification 25 Resolution copy 118 fax (standard, fine, superfine, photo) . 117 print 120 scan 119 Resolution key 8 Ring ...
Personalized Ring 34 Presto! PageManager See Software User's Guide. Replacing drum unit 62 toner cartridge 55 Reports Transmission Verification 25 Resolution copy 118 fax (standard, fine, superfine, photo) . 117 print 120 scan 119 Resolution key 8 Ring ...


