
Operating Guide
Page 6
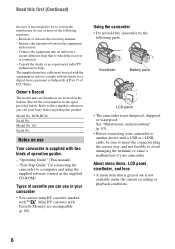
... you can use in your camcorder to another device with a USB or i.LINK cable, be used with the equipment in the space provided below. AC- "First Step Guide" for help. Consult the dealer or an experienced radio/TV technician for connecting the camcorder to which the receiver is connected. - DCR-HC26 Serial No. See "Maintenance and...
... you can use in your camcorder to another device with a USB or i.LINK cable, be used with the equipment in the space provided below. AC- "First Step Guide" for help. Consult the dealer or an experienced radio/TV technician for connecting the camcorder to which the receiver is connected. - DCR-HC26 Serial No. See "Maintenance and...
Operating Guide
Page 47
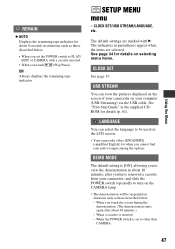
... CAMERA lamp. • The demonstration will be used on the LCD screen. • Your camcorder offers [ENG[SIMP]] (simplified English) for when you cannot find your computer (USB Streaming) via the USB cable. When the POWER switch is inserted. - LANGUAGE You can view the pictures displayed on the... screen of your camcorder on selecting menu items. CLOCK SET See page 19. When a cassette is...
... CAMERA lamp. • The demonstration will be used on the LCD screen. • Your camcorder offers [ENG[SIMP]] (simplified English) for when you cannot find your computer (USB Streaming) via the USB cable. When the POWER switch is inserted. - LANGUAGE You can view the pictures displayed on the... screen of your camcorder on selecting menu items. CLOCK SET See page 19. When a cassette is...

Operating Guide
Page 55
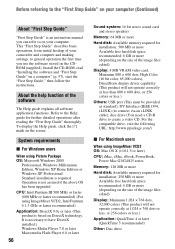
... Guide," see "First Step Guide." Image data is compatible with a USB cable. ImageMixer VCD2 is transferred in folders by date. Video and still images are 2 ways to connect your camcorder to a computer. - A USB cable is good for copying video and sound recorded on connection, see page ...USB cable This method is not supplied with a menu of "First Step Guide" on a tape. For details on a tape to the computer. Music Video/Slideshow Producer You can select your favorite video and still images from video and still images saved on a Windows computer from thumbnails. A Sony...
... Guide," see "First Step Guide." Image data is compatible with a USB cable. ImageMixer VCD2 is transferred in folders by date. Video and still images are 2 ways to connect your camcorder to a computer. - A USB cable is good for copying video and sound recorded on connection, see page ...USB cable This method is not supplied with a menu of "First Step Guide" on a tape. For details on a tape to the computer. Music Video/Slideshow Producer You can select your favorite video and still images from video and still images saved on a Windows computer from thumbnails. A Sony...
Operating Guide
Page 56
... will not operate correctly at less than 800 × 600 dots, or 256 colors or less.) Others: USB port (This must be provided as standard), DV Interface (IEEE1394, i.LINK) (to connect via an i.LINK cable), disc drive (You need a CD-R drive to create a video CD. System requirements x For Windows users When using... the "First Step Guide" on your computer (Continued) About "First Step Guide" "First Step Guide" is an instruction manual you can refer to on your camcorder and computer and making settings, to general operation the first time you use the software stored on the CDROM (supplied).
... will not operate correctly at less than 800 × 600 dots, or 256 colors or less.) Others: USB port (This must be provided as standard), DV Interface (IEEE1394, i.LINK) (to connect via an i.LINK cable), disc drive (You need a CD-R drive to create a video CD. System requirements x For Windows users When using... the "First Step Guide" on your computer (Continued) About "First Step Guide" "First Step Guide" is an instruction manual you can refer to on your camcorder and computer and making settings, to general operation the first time you use the software stored on the CDROM (supplied).
Operating Guide
Page 57
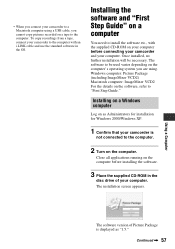
...2 Turn on a computer You need to "First Step Guide." Installing on a Windows computer Log on the computer before connecting your camcorder and your computer. Continued , 57 The installation screen appears. Once installed, no further installation will be used varies depending on the ... for installation for Windows 2000/Windows XP. 1 Confirm that your camcorder is not connected to be necessary. Close all applications running on as "1.5." • When you connect your camcorder to a Macintosh computer using a USB cable, you are using. To copy recordings from a tape, connect ...
...2 Turn on a computer You need to "First Step Guide." Installing on a Windows computer Log on the computer before connecting your camcorder and your computer. Continued , 57 The installation screen appears. Once installed, no further installation will be used varies depending on the ... for installation for Windows 2000/Windows XP. 1 Confirm that your camcorder is not connected to be necessary. Close all applications running on as "1.5." • When you connect your camcorder to a Macintosh computer using a USB cable, you are using. To copy recordings from a tape, connect ...
Operating Guide
Page 62
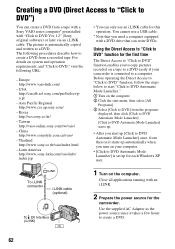
... Prepare the power source for the camcorder. Close all applications running with "Click to DVD Ver.1.2" (Sony original software) or later via an i.LINK cable. Asia Pacific Regional http://www.css.ap.sony.com/ - Taiwan http://vaio-online.sony.com/tw/vaio/ - You cannot use an i.LINK cable for this operation. Use the supplied... if your computer. • [Click to DVD Automatic Mode Launcher] is set up for each Windows XP user. Latin America http://www.sony-latin.com/vaio/info/ index.jsp • You can only use a USB cable. * Note that can create a DVD from a recorded tape.
... Prepare the power source for the camcorder. Close all applications running with "Click to DVD Ver.1.2" (Sony original software) or later via an i.LINK cable. Asia Pacific Regional http://www.css.ap.sony.com/ - Taiwan http://vaio-online.sony.com/tw/vaio/ - You cannot use an i.LINK cable for this operation. Use the supplied... if your computer. • [Click to DVD Automatic Mode Launcher] is set up for each Windows XP user. Latin America http://www.sony-latin.com/vaio/info/ index.jsp • You can only use a USB cable. * Note that can create a DVD from a recorded tape.
Operating Guide
Page 65
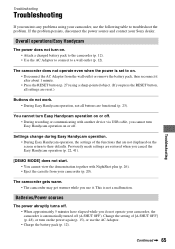
... You cannot view the demonstration together with another device via USB cable, you cannot turn on or off . • When approximately 5 minutes have elapsed while you do not work. • During Easy Handycam operation, not all buttons are functional (p. 23). Troubleshooting ... AC Adaptor from your Sony dealer. If the problem persists, disconnect the power source and contact your camcorder (p. 20). Settings change during Easy Handycam operation. • During Easy Handycam operation, the settings of [A.SHUT OFF] (p. 48), or turn Easy Handycam operation on the power again...
... You cannot view the demonstration together with another device via USB cable, you cannot turn on or off . • When approximately 5 minutes have elapsed while you do not work. • During Easy Handycam operation, not all buttons are functional (p. 23). Troubleshooting ... AC Adaptor from your Sony dealer. If the problem persists, disconnect the power source and contact your camcorder (p. 20). Settings change during Easy Handycam operation. • During Easy Handycam operation, the settings of [A.SHUT OFF] (p. 48), or turn Easy Handycam operation on the power again...

Operating Guide
Page 71
...Connecting to a computer The computer does not recognize your camcorder. • Disconnect the cable from the computer and camcorder, then connect it again securely. • Disconnect USB devices other information appear on the computer. • Disconnect the cable from connected devices are not displayed correctly. • The...53). Make sure that the A/V connecting cable is connected to the input jack of the connected device. • Set [DISP OUT] to other devices Time code and other than the keyboard, the mouse, and the camcorder from the (USB) jack on the display of another ...
...Connecting to a computer The computer does not recognize your camcorder. • Disconnect the cable from the computer and camcorder, then connect it again securely. • Disconnect USB devices other information appear on the computer. • Disconnect the cable from connected devices are not displayed correctly. • The...53). Make sure that the A/V connecting cable is connected to the input jack of the connected device. • Set [DISP OUT] to other devices Time code and other than the keyboard, the mouse, and the camcorder from the (USB) jack on the display of another ...

Operating Guide
Page 72
...). (Only when connected to the Windows computer with the USB cable) You cannot view the video recorded on a tape on the computer. • Disconnect the cable from a tape, connect your camcorder to your camcorder before the installation of the USB driver was connected to the computer with the USB cable) You cannot view the video recorded on a tape...
...). (Only when connected to the Windows computer with the USB cable) You cannot view the video recorded on a tape on the computer. • Disconnect the cable from a tape, connect your camcorder to your camcorder before the installation of the USB driver was connected to the computer with the USB cable) You cannot view the video recorded on a tape...
Operating Guide
Page 73
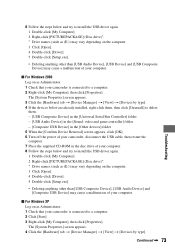
... Serial Bus Controller] folder - [USB Audio Device] in the [Sound, video and game controller] folder - [Composite USB Device] in the [Other devices] folder 5 When the [Confirm Device Removal] screen appears, click [OK]. 6 Turn off the power of your camcorder, disconnect the USB cable, then restart the computer. 7... Place the supplied CD-ROM in the disc drive of your computer. 8 Follow the steps below and try to install the USB driver again. 1 Double-click [My Computer]. 2 Right-...
... Serial Bus Controller] folder - [USB Audio Device] in the [Sound, video and game controller] folder - [Composite USB Device] in the [Other devices] folder 5 When the [Confirm Device Removal] screen appears, click [OK]. 6 Turn off the power of your camcorder, disconnect the USB cable, then restart the computer. 7... Place the supplied CD-ROM in the disc drive of your computer. 8 Follow the steps below and try to install the USB driver again. 1 Double-click [My Computer]. 2 Right-...
Operating Guide
Page 74
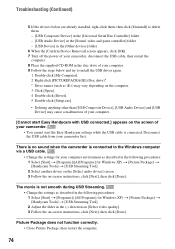
...]. 7 Turn off the power of your camcorder, disconnect the USB cable, then restart the computer. 8 Place the supplied CD-ROM in the disc drive of your computer. 9 Follow the steps below and try to the Windows computer via a USB cable. • Change the settings for Windows XP) t [Picture Package] t [Handycam Tools] t [USB Streaming Tool]. 2 Select another device...
...]. 7 Turn off the power of your camcorder, disconnect the USB cable, then restart the computer. 8 Place the supplied CD-ROM in the disc drive of your computer. 9 Follow the steps below and try to the Windows computer via a USB cable. • Change the settings for Windows XP) t [Picture Package] t [Handycam Tools] t [USB Streaming Tool]. 2 Select another device...

Operating Guide
Page 77
.... check the tab. (p. 80) Q The tape has reached the end. (p. 20, 25) • Rewind or change the tape. Disconnect the USB cable from your camcorder first. Use a new one. (p. 81) Z Re-attach the power source. (p. 12) Use new AC adapter or reinsert. (p. 12) x ...cassette is connected. Use a cleaning cassette. (p. 84) Cannot start Easy Handycam. (p. 22, 65) Cannot cancel Easy Handycam. (p. 22, 65) Cannot start Easy Handycam with USB connected. • You cannot start the Easy Handycam settings while the USB cable is damaged. QZ The tape is low. • Change the battery ...
.... check the tab. (p. 80) Q The tape has reached the end. (p. 20, 25) • Rewind or change the tape. Disconnect the USB cable from your camcorder first. Use a new one. (p. 81) Z Re-attach the power source. (p. 12) Use new AC adapter or reinsert. (p. 12) x ...cassette is connected. Use a cleaning cassette. (p. 84) Cannot start Easy Handycam. (p. 22, 65) Cannot cancel Easy Handycam. (p. 22, 65) Cannot start Easy Handycam with USB connected. • You cannot start the Easy Handycam settings while the USB cable is damaged. QZ The tape is low. • Change the battery ...
Operating Guide
Page 78
Play back the tape with the equipment that recorded it. HDV recorded tape. Cannot add audio. • Your camcorder does not allow you to add audio on a section of a tape recorded in HDV format (p. 52). 78 Cannot playback. • Your camcorder cannot play back this format. Touch . Warning indicators and messages (Continued) Invalid during Easy Handycam operation. (p. 23) USB invalid during Easy Handycam • You cannot connect the USB cable during Easy Handycam. HDV recorded tape.
Play back the tape with the equipment that recorded it. HDV recorded tape. Cannot add audio. • Your camcorder does not allow you to add audio on a section of a tape recorded in HDV format (p. 52). 78 Cannot playback. • Your camcorder cannot play back this format. Touch . Warning indicators and messages (Continued) Invalid during Easy Handycam operation. (p. 23) USB invalid during Easy Handycam • You cannot connect the USB cable during Easy Handycam. HDV recorded tape.

Marketing Specifications
Page 2
DCR-HC26 MiniDV Handycam® Camcorder Specifications General Imaging Device: 1/6" CCD Pixel Gross: 680K Recording Media: MiniDV Cassette (sold separately) Recording and Playback Times: SP: up to 60 min., LP: up to -DigitalConverter: N/A Video ...Power Adapter/In-Camera Charger (AC-L25) InfoLITHIUM® Rechargeable Battery (NP-FP30) Stereo A/V Cable CD-ROM with USB Driver (PicturePackage™ Software Ver. 1.5 for Sony) Lens Cap Optional Accessories Handycam Camcorder Starter Kit for MiniDV (ACC-DVP) High Capacity InfoLITHIUM™ Batteries (NP- i.LINK is a trademark of CIPA. ...
DCR-HC26 MiniDV Handycam® Camcorder Specifications General Imaging Device: 1/6" CCD Pixel Gross: 680K Recording Media: MiniDV Cassette (sold separately) Recording and Playback Times: SP: up to 60 min., LP: up to -DigitalConverter: N/A Video ...Power Adapter/In-Camera Charger (AC-L25) InfoLITHIUM® Rechargeable Battery (NP-FP30) Stereo A/V Cable CD-ROM with USB Driver (PicturePackage™ Software Ver. 1.5 for Sony) Lens Cap Optional Accessories Handycam Camcorder Starter Kit for MiniDV (ACC-DVP) High Capacity InfoLITHIUM™ Batteries (NP- i.LINK is a trademark of CIPA. ...


