

Operating Guide
Page 13
... battery pack 1 Slide the POWER switch to OFF(CHG). Continued , 13 Disconnect the AC Adaptor from the DC IN jack holding both the camcorder and the DC plug. The battery pack will not lose its charge in the direction of the arrow with LCD screen. Charging time Approximate time... storing it for an extended period (p. 81). Bottom: Recording with viewfinder while the LCD panel closed. * Typical recording time shows the time when you use an outside power source You can operate your camcorder using the power from the wall outlet by making the same connections as you fully charge a...
... battery pack 1 Slide the POWER switch to OFF(CHG). Continued , 13 Disconnect the AC Adaptor from the DC IN jack holding both the camcorder and the DC plug. The battery pack will not lose its charge in the direction of the arrow with LCD screen. Charging time Approximate time... storing it for an extended period (p. 81). Bottom: Recording with viewfinder while the LCD panel closed. * Typical recording time shows the time when you use an outside power source You can operate your camcorder using the power from the wall outlet by making the same connections as you fully charge a...
Operating Guide
Page 14
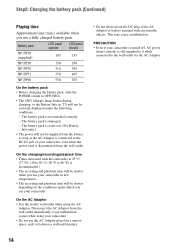
...with any malfunction occurs while using the AC Adaptor. Disconnect the AC Adaptor from the wall outlet. Battery pack LCD panel opened LCD panel closed NP-FP30 (supplied) NP-FP50 105 135 150 190 NP-FP70 310 395 NP-FP71 370 465 NP-FP90 550 705 On the ... will not be shorter depending on the conditions under the following conditions. - The battery pack is not attached correctly. - PRECAUTION • Even if your camcorder is turned off, AC power (house current) is worn-out. (For Battery Info only.) • The power will not be correctly displayed under which you...
...with any malfunction occurs while using the AC Adaptor. Disconnect the AC Adaptor from the wall outlet. Battery pack LCD panel opened LCD panel closed NP-FP30 (supplied) NP-FP50 105 135 150 190 NP-FP70 310 395 NP-FP71 370 465 NP-FP90 550 705 On the ... will not be shorter depending on the conditions under the following conditions. - The battery pack is not attached correctly. - PRECAUTION • Even if your camcorder is turned off, AC power (house current) is worn-out. (For Battery Info only.) • The power will not be correctly displayed under which you...

Operating Guide
Page 16
Viewfinder 90 degrees (max.) 1 90 degrees to the camcorder • Do not press the buttons on the LCD screen is poor. This is convenient during playback operations... adjust the LCD panel. • If you rotate the LCD panel 180 degrees to the lens side, you can close the LCD panel with the LCD screen facing out. Viewfinder lens adjustment lever Move it to the best angle to record... the LCD panel and viewfinder The LCD panel Open the LCD panel 90 degrees to the camcorder (1), then rotate it until the picture is clear. • You can adjust the brightness of the LCD screen.
Viewfinder 90 degrees (max.) 1 90 degrees to the camcorder • Do not press the buttons on the LCD screen is poor. This is convenient during playback operations... adjust the LCD panel. • If you rotate the LCD panel 180 degrees to the lens side, you can close the LCD panel with the LCD screen facing out. Viewfinder lens adjustment lever Move it to the best angle to record... the LCD panel and viewfinder The LCD panel Open the LCD panel 90 degrees to the camcorder (1), then rotate it until the picture is clear. • You can adjust the brightness of the LCD screen.
Operating Guide
Page 20
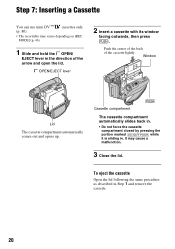
Push the center of the back of the arrow and open the lid. It may cause a malfunction. 3 Close the lid. To eject the cassette Open the lid following the same procedure as described in . OPEN/EJECT lever 2 Insert a cassette with its window... facing outwards, then press . Cassette compartment The cassette compartment automatically slides back in. • Do not force the cassette compartment closed by pressing the portion marked {DO NOT PUSH} while it is sliding in Step 1 and remove the cassette. 20 Window Lid The cassette compartment automatically...
Push the center of the back of the arrow and open the lid. It may cause a malfunction. 3 Close the lid. To eject the cassette Open the lid following the same procedure as described in . OPEN/EJECT lever 2 Insert a cassette with its window... facing outwards, then press . Cassette compartment The cassette compartment automatically slides back in. • Do not force the cassette compartment closed by pressing the portion marked {DO NOT PUSH} while it is sliding in Step 1 and remove the cassette. 20 Window Lid The cassette compartment automatically...
Operating Guide
Page 26
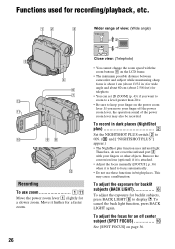
... be recorded. Therefore, do not cover the infrared port 3 with the zoom buttons qa on the LCD frame. • The minimum possible distance between camcorder and subject while maintaining sharp focus is attached. • Adjust the focus manually ([FOCUS], p. 36) when it further for backlit subjects, press BACK ...LIGHT 6 to keep your finger on the power zoom lever. To cancel the back light function, press BACK LIGHT again. Close view: (Telephoto) • You cannot change the zoom speed with your fingers or other objects. If you want to zoom to a level ...
... be recorded. Therefore, do not cover the infrared port 3 with the zoom buttons qa on the LCD frame. • The minimum possible distance between camcorder and subject while maintaining sharp focus is attached. • Adjust the focus manually ([FOCUS], p. 36) when it further for backlit subjects, press BACK ...LIGHT 6 to keep your finger on the power zoom lever. To cancel the back light function, press BACK LIGHT again. Close view: (Telephoto) • You cannot change the zoom speed with your fingers or other objects. If you want to zoom to a level ...

Operating Guide
Page 34
.... 4 Select the desired setting, then touch t •With some settings, you to the previous screen. 34 EXEC RET. After finishing the settings, touch (close) to hide the menu screen. The menu index screen appears. 2 Select the desired menu. x To use the operation buttons on the respective lamp. EXEC RET... for viewing/editing 2 Touch the LCD screen to select the menu item. Each touch of [ RET.] takes you do not have to touch . (Close). Using the Menu Using the menu items Follow the instructions below to use each of the menu items listed after this page. 1 Slide the POWER...
.... 4 Select the desired setting, then touch t •With some settings, you to the previous screen. 34 EXEC RET. After finishing the settings, touch (close) to hide the menu screen. The menu index screen appears. 2 Select the desired menu. x To use the operation buttons on the respective lamp. EXEC RET... for viewing/editing 2 Touch the LCD screen to select the menu item. Each touch of [ RET.] takes you do not have to touch . (Close). Using the Menu Using the menu items Follow the instructions below to use each of the menu items listed after this page. 1 Slide the POWER...
Operating Guide
Page 35
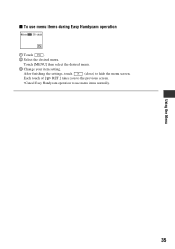
x To use menu items normally. Using the Menu 35 Touch [MENU] then select the desired menu. 3 Change your item setting. After finishing the settings, touch (close) to use menu items during Easy Handycam operation 60min STBY 0:00:00 FN 1 Touch . 2 Select the desired menu. Each touch of [ RET.] takes you to the previous screen. •Cancel Easy Handycam operation to hide the menu screen.
x To use menu items normally. Using the Menu 35 Touch [MENU] then select the desired menu. 3 Change your item setting. After finishing the settings, touch (close) to use menu items during Easy Handycam operation 60min STBY 0:00:00 FN 1 Touch . 2 Select the desired menu. Each touch of [ RET.] takes you to the previous screen. •Cancel Easy Handycam operation to hide the menu screen.
Operating Guide
Page 36
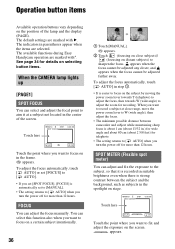
... focal point to aim it is recorded in suitable brightness even when there is strong contrast between camcorder and subject while maintaining sharp focus is about 1 cm (about 13/32 in.) for wide ...want to focus on a certain subject intentionally. 36 1 Touch [MANUAL]. 9 appears. 2 Touch (focusing on close range, move the power zoom lever to record a subject at a subject not located in the frame. 9 appears... the display (PAGE). The available functions during Easy Handycam operation are marked with B. appears. Operation button items Available operation buttons vary depending on the position ...
... focal point to aim it is recorded in suitable brightness even when there is strong contrast between camcorder and subject while maintaining sharp focus is about 1 cm (about 13/32 in.) for wide ...want to focus on a certain subject intentionally. 36 1 Touch [MANUAL]. 9 appears. 2 Touch (focusing on close range, move the power zoom lever to record a subject at a subject not located in the frame. 9 appears... the display (PAGE). The available functions during Easy Handycam operation are marked with B. appears. Operation button items Available operation buttons vary depending on the position ...
Operating Guide
Page 37
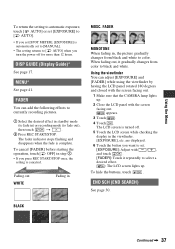
Fading out WHITE Fading in ) or recording mode (to select a desired effect. : The LCD screen lights up . 2 Close the LCD panel with / , and touch . [FADER]: Touch it gradually changes from black and white to [ AUTO] when you turn the power off . 5 Touch the ... mode (to fade in MOSC. FADER You can adjust [EXPOSURE] and [FADER] while using the viewfinder by having the LCD panel rotated 180 degrees and closed with the screen facing out. 1 Make sure that the CAMERA lamp lights up . The LCD screen is canceled. Using the Menu To return the setting...
Fading out WHITE Fading in ) or recording mode (to select a desired effect. : The LCD screen lights up . 2 Close the LCD panel with / , and touch . [FADER]: Touch it gradually changes from black and white to [ AUTO] when you turn the power off . 5 Touch the ... mode (to fade in MOSC. FADER You can adjust [EXPOSURE] and [FADER] while using the viewfinder by having the LCD panel rotated 180 degrees and closed with the screen facing out. 1 Make sure that the CAMERA lamp lights up . The LCD screen is canceled. Using the Menu To return the setting...
Operating Guide
Page 38
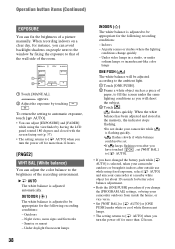
...60min AUTO STBY 0:00:00 OK 1 MANU- At party scenes or studios where the lighting conditions change the [PROGRAM AE] settings, or bring your camcorder while is adjusted to [ AUTO] when you turn the power off for the following recording conditions: - To return the setting to automatic exposure, touch ... not be set. •If keeps flashing even after outside use while using the viewfinder by having the LCD panel rotated 180 degrees and closed with the screen facing out (p. 37). • The setting returns to the brightness of the recording environment. When the white balance has ...
...60min AUTO STBY 0:00:00 OK 1 MANU- At party scenes or studios where the lighting conditions change the [PROGRAM AE] settings, or bring your camcorder while is adjusted to [ AUTO] when you turn the power off for the following recording conditions: - To return the setting to automatic exposure, touch ... not be set. •If keeps flashing even after outside use while using the viewfinder by having the LCD panel rotated 180 degrees and closed with the screen facing out (p. 37). • The setting returns to the brightness of the recording environment. When the white balance has ...

Operating Guide
Page 57
...Package is displayed as Administrators for installation for Windows 2000/Windows XP. 1 Confirm that your camcorder is not connected to the computer. Installing on a Windows computer Log on the computer before connecting your camcorder and your computer. Close all applications running on as "1.5." The software to the computer with the supplied CD-ROM... computer. 2 Turn on your computer before installing the software. 3 Place the supplied CD-ROM in the OS. Continued , 57 • When you connect your camcorder to a Macintosh computer using a USB cable, you are using.
...Package is displayed as Administrators for installation for Windows 2000/Windows XP. 1 Confirm that your camcorder is not connected to the computer. Installing on a Windows computer Log on the computer before connecting your camcorder and your computer. Close all applications running on as "1.5." The software to the computer with the supplied CD-ROM... computer. 2 Turn on your computer before installing the software. 3 Place the supplied CD-ROM in the OS. Continued , 57 • When you connect your camcorder to a Macintosh computer using a USB cable, you are using.

Operating Guide
Page 60
... on how to use ImageMixer VCD2, refer to . 8 Double-click the unzipped [ImageMixerVCD2_Install]. 9 When the user acceptance screen is displayed, enter your camcorder and computer, see "First Step Guide" on the supplied CD-ROM (p. 61). • If you have any questions about Picture Package, contact information...(Restart). The installation of your choice. 7 Double-click [IMXINST.SIT] in the folder it was copied to software's on the computer. Close all applications running on the computer before installing the software. 3 Place the supplied CD-ROM in the disc drive of your computer. 4 ...
... on how to use ImageMixer VCD2, refer to . 8 Double-click the unzipped [ImageMixerVCD2_Install]. 9 When the user acceptance screen is displayed, enter your camcorder and computer, see "First Step Guide" on the supplied CD-ROM (p. 61). • If you have any questions about Picture Package, contact information...(Restart). The installation of your choice. 7 Double-click [IMXINST.SIT] in the folder it was copied to software's on the computer. Close all applications running on the computer before installing the software. 3 Place the supplied CD-ROM in the disc drive of your computer. 4 ...
Operating Guide
Page 62
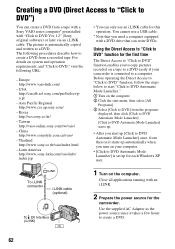
...[Click to DVD Automatic Mode Launcher] starts up [Click to DVD Automatic Mode Launcher] once, from then on your camcorder is automatically copied and written to DVD Ver.1.2" (Sony original software) or later via an i.LINK cable. The following URL: - For details on the computer. Thailand http://...www.sony.co.th/vaio/index.html - Close all applications running with "Click to a DVD. Taiwan http://vaio-online.sony.com/tw/vaio/ - Asia ...
...[Click to DVD Automatic Mode Launcher] starts up [Click to DVD Automatic Mode Launcher] once, from then on your camcorder is automatically copied and written to DVD Ver.1.2" (Sony original software) or later via an i.LINK cable. The following URL: - For details on the computer. Thailand http://...www.sony.co.th/vaio/index.html - Close all applications running with "Click to a DVD. Taiwan http://vaio-online.sony.com/tw/vaio/ - Asia ...
Operating Guide
Page 66
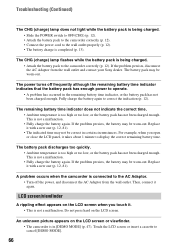
...(p. 12, 81). LCD screen/viewfinder A rippling effect appears on the LCD screen when you open or close the LCD panel, it again. Replace it . • This is too high or too low, ...The power turns off the power, and disconnect the AC Adaptor from the wall outlet and contact your Sony dealer. Troubleshooting (Continued) The CHG (charge) lamp does not light while the battery pack is being... (p. 12). • The battery charge is being charged. • Attach the battery pack to the camcorder correctly (p. 12). The CHG (charge) lamp flashes while the battery pack is completed (p. 13). The ...
...(p. 12, 81). LCD screen/viewfinder A rippling effect appears on the LCD screen when you open or close the LCD panel, it again. Replace it . • This is too high or too low, ...The power turns off the power, and disconnect the AC Adaptor from the wall outlet and contact your Sony dealer. Troubleshooting (Continued) The CHG (charge) lamp does not light while the battery pack is being... (p. 12). • The battery charge is being charged. • Attach the battery pack to the camcorder correctly (p. 12). The CHG (charge) lamp flashes while the battery pack is completed (p. 13). The ...
Operating Guide
Page 67
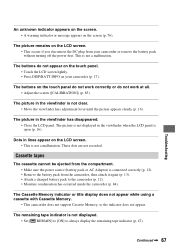
...off the power first. The Cassette Memory indicator or title display does not appear while using a cassette with Cassette Memory. • This camcorder does not support Cassette Memory, so the indicator does not appear. The picture in the viewfinder is connected correctly (p. 12). • ... lever until the picture appears clearly (p. 16). The buttons on the screen (p. 76). The picture in the viewfinder has disappeared. • Close the LCD panel. Continued , 67 These dots are not recorded. Troubleshooting An unknown indicator appears on the screen. • A warning indicator ...
...off the power first. The Cassette Memory indicator or title display does not appear while using a cassette with Cassette Memory. • This camcorder does not support Cassette Memory, so the indicator does not appear. The picture in the viewfinder is connected correctly (p. 12). • ... lever until the picture appears clearly (p. 16). The buttons on the screen (p. 76). The picture in the viewfinder has disappeared. • Close the LCD panel. Continued , 67 These dots are not recorded. Troubleshooting An unknown indicator appears on the screen. • A warning indicator ...
Operating Guide
Page 74
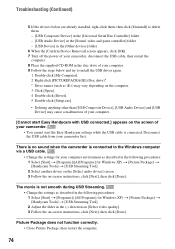
...[Next], then click [Done]. The movie is connected. Picture Package does not function correctly. • Close Picture Package, then restart the computer. 74 Disconnect the USB cable from your camcorder first. Troubleshooting (Continued) 5 If the devices below are already installed, right-click them, then click ... the USB cable, then restart the computer. 8 Place the supplied CD-ROM in the disc drive of your camcorder. • You cannot start the Easy Handycam settings while the USB cable is not smooth during USB Streaming. • Change the settings as described in the following ...
...[Next], then click [Done]. The movie is connected. Picture Package does not function correctly. • Close Picture Package, then restart the computer. 74 Disconnect the USB cable from your camcorder first. Troubleshooting (Continued) 5 If the devices below are already installed, right-click them, then click ... the USB cable, then restart the computer. 8 Place the supplied CD-ROM in the disc drive of your camcorder. • You cannot start the Easy Handycam settings while the USB cable is not smooth during USB Streaming. • Change the settings as described in the following ...
Operating Guide
Page 75
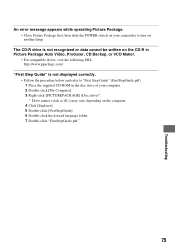
...the procedure below and refer to "First Step Guide" (FirstStepGuide.pdf). 1 Place the supplied CD-ROM in the disc drive of your camcorder to turn on the computer. 4 Click [Explorer]. 5 Double-click [FirstStepGuide]. 6 Double-click the desired language folder. 7 Double-click ..."FirstStepGuide.pdf." 75 Troubleshooting An error message appears while operating Picture Package. • Close Picture Package first, then slide the POWER switch on your computer. 2 Double-click [My Computer]. 3 Right-click [PICTUREPACKAGE] (Disc drive)*. *...
...the procedure below and refer to "First Step Guide" (FirstStepGuide.pdf). 1 Place the supplied CD-ROM in the disc drive of your camcorder to turn on the computer. 4 Click [Explorer]. 5 Double-click [FirstStepGuide]. 6 Double-click the desired language folder. 7 Double-click ..."FirstStepGuide.pdf." 75 Troubleshooting An error message appears while operating Picture Package. • Close Picture Package first, then slide the POWER switch on your computer. 2 Double-click [My Computer]. 3 Right-click [PICTUREPACKAGE] (Disc drive)*. *...
Operating Guide
Page 84
...dirty, video or sound distortion may stick to condense, your camcorder for a long time • Periodically turn off for about one hour). Do not close the cassette lid until the cassette is moisture inside your local authorized Sony service facility. - Video head • If the video ... cassette is turned on the lens. Please contact your Sony dealer or local authorized Sony service facility to a warm place, moisture may have the video heads replaced. wash off . - [x Dirty video head. The indicator will work. Your camcorder can be because the video heads are touched. This is...
...dirty, video or sound distortion may stick to condense, your camcorder for a long time • Periodically turn off for about one hour). Do not close the cassette lid until the cassette is moisture inside your local authorized Sony service facility. - Video head • If the video ... cassette is turned on the lens. Please contact your Sony dealer or local authorized Sony service facility to a warm place, moisture may have the video heads replaced. wash off . - [x Dirty video head. The indicator will work. Your camcorder can be because the video heads are touched. This is...

Marketing Specifications
Page 1
MiniDV Recording Offers up to 500 lines of horizontal resolution, 3X the color bandwidth and a significantly higher signal/noise ratio, to provide spectacular video performance. 20X Optical/800X Digital Zoom The optical zoom helps to bring the action close...excellent viewing clarity with increased contrast. NightShot® Plus Infrared System With Sony's NightShot Infrared System you can continuously record for up to 9 hours...Interpolation means that extreme digital zooming is clearer, with the compact DCR-HC26 MiniDV Handycam camcorder. i.LINK® DV Interface1 A digital high-speed bi-...
MiniDV Recording Offers up to 500 lines of horizontal resolution, 3X the color bandwidth and a significantly higher signal/noise ratio, to provide spectacular video performance. 20X Optical/800X Digital Zoom The optical zoom helps to bring the action close...excellent viewing clarity with increased contrast. NightShot® Plus Infrared System With Sony's NightShot Infrared System you can continuously record for up to 9 hours...Interpolation means that extreme digital zooming is clearer, with the compact DCR-HC26 MiniDV Handycam camcorder. i.LINK® DV Interface1 A digital high-speed bi-...


