
Operating Guide
Page 4
When the power cord or plug is in the operating instructions. If the set does not operate normally when following conditions: - Refer all servicing to rain or water. - If liquid has been spilled or objects have the same characteristics as the original parts. Replacement parts When replacement parts are specified in safe operating condition. 4 Safety Check Upon completion of any service or repairs to the set from the wall...
When the power cord or plug is in the operating instructions. If the set does not operate normally when following conditions: - Refer all servicing to rain or water. - If liquid has been spilled or objects have the same characteristics as the original parts. Replacement parts When replacement parts are specified in safe operating condition. 4 Safety Check Upon completion of any service or repairs to the set from the wall...
Operating Guide
Page 6
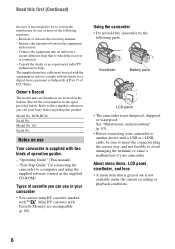
... measures: - "First Step Guide" for connecting the camcorder to which the receiver is connected. - Mini DV cassettes with . About menu items, LCD panel, viewfinder, and lens • A menu item that to a computer and using the supplied software (stored on the supplied CD-ROM) Types of cassette you call your camcorder. DCR-HC26 Serial No. Serial No. Consult the dealer or an experienced radio/TV technician for a digital device pursuant to avoid damaging...
... measures: - "First Step Guide" for connecting the camcorder to which the receiver is connected. - Mini DV cassettes with . About menu items, LCD panel, viewfinder, and lens • A menu item that to a computer and using the supplied software (stored on the supplied CD-ROM) Types of cassette you call your camcorder. DCR-HC26 Serial No. Serial No. Consult the dealer or an experienced radio/TV technician for a digital device pursuant to avoid damaging...

Operating Guide
Page 7
... pictures of time may cause malfunctions. • Do not aim at dusk. Black point White, red, blue or green point • Exposing the LCD screen, the viewfinder, or the lens to change without any way. Doing so might cause your camcorder if necessary (p. 47). • Design and specifications of recording media and accessories are subject to direct sunlight for the contents of the camcorder, storage media...
... pictures of time may cause malfunctions. • Do not aim at dusk. Black point White, red, blue or green point • Exposing the LCD screen, the viewfinder, or the lens to change without any way. Doing so might cause your camcorder if necessary (p. 47). • Design and specifications of recording media and accessories are subject to direct sunlight for the contents of the camcorder, storage media...
Operating Guide
Page 8
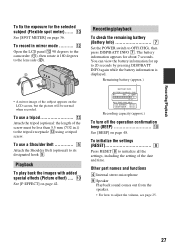
... adjust the focus for an off center subject (SPOT FOCUS) To fix the exposure for the selected subject (Flexible spot meter) To record in mirror mode To use a tripod To use a Shoulder Belt Playback To play back the images with added special effects (Picture effect) Recording/playback To check the remaining battery (Battery Info) To turn off the operation confirmation beep (BEEP) To initialize the settings (RESET) Other part names and functions Indicators displayed...
... adjust the focus for an off center subject (SPOT FOCUS) To fix the exposure for the selected subject (Flexible spot meter) To record in mirror mode To use a tripod To use a Shoulder Belt Playback To play back the images with added special effects (Picture effect) Recording/playback To check the remaining battery (Battery Info) To turn off the operation confirmation beep (BEEP) To initialize the settings (RESET) Other part names and functions Indicators displayed...
Operating Guide
Page 27
... hook 5. Other part names and functions D Internal stereo microphone I Speaker Playback sound comes out from the speaker. • For how to the lens side (2). 2 1 • A mirror-image of the date and time. You can view the battery information for about 7 seconds. Playback To play back the images with added special effects (Picture effect) .... 0 See [P EFFECT] on page 48. Remaining battery (approx.) BATTERY INFO BATTERY CHARGE LEVEL 0% 50% 100% REC TIME AVAILABLE LCD SCREEN : 86 min...
... hook 5. Other part names and functions D Internal stereo microphone I Speaker Playback sound comes out from the speaker. • For how to the lens side (2). 2 1 • A mirror-image of the date and time. You can view the battery information for about 7 seconds. Playback To play back the images with added special effects (Picture effect) .... 0 See [P EFFECT] on page 48. Remaining battery (approx.) BATTERY INFO BATTERY CHARGE LEVEL 0% 50% 100% REC TIME AVAILABLE LCD SCREEN : 86 min...
Operating Guide
Page 32
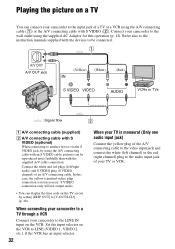
Playing the picture on a TV You can connect your camcorder to the input jack of an A/V connecting cable. S VIDEO connection only will not output audio. • You can be connected. 1 A/V OUT A/V OUT jack (Yellow) (White) (Red) VCRs or TVs : Signal flow 2 A A/V connecting cable (supplied) B A/V connecting cable with an S VIDEO cable, pictures can display the time code on the TV screen by using the supplied AC Adaptor for this case, the yellow (standard video) plug connection is monaural (Only one audio input jack) Connect the...
Playing the picture on a TV You can connect your camcorder to the input jack of an A/V connecting cable. S VIDEO connection only will not output audio. • You can be connected. 1 A/V OUT A/V OUT jack (Yellow) (White) (Red) VCRs or TVs : Signal flow 2 A A/V connecting cable (supplied) B A/V connecting cable with an S VIDEO cable, pictures can display the time code on the TV screen by using the supplied AC Adaptor for this case, the yellow (standard video) plug connection is monaural (Only one audio input jack) Connect the...

Operating Guide
Page 55
... following operations by date. Save the images on a tape. Burning Video CD You can view live or recorded images from those available for copying video and sound recorded on a computer. Video and still images are 2 ways to connect your camcorder. USB Driver - "First Step Guide" Using a Computer Continued , 55 i.LINK cable This method is transferred in folders by connecting your camcorder to Type B-mini.). ImageMixer VCD2 - USB cable This method is recommended. - USB Streaming Tool You can compose a video CD with a USB cable. A Sony...
... following operations by date. Save the images on a tape. Burning Video CD You can view live or recorded images from those available for copying video and sound recorded on a computer. Video and still images are 2 ways to connect your camcorder. USB Driver - "First Step Guide" Using a Computer Continued , 55 i.LINK cable This method is transferred in folders by connecting your camcorder to Type B-mini.). ImageMixer VCD2 - USB cable This method is recommended. - USB Streaming Tool You can compose a video CD with a USB cable. A Sony...
Operating Guide
Page 61
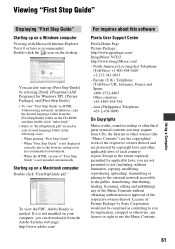
... the respective owners thereof and are not permitted to the public, transferring, distributing, lending, licensing, selling and publishing) any license or right to use (including, without limitation, copying, modifying, reproducing, uploading, transmitting or placing to the external network accessible to use the Music Contents. 61 Viewing "First Step Guide" Using a Computer Displaying "First Step Guide" Starting up on a Macintosh computer Double-click "FirstStepGuide.pdf."
... the respective owners thereof and are not permitted to the public, transferring, distributing, lending, licensing, selling and publishing) any license or right to use (including, without limitation, copying, modifying, reproducing, uploading, transmitting or placing to the external network accessible to use the Music Contents. 61 Viewing "First Step Guide" Using a Computer Displaying "First Step Guide" Starting up on a Macintosh computer Double-click "FirstStepGuide.pdf."
Operating Guide
Page 65
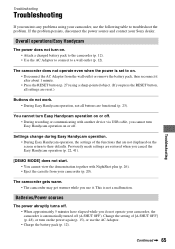
... not work. • During Easy Handycam operation, not all settings are restored when you cancel the Easy Handycam operation (p. 22, 41). [DEMO MODE] does not start. • You cannot view the demonstration together with another device via USB cable, you cannot turn on. • Attach a charged battery pack to the camcorder (p. 12). • Use the AC Adaptor to connect to a wall outlet (p. 12). If the problem persists, disconnect the power...
... not work. • During Easy Handycam operation, not all settings are restored when you cancel the Easy Handycam operation (p. 22, 41). [DEMO MODE] does not start. • You cannot view the demonstration together with another device via USB cable, you cannot turn on. • Attach a charged battery pack to the camcorder (p. 12). • Use the AC Adaptor to connect to a wall outlet (p. 12). If the problem persists, disconnect the power...
Operating Guide
Page 70
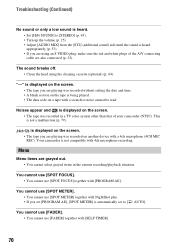
...]. is displayed on the screen. • The tape you are also connected (p. 32). "---" is displayed on the screen. • The tape you are grayed out. • You cannot select grayed items in a TV color system other than that of the A/V connecting cable are playing was recorded on a tape with a 4ch microphone (4CH MIC REC). The sound breaks off. • Clean the head using an S VIDEO plug, make sure the red and white plugs of your camcorder (NTSC).
...]. is displayed on the screen. • The tape you are also connected (p. 32). "---" is displayed on the screen. • The tape you are grayed out. • You cannot select grayed items in a TV color system other than that of the A/V connecting cable are playing was recorded on a tape with a 4ch microphone (4CH MIC REC). The sound breaks off. • Clean the head using an S VIDEO plug, make sure the red and white plugs of your camcorder (NTSC).

Operating Guide
Page 72
... [Remove] to delete them. - [USB Audio Device] in the [Sound, video and game controllers] folder - [USB Device] in the [Other devices] folder - [USB Composite Device] in the [Universal Serial Bus Controller] folder 5 When the [Confirm Device Removal] screen appears, click [OK]. 6 Turn off the power of your camcorder, disconnect the USB cable, then restart the computer. 7 Place the supplied CD-ROM in the OS. To copy recordings from the computer, then connect it again. • Slide the POWER switch...
... [Remove] to delete them. - [USB Audio Device] in the [Sound, video and game controllers] folder - [USB Device] in the [Other devices] folder - [USB Composite Device] in the [Universal Serial Bus Controller] folder 5 When the [Confirm Device Removal] screen appears, click [OK]. 6 Turn off the power of your camcorder, disconnect the USB cable, then restart the computer. 7 Place the supplied CD-ROM in the OS. To copy recordings from the computer, then connect it again. • Slide the POWER switch...
Operating Guide
Page 73
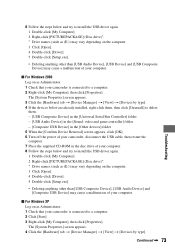
...] t [View] t [Devices by type]. 4 If the devices below are already installed, right-click them, then click [Uninstall] to delete them. - [USB Composite Device] in the [Universal Serial Bus Controller] folder - [USB Audio Device] in the [Sound, video and game controller] folder - [Composite USB Device] in the [Other devices] folder 5 When the [Confirm Device Removal] screen appears, click [OK]. 6 Turn off the power of your camcorder, disconnect the USB cable, then restart the computer. 7 Place the supplied CD-ROM...
...] t [View] t [Devices by type]. 4 If the devices below are already installed, right-click them, then click [Uninstall] to delete them. - [USB Composite Device] in the [Universal Serial Bus Controller] folder - [USB Audio Device] in the [Sound, video and game controller] folder - [Composite USB Device] in the [Other devices] folder 5 When the [Confirm Device Removal] screen appears, click [OK]. 6 Turn off the power of your camcorder, disconnect the USB cable, then restart the computer. 7 Place the supplied CD-ROM...
Operating Guide
Page 74
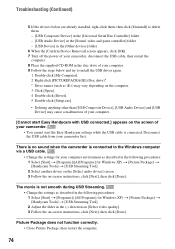
... Easy Handycam with USB connected.] appears on the screen of your camcorder first. Troubleshooting (Continued) 5 If the devices below are already installed, right-click them, then click [Uninstall] to delete them. - [USB Composite Device] in the [Universal Serial Bus Controller] folder - [USB Audio Device] in the [Sound, video and game controller] folder - [USB Device] in the [Other devices] folder 6 When the [Confirm Device Removal] screen appears, click [OK]. 7 Turn off the power of your camcorder, disconnect the USB cable, then...
... Easy Handycam with USB connected.] appears on the screen of your camcorder first. Troubleshooting (Continued) 5 If the devices below are already installed, right-click them, then click [Uninstall] to delete them. - [USB Composite Device] in the [Universal Serial Bus Controller] folder - [USB Audio Device] in the [Sound, video and game controller] folder - [USB Device] in the [Other devices] folder 6 When the [Confirm Device Removal] screen appears, click [OK]. 7 Turn off the power of your camcorder, disconnect the USB cable, then...

Operating Guide
Page 77
x Others Cannot record due to a tape recorded on other devices by 4CH MIC REC. Use a cleaning cassette. (p. 84) Cannot start Easy Handycam. (p. 22, 65) Cannot cancel Easy Handycam. (p. 22, 65) Cannot start Easy Handycam with USB connected. • You cannot start the Easy Handycam settings while the USB cable is low. • Change the battery (p. 12, 81). Disconnect the USB cable from your camcorder first. Troubleshooting Continued , 77 x Battery/Power Use the "InfoLITHIUM" battery pack. (p. 81) Battery level is connected. Use a new one...
x Others Cannot record due to a tape recorded on other devices by 4CH MIC REC. Use a cleaning cassette. (p. 84) Cannot start Easy Handycam. (p. 22, 65) Cannot cancel Easy Handycam. (p. 22, 65) Cannot start Easy Handycam with USB connected. • You cannot start the Easy Handycam settings while the USB cable is low. • Change the battery (p. 12, 81). Disconnect the USB cable from your camcorder first. Troubleshooting Continued , 77 x Battery/Power Use the "InfoLITHIUM" battery pack. (p. 81) Battery level is connected. Use a new one...
Operating Guide
Page 80
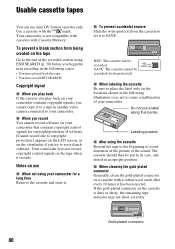
... another video camera connected to your camcorder. x When labeling the cassette Be sure to place the label only on the cassette to set it to the end of your camcorder contains copyright signals, you cannot copy it . Labeling position x After using the cassette Rewind the tape to the beginning to avoid distortion of software. [Cannot record due to copyright protection.] appears on the LCD screen, or...
... another video camera connected to your camcorder. x When labeling the cassette Be sure to place the label only on the cassette to set it to the end of your camcorder contains copyright signals, you cannot copy it . Labeling position x After using the cassette Rewind the tape to the beginning to avoid distortion of software. [Cannot record due to copyright protection.] appears on the LCD screen, or...
Operating Guide
Page 89
... AUDIO MODE 46 AUTO SHTR (Auto shutter 43 A.SHUT OFF (Auto shut off 48 A/V connecting cable .....32, 49 A/V OUT jack 32, 49 B BACK LIGHT 26, 69 BATT (battery) release lever 13 Battery Battery info 27 Battery pack 12 Charging time 13 Playing time 14 Recording time 13 Remaining battery .........28 BEACH&SKI 42 BEEP 48 BLACK 37 BURN DVD 40, 62 BURN VCD 40 B&W 43 C CALIBRATION 85 CAM DATA 39 CAMERA SET menu........... 43 Cassette 20, 80 Insert/Eject...
... AUDIO MODE 46 AUTO SHTR (Auto shutter 43 A.SHUT OFF (Auto shut off 48 A/V connecting cable .....32, 49 A/V OUT jack 32, 49 B BACK LIGHT 26, 69 BATT (battery) release lever 13 Battery Battery info 27 Battery pack 12 Charging time 13 Playing time 14 Recording time 13 Remaining battery .........28 BEACH&SKI 42 BEEP 48 BLACK 37 BURN DVD 40, 62 BURN VCD 40 B&W 43 C CALIBRATION 85 CAM DATA 39 CAMERA SET menu........... 43 Cassette 20, 80 Insert/Eject...
Operating Guide
Page 90
... Power cord 12 POWER switch 15 Pre-installed rechargeable battery 85 PROGRAM AE 42, 71 R REC CTRL (Recording control 51 REC MODE (Recording mode 46 Rec review 31 REC START/STOP button 22, 24 Rechargeable battery pack See Battery Recording 24 Recording capacity 28 Recording time 13 REMAIN 47 RESET button 27 Reversal Playback 40 S S VIDEO cable 32, 49 S VIDEO jack 32, 49 Searching for the starting point 30 SELF TIMER 39 Self-diagnosis display ..........76 SEPIA 43 Setting the date and time ......19 SETUP MENU menu...
... Power cord 12 POWER switch 15 Pre-installed rechargeable battery 85 PROGRAM AE 42, 71 R REC CTRL (Recording control 51 REC MODE (Recording mode 46 Rec review 31 REC START/STOP button 22, 24 Rechargeable battery pack See Battery Recording 24 Recording capacity 28 Recording time 13 REMAIN 47 RESET button 27 Reversal Playback 40 S S VIDEO cable 32, 49 S VIDEO jack 32, 49 Searching for the starting point 30 SELF TIMER 39 Self-diagnosis display ..........76 SEPIA 43 Setting the date and time ......19 SETUP MENU menu...
Operating Guide
Page 91
... (White balance 38, 71 Wide angle 26 WIDE DISP (Wide display 46 WIDE SEL (Wide select)..... 44 Windows 56, 57 WORLD TIME 48 Write-protect tab 80 Z Zoom 26 Zoom lever 26 Additional Information U USB jack 54 USB STREAM 47 USB Streaming 47 Using abroad 79 V V SPD PLAY (Various speed playback) .....40 VCR SET menu 45 VF B.L. (Viewfinder back light).........45 Video head 84 Video operation buttons........28 Viewfinder 16 Back light 45 Viewfinder lens adjustment...
... (White balance 38, 71 Wide angle 26 WIDE DISP (Wide display 46 WIDE SEL (Wide select)..... 44 Windows 56, 57 WORLD TIME 48 Write-protect tab 80 Z Zoom 26 Zoom lever 26 Additional Information U USB jack 54 USB STREAM 47 USB Streaming 47 Using abroad 79 V V SPD PLAY (Various speed playback) .....40 VCR SET menu 45 VF B.L. (Viewfinder back light).........45 Video head 84 Video operation buttons........28 Viewfinder 16 Back light 45 Viewfinder lens adjustment...

Marketing Specifications
Page 1
...-speed bi-directional interface which provides Audio/Video communication between devices equipped with exceptional video (up from far away. The high resolution 123K pixel LCD screen rotates up to perform optimally, such as camcorders, digital VTRs, capture cards and PCs. Photo Mode Using Sony's Adaptive Frame Interpolation for up to 9 hours (Viewfinder) or up to -life color saturation and perfect renditions of the camcorder, the DCR-HC26 features Zoom and Record buttons on the tape...
...-speed bi-directional interface which provides Audio/Video communication between devices equipped with exceptional video (up from far away. The high resolution 123K pixel LCD screen rotates up to perform optimally, such as camcorders, digital VTRs, capture cards and PCs. Photo Mode Using Sony's Adaptive Frame Interpolation for up to 9 hours (Viewfinder) or up to -life color saturation and perfect renditions of the camcorder, the DCR-HC26 features Zoom and Record buttons on the tape...

Marketing Specifications
Page 2
... Focus: Full Range Auto, Manual (Touch Panel) Progressive Shutter Mode: N/A Shutter Speed: Auto, 1/60-1/4000 (AE Mode) Optical Zoom: 20X Digital Zoom: 800X Lens Type: Carl Zeiss® Vario-Tessar® Power 1. PictBridge is a registered trademark of Apple Computer, Inc. Macintosh is a trademark of Carl Zeiss. Actual battery life may not communicate with S-Video (VMC-30FS) UPC Code: 027242688698 Display LCD Screen: 2.5" (123K Pixels) SwivelScreen™ LCD Display Hardware Viewfinder: Color (123K Pixels) Docking Station: N/A Microphone...
... Focus: Full Range Auto, Manual (Touch Panel) Progressive Shutter Mode: N/A Shutter Speed: Auto, 1/60-1/4000 (AE Mode) Optical Zoom: 20X Digital Zoom: 800X Lens Type: Carl Zeiss® Vario-Tessar® Power 1. PictBridge is a registered trademark of Apple Computer, Inc. Macintosh is a trademark of Carl Zeiss. Actual battery life may not communicate with S-Video (VMC-30FS) UPC Code: 027242688698 Display LCD Screen: 2.5" (123K Pixels) SwivelScreen™ LCD Display Hardware Viewfinder: Color (123K Pixels) Docking Station: N/A Microphone...


