
2008 Water Housing Cross Reference
Page 1
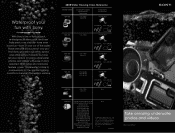
... 2008 Water Housing Cross Reference MODEL NAME MPK-THE Compatible Digital Still Camera/ Camcorder DSC-T200 DSC-T70 Compatible Accessories HVL-ML20M VCT-MP1K ACC-MP105 ...DCR-HC26/28, DCR-HC36/38 DCR-HC46/48, DCR-HC52/54 DCR-HC62/96 DCR-DVD103/108 DCR-DVD203/308 DCR-DVD403/408 DCR-DVD508/610 DCR-DVD710/810 DCR-DVD910/92 DCR-SR200/220/220D DCR-SR300/42/45/46 DCR...Sony gear from splashes, sprays and other watery hazards, but also let you can have even more fun-both in part without written permission is prohibited. Waterproof your fun with ease. Sony, the Sony logo, Cyber-shot, and Handycam...
... 2008 Water Housing Cross Reference MODEL NAME MPK-THE Compatible Digital Still Camera/ Camcorder DSC-T200 DSC-T70 Compatible Accessories HVL-ML20M VCT-MP1K ACC-MP105 ...DCR-HC26/28, DCR-HC36/38 DCR-HC46/48, DCR-HC52/54 DCR-HC62/96 DCR-DVD103/108 DCR-DVD203/308 DCR-DVD403/408 DCR-DVD508/610 DCR-DVD710/810 DCR-DVD910/92 DCR-SR200/220/220D DCR-SR300/42/45/46 DCR...Sony gear from splashes, sprays and other watery hazards, but also let you can have even more fun-both in part without written permission is prohibited. Waterproof your fun with ease. Sony, the Sony logo, Cyber-shot, and Handycam...

2008 Water Housing Cross Reference
Page 2
...diving... MPK-THG • Fits selected Cyber-shot® digital still cameras • Protects against dust, rain and spray • Lets users take photos at depths up to 5 feet • Fits selected Sony® Handycam® camcorders • Guards against dust, dirt, and more • Allows ...videos to be taken up to 17 feet below the water's surface • Fits selected Sony® Cyber-shot® digital still cameras • Allows underwater photography up ...
...diving... MPK-THG • Fits selected Cyber-shot® digital still cameras • Protects against dust, rain and spray • Lets users take photos at depths up to 5 feet • Fits selected Sony® Handycam® camcorders • Guards against dust, dirt, and more • Allows ...videos to be taken up to 17 feet below the water's surface • Fits selected Sony® Cyber-shot® digital still cameras • Allows underwater photography up ...

Operating Guide
Page 7
...LCD screen and the viewfinder used for illustration purposes are captured using a digital still camera, and therefore may be contrary to a malfunction of the camcorder, storage media, etc. • TV color systems differ depending on the countries/...sun only in low light conditions, such as at the sun. Change the screen language before using your camcorder to direct sunlight for Modulation Transfer Function. The number value indicates the amount of light from a subject ... which was developed jointly by Carl Zeiss, in Germany, and Sony Corporation, and produces superior images.
...LCD screen and the viewfinder used for illustration purposes are captured using a digital still camera, and therefore may be contrary to a malfunction of the camcorder, storage media, etc. • TV color systems differ depending on the countries/...sun only in low light conditions, such as at the sun. Change the screen language before using your camcorder to direct sunlight for Modulation Transfer Function. The number value indicates the amount of light from a subject ... which was developed jointly by Carl Zeiss, in Germany, and Sony Corporation, and produces superior images.
Operating Guide
Page 9
HiFi SOUND/AUDIO MIX LCD/VF SET menu 45 - REC MODE/AUDIO MODE/REMAIN SETUP MENU menu 47 - WORLD TIME/BEEP, etc. CAMERA SET menu 43 - D ZOOM/WIDE SEL/STEADYSHOT, etc. OTHERS menu 48 - Reviewing the most recently recorded scenes (Rec review 31 Playing the picture on a computer ...
HiFi SOUND/AUDIO MIX LCD/VF SET menu 45 - REC MODE/AUDIO MODE/REMAIN SETUP MENU menu 47 - WORLD TIME/BEEP, etc. CAMERA SET menu 43 - D ZOOM/WIDE SEL/STEADYSHOT, etc. OTHERS menu 48 - Reviewing the most recently recorded scenes (Rec review 31 Playing the picture on a computer ...
Operating Guide
Page 15
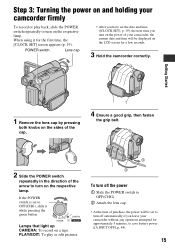
... OFF(CHG). 2 Attach the lens cap. • At the time of purchase, the power will be set to turn off automatically if you leave your camcorder firmly To record or play back, slide the POWER switch repeatedly to turn on a tape. When using it while pressing the green button. POWER switch... Lens cap • After you turn on the power of the arrow to turn on the respective lamp. Lamps that light up CAMERA: To record on the respective lamp. Getting Started 1 Remove the lens cap by pressing both knobs on the sides of the cap. 4 Ensure a good grip...
... OFF(CHG). 2 Attach the lens cap. • At the time of purchase, the power will be set to turn off automatically if you leave your camcorder firmly To record or play back, slide the POWER switch repeatedly to turn on a tape. When using it while pressing the green button. POWER switch... Lens cap • After you turn on the power of the arrow to turn on the respective lamp. Lamps that light up CAMERA: To record on the respective lamp. Getting Started 1 Remove the lens cap by pressing both knobs on the sides of the cap. 4 Ensure a good grip...
Operating Guide
Page 22
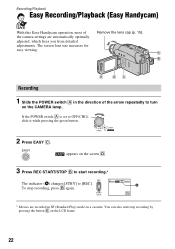
The screen font size increases for easy viewing. EASY appears on a cassette. the camera settings are recorded in the direction of Remove the lens cap (p. 15). To...mode on the screen D. 3 Press REC START/STOP B to start /stop recording by pressing the button E on the CAMERA lamp. If the POWER switch A is set to OFF(CHG), slide it while pressing the green button. 2 Press EASY ...The indicator (A) changes [STBY] to [REC]. Recording/Playback Easy Recording/Playback (Easy Handycam) With this Easy Handycam operation, most of the arrow repeatedly to turn on the LCD frame. 22
The screen font size increases for easy viewing. EASY appears on a cassette. the camera settings are recorded in the direction of Remove the lens cap (p. 15). To...mode on the screen D. 3 Press REC START/STOP B to start /stop recording by pressing the button E on the CAMERA lamp. If the POWER switch A is set to OFF(CHG), slide it while pressing the green button. 2 Press EASY ...The indicator (A) changes [STBY] to [REC]. Recording/Playback Easy Recording/Playback (Easy Handycam) With this Easy Handycam operation, most of the arrow repeatedly to turn on the LCD frame. 22

Operating Guide
Page 24
... to OFF(CHG), slide it fully (B). Movies Press REC START/STOP A (or B). Recording Lens cap Remove the lens cap by pressing both knobs on the CAMERA lamp. If the POWER switch is recorded with sound for 7 seconds.
... to OFF(CHG), slide it fully (B). Movies Press REC START/STOP A (or B). Recording Lens cap Remove the lens cap by pressing both knobs on the CAMERA lamp. If the POWER switch is recorded with sound for 7 seconds.
Operating Guide
Page 28
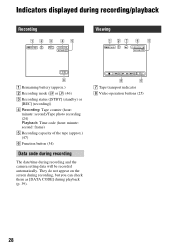
They do not appear on the screen during recording, but you can check them as [DATA CODE] during recording and the camera setting data will be recorded automatically. Indicators displayed during recording/playback Recording 12 3 4 5 Viewing 1 27 4 5 6 A Remaining battery (approx.) B Recording mode (SP or LP) (46) C Recording ...
They do not appear on the screen during recording, but you can check them as [DATA CODE] during recording and the camera setting data will be recorded automatically. Indicators displayed during recording/playback Recording 12 3 4 5 Viewing 1 27 4 5 6 A Remaining battery (approx.) B Recording mode (SP or LP) (46) C Recording ...
Operating Guide
Page 30
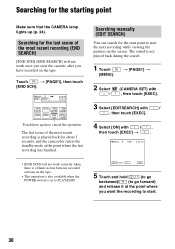
... want the recording to start the next recording while viewing the pictures on the screen. Searching for about 5 seconds, and the camcorder enters the standby mode at the point where you have recorded on the tape. • This operation is also available when the... SURE Touch here again to start . 30 Searching manually (EDIT SEARCH) You can search for the starting point Make sure that the CAMERA lamp lights up (p. 24). t [PAGE1] t 2 Select / (CAMERA SET) with , then touch [EXEC]. 3 Select [EDITSEARCH] with / , then touch [EXEC]. 4 Select [ON] with / , then touch [EXEC] t...
... want the recording to start the next recording while viewing the pictures on the screen. Searching for about 5 seconds, and the camcorder enters the standby mode at the point where you have recorded on the tape. • This operation is also available when the... SURE Touch here again to start . 30 Searching manually (EDIT SEARCH) You can search for the starting point Make sure that the CAMERA lamp lights up (p. 24). t [PAGE1] t 2 Select / (CAMERA SET) with , then touch [EXEC]. 3 Select [EDITSEARCH] with / , then touch [EXEC]. 4 Select [ON] with / , then touch [EXEC] t...

Operating Guide
Page 31
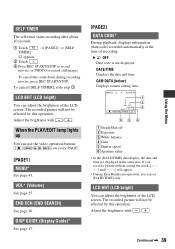
Recording/Playback Reviewing the most recently recorded scenes (Rec review) You can view a few seconds of the scene recorded just before you stopped the tape. 1 Touch [MENU]. The last few seconds of the most recently recorded scene are played back. t [PAGE1] t 2 Select / (CAMERA SET) with , then touch [EXEC]. 3 Select [EDITSEARCH] with / , then touch [EXEC]. 4 Select [ON] with / , then touch [EXEC] t . 60min STBY 0:00:00 EDIT FN 5 Touch . Then, your camcorder is set to the standby. 31
Recording/Playback Reviewing the most recently recorded scenes (Rec review) You can view a few seconds of the scene recorded just before you stopped the tape. 1 Touch [MENU]. The last few seconds of the most recently recorded scene are played back. t [PAGE1] t 2 Select / (CAMERA SET) with , then touch [EXEC]. 3 Select [EDITSEARCH] with / , then touch [EXEC]. 4 Select [ON] with / , then touch [EXEC] t . 60min STBY 0:00:00 EDIT FN 5 Touch . Then, your camcorder is set to the standby. 31

Operating Guide
Page 34
CAMERA lamp: settings for recording on the respective lamp. The menu index screen appears. 2 Select the desired menu. EXEC RET. 1 Touch t [MENU] on PAGE1/PAGE2/PAGE3 ...
CAMERA lamp: settings for recording on the respective lamp. The menu index screen appears. 2 Select the desired menu. EXEC RET. 1 Touch t [MENU] on PAGE1/PAGE2/PAGE3 ...
Operating Guide
Page 36
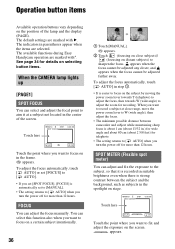
...the zoom for recording. See page 34 for details on selecting button items. When the CAMERA lamp lights up [PAGE1] SPOT FOCUS You can adjust and fix the exposure to the... zoom lever to W (wide angle), then adjust the focus. • The minimum possible distance between camcorder and subject while maintaining sharp focus is automatically set to [MANUAL]. • The setting returns to aim... button items Available operation buttons vary depending on stage. The available functions during Easy Handycam operation are selected. FOCUS You can select this function also when you want to ...
...the zoom for recording. See page 34 for details on selecting button items. When the CAMERA lamp lights up [PAGE1] SPOT FOCUS You can adjust and fix the exposure to the... zoom lever to W (wide angle), then adjust the focus. • The minimum possible distance between camcorder and subject while maintaining sharp focus is automatically set to [MANUAL]. • The setting returns to aim... button items Available operation buttons vary depending on stage. The available functions during Easy Handycam operation are selected. FOCUS You can select this function also when you want to ...
Operating Guide
Page 37
...] and [FADER] while using the viewfinder by having the LCD panel rotated 180 degrees and closed with the screen facing out. 1 Make sure that the CAMERA lamp lights up. 2 Close the LCD panel with / , and touch . [FADER]: Touch it gradually changes from black and white to select a desired effect. : The LCD...
...] and [FADER] while using the viewfinder by having the LCD panel rotated 180 degrees and closed with the screen facing out. 1 Make sure that the CAMERA lamp lights up. 2 Close the LCD panel with / , and touch . [FADER]: Touch it gradually changes from black and white to select a desired effect. : The LCD...
Operating Guide
Page 39
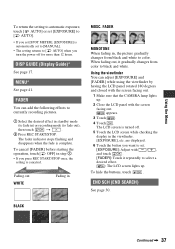
... be affected by this operation. Adjust the brightness with / . B OFF Data code is not displayed. The recorded picture will appear. • During Easy Handycam operation, you can use the video operation buttons ( / / / ) on every PAGE. [PAGE1] MENU* See page 41. DISP GUIDE (Display Guide.... t [PAGE2] t [SELF appears. 2 Touch . 3 Press REC START/STOP to record movies, or PHOTO to record still images. CAM DATA (below) Displays camera setting data. 60min 0:00:00:00 AUTO 100 AWB F1. 8 9dB FN 1 2 3 654 A SteadyShot off B Exposure C White balance D Gain E Shutter speed...
... be affected by this operation. Adjust the brightness with / . B OFF Data code is not displayed. The recorded picture will appear. • During Easy Handycam operation, you can use the video operation buttons ( / / / ) on every PAGE. [PAGE1] MENU* See page 41. DISP GUIDE (Display Guide.... t [PAGE2] t [SELF appears. 2 Touch . 3 Press REC START/STOP to record movies, or PHOTO to record still images. CAM DATA (below) Displays camera setting data. 60min 0:00:00:00 AUTO 100 AWB F1. 8 9dB FN 1 2 3 654 A SteadyShot off B Exposure C White balance D Gain E Shutter speed...
Operating Guide
Page 41
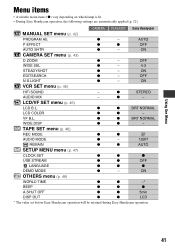
... - AUTO P EFFECT z z OFF AUTO SHTR z - ON CAMERA SET menu (p. 43) D ZOOM z - Using the Menu Menu items • Available menu items (z) vary depending on which lamp is lit. • During Easy Handycam operation, the following settings are automatically applied (p. 22). z STEREO ...AUDIO MIX - VF B.L. z z BRT NORMAL WIDE DISP z z - CAMERA PLAY/EDIT Easy Handycam MANUAL SET menu (p. 42) PROGRAM AE z - ON ...
... - AUTO P EFFECT z z OFF AUTO SHTR z - ON CAMERA SET menu (p. 43) D ZOOM z - Using the Menu Menu items • Available menu items (z) vary depending on which lamp is lit. • During Easy Handycam operation, the following settings are automatically applied (p. 22). z STEREO ...AUDIO MIX - VF B.L. z z BRT NORMAL WIDE DISP z z - CAMERA PLAY/EDIT Easy Handycam MANUAL SET menu (p. 42) PROGRAM AE z - ON ...
Operating Guide
Page 43
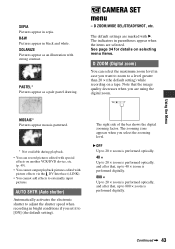
... input pictures. D ZOOM/WIDE SEL/STEADYSHOT, etc. The right side of the bar shows the digital zooming factor. SEPIA Pictures appear in black and white. CAMERA SET menu - B OFF Up to 20 × zoom is performed optically. 40 × Up to 20 × zoom is performed optically, and after that the...
... input pictures. D ZOOM/WIDE SEL/STEADYSHOT, etc. The right side of the bar shows the digital zooming factor. SEPIA Pictures appear in black and white. CAMERA SET menu - B OFF Up to 20 × zoom is performed optically. 40 × Up to 20 × zoom is performed optically, and after that the...
Operating Guide
Page 44
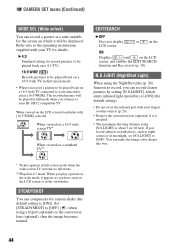
... display LCD screen. If you record subjects in dark places, such as you connect to full mode. ** Played in 4:3 mode. STEADYSHOT You can compensate for camera shake (the default setting is about 3 m (10 feet). Refer also to [OFF] ( ) when using [N.S.LIGHT] is [ON]). When viewed on a 16... wide screen TV* When viewed on the LCD screen/viewfinder with [16:9 WIDE] selected. Set [STEADYSHOT] to the operating instructions supplied with your camcorder, select [16:9 WIDE]. You can make the image color deeper this way. * Picture appears in full screen mode when the wide-screen TV switches...
... display LCD screen. If you record subjects in dark places, such as you connect to full mode. ** Played in 4:3 mode. STEADYSHOT You can compensate for camera shake (the default setting is about 3 m (10 feet). Refer also to [OFF] ( ) when using [N.S.LIGHT] is [ON]). When viewed on a 16... wide screen TV* When viewed on the LCD screen/viewfinder with [16:9 WIDE] selected. Set [STEADYSHOT] to the operating instructions supplied with your camcorder, select [16:9 WIDE]. You can make the image color deeper this way. * Picture appears in full screen mode when the wide-screen TV switches...
Operating Guide
Page 47
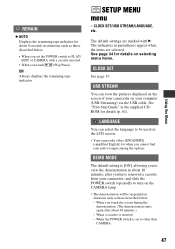
...CLOCK SET See page 19. When the POWER switch is set the POWER switch to turn on the CAMERA lamp. • The demonstration will be used on the LCD screen. • Your camcorder offers [ENG[SIMP]] (simplified English) for details on your computer (USB Streaming) via the USB ...be suspended in parentheses appear when the items are marked with a cassette inserted. • When you have removed a cassette from your camcorder, and slide the POWER switch repeatedly to PLAY/ EDIT or CAMERA with B. DEMO MODE The default setting is inserted. - CLOCK SET/USB STREAM/LANGUAGE, etc.
...CLOCK SET See page 19. When the POWER switch is set the POWER switch to turn on the CAMERA lamp. • The demonstration will be used on the LCD screen. • Your camcorder offers [ENG[SIMP]] (simplified English) for details on your computer (USB Streaming) via the USB ...be suspended in parentheses appear when the items are marked with a cassette inserted. • When you have removed a cassette from your camcorder, and slide the POWER switch repeatedly to PLAY/ EDIT or CAMERA with B. DEMO MODE The default setting is inserted. - CLOCK SET/USB STREAM/LANGUAGE, etc.
Operating Guide
Page 50
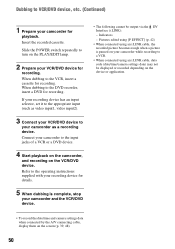
... becomes rough when a picture is complete, stop your camcorder and the VCR/DVD device. • The following cannot be displayed or recorded depending on the device or application. • To record the date/time and camera settings data when connected by the A/V connecting cable, display... them on the screen (p. 39, 48). 50 When dubbing to VCR/DVD device, etc. (Continued) 1 Prepare your camcorder for playback. Dubbing to the VCR, insert a cassette for...
... becomes rough when a picture is complete, stop your camcorder and the VCR/DVD device. • The following cannot be displayed or recorded depending on the device or application. • To record the date/time and camera settings data when connected by the A/V connecting cable, display... them on the screen (p. 39, 48). 50 When dubbing to VCR/DVD device, etc. (Continued) 1 Prepare your camcorder for playback. Dubbing to the VCR, insert a cassette for...
Operating Guide
Page 68
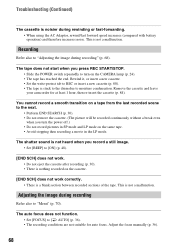
... the focus manually (p. 36). 68 Recording Refer also to "Adjusting the image during recording Refer also to "Menu" (p. 70). Remove the cassette and leave your camcorder for auto focus. Adjusting the image during recording" (p. 68). The shutter sound is not heard when you record a still image. • Set [BEEP] to ...turn the power off.) • Do not record pictures in SP mode and LP mode on the CAMERA lamp (p. 24). • The tape has reached the end. The tape does not start when you turn on the same tape. • Avoid stopping then...
... the focus manually (p. 36). 68 Recording Refer also to "Adjusting the image during recording Refer also to "Menu" (p. 70). Remove the cassette and leave your camcorder for auto focus. Adjusting the image during recording" (p. 68). The shutter sound is not heard when you record a still image. • Set [BEEP] to ...turn the power off.) • Do not record pictures in SP mode and LP mode on the CAMERA lamp (p. 24). • The tape has reached the end. The tape does not start when you turn on the same tape. • Avoid stopping then...


