
Operating Guide
Page 17
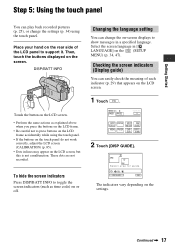
...), or change the on-screen displays to show messages in lines may appear on the touch panel do not work correctly, adjust the LCD screen (CALIBRATION) (p. 85). • Dots in a specified language.
...), or change the on-screen displays to show messages in lines may appear on the touch panel do not work correctly, adjust the LCD screen (CALIBRATION) (p. 85). • Dots in a specified language.
Operating Guide
Page 67
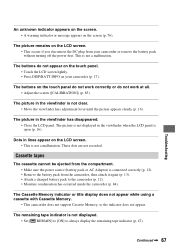
... appears on the screen. • A warning indicator or message appears on the touch panel do not work at all. • Adjust the screen ([CALIBRATION]) (p. 85). Dots in the viewfinder when the LCD panel is not clear. • Move the viewfinder lens adjustment lever until the picture appears clearly ...Touch the LCD screen lightly. • Press DISP/BATT INFO on the LCD screen. • This occurs if you disconnect the DC plug from the camcorder, then attach it again (p. 13). • Attach a charged battery pack to always display the remaining tape indicator (p. 47). The picture is not ...
... appears on the screen. • A warning indicator or message appears on the touch panel do not work at all. • Adjust the screen ([CALIBRATION]) (p. 85). Dots in the viewfinder when the LCD panel is not clear. • Move the viewfinder lens adjustment lever until the picture appears clearly ...Touch the LCD screen lightly. • Press DISP/BATT INFO on the LCD screen. • This occurs if you disconnect the DC plug from the camcorder, then attach it again (p. 13). • Attach a charged battery pack to always display the remaining tape indicator (p. 47). The picture is not ...
Operating Guide
Page 85
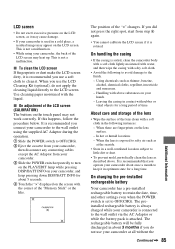
... supplied AC Adaptor during the operation. 1 Slide the POWER switch to OFF(CHG). 2 Eject the cassette from your camcorder, then disconnect any connecting cables except the AC Adaptor from step 4 again. • You cannot calibrate the LCD screen if it . In hot or humid locations - Handling with a soft cloth in a cold place...
... supplied AC Adaptor during the operation. 1 Slide the POWER switch to OFF(CHG). 2 Eject the cassette from your camcorder, then disconnect any connecting cables except the AC Adaptor from step 4 again. • You cannot calibrate the LCD screen if it . In hot or humid locations - Handling with a soft cloth in a cold place...
Operating Guide
Page 89
... BEACH&SKI 42 BEEP 48 BLACK 37 BURN DVD 40, 62 BURN VCD 40 B&W 43 C CALIBRATION 85 CAM DATA 39 CAMERA SET menu........... 43 Cassette 20, 80 Insert/Eject 20 Write-protect tab... Playback ........ 40 Dubbing 49, 52 DV Interface....... 49, 51, 54, 62 E EASY button 22 Easy Handycam 22, 35 EDITSEARCH 30, 44 END SCH (END SEARCH 30, 68 EXPOSURE 38, 71 F FADER 37,...40 Full charge 13 G Getting started 11 Grip belt 15 H Help 56 HiFi SOUND 45 Holding the camcorder .........15 I Icon .......See Display indicators ID-1/ID-2 44 ImageMixer VCD2 55 Indicators 29 INDOOR 38 "InfoLITHIUM"...
... BEACH&SKI 42 BEEP 48 BLACK 37 BURN DVD 40, 62 BURN VCD 40 B&W 43 C CALIBRATION 85 CAM DATA 39 CAMERA SET menu........... 43 Cassette 20, 80 Insert/Eject 20 Write-protect tab... Playback ........ 40 Dubbing 49, 52 DV Interface....... 49, 51, 54, 62 E EASY button 22 Easy Handycam 22, 35 EDITSEARCH 30, 44 END SCH (END SEARCH 30, 68 EXPOSURE 38, 71 F FADER 37,...40 Full charge 13 G Getting started 11 Grip belt 15 H Help 56 HiFi SOUND 45 Holding the camcorder .........15 I Icon .......See Display indicators ID-1/ID-2 44 ImageMixer VCD2 55 Indicators 29 INDOOR 38 "InfoLITHIUM"...


