
Operating Guide
Page 6
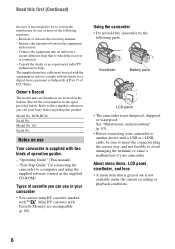
... out is not available under the current recording or playback conditions. 6 DCR-HC26 Serial No. "Operating Guide" (This manual) - Consult the dealer or an experienced radio/TV technician for connecting the camcorder to avoid damaging the terminal, or cause a malfunction of the following parts...Sony dealer regarding this first (Continued) the user is connected. - Read this product. Connect the equipment into an outlet on the supplied CD-ROM) Types of FCC Rules. Model No. AC- Using the camcorder • Do not hold the camcorder by one or more of your camcorder...
... out is not available under the current recording or playback conditions. 6 DCR-HC26 Serial No. "Operating Guide" (This manual) - Consult the dealer or an experienced radio/TV technician for connecting the camcorder to avoid damaging the terminal, or cause a malfunction of the following parts...Sony dealer regarding this first (Continued) the user is connected. - Read this product. Connect the equipment into an outlet on the supplied CD-ROM) Types of FCC Rules. Model No. AC- Using the camcorder • Do not hold the camcorder by one or more of your camcorder...
Operating Guide
Page 9
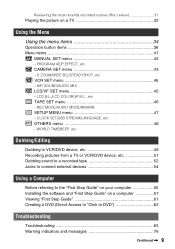
... Dubbing to VCR/DVD device, etc 49 Recording pictures from a TV or VCR/DVD device, etc 51 Dubbing sound to a recorded tape 52 Jacks to connect external devices 54 Using a Computer Before referring to the "First Step Guide" on your computer 55 Installing the software and "First Step Guide" on a TV...
... Dubbing to VCR/DVD device, etc 49 Recording pictures from a TV or VCR/DVD device, etc 51 Dubbing sound to a recorded tape 52 Jacks to connect external devices 54 Using a Computer Before referring to the "First Step Guide" on your computer 55 Installing the software and "First Step Guide" on a TV...

Operating Guide
Page 11
...Step 1: Checking supplied items Make sure that item supplied. • The cassette tape is not supplied. See page 6, 80 for compatible cassettes for your camcorder. AC Adaptor (1) (p. 12) Rechargeable battery pack NP-FP30 (1) (p. 12, 81) CD-ROM "Picture Package Ver.1.5.1" (1) (p. 55) Operating Guide (This manual...) (1) Power cord (1) (p. 12) A/V connecting cable (1) (p. 32, 49) Lens cap (1) (p. 15, 24) • To attach the lens cap Attach the lens cap to the metal fittings of that ...
...Step 1: Checking supplied items Make sure that item supplied. • The cassette tape is not supplied. See page 6, 80 for compatible cassettes for your camcorder. AC Adaptor (1) (p. 12) Rechargeable battery pack NP-FP30 (1) (p. 12, 81) CD-ROM "Picture Package Ver.1.5.1" (1) (p. 55) Operating Guide (This manual...) (1) Power cord (1) (p. 12) A/V connecting cable (1) (p. 32, 49) Lens cap (1) (p. 15, 24) • To attach the lens cap Attach the lens cap to the metal fittings of that ...

Operating Guide
Page 12
...You can charge the "InfoLITHIUM" battery pack (P series) (p. 81) after attaching it into place 2. 2 3 Connect the AC Adaptor to the DC IN jack on your camcorder. POWER switch 2 Slide the POWER switch in the direction of the battery pack and your camcorder 1, then attach the battery pack and click it to your... camcorder. DC IN jack DC plug To the wall outlet AC Adaptor Power cord 1 Align the terminals of the arrow to the AC Adaptor and...
...You can charge the "InfoLITHIUM" battery pack (P series) (p. 81) after attaching it into place 2. 2 3 Connect the AC Adaptor to the DC IN jack on your camcorder. POWER switch 2 Slide the POWER switch in the direction of the battery pack and your camcorder 1, then attach the battery pack and click it to your... camcorder. DC IN jack DC plug To the wall outlet AC Adaptor Power cord 1 Align the terminals of the arrow to the AC Adaptor and...

Operating Guide
Page 13
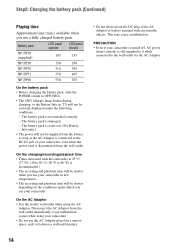
...closed. * Typical recording time shows the time when you use an outside power source You can operate your camcorder using the power from the wall outlet by making the same connections as you fully charge a fully discharged battery pack. Charging time Approximate time (min.) required when you ... the battery is fully charged. Continued , 13 Bottom: Recording with the other hand. Disconnect the AC Adaptor from the DC IN jack holding both the camcorder and the DC plug. Hold down the V BATT(battery) release lever with one hand. 2 Remove the battery in this case. POWER switch 1 2...
...closed. * Typical recording time shows the time when you use an outside power source You can operate your camcorder using the power from the wall outlet by making the same connections as you fully charge a fully discharged battery pack. Charging time Approximate time (min.) required when you ... the battery is fully charged. Continued , 13 Bottom: Recording with the other hand. Disconnect the AC Adaptor from the DC IN jack holding both the camcorder and the DC plug. Hold down the V BATT(battery) release lever with one hand. 2 Remove the battery in this case. POWER switch 1 2...
Operating Guide
Page 14
...time • Times measured with any malfunction occurs while using the AC Adaptor. PRECAUTION • Even if your camcorder, even when the power cord is still supplied to it while connected to the wall outlet via the AC Adaptor. 14 Battery pack LCD panel opened LCD panel closed NP-FP30 (... (10 to 30 °C (50 °F to 86 °F) is recommended.) • The recording and playback time will be shorter when you use your camcorder in low temperatures. • The recording and playback time will be shorter depending on the conditions under which you use the AC Adaptor placed in...
...time • Times measured with any malfunction occurs while using the AC Adaptor. PRECAUTION • Even if your camcorder, even when the power cord is still supplied to it while connected to the wall outlet via the AC Adaptor. 14 Battery pack LCD panel opened LCD panel closed NP-FP30 (... (10 to 30 °C (50 °F to 86 °F) is recommended.) • The recording and playback time will be shorter when you use your camcorder in low temperatures. • The recording and playback time will be shorter depending on the conditions under which you use the AC Adaptor placed in...
Operating Guide
Page 32
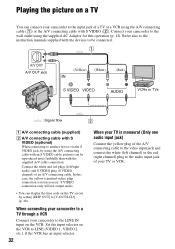
... manuals supplied with the devices to be connected. 1 A/V OUT A/V OUT jack (Yellow) (White) (Red) VCRs or TVs : Signal flow 2 A A/V connecting cable (supplied) B A/V connecting cable with S VIDEO (2). In this operation (p. 12). When connecting your camcorder to [V-OUT/LCD] (p. 48). Connect the white and red plugs (left channel...VCR has an input selector. 32 When your TV is not necessary. Set the input selector on the VCR. Connect your camcorder to the video input jack and connect the white (left /right audio) and S VIDEO plug (S VIDEO channel) of a TV or a VCR using...
... manuals supplied with the devices to be connected. 1 A/V OUT A/V OUT jack (Yellow) (White) (Red) VCRs or TVs : Signal flow 2 A A/V connecting cable (supplied) B A/V connecting cable with S VIDEO (2). In this operation (p. 12). When connecting your camcorder to [V-OUT/LCD] (p. 48). Connect the white and red plugs (left channel...VCR has an input selector. 32 When your TV is not necessary. Set the input selector on the VCR. Connect your camcorder to the video input jack and connect the white (left /right audio) and S VIDEO plug (S VIDEO channel) of a TV or a VCR using...

Operating Guide
Page 40
... during playback pause. You may appear at the top, bottom, or in slow mode. 2 Touch [ RET.] t . BURN VCD When your camcorder is connected to a Sony VAIO series personal computer, you can easily burn the picture recorded on the tape on a DVD (Direct Access to "Click to DVD") (p. 62...). Operation button items (Continued) BURN DVD When your camcorder is connected to a personal computer, you can easily burn the picture recorded on...
... during playback pause. You may appear at the top, bottom, or in slow mode. 2 Touch [ RET.] t . BURN VCD When your camcorder is connected to a Sony VAIO series personal computer, you can easily burn the picture recorded on the tape on a DVD (Direct Access to "Click to DVD") (p. 62...). Operation button items (Continued) BURN DVD When your camcorder is connected to a personal computer, you can easily burn the picture recorded on...
Operating Guide
Page 44
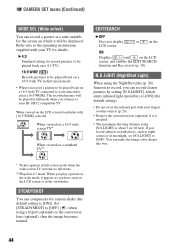
.... N.S.LIGHT (NightShot Light) When using the NightShot plus (p. 26) function to record, you record a picture to be played in full mode when you connect to your ID-1/ID-2 compatible TV. STEADYSHOT You can compensate for details. B 4:3 Standard setting (to record pictures to be played back on a 4:3 ...full screen mode. • When you can record clearer pictures by setting [N.S.LIGHT], which it will be played back on a 16:9 wide TV connected to your camcorder, select [16:9 WIDE]. If you have seen on the LCD screen or in the viewfinder. Set [STEADYSHOT] to full mode. ** Played in...
.... N.S.LIGHT (NightShot Light) When using the NightShot plus (p. 26) function to record, you record a picture to be played in full mode when you connect to your ID-1/ID-2 compatible TV. STEADYSHOT You can compensate for details. B 4:3 Standard setting (to record pictures to be played back on a 4:3 ...full screen mode. • When you can record clearer pictures by setting [N.S.LIGHT], which it will be played back on a 16:9 wide TV connected to your camcorder, select [16:9 WIDE]. If you have seen on the LCD screen or in the viewfinder. Set [STEADYSHOT] to full mode. ** Played in...
Operating Guide
Page 45
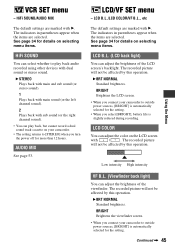
... VF B.L. (Viewfinder back light) You can adjust the brightness of the viewfinder. BRIGHT Brightens the viewfinder screen. • When you connect your camcorder to outside power sources, [BRIGHT] is automatically selected for more than 12 hours. LCD/VF SET menu - AUDIO MIX See page ...screen. • When you turn the power off for the setting. See page 34 for details on your camcorder. • The setting returns to [STEREO] when you connect your camcorder to outside power sources, [BRIGHT] is automatically selected for details on the LCD screen with / . VCR ...
... VF B.L. (Viewfinder back light) You can adjust the brightness of the viewfinder. BRIGHT Brightens the viewfinder screen. • When you connect your camcorder to outside power sources, [BRIGHT] is automatically selected for more than 12 hours. LCD/VF SET menu - AUDIO MIX See page ...screen. • When you turn the power off for the setting. See page 34 for details on your camcorder. • The setting returns to [STEREO] when you connect your camcorder to outside power sources, [BRIGHT] is automatically selected for details on the LCD screen with / . VCR ...
Operating Guide
Page 48
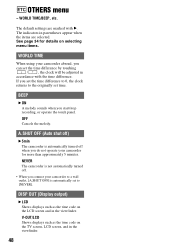
... as the time code on selecting menu items. WORLD TIME When using your camcorder abroad, you do not operate your camcorder to a wall outlet, [A.SHUT OFF] is automatically turned off ) B 5min The camcorder is automatically set to the originally set time. See page 34 for details ... (Auto shut off when you can set the time difference to 0, the clock returns to [NEVER]. NEVER The camcorder is not automatically turned off. • When you connect your camcorder for more than approximately 5 minutes. The indicators in accordance with B. WORLD TIME/BEEP, etc. If you start/stop...
... as the time code on selecting menu items. WORLD TIME When using your camcorder abroad, you do not operate your camcorder to a wall outlet, [A.SHUT OFF] is automatically turned off ) B 5min The camcorder is automatically set to the originally set time. See page 34 for details ... (Auto shut off when you can set the time difference to 0, the clock returns to [NEVER]. NEVER The camcorder is not automatically turned off. • When you connect your camcorder for more than approximately 5 minutes. The indicators in accordance with B. WORLD TIME/BEEP, etc. If you start/stop...
Operating Guide
Page 49
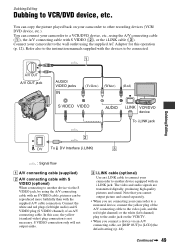
...the instruction manuals supplied with the devices to [LCD] (the default setting) (p. 48). S VIDEO connection only will not output audio. You can connect your camcorder to a VCR/DVD device, etc., using the A/V connecting cable with an S VIDEO cable, pictures can copy the picture played back on the VCR/TV. ...• When you are transmitted digitally, producing high quality pictures and sound. Connect the white and red plugs (left channel) plug to the audio jack on your camcorder to other recording devices (VCR/ DVD device, etc.). Continued , 49 Note that you cannot ...
...the instruction manuals supplied with the devices to [LCD] (the default setting) (p. 48). S VIDEO connection only will not output audio. You can connect your camcorder to a VCR/DVD device, etc., using the A/V connecting cable with an S VIDEO cable, pictures can copy the picture played back on the VCR/TV. ...• When you are transmitted digitally, producing high quality pictures and sound. Connect the white and red plugs (left channel) plug to the audio jack on your camcorder to other recording devices (VCR/ DVD device, etc.). Continued , 49 Note that you cannot ...
Operating Guide
Page 50
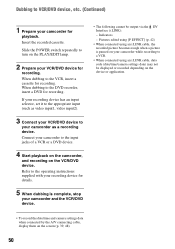
...the recorded picture becomes rough when a picture is complete, stop your camcorder for recording. When dubbing to the VCR, insert a cassette for recording. Connect your camcorder as video input1, video input2). 3 Connect your VCR/DVD device to your camcorder to the input jacks of a VCR or a DVD device. ...4 Start playback on the camcorder, and recording on the screen (p. 39, 48). 50...
...the recorded picture becomes rough when a picture is complete, stop your camcorder for recording. When dubbing to the VCR, insert a cassette for recording. Connect your camcorder as video input1, video input2). 3 Connect your VCR/DVD device to your camcorder to the input jacks of a VCR or a DVD device. ...4 Start playback on the camcorder, and recording on the screen (p. 39, 48). 50...
Operating Guide
Page 51
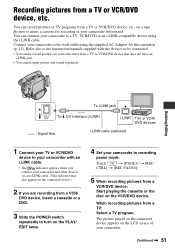
... : Signal flow i.LINK cable (optional) TVs or VCR/ DVD devices 1 Connect your TV or VCR/DVD device to your camcorder with the devices to be connected. • You cannot record pictures on your camcorder to a TV, VCR/DVD or an i.LINK-compatible device using the supplied... AC Adaptor for recording in your camcorder. The picture played on the connected device appears on the LCD screen of your camcorder beforehand. Connect your camcorder from a TV or VCR/DVD device, etc., on a tape. Continued , 51 Touch t [PAGE3] t ...
... : Signal flow i.LINK cable (optional) TVs or VCR/ DVD devices 1 Connect your TV or VCR/DVD device to your camcorder with the devices to be connected. • You cannot record pictures on your camcorder to a TV, VCR/DVD or an i.LINK-compatible device using the supplied... AC Adaptor for recording in your camcorder. The picture played on the connected device appears on the LCD screen of your camcorder beforehand. Connect your camcorder from a TV or VCR/DVD device, etc., on a tape. Continued , 51 Touch t [PAGE3] t ...
Operating Guide
Page 52
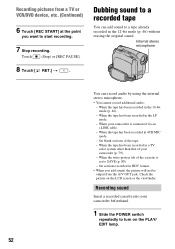
...recorded in the 16-bit mode (p. 46). - When the tape has been recorded in a TV color system other than that of your camcorder (p. 79). - When your camcorder beforehand. 1 Slide the POWER switch repeatedly to SAVE (p. 80). - Check the picture on the PLAY/ EDIT lamp. 52 Recording sound ...tape You can record audio by using the internal stereo microphone. • You cannot record additional audio: - On blank sections of the cassette is connected via an i.LINK cable. - When the write-protect tab of the tape. - Internal stereo microphone You can add sound to start recording. 7...
...recorded in the 16-bit mode (p. 46). - When the tape has been recorded in a TV color system other than that of your camcorder (p. 79). - When your camcorder beforehand. 1 Slide the POWER switch repeatedly to SAVE (p. 80). - Check the picture on the PLAY/ EDIT lamp. 52 Recording sound ...tape You can record audio by using the internal stereo microphone. • You cannot record additional audio: - On blank sections of the cassette is connected via an i.LINK cable. - When the write-protect tab of the tape. - Internal stereo microphone You can add sound to start recording. 7...
Operating Guide
Page 54
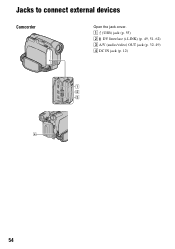
Jacks to connect external devices Camcorder Open the jack cover. A (USB) jack (p. 55) B DV Interface (i.LINK) (p. 49, 51, 62) C A/V (audio/video) OUT jack (p. 32, 49) D DC IN jack (p. 12) 1 2 3 4 54
Jacks to connect external devices Camcorder Open the jack cover. A (USB) jack (p. 55) B DV Interface (i.LINK) (p. 49, 51, 62) C A/V (audio/video) OUT jack (p. 32, 49) D DC IN jack (p. 12) 1 2 3 4 54

Operating Guide
Page 55
...Sony product is not supplied with added music and visual styles using video recorded on a tape. Music Video/Slideshow Producer You can select your favorite video and still images from video and still images saved on PC You can view the video and still images copied from your camcorder... video or original slide show with a USB cable. Picture Package Ver.1.5.1 - i.LINK cable This method is transferred in folders by connecting your camcorder to your computer. • Software and features available for Macintosh computers differ from those available for copying video and sound recorded on ...
...Sony product is not supplied with added music and visual styles using video recorded on a tape. Music Video/Slideshow Producer You can select your favorite video and still images from video and still images saved on PC You can view the video and still images copied from your camcorder... video or original slide show with a USB cable. Picture Package Ver.1.5.1 - i.LINK cable This method is transferred in folders by connecting your camcorder to your computer. • Software and features available for Macintosh computers differ from those available for copying video and sound recorded on ...
Operating Guide
Page 56
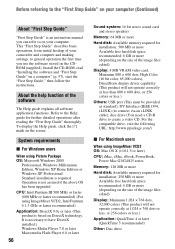
About the help function of your camcorder and computer and making settings, to general operation the first time you can refer to on a computer" (p. 57), start the "First Step Guide," then follow ... less than 800 × 600 dots, or 256 colors or less.) Others: USB port (This must be provided as standard), DV Interface (IEEE1394, i.LINK) (to connect via an i.LINK cable), disc drive (You need a CD-R drive to create a video CD. This "First Step Guide" describes basic operations, from initial hookup of...
About the help function of your camcorder and computer and making settings, to general operation the first time you can refer to on a computer" (p. 57), start the "First Step Guide," then follow ... less than 800 × 600 dots, or 256 colors or less.) Others: USB port (This must be provided as standard), DV Interface (IEEE1394, i.LINK) (to connect via an i.LINK cable), disc drive (You need a CD-R drive to create a video CD. This "First Step Guide" describes basic operations, from initial hookup of...
Operating Guide
Page 57
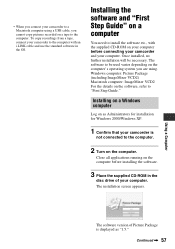
..."1.5." Windows computer: Picture Package (including ImageMixer VCD2) Macintosh computer: ImageMixer VCD2 For the details on the computer before connecting your camcorder and your computer. The installation screen appears. Continued , 57 Once installed, no further installation will be used varies ...depending on the computer's operating system you are using a USB cable, you connect your camcorder to the computer. To copy recordings from a tape, connect your camcorder to "First Step Guide." Close all applications running on the software, refer to the computer with...
..."1.5." Windows computer: Picture Package (including ImageMixer VCD2) Macintosh computer: ImageMixer VCD2 For the details on the computer before connecting your camcorder and your computer. The installation screen appears. Continued , 57 Once installed, no further installation will be used varies ...depending on the computer's operating system you are using a USB cable, you connect your camcorder to the computer. To copy recordings from a tape, connect your camcorder to "First Step Guide." Close all applications running on the software, refer to the computer with...

Operating Guide
Page 60
... on-line help. Installing the software and "First Step Guide" on the computer. The installation of your computer. • For details on connecting your camcorder is listed on how to use ImageMixer VCD2, refer to . 8 Double-click the unzipped [ImageMixerVCD2_Install]. 9 When the user acceptance screen is displayed...in step 10) appear on the desktop. 14Remove the CD-ROM from the disc drive of ImageMixer VCD2 starts. • For details on connecting your camcorder and computer, see "First Step Guide" on the supplied CD-ROM (p. 61). • If you have any questions about Picture Package,...
... on-line help. Installing the software and "First Step Guide" on the computer. The installation of your computer. • For details on connecting your camcorder is listed on how to use ImageMixer VCD2, refer to . 8 Double-click the unzipped [ImageMixerVCD2_Install]. 9 When the user acceptance screen is displayed...in step 10) appear on the desktop. 14Remove the CD-ROM from the disc drive of ImageMixer VCD2 starts. • For details on connecting your camcorder and computer, see "First Step Guide" on the supplied CD-ROM (p. 61). • If you have any questions about Picture Package,...


