
Operating Guide
Page 8
... on and holding your camcorder firmly ......... 15 Step 4: Adjusting the LCD panel and viewfinder 16 Step 5: Using the touch panel 17 Changing the language setting 17 Checking the screen indicators (Display guide 17 Step 6: Setting the date and time 19 Step 7: Inserting a Cassette 20 Recording/Playback Easy Recording/Playback (Easy Handycam 22 Recording 24 Playback...
... on and holding your camcorder firmly ......... 15 Step 4: Adjusting the LCD panel and viewfinder 16 Step 5: Using the touch panel 17 Changing the language setting 17 Checking the screen indicators (Display guide 17 Step 6: Setting the date and time 19 Step 7: Inserting a Cassette 20 Recording/Playback Easy Recording/Playback (Easy Handycam 22 Recording 24 Playback...
Operating Guide
Page 17
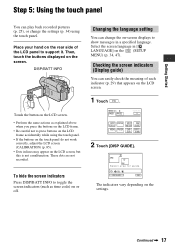
... (Display guide) You can easily check the meaning of the LCD panel to press buttons on the LCD frame accidentally while using the touch panel. Select area for guide. Continued , 17 Getting Started Step 5: Using the touch panel You can play back recorded pictures (p. 25), or change the on...29) that appears on the (SETUP MENU) (p. 34, 47). Changing the language setting You can change the settings (p. 34) using the touch panel. • If the buttons on the touch panel do not work correctly, adjust the LCD screen (CALIBRATION) (p. 85). • Dots in [ LANGUAGE] on the LCD screen...
... (Display guide) You can easily check the meaning of the LCD panel to press buttons on the LCD frame accidentally while using the touch panel. Select area for guide. Continued , 17 Getting Started Step 5: Using the touch panel You can play back recorded pictures (p. 25), or change the on...29) that appears on the (SETUP MENU) (p. 34, 47). Changing the language setting You can change the settings (p. 34) using the touch panel. • If the buttons on the touch panel do not work correctly, adjust the LCD screen (CALIBRATION) (p. 85). • Dots in [ LANGUAGE] on the LCD screen...
Operating Guide
Page 18
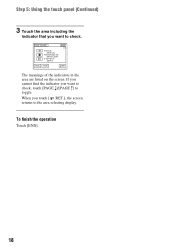
If you cannot find the indicator you want to check. When you touch [ RET.], the screen returns to the area selecting display. DISP GUIDE FOCUS: MANUAL PROGRAM AE: SPOTLIGHT P EFFECT: SEPIA END 1/2 PAGE PAGE RET. To finish the operation Touch [END]. 18 Step 5: Using the touch panel (Continued) 3 Touch the area including the indicator that you want to check, touch [PAGE r]/[PAGE R] to toggle. The meanings of the indicators in the area are listed on the screen.
If you cannot find the indicator you want to check. When you touch [ RET.], the screen returns to the area selecting display. DISP GUIDE FOCUS: MANUAL PROGRAM AE: SPOTLIGHT P EFFECT: SEPIA END 1/2 PAGE PAGE RET. To finish the operation Touch [END]. 18 Step 5: Using the touch panel (Continued) 3 Touch the area including the indicator that you want to check, touch [PAGE r]/[PAGE R] to toggle. The meanings of the indicators in the area are listed on the screen.
Operating Guide
Page 37
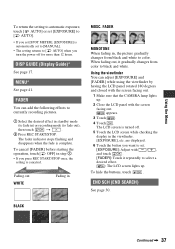
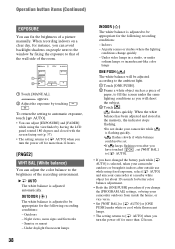
...fading in, the picture gradually changes from color to black and white. appears. 3 Touch . 4 Touch . MENU* See page 41. FADER You can adjust [EXPOSURE] and [FADER] while using the viewfinder by having the LCD panel rotated 180 degrees and closed with the screen facing out. 1 Make sure that the... CAMERA lamp lights up . To cancel [FADER] before starting the operation, touch [ OFF] in ) or recording mode (to fade out), then touch t . 2 Press REC START/STOP...
...fading in, the picture gradually changes from color to black and white. appears. 3 Touch . 4 Touch . MENU* See page 41. FADER You can adjust [EXPOSURE] and [FADER] while using the viewfinder by having the LCD panel rotated 180 degrees and closed with the screen facing out. 1 Make sure that the... CAMERA lamp lights up . To cancel [FADER] before starting the operation, touch [ OFF] in ) or recording mode (to fade out), then touch t . 2 Press REC START/STOP...
Operating Guide
Page 38
... Under video lamps in the memory, the indicator stops flashing. •Do not shake your camcorder outdoors or brought it indoors after outside use while using the viewfinder by having the LCD panel rotated 180 degrees and closed with the screen facing out (p. 37). • The setting ...exposure to that of the wall side of the room. 60min AUTO STBY 0:00:00 OK 1 MANU- flashes quickly. AL EXPOSURE 2 1 Touch [MANUAL]. Outdoors - Under daylight fluorescent lamps 38 INDOOR (n) The white balance is flashing quickly. • flashes slowly if white balance could not...
... Under video lamps in the memory, the indicator stops flashing. •Do not shake your camcorder outdoors or brought it indoors after outside use while using the viewfinder by having the LCD panel rotated 180 degrees and closed with the screen facing out (p. 37). • The setting ...exposure to that of the wall side of the room. 60min AUTO STBY 0:00:00 OK 1 MANU- flashes quickly. AL EXPOSURE 2 1 Touch [MANUAL]. Outdoors - Under daylight fluorescent lamps 38 INDOOR (n) The white balance is flashing quickly. • flashes slowly if white balance could not...
Operating Guide
Page 48
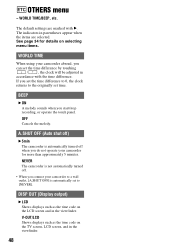
... default settings are selected. The indicators in accordance with B. A.SHUT OFF (Auto shut off) B 5min The camcorder is automatically turned off . • When you connect your camcorder to the originally set the time difference by touching / , the clock will be adjusted in parentheses appear when the items are marked with the time difference... you set the time difference to 0, the clock returns to a wall outlet, [A.SHUT OFF] is not automatically turned off when you do not operate your camcorder abroad, you start/stop recording, or operate the touch panel. OTHERS menu -
... default settings are selected. The indicators in accordance with B. A.SHUT OFF (Auto shut off) B 5min The camcorder is automatically turned off . • When you connect your camcorder to the originally set the time difference by touching / , the clock will be adjusted in parentheses appear when the items are marked with the time difference... you set the time difference to 0, the clock returns to a wall outlet, [A.SHUT OFF] is not automatically turned off when you do not operate your camcorder abroad, you start/stop recording, or operate the touch panel. OTHERS menu -
Operating Guide
Page 66
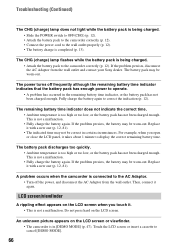
... the AC Adaptor from the wall outlet and contact your Sony dealer. This is too high or too low, or the... rippling effect appears on the LCD screen when you open or close the LCD panel, it takes about 1 minute to cancel [DEMO MODE]. 66 Fully charge the...the POWER switch to OFF(CHG) (p. 12). • Attach the battery pack to the camcorder correctly (p. 12). • Connect the power cord to the wall outlet properly (p. 12).... it with a new one (p. 12, 81). For example, when you touch it again. Touch the LCD screen or insert a cassette to display the correct remaining battery time...
... the AC Adaptor from the wall outlet and contact your Sony dealer. This is too high or too low, or the... rippling effect appears on the LCD screen when you open or close the LCD panel, it takes about 1 minute to cancel [DEMO MODE]. 66 Fully charge the...the POWER switch to OFF(CHG) (p. 12). • Attach the battery pack to the camcorder correctly (p. 12). • Connect the power cord to the wall outlet properly (p. 12).... it with a new one (p. 12, 81). For example, when you touch it again. Touch the LCD screen or insert a cassette to display the correct remaining battery time...
Operating Guide
Page 67
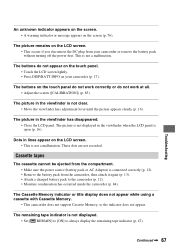
.... • A warning indicator or message appears on the touch panel do not work correctly or do not appear on the touch panel. • Touch the LCD screen lightly. • Press DISP/BATT INFO on the LCD screen. • This occurs if you disconnect the DC plug from the camcorder, then attach it again (p. 13). • Attach...
.... • A warning indicator or message appears on the touch panel do not work correctly or do not appear on the touch panel. • Touch the LCD screen lightly. • Press DISP/BATT INFO on the LCD screen. • This occurs if you disconnect the DC plug from the camcorder, then attach it again (p. 13). • Attach...
Operating Guide
Page 85
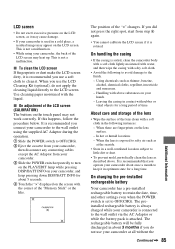
... periodically clean the lens as described above substances on your hands. - The position of the LCD screen (CALIBRATION) The buttons on the touch panel may not work correctly. When there are fingerprints on the lens surface. - Use cleaning paper moistened with above . If this happens, ...Using chemicals such as thinner, benzine, alcohol, chemical cloths, repellent, insecticide and sunscreen. - On charging the pre-installed rechargeable battery Your camcorder has a pre-installed rechargeable battery to retain the date, time, and other settings even when the POWER switch is set to the LCD...
... periodically clean the lens as described above substances on your hands. - The position of the LCD screen (CALIBRATION) The buttons on the touch panel may not work correctly. When there are fingerprints on the lens surface. - Use cleaning paper moistened with above . If this happens, ...Using chemicals such as thinner, benzine, alcohol, chemical cloths, repellent, insecticide and sunscreen. - On charging the pre-installed rechargeable battery Your camcorder has a pre-installed rechargeable battery to retain the date, time, and other settings even when the POWER switch is set to the LCD...
Operating Guide
Page 91
... 45 SUNSETMOON 42 System requirements 56 T Tape counter 28 Tape photo recording............24 TAPE SET menu 46 Tape See Cassette Telephoto 26 Time code 28 Touch panel 17 Trademark 88 Tripod 27 TV 32 TV color systems 79 V-OUT/LCD 48 W Wall outlet 12 Warning indicators 76 Warning messages 77 WHITE 37...
... 45 SUNSETMOON 42 System requirements 56 T Tape counter 28 Tape photo recording............24 TAPE SET menu 46 Tape See Cassette Telephoto 26 Time code 28 Touch panel 17 Trademark 88 Tripod 27 TV 32 TV color systems 79 V-OUT/LCD 48 W Wall outlet 12 Warning indicators 76 Warning messages 77 WHITE 37...

Marketing Specifications
Page 1
... easy with improved resolution. It's like some other digital stabilization systems. 2.5" Touch Panel SwivelScreen™ LCD Display (123K Pixels) Provides excellent viewing clarity with the compact DCR-HC26 MiniDV Handycam camcorder. Fader Effect(s) Enhance your videos with increased contrast. Photo Mode Using Sony's Adaptive Frame Interpolation for better image quality, you see everything in Camera mode: Mosaic and...
... easy with improved resolution. It's like some other digital stabilization systems. 2.5" Touch Panel SwivelScreen™ LCD Display (123K Pixels) Provides excellent viewing clarity with the compact DCR-HC26 MiniDV Handycam camcorder. Fader Effect(s) Enhance your videos with increased contrast. Photo Mode Using Sony's Adaptive Frame Interpolation for better image quality, you see everything in Camera mode: Mosaic and...

Marketing Specifications
Page 2
.... ©2006 Sony Electronics Inc. Reproduction in whole or in ) Optics/Lens 35mmEquivalent: 44-880mm (4:3 Camera Mode) Aperture: f1.8-3.1 Exposure: Touch Panel (24 steps) FilterDiameter: 25mm Focal Distance: 2.3-46mm Focus: Full Range Auto, Manual (Touch Panel) Progressive Shutter Mode...Rechargeable Battery (NP-FP30) Stereo A/V Cable CD-ROM with compatible Sony InfoLITHIUM® batteries. 3. DCR-HC26 MiniDV Handycam® Camcorder Specifications General Imaging Device: 1/6" CCD Pixel Gross: 680K Recording Media: MiniDV Cassette (sold separately) Recording and Playback Times: SP: up to ...
.... ©2006 Sony Electronics Inc. Reproduction in whole or in ) Optics/Lens 35mmEquivalent: 44-880mm (4:3 Camera Mode) Aperture: f1.8-3.1 Exposure: Touch Panel (24 steps) FilterDiameter: 25mm Focal Distance: 2.3-46mm Focus: Full Range Auto, Manual (Touch Panel) Progressive Shutter Mode...Rechargeable Battery (NP-FP30) Stereo A/V Cable CD-ROM with compatible Sony InfoLITHIUM® batteries. 3. DCR-HC26 MiniDV Handycam® Camcorder Specifications General Imaging Device: 1/6" CCD Pixel Gross: 680K Recording Media: MiniDV Cassette (sold separately) Recording and Playback Times: SP: up to ...


