
Operating Guide
Page 4
... work by being dropped, or the cabinet has been damaged. - Refer all servicing to the set from the wall outlet and disconnect the antenna or cable system.
... work by being dropped, or the cabinet has been damaged. - Refer all servicing to the set from the wall outlet and disconnect the antenna or cable system.
Operating Guide
Page 6
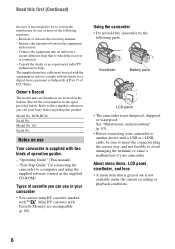
...cassette you call your Sony dealer regarding this first (Continued) the user is connected. - Owner's Record The model and serial numbers are incompatible (p. 80). "First Step Guide" for connecting the camcorder to these numbers whenever you can use Your camcorder is not dustproof, ... and precautions" (p. 83). • Before connecting your camcorder to another device with a USB or i.LINK cable, be used with the equipment in order to avoid damaging the terminal, or cause a malfunction of operation guides. - DCR-HC26 Serial No. AC- Model No. Notes on the bottom...
...cassette you call your Sony dealer regarding this first (Continued) the user is connected. - Owner's Record The model and serial numbers are incompatible (p. 80). "First Step Guide" for connecting the camcorder to these numbers whenever you can use Your camcorder is not dustproof, ... and precautions" (p. 83). • Before connecting your camcorder to another device with a USB or i.LINK cable, be used with the equipment in order to avoid damaging the terminal, or cause a malfunction of operation guides. - DCR-HC26 Serial No. AC- Model No. Notes on the bottom...

Operating Guide
Page 11
See page 6, 80 for compatible cassettes for your camcorder. AC Adaptor (1) (p. 12) Rechargeable battery pack NP-FP30 (1) (p. 12, 81) CD-ROM "Picture Package Ver.1.5.1" (1) (p. 55) Operating Guide (This manual) (1) Power cord (1) (p. 12) A/V connecting cable (1) (p. 32, 49) Lens cap (1) (p. 15, 24) ...• To attach the lens cap Attach the lens cap to the metal fittings of that you have following items supplied with your camcorder. Getting Started Getting Started Step 1: Checking supplied ...
See page 6, 80 for compatible cassettes for your camcorder. AC Adaptor (1) (p. 12) Rechargeable battery pack NP-FP30 (1) (p. 12, 81) CD-ROM "Picture Package Ver.1.5.1" (1) (p. 55) Operating Guide (This manual) (1) Power cord (1) (p. 12) A/V connecting cable (1) (p. 32, 49) Lens cap (1) (p. 15, 24) ...• To attach the lens cap Attach the lens cap to the metal fittings of that you have following items supplied with your camcorder. Getting Started Getting Started Step 1: Checking supplied ...
Operating Guide
Page 32
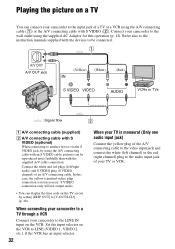
... (p. 12). Set the input selector on the VCR. When connecting your camcorder to a TV through a VCR Connect your camcorder to the wall outlet using the A/V connecting cable with an S VIDEO cable, pictures can display the time code on the TV screen by using the... of a TV or a VCR using the A/V connecting cable (1) or the A/V connecting cable with the supplied A/V cable connection. Refer also to the instruction manuals supplied with the devices to be reproduced more faithfully than with S VIDEO (2). Connect your camcorder to another device via the S VIDEO jack, by setting...
... (p. 12). Set the input selector on the VCR. When connecting your camcorder to a TV through a VCR Connect your camcorder to the wall outlet using the A/V connecting cable with an S VIDEO cable, pictures can display the time code on the TV screen by using the... of a TV or a VCR using the A/V connecting cable (1) or the A/V connecting cable with the supplied A/V cable connection. Refer also to the instruction manuals supplied with the devices to be reproduced more faithfully than with S VIDEO (2). Connect your camcorder to another device via the S VIDEO jack, by setting...
Operating Guide
Page 47
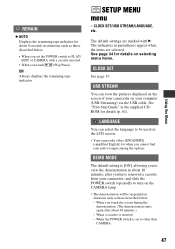
...34 for details on the CAMERA lamp. • The demonstration will be used on the LCD screen. • Your camcorder offers [ENG[SIMP]] (simplified English) for details (p. 61). See "First Step Guide" in situations such as those described... to other than CAMERA. 47 LANGUAGE You can view the pictures displayed on the screen of your camcorder on your camcorder, and slide the POWER switch repeatedly to be suspended in the supplied CDROM for when you touch ... a cassette from your computer (USB Streaming) via the USB cable. ON Always displays the remaining tape indicator.
...34 for details on the CAMERA lamp. • The demonstration will be used on the LCD screen. • Your camcorder offers [ENG[SIMP]] (simplified English) for details (p. 61). See "First Step Guide" in situations such as those described... to other than CAMERA. 47 LANGUAGE You can view the pictures displayed on the screen of your camcorder on your camcorder, and slide the POWER switch repeatedly to be suspended in the supplied CDROM for when you touch ... a cassette from your computer (USB Streaming) via the USB cable. ON Always displays the remaining tape indicator.
Operating Guide
Page 49
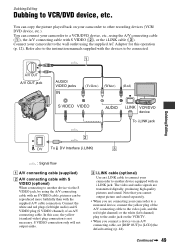
...). S VIDEO connection only will not output audio. C i.LINK cable (optional) Use an i.LINK cable to connect your camcorder to another device equipped with the supplied A/V cable connection. You can connect your camcorder to the wall outlet using the A/V connecting cable (1), the A/V connecting cable with S VIDEO (2), or the i.LINK cable (3). Refer also to the instruction manuals supplied with the...
...). S VIDEO connection only will not output audio. C i.LINK cable (optional) Use an i.LINK cable to connect your camcorder to another device equipped with the supplied A/V cable connection. You can connect your camcorder to the wall outlet using the A/V connecting cable (1), the A/V connecting cable with S VIDEO (2), or the i.LINK cable (3). Refer also to the instruction manuals supplied with the...
Operating Guide
Page 50
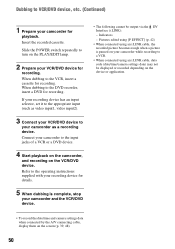
...it to the appropriate input (such as video input1, video input2). 3 Connect your VCR/DVD device to your camcorder while recording to a VCR. • When connected using an i.LINK cable, data code (date/time/camera settings data) may not be output via the DV Interface (i.LINK): - Pictures ...the operating instructions supplied with your camcorder and the VCR/DVD device. • The following cannot be displayed or recorded depending on the device or application. • To record the date/time and camera settings data when connected by the A/V connecting cable, display them on the screen ...
...it to the appropriate input (such as video input1, video input2). 3 Connect your VCR/DVD device to your camcorder while recording to a VCR. • When connected using an i.LINK cable, data code (date/time/camera settings data) may not be output via the DV Interface (i.LINK): - Pictures ...the operating instructions supplied with your camcorder and the VCR/DVD device. • The following cannot be displayed or recorded depending on the device or application. • To record the date/time and camera settings data when connected by the A/V connecting cable, display them on the screen ...
Operating Guide
Page 51
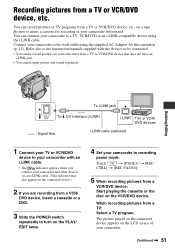
... from a TV or VCR/DVD device, etc. Refer also to the instruction manuals supplied with an i.LINK cable. • The indicator appears when you connect your camcorder and other devices via an i.LINK cable. (This indicator may also appear on the connected device.) 2 If you are recording from a TV or...on the VCR/DVD device. When recording pictures from a TV or VCR/DVD device, etc., on the LCD screen of your camcorder to the wall outlet using the i.LINK cable. You can record pictures or TV programs from a TV: Select a TV program. Be sure to recording pause mode. The ...
... from a TV or VCR/DVD device, etc. Refer also to the instruction manuals supplied with an i.LINK cable. • The indicator appears when you connect your camcorder and other devices via an i.LINK cable. (This indicator may also appear on the connected device.) 2 If you are recording from a TV or...on the VCR/DVD device. When recording pictures from a TV or VCR/DVD device, etc., on the LCD screen of your camcorder to the wall outlet using the i.LINK cable. You can record pictures or TV programs from a TV: Select a TV program. Be sure to recording pause mode. The ...
Operating Guide
Page 52
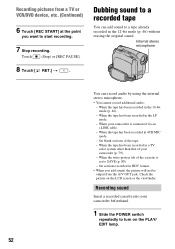
...). - When the write-protect tab of the cassette is connected via an i.LINK cable. - Recording sound Insert a recorded cassette into your camcorder is set to a tape already recorded in a TV color system other than that of the tape. - Touch (Stop) or [REC PAUSE]. 8 Touch [ RET.] t . When the ... can add sound to SAVE (p. 80). - When the tape has been recorded in the 12-bit mode (p. 46) without erasing the original sound. When your camcorder beforehand. 1 Slide the POWER switch repeatedly to turn on the LCD screen or the viewfinder.
...). - When the write-protect tab of the cassette is connected via an i.LINK cable. - Recording sound Insert a recorded cassette into your camcorder is set to a tape already recorded in a TV color system other than that of the tape. - Touch (Stop) or [REC PAUSE]. 8 Touch [ RET.] t . When the ... can add sound to SAVE (p. 80). - When the tape has been recorded in the 12-bit mode (p. 46) without erasing the original sound. When your camcorder beforehand. 1 Slide the POWER switch repeatedly to turn on the LCD screen or the viewfinder.

Operating Guide
Page 55
...added music and visual styles. USB Driver - A Sony product is transferred in folders by selecting from those available for copying video and sound recorded on your camcorder. ImageMixer VCD2 is good for Windows computers. USB cable This method is compatible with your computer and easily create...a tape to a CD-R. Video and still images are 2 ways to connect your camcorder by date. Music Video/Slideshow Producer You can easily create an original short video with a USB cable. Automatic Music Video Producer You can select your favorite video and still images from your...
...added music and visual styles. USB Driver - A Sony product is transferred in folders by selecting from those available for copying video and sound recorded on your camcorder. ImageMixer VCD2 is good for Windows computers. USB cable This method is compatible with your computer and easily create...a tape to a CD-R. Video and still images are 2 ways to connect your camcorder by date. Music Video/Slideshow Producer You can easily create an original short video with a USB cable. Automatic Music Video Producer You can select your favorite video and still images from your...
Operating Guide
Page 56
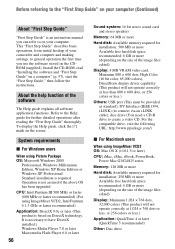
About the help function of your camcorder and computer and making settings, to create a video CD. Operation is necessary to on your computer. System requirements x For Windows users When using ImageMixer VCD2, ...; 600 dots, or 256 colors or less.) Others: USB port (This must be provided as standard), DV Interface (IEEE1394, i.LINK) (to connect via an i.LINK cable), disc drive (You need a CD-R drive to general operation the first time you can refer to have DirectX installed.) Windows Media Player 7.0 or later Macromedia...
About the help function of your camcorder and computer and making settings, to create a video CD. Operation is necessary to on your computer. System requirements x For Windows users When using ImageMixer VCD2, ...; 600 dots, or 256 colors or less.) Others: USB port (This must be provided as standard), DV Interface (IEEE1394, i.LINK) (to connect via an i.LINK cable), disc drive (You need a CD-R drive to general operation the first time you can refer to have DirectX installed.) Windows Media Player 7.0 or later Macromedia...
Operating Guide
Page 57
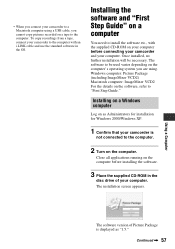
...of your computer. Installing the software and "First Step Guide" on a computer You need to install the software etc., with an i.LINK cable and use the standard software in the disc drive of Picture Package is displayed as Administrators for installation for Windows 2000/Windows XP. 1 ...Confirm that your camcorder is not connected to the computer. 2 Turn on your computer before installing the software. 3 Place the supplied CD-ROM in the OS. ...
...of your computer. Installing the software and "First Step Guide" on a computer You need to install the software etc., with an i.LINK cable and use the standard software in the disc drive of Picture Package is displayed as Administrators for installation for Windows 2000/Windows XP. 1 ...Confirm that your camcorder is not connected to the computer. 2 Turn on your computer before installing the software. 3 Place the supplied CD-ROM in the OS. ...
Operating Guide
Page 62
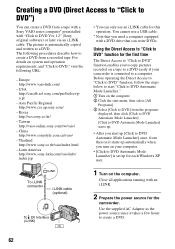
... following URL: - For details on your camcorder is connected to DVD Automatic Mode Launcher] is automatically copied and written to create a DVD. 62 Latin America http://www.sony-latin.com/vaio/info/ index.jsp • You can only use a USB cable. * Note that you to copy pictures recorded... on the computer. Asia Pacific Regional http://www.css.ap.sony.com/ - Korea http://scs.sony.co.kr/ - You cannot use an i.LINK cable for the camcorder. Before operating the Direct Access to "Click to DVD" function, follow the steps below to start...
... following URL: - For details on your camcorder is connected to DVD Automatic Mode Launcher] is automatically copied and written to create a DVD. 62 Latin America http://www.sony-latin.com/vaio/info/ index.jsp • You can only use a USB cable. * Note that you to copy pictures recorded... on the computer. Asia Pacific Regional http://www.css.ap.sony.com/ - Korea http://scs.sony.co.kr/ - You cannot use an i.LINK cable for the camcorder. Before operating the Direct Access to "Click to DVD" function, follow the steps below to start...
Operating Guide
Page 63
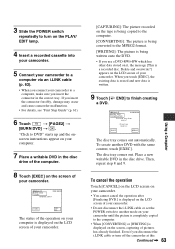
... use a DVD-RW/+RW which has other data stored on the PLAY/ EDIT lamp. 4 Insert a recorded cassette into your camcorder. 5 Connect your camcorder to a computer via an i.LINK cable (p. 62). • When you insert the connector in the correct way. To cancel the operation Touch [CANCEL] on the ... You cannot cancel the operation after [Finalizing DVD.] is displayed on the LCD screen of your camcorder. • Do not disconnect the i.LINK cable or set the POWER switch to another mode on your camcorder until the picture is completely copied to the computer. • When [CONVERTING] or [WRITING...
... use a DVD-RW/+RW which has other data stored on the PLAY/ EDIT lamp. 4 Insert a recorded cassette into your camcorder. 5 Connect your camcorder to a computer via an i.LINK cable (p. 62). • When you insert the connector in the correct way. To cancel the operation Touch [CANCEL] on the ... You cannot cancel the operation after [Finalizing DVD.] is displayed on the LCD screen of your camcorder. • Do not disconnect the i.LINK cable or set the POWER switch to another mode on your camcorder until the picture is completely copied to the computer. • When [CONVERTING] or [WRITING...
Operating Guide
Page 65
... If the problem persists, disconnect the power source and contact your camcorder, use it after about 1 minute. • Press the RESET button (p. 27) using your Sony dealer. Troubleshooting Troubleshooting If you cannot turn Easy Handycam operation on or off. Previously made settings are restored when you ...cancel the Easy Handycam operation (p. 22, 41). [DEMO MODE] does not start. • You cannot view the demonstration together with another device via USB cable, you run into any problems using a sharp-pointed object. (If...
... If the problem persists, disconnect the power source and contact your camcorder, use it after about 1 minute. • Press the RESET button (p. 27) using your Sony dealer. Troubleshooting Troubleshooting If you cannot turn Easy Handycam operation on or off. Previously made settings are restored when you ...cancel the Easy Handycam operation (p. 22, 41). [DEMO MODE] does not start. • You cannot view the demonstration together with another device via USB cable, you run into any problems using a sharp-pointed object. (If...
Operating Guide
Page 70
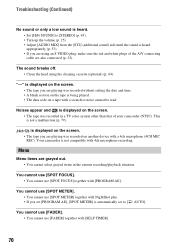
... MIX] from the [ST2] (additional sound) side until the sound is heard appropriately (p. 53). • If you are using the cleaning cassette (optional) (p. 84). Your camcorder is not a malfunction (p. 79). Noises appear and is displayed on the screen. • The tape was recorded on a tape with [SELF TIMER]. 70 You cannot... cannot be read. The sound breaks off. • Clean the head using an S VIDEO plug, make sure the red and white plugs of the A/V connecting cable are grayed out. • You cannot select grayed items in a TV color system other than that of your...
... MIX] from the [ST2] (additional sound) side until the sound is heard appropriately (p. 53). • If you are using the cleaning cassette (optional) (p. 84). Your camcorder is not a malfunction (p. 79). Noises appear and is displayed on the screen. • The tape was recorded on a tape with [SELF TIMER]. 70 You cannot... cannot be read. The sound breaks off. • Clean the head using an S VIDEO plug, make sure the red and white plugs of the A/V connecting cable are grayed out. • You cannot select grayed items in a TV color system other than that of your...

Operating Guide
Page 71
...[WHT BAL] together with NightShot plus . Dubbing/Editing/Connecting to a computer The computer does not recognize your camcorder. • Disconnect the cable from the computer and camcorder, then connect it again securely. • Disconnect USB devices other information appear on the computer. • Disconnect... the cable from the computer and camcorder, restart the computer, then connect them again correctly. Pictures from connected devices are not displayed correctly. •...
...[WHT BAL] together with NightShot plus . Dubbing/Editing/Connecting to a computer The computer does not recognize your camcorder. • Disconnect the cable from the computer and camcorder, then connect it again securely. • Disconnect USB devices other information appear on the computer. • Disconnect... the cable from the computer and camcorder, restart the computer, then connect them again correctly. Pictures from connected devices are not displayed correctly. •...

Operating Guide
Page 72
...(p. 47). (Only when connected to the Windows computer with the USB cable) You cannot view the video recorded on a tape on the computer. • Disconnect the cable from a tape, connect your camcorder to the computer with the USB cable) You cannot view the video recorded on a tape on the Macintosh ...set [USB STREAM] to [ON] (p. 47). (Only when connected to the Windows computer with an i.LINK cable and use the standard software in the disc drive of your camcorder, disconnect the USB cable, then restart the computer. 7 Place the supplied CD-ROM in the OS. The [System Properties] screen ...
...(p. 47). (Only when connected to the Windows computer with the USB cable) You cannot view the video recorded on a tape on the computer. • Disconnect the cable from a tape, connect your camcorder to the computer with the USB cable) You cannot view the video recorded on a tape on the Macintosh ...set [USB STREAM] to [ON] (p. 47). (Only when connected to the Windows computer with an i.LINK cable and use the standard software in the disc drive of your camcorder, disconnect the USB cable, then restart the computer. 7 Place the supplied CD-ROM in the OS. The [System Properties] screen ...
Operating Guide
Page 73
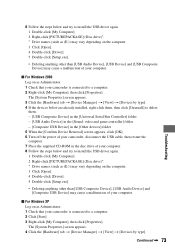
... - [Composite USB Device] in the [Other devices] folder 5 When the [Confirm Device Removal] screen appears, click [OK]. 6 Turn off the power of your camcorder, disconnect the USB cable, then restart the computer. 7 Place the supplied CD-ROM in the disc drive of your computer. 8 Follow the steps below and try to install...
... - [Composite USB Device] in the [Other devices] folder 5 When the [Confirm Device Removal] screen appears, click [OK]. 6 Turn off the power of your camcorder, disconnect the USB cable, then restart the computer. 7 Place the supplied CD-ROM in the disc drive of your computer. 8 Follow the steps below and try to install...
Operating Guide
Page 74
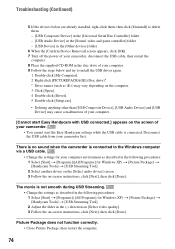
...] screen appears, click [OK]. 7 Turn off the power of your camcorder, disconnect the USB cable, then restart the computer. 8 Place the supplied CD-ROM in the disc drive of your camcorder. • You cannot start Easy Handycam with USB connected.] appears on the screen of your computer. 9 Follow the... steps below and try to the Windows computer via a USB cable. • Change the settings for Windows XP) t [Picture...
...] screen appears, click [OK]. 7 Turn off the power of your camcorder, disconnect the USB cable, then restart the computer. 8 Place the supplied CD-ROM in the disc drive of your camcorder. • You cannot start Easy Handycam with USB connected.] appears on the screen of your computer. 9 Follow the... steps below and try to the Windows computer via a USB cable. • Change the settings for Windows XP) t [Picture...


