
Operating Guide
Page 6
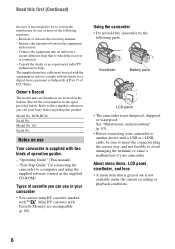
...- Connect the equipment into an outlet on use mini DV cassettes marked with a USB or i.LINK cable, be used with the equipment in order to these numbers whenever...number in your camcorder to which the receiver is not available under the current recording or playback conditions. 6 Increase the separation between the equipment and receiver. - DCR-HC26 Serial No. ... • Before connecting your camcorder • You can use Your camcorder is supplied with Cassette Memory are located on the supplied CD-ROM) Types of your Sony dealer regarding this first (Continued...
...- Connect the equipment into an outlet on use mini DV cassettes marked with a USB or i.LINK cable, be used with the equipment in order to these numbers whenever...number in your camcorder to which the receiver is not available under the current recording or playback conditions. 6 Increase the separation between the equipment and receiver. - DCR-HC26 Serial No. ... • Before connecting your camcorder • You can use Your camcorder is supplied with Cassette Memory are located on the supplied CD-ROM) Types of your Sony dealer regarding this first (Continued...
Operating Guide
Page 9
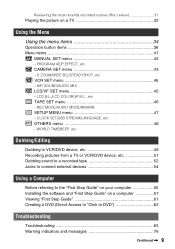
.../P EFFECT, etc. HiFi SOUND/AUDIO MIX LCD/VF SET menu 45 - OTHERS menu 48 - VCR SET menu 45 - D ZOOM/WIDE SEL/STEADYSHOT, etc. CLOCK SET/USB STREAM/LANGUAGE, etc. WORLD TIME/BEEP, etc. Dubbing/Editing Dubbing to VCR/DVD device, etc 49 Recording pictures from a TV or VCR/DVD device, etc...
.../P EFFECT, etc. HiFi SOUND/AUDIO MIX LCD/VF SET menu 45 - OTHERS menu 48 - VCR SET menu 45 - D ZOOM/WIDE SEL/STEADYSHOT, etc. CLOCK SET/USB STREAM/LANGUAGE, etc. WORLD TIME/BEEP, etc. Dubbing/Editing Dubbing to VCR/DVD device, etc 49 Recording pictures from a TV or VCR/DVD device, etc...
Operating Guide
Page 19
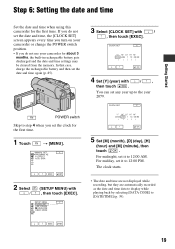
SETUP MENU CLOCK SET USB STREAM LANGUAGE DEMO MODE --:--:-- 3 Select [CLOCK SET] with , then touch [EXEC]. The clock starts....time data to display while playing back by selecting [DATA CODE] to step 4 when you do not use your camcorder for about 3 months, the built-in rechargeable battery gets discharged and the date and time settings may be cleared ...and time again (p. 85). Step 6: Setting the date and time Getting Started Set the date and time when using this camcorder for the first time. 1 Touch t [MENU]. In that case, charge the rechargeable battery and then set the clock ...
SETUP MENU CLOCK SET USB STREAM LANGUAGE DEMO MODE --:--:-- 3 Select [CLOCK SET] with , then touch [EXEC]. The clock starts....time data to display while playing back by selecting [DATA CODE] to step 4 when you do not use your camcorder for about 3 months, the built-in rechargeable battery gets discharged and the date and time settings may be cleared ...and time again (p. 85). Step 6: Setting the date and time Getting Started Set the date and time when using this camcorder for the first time. 1 Touch t [MENU]. In that case, charge the rechargeable battery and then set the clock ...
Operating Guide
Page 41
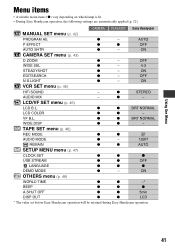
...-* BEEP z z z A.SHUT OFF z z 5min DISP OUT z z LCD * The value set before Easy Handycam operation will be retained during Easy Handycam operation. 41 CAMERA PLAY/EDIT Easy Handycam MANUAL SET menu (p. 42) PROGRAM AE z - z z BRT NORMAL WIDE DISP z z - Using the Menu ...Menu items • Available menu items (z) vary depending on which lamp is lit. • During Easy Handycam operation, the following settings are automatically applied (p. 22). ON EDITSEARCH z - z STEREO AUDIO MIX - TAPE SET menu (p. 46) REC MODE ...
...-* BEEP z z z A.SHUT OFF z z 5min DISP OUT z z LCD * The value set before Easy Handycam operation will be retained during Easy Handycam operation. 41 CAMERA PLAY/EDIT Easy Handycam MANUAL SET menu (p. 42) PROGRAM AE z - z z BRT NORMAL WIDE DISP z z - Using the Menu ...Menu items • Available menu items (z) vary depending on which lamp is lit. • During Easy Handycam operation, the following settings are automatically applied (p. 22). ON EDITSEARCH z - z STEREO AUDIO MIX - TAPE SET menu (p. 46) REC MODE ...
Operating Guide
Page 47
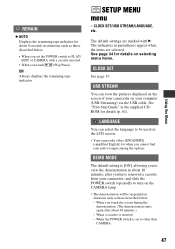
...touch (Play/Pause). The indicators in parentheses appear when the items are marked with a cassette inserted. • When you cannot find your camcorder, and slide the POWER switch repeatedly to other than CAMERA. 47 When a cassette is [ON], allowing you to view the demonstration in...the USB cable. When you touch the screen during the demonstration. (The demonstration starts again after you set to turn on the CAMERA lamp. • The demonstration will be used on the LCD screen. • Your camcorder offers [ENG[SIMP]] (simplified English) for details on your camcorder on...
...touch (Play/Pause). The indicators in parentheses appear when the items are marked with a cassette inserted. • When you cannot find your camcorder, and slide the POWER switch repeatedly to other than CAMERA. 47 When a cassette is [ON], allowing you to view the demonstration in...the USB cable. When you touch the screen during the demonstration. (The demonstration starts again after you set to turn on the CAMERA lamp. • The demonstration will be used on the LCD screen. • Your camcorder offers [ENG[SIMP]] (simplified English) for details on your camcorder on...
Operating Guide
Page 54
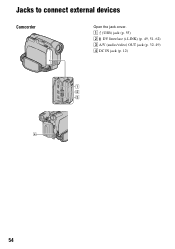
Jacks to connect external devices Camcorder Open the jack cover. A (USB) jack (p. 55) B DV Interface (i.LINK) (p. 49, 51, 62) C A/V (audio/video) OUT jack (p. 32, 49) D DC IN jack (p. 12) 1 2 3 4 54
Jacks to connect external devices Camcorder Open the jack cover. A (USB) jack (p. 55) B DV Interface (i.LINK) (p. 49, 51, 62) C A/V (audio/video) OUT jack (p. 32, 49) D DC IN jack (p. 12) 1 2 3 4 54

Operating Guide
Page 55
... show with added music and visual styles. Burning Video CD You can view the video and still images copied from your camcorder by date. ImageMixer VCD2 - A Sony product is not supplied with a menu of "First Step Guide" on the supplied CD-ROM. Video and still images... includes the following operations by connecting your camcorder. Video Capturing Tool You can import the entire contents of a tape to create a video CD. USB Driver - "First Step Guide" Using a Computer Continued , 55 Image data is compatible with a USB cable. USB Streaming Tool You can view live or ...
... show with added music and visual styles. Burning Video CD You can view the video and still images copied from your camcorder by date. ImageMixer VCD2 - A Sony product is not supplied with a menu of "First Step Guide" on the supplied CD-ROM. Video and still images... includes the following operations by connecting your camcorder. Video Capturing Tool You can import the entire contents of a tape to create a video CD. USB Driver - "First Step Guide" Using a Computer Continued , 55 Image data is compatible with a USB cable. USB Streaming Tool You can view live or ...
Operating Guide
Page 56
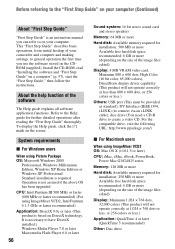
... Step Guide" on your computer (Continued) About "First Step Guide" "First Step Guide" is an instruction manual you can refer to on your camcorder and computer and making settings, to general operation the first time you use the software stored on the CDROM (supplied). To display the Help guide...,000 colors), DirectDraw display driver capability (This product will not operate correctly at less than 800 × 600 dots, or 256 colors or less.) Others: USB port (This must be provided as standard), DV Interface (IEEE1394, i.LINK) (to connect via an i.LINK cable), disc drive (You need a CD-R ...
... Step Guide" on your computer (Continued) About "First Step Guide" "First Step Guide" is an instruction manual you can refer to on your camcorder and computer and making settings, to general operation the first time you use the software stored on the CDROM (supplied). To display the Help guide...,000 colors), DirectDraw display driver capability (This product will not operate correctly at less than 800 × 600 dots, or 256 colors or less.) Others: USB port (This must be provided as standard), DV Interface (IEEE1394, i.LINK) (to connect via an i.LINK cable), disc drive (You need a CD-R ...
Operating Guide
Page 57
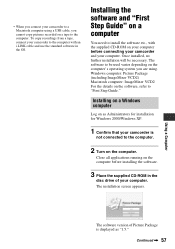
... installed, no further installation will be used varies depending on the computer's operating system you are using a USB cable, you connect your camcorder to the computer with the supplied CD-ROM on your computer before installing the software. 3 Place the supplied... software to the computer. Installing on a Windows computer Log on as Administrators for installation for Windows 2000/Windows XP. 1 Confirm that your camcorder is displayed as "1.5." Close all applications running on a tape to be necessary. Continued , 57 Windows computer: Picture Package (including ImageMixer VCD2...
... installed, no further installation will be used varies depending on the computer's operating system you are using a USB cable, you connect your camcorder to the computer with the supplied CD-ROM on your computer before installing the software. 3 Place the supplied... software to the computer. Installing on a Windows computer Log on as Administrators for installation for Windows 2000/Windows XP. 1 Confirm that your camcorder is displayed as "1.5." Close all applications running on a tape to be necessary. Continued , 57 Windows computer: Picture Package (including ImageMixer VCD2...
Operating Guide
Page 62
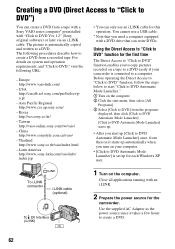
....com/vaio/info/ index.jsp • You can only use a USB cable. * Note that can write DVDs. Using the Direct Access to "Click to DVD" function for each Windows XP user. Taiwan http://vaio-online.sony.com/tw/vaio/ - Use the supplied AC Adaptor as the power source since it takes a few... Launcher] once, from then on it starts up for the first time The Direct Access to "Click to DVD" function enables you turn on your camcorder is automatically copied and written to DVD Ver.1.2" (Sony original software) or later via an i.LINK cable. You cannot use an i.LINK cable for the...
....com/vaio/info/ index.jsp • You can only use a USB cable. * Note that can write DVDs. Using the Direct Access to "Click to DVD" function for each Windows XP user. Taiwan http://vaio-online.sony.com/tw/vaio/ - Use the supplied AC Adaptor as the power source since it takes a few... Launcher] once, from then on it starts up for the first time The Direct Access to "Click to DVD" function enables you turn on your camcorder is automatically copied and written to DVD Ver.1.2" (Sony original software) or later via an i.LINK cable. You cannot use an i.LINK cable for the...
Operating Guide
Page 65
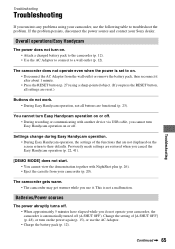
... are restored when you cancel the Easy Handycam operation (p. 22, 41). [DEMO MODE] does not start. • You cannot view the demonstration together with another device via USB cable, you cannot turn on . • Attach a charged battery pack to the camcorder (p. 12). • Use the AC..., all settings are reset.) Buttons do not operate your camcorder (p. 20). If the problem persists, disconnect the power source and contact your camcorder, use it after about 1 minute. • Press the RESET button (p. 27) using your Sony dealer. Batteries/Power sources The power abruptly turns off ...
... are restored when you cancel the Easy Handycam operation (p. 22, 41). [DEMO MODE] does not start. • You cannot view the demonstration together with another device via USB cable, you cannot turn on . • Attach a charged battery pack to the camcorder (p. 12). • Use the AC..., all settings are reset.) Buttons do not operate your camcorder (p. 20). If the problem persists, disconnect the power source and contact your camcorder, use it after about 1 minute. • Press the RESET button (p. 27) using your Sony dealer. Batteries/Power sources The power abruptly turns off ...

Operating Guide
Page 71
... computer The computer does not recognize your camcorder. • Disconnect the cable from the computer and camcorder, then connect it again securely. • Disconnect USB devices other than the keyboard, the mouse, and the camcorder from the (USB) jack on the display of another device... for dubbing a picture from your camcorder (p. 49). You cannot dub correctly...
... computer The computer does not recognize your camcorder. • Disconnect the cable from the computer and camcorder, then connect it again securely. • Disconnect USB devices other than the keyboard, the mouse, and the camcorder from the (USB) jack on the display of another device... for dubbing a picture from your camcorder (p. 49). You cannot dub correctly...

Operating Guide
Page 72
...Removal] screen appears, click [OK]. 6 Turn off the power of your computer. 72 Troubleshooting (Continued) You cannot view the video your camcorder is connected to install the USB driver correctly. The image on tape does not appear on a tape to the computer. The [System Properties] screen appears. 3 Click ...recordings from the computer, then connect it again. • Slide the POWER switch repeatedly to turn on the PLAY/EDIT lamp on your camcorder and set [USB STREAM] to [ON] (p. 47). (Only when connected to the Windows computer with an i.LINK cable and use the standard software in...
...Removal] screen appears, click [OK]. 6 Turn off the power of your computer. 72 Troubleshooting (Continued) You cannot view the video your camcorder is connected to install the USB driver correctly. The image on tape does not appear on a tape to the computer. The [System Properties] screen appears. 3 Click ...recordings from the computer, then connect it again. • Slide the POWER switch repeatedly to turn on the PLAY/EDIT lamp on your camcorder and set [USB STREAM] to [ON] (p. 47). (Only when connected to the Windows computer with an i.LINK cable and use the standard software in...
Operating Guide
Page 73
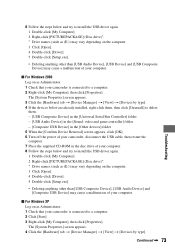
... [Other devices] folder 5 When the [Confirm Device Removal] screen appears, click [OK]. 6 Turn off the power of your camcorder, disconnect the USB cable, then restart the computer. 7 Place the supplied CD-ROM in the disc drive of your computer. x For Windows 2000... names (such as (E:)) may vary depending on as Administrator. 1 Check that your camcorder is connected to a computer. 2 Right-click [My Computer], then click [Properties]. Troubleshooting 8 Follow the steps below and try to install the USB driver again. 1 Double-click [My Computer]. 2 Right-click [PICTUREPACKAGE] (Disc drive...
... [Other devices] folder 5 When the [Confirm Device Removal] screen appears, click [OK]. 6 Turn off the power of your camcorder, disconnect the USB cable, then restart the computer. 7 Place the supplied CD-ROM in the disc drive of your computer. x For Windows 2000... names (such as (E:)) may vary depending on as Administrator. 1 Check that your camcorder is connected to a computer. 2 Right-click [My Computer], then click [Properties]. Troubleshooting 8 Follow the steps below and try to install the USB driver again. 1 Double-click [My Computer]. 2 Right-click [PICTUREPACKAGE] (Disc drive...
Operating Guide
Page 74
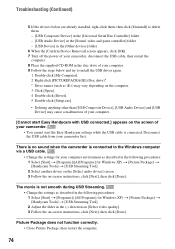
... [Confirm Device Removal] screen appears, click [OK]. 7 Turn off the power of your camcorder, disconnect the USB cable, then restart the computer. 8 Place the supplied CD-ROM in the disc drive of your camcorder. • You cannot start Easy Handycam with USB connected.] appears on the screen of your computer. 9 Follow the steps below and...
... [Confirm Device Removal] screen appears, click [OK]. 7 Turn off the power of your camcorder, disconnect the USB cable, then restart the computer. 8 Place the supplied CD-ROM in the disc drive of your camcorder. • You cannot start Easy Handycam with USB connected.] appears on the screen of your computer. 9 Follow the steps below and...

Operating Guide
Page 77
... mode. Use a cleaning cassette. (p. 84) Cannot start Easy Handycam. (p. 22, 65) Cannot cancel Easy Handycam. (p. 22, 65) Cannot start Easy Handycam with USB connected. • You cannot start the Easy Handycam settings while the USB cable is low. • Change the battery (p. 12, 81). Disconnect the USB cable from your camcorder first. Use a new one. (p. 81) Z Re-attach...
... mode. Use a cleaning cassette. (p. 84) Cannot start Easy Handycam. (p. 22, 65) Cannot cancel Easy Handycam. (p. 22, 65) Cannot start Easy Handycam with USB connected. • You cannot start the Easy Handycam settings while the USB cable is low. • Change the battery (p. 12, 81). Disconnect the USB cable from your camcorder first. Use a new one. (p. 81) Z Re-attach...
Operating Guide
Page 78
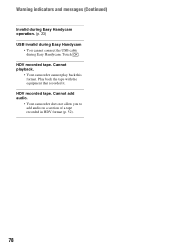
HDV recorded tape. Play back the tape with the equipment that recorded it. Cannot add audio. • Your camcorder does not allow you to add audio on a section of a tape recorded in HDV format (p. 52). 78 HDV recorded tape. Cannot playback. • Your camcorder cannot play back this format. Touch . Warning indicators and messages (Continued) Invalid during Easy Handycam operation. (p. 23) USB invalid during Easy Handycam • You cannot connect the USB cable during Easy Handycam.
HDV recorded tape. Play back the tape with the equipment that recorded it. Cannot add audio. • Your camcorder does not allow you to add audio on a section of a tape recorded in HDV format (p. 52). 78 HDV recorded tape. Cannot playback. • Your camcorder cannot play back this format. Touch . Warning indicators and messages (Continued) Invalid during Easy Handycam operation. (p. 23) USB invalid during Easy Handycam • You cannot connect the USB cable during Easy Handycam.

Operating Guide
Page 87
... 5 lx (lux) (F 1.8) 0 lx (lux) (during NightShot plus function)*1 *1Objects unable to be seen due to the dark can be shot with less than 2.2 kΩ (kilohms) USB jack mini-B DV input/output i.LINK Interface (IEEE1394, 4-pin connector S100) LCD screen Picture 6.2 cm (2.5 type) Total dot number 123 200 (560 × 220) General...
... 5 lx (lux) (F 1.8) 0 lx (lux) (during NightShot plus function)*1 *1Objects unable to be seen due to the dark can be shot with less than 2.2 kΩ (kilohms) USB jack mini-B DV input/output i.LINK Interface (IEEE1394, 4-pin connector S100) LCD screen Picture 6.2 cm (2.5 type) Total dot number 123 200 (560 × 220) General...
Operating Guide
Page 91
... 46 WIDE SEL (Wide select)..... 44 Windows 56, 57 WORLD TIME 48 Write-protect tab 80 Z Zoom 26 Zoom lever 26 Additional Information U USB jack 54 USB STREAM 47 USB Streaming 47 Using abroad 79 V V SPD PLAY (Various speed playback) .....40 VCR SET menu 45 VF B.L. (Viewfinder back light).........45 Video head 84...
... 46 WIDE SEL (Wide select)..... 44 Windows 56, 57 WORLD TIME 48 Write-protect tab 80 Z Zoom 26 Zoom lever 26 Additional Information U USB jack 54 USB STREAM 47 USB Streaming 47 Using abroad 79 V V SPD PLAY (Various speed playback) .....40 VCR SET menu 45 VF B.L. (Viewfinder back light).........45 Video head 84...

Marketing Specifications
Page 1
...SteadyShot® Picture Stabilization System Picture stabilization system that offers less glare and flare with Sony's Picture Effect Modes. USB Streaming Stay connected to 500 lines of the camcorder using the LCD screen or in Camera mode: Mosaic and Pastel. You can even ... systems. On Screen Zoom and Record Controls For additional control of the camcorder, the DCR-HC26 features Zoom and Record buttons on the frame of individual still images with the compact DCR-HC26 MiniDV Handycam camcorder. Sony's exclusive AccuPower™ meter displays the battery time remaining in minutes, in...
...SteadyShot® Picture Stabilization System Picture stabilization system that offers less glare and flare with Sony's Picture Effect Modes. USB Streaming Stay connected to 500 lines of the camcorder using the LCD screen or in Camera mode: Mosaic and Pastel. You can even ... systems. On Screen Zoom and Record Controls For additional control of the camcorder, the DCR-HC26 features Zoom and Record buttons on the frame of individual still images with the compact DCR-HC26 MiniDV Handycam camcorder. Sony's exclusive AccuPower™ meter displays the battery time remaining in minutes, in...


