
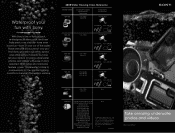
2008 Water Housing Cross Reference
Page 1
...MP1K ACC-MP105 DSC-T700 DSC-T77 N/A SPK-HCD DCR-HC26/28, DCR-HC36/38 DCR-HC46/48, DCR-HC52/54 DCR-HC62/96 DCR-DVD103/108 DCR-DVD203/308 DCR-DVD403/408 DCR-DVD508/610 DCR-DVD710/810 DCR-DVD910/92 DCR-SR200/220/220D DCR-SR300/42/45/46 DCR-SR62/65/82/85 HDR-CX7/CX12 HDR-HC3/5/7/9, ...HDR-SR5/7 HDR-SR10/10D/11/12 HDR-UX5/7/10/20 N/A © 2008 Sony Electronics Inc. Sony, the Sony logo, Cyber-shot, and Handycam...
...MP1K ACC-MP105 DSC-T700 DSC-T77 N/A SPK-HCD DCR-HC26/28, DCR-HC36/38 DCR-HC46/48, DCR-HC52/54 DCR-HC62/96 DCR-DVD103/108 DCR-DVD203/308 DCR-DVD403/408 DCR-DVD508/610 DCR-DVD710/810 DCR-DVD910/92 DCR-SR200/220/220D DCR-SR300/42/45/46 DCR-SR62/65/82/85 HDR-CX7/CX12 HDR-HC3/5/7/9, ...HDR-SR5/7 HDR-SR10/10D/11/12 HDR-UX5/7/10/20 N/A © 2008 Sony Electronics Inc. Sony, the Sony logo, Cyber-shot, and Handycam...

2008 Water Housing Cross Reference
Page 2
...still cameras • Protects against dust, rain and spray • Lets users take photos at depths up to 5 feet • Fits selected Sony® Handycam® camcorders • Guards against dust, dirt, and more • Allows videos to be taken up to 17 feet below the water's surface •... Fits selected Sony® Cyber-shot® digital still cameras • Allows underwater photography up to 132 feet deep • Works with the ...
...still cameras • Protects against dust, rain and spray • Lets users take photos at depths up to 5 feet • Fits selected Sony® Handycam® camcorders • Guards against dust, dirt, and more • Allows videos to be taken up to 17 feet below the water's surface •... Fits selected Sony® Cyber-shot® digital still cameras • Allows underwater photography up to 132 feet deep • Works with the ...

Operating Guide
Page 2
This symbol is intended to alert the user to the presence of uninsulated "dangerous voltage" within the product's enclosure that may be of sufficient magnitude to rain or moisture. This symbol is intended to alert the user to the presence of electric shock to persons. WARNING To reduce fire or shock hazard, do not expose the unit to constitute a risk of important operating and maintenance (servicing) instructions in the literature accompanying the appliance. 2
This symbol is intended to alert the user to the presence of uninsulated "dangerous voltage" within the product's enclosure that may be of sufficient magnitude to rain or moisture. This symbol is intended to alert the user to the presence of electric shock to persons. WARNING To reduce fire or shock hazard, do not expose the unit to constitute a risk of important operating and maintenance (servicing) instructions in the literature accompanying the appliance. 2

Operating Guide
Page 3
Carefully observe all warnings, precautions and instructions on the appliance, or the one described in cabinet, unless proper ventilation is exposed to direct sunlight. For those sets designed to operate from the type of power source indicated on the marking label. Installation Water and Moisture Do not use power-line operated sets near a bathtub, washbowl, kitchen sink, or laundry tub, in a fire or electric shock. Never cover the slots and openings with a polarized ac power cord plug (a plug having one way. Do not place the set on an unstable cart, stand, tripod, bracket,...
Carefully observe all warnings, precautions and instructions on the appliance, or the one described in cabinet, unless proper ventilation is exposed to direct sunlight. For those sets designed to operate from the type of power source indicated on the marking label. Installation Water and Moisture Do not use power-line operated sets near a bathtub, washbowl, kitchen sink, or laundry tub, in a fire or electric shock. Never cover the slots and openings with a polarized ac power cord plug (a plug having one way. Do not place the set on an unstable cart, stand, tripod, bracket,...
Operating Guide
Page 4
IMPORTANT SAFEGUARDS (Continued) Lightning For added protection for this indicates a need for long periods of other controls may result in damage and will prevent damage to the set due to lightning and power-line surges. If liquid has been spilled or objects have the same characteristics as the original parts. Improper adjustment of time, unplug it is left unattended and unused for service. this set during a lightning storm, or when it from the wall outlet and refer servicing to qualified service personnel under the following the operating instructions. If the set has been...
IMPORTANT SAFEGUARDS (Continued) Lightning For added protection for this indicates a need for long periods of other controls may result in damage and will prevent damage to the set due to lightning and power-line surges. If liquid has been spilled or objects have the same characteristics as the original parts. Improper adjustment of time, unplug it is left unattended and unused for service. this set during a lightning storm, or when it from the wall outlet and refer servicing to qualified service personnel under the following the operating instructions. If the set has been...
Operating Guide
Page 5
... BATTERIES Lithium-Ion batteries are cautioned that any changes or modifications not expressly approved in accordance with Part 15 of Conformity Trade Name: SONY Model No.: DCR-HC26 Responsible Party: Sony Electronics Inc. The number below is subject to the following two conditions: (1) This device may not cause harmful interference, and (2) this manual ...not handle damaged or leaking Lithium-Ion batteries. CAUTION Replace the battery with Canadian ICES-003. For more information regarding recycling of rechargeable batteries, call : Sony Customer Information Center 1-800222...
... BATTERIES Lithium-Ion batteries are cautioned that any changes or modifications not expressly approved in accordance with Part 15 of Conformity Trade Name: SONY Model No.: DCR-HC26 Responsible Party: Sony Electronics Inc. The number below is subject to the following two conditions: (1) This device may not cause harmful interference, and (2) this manual ...not handle damaged or leaking Lithium-Ion batteries. CAUTION Replace the battery with Canadian ICES-003. For more information regarding recycling of rechargeable batteries, call : Sony Customer Information Center 1-800222...
Operating Guide
Page 6
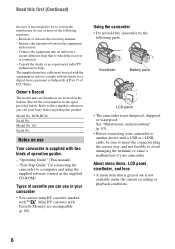
Increase the separation between the equipment and receiver. - Model No. Notes on the supplied CD-ROM) Types of cassette you call your Sony dealer regarding this first (Continued) the user is encouraged to try to avoid damaging the terminal, or cause a malfunction of operation guides....Guide" (This manual) - Mini DV cassettes with the limits for help. DCR-HC26 Serial No. The supplied interface cable must be used with the equipment in the space provided below. Viewfinder Battery pack LCD panel • The camcorder is supplied with a USB or i.LINK cable, be sure to insert ...
Increase the separation between the equipment and receiver. - Model No. Notes on the supplied CD-ROM) Types of cassette you call your Sony dealer regarding this first (Continued) the user is encouraged to try to avoid damaging the terminal, or cause a malfunction of operation guides....Guide" (This manual) - Mini DV cassettes with the limits for help. DCR-HC26 Serial No. The supplied interface cable must be used with the equipment in the space provided below. Viewfinder Battery pack LCD panel • The camcorder is supplied with a USB or i.LINK cable, be sure to insert ...

Operating Guide
Page 7
Doing so might cause your camcorder to change without any way. Change the screen language before using your recordings on -screen displays in Germany, and Sony Corporation, and produces superior images. The number value indicates the amount of time may appear different. • ...Zeiss lens, which was developed jointly by Carl Zeiss, in each local language are operational for Modulation Transfer Function. To view your camcorder if necessary (p. 47). • Design and specifications of recording media and accessories are subject to malfunction. It adopts the MTF...
Doing so might cause your camcorder to change without any way. Change the screen language before using your recordings on -screen displays in Germany, and Sony Corporation, and produces superior images. The number value indicates the amount of time may appear different. • ...Zeiss lens, which was developed jointly by Carl Zeiss, in each local language are operational for Modulation Transfer Function. To view your camcorder if necessary (p. 47). • Design and specifications of recording media and accessories are subject to malfunction. It adopts the MTF...
Operating Guide
Page 8
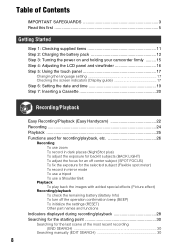
...first 5 Getting Started Step 1: Checking supplied items 11 Step 2: Charging the battery pack 12 Step 3: Turning the power on and holding your camcorder firmly ......... 15 Step 4: Adjusting the LCD panel and viewfinder 16 Step 5: Using the touch panel 17 Changing the language setting 17 Checking the... (Display guide 17 Step 6: Setting the date and time 19 Step 7: Inserting a Cassette 20 Recording/Playback Easy Recording/Playback (Easy Handycam 22 Recording 24 Playback 25 Functions used for recording/playback, etc 26 Recording To use zoom To record in dark places (NightShot plus)...
...first 5 Getting Started Step 1: Checking supplied items 11 Step 2: Charging the battery pack 12 Step 3: Turning the power on and holding your camcorder firmly ......... 15 Step 4: Adjusting the LCD panel and viewfinder 16 Step 5: Using the touch panel 17 Changing the language setting 17 Checking the... (Display guide 17 Step 6: Setting the date and time 19 Step 7: Inserting a Cassette 20 Recording/Playback Easy Recording/Playback (Easy Handycam 22 Recording 24 Playback 25 Functions used for recording/playback, etc 26 Recording To use zoom To record in dark places (NightShot plus)...
Operating Guide
Page 9
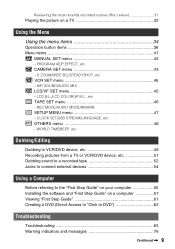
VCR SET menu 45 - WORLD TIME/BEEP, etc. HiFi SOUND/AUDIO MIX LCD/VF SET menu 45 - LCD B.L./LCD COLOR/VF B.L., etc TAPE SET menu 46 - Reviewing the most recently recorded scenes (Rec review 31 Playing the picture on a computer 57 Viewing "First Step Guide 61 Creating a DVD (Direct Access to "Click to the "First Step Guide" on your computer 55 Installing the software and "First Step Guide" on a TV 32 Using the Menu Using the menu items 34 Operation button items 36 Menu items 41 MANUAL SET menu 42 - REC MODE/AUDIO MODE/REMAIN SETUP MENU menu 47 - D ZOOM/WIDE SEL/...
VCR SET menu 45 - WORLD TIME/BEEP, etc. HiFi SOUND/AUDIO MIX LCD/VF SET menu 45 - LCD B.L./LCD COLOR/VF B.L., etc TAPE SET menu 46 - Reviewing the most recently recorded scenes (Rec review 31 Playing the picture on a computer 57 Viewing "First Step Guide 61 Creating a DVD (Direct Access to "Click to the "First Step Guide" on your computer 55 Installing the software and "First Step Guide" on a TV 32 Using the Menu Using the menu items 34 Operation button items 36 Menu items 41 MANUAL SET menu 42 - REC MODE/AUDIO MODE/REMAIN SETUP MENU menu 47 - D ZOOM/WIDE SEL/...

Operating Guide
Page 10
Additional Information Using your camcorder abroad 79 Usable cassette tapes 80 About the "InfoLITHIUM" battery pack 81 About i.LINK 82 Maintenance and precautions 83 Specifications 86 Index ...89 10
Additional Information Using your camcorder abroad 79 Usable cassette tapes 80 About the "InfoLITHIUM" battery pack 81 About i.LINK 82 Maintenance and precautions 83 Specifications 86 Index ...89 10

Operating Guide
Page 11
... in the parentheses indicates the number of the grip belt, as illustrated below, using the strap. 11 See page 6, 80 for compatible cassettes for your camcorder. AC Adaptor (1) (p. 12) Rechargeable battery pack NP-FP30 (1) (p. 12, 81) CD-ROM "Picture Package Ver.1.5.1" (1) (p. 55) Operating Guide (This manual) (1) Power ... To attach the lens cap Attach the lens cap to the metal fittings of that you have following items supplied with your camcorder. Getting Started Getting Started Step 1: Checking supplied items Make sure that item supplied. • The cassette tape is not supplied.
... in the parentheses indicates the number of the grip belt, as illustrated below, using the strap. 11 See page 6, 80 for compatible cassettes for your camcorder. AC Adaptor (1) (p. 12) Rechargeable battery pack NP-FP30 (1) (p. 12, 81) CD-ROM "Picture Package Ver.1.5.1" (1) (p. 55) Operating Guide (This manual) (1) Power ... To attach the lens cap Attach the lens cap to the metal fittings of that you have following items supplied with your camcorder. Getting Started Getting Started Step 1: Checking supplied items Make sure that item supplied. • The cassette tape is not supplied.

Operating Guide
Page 12
...You can charge the "InfoLITHIUM" battery pack (P series) (p. 81) after attaching it into place 2. 2 3 Connect the AC Adaptor to the DC IN jack on your camcorder. CHG (charge) lamp 1 The CHG (charge) lamp lights up and charging starts. 12 DC IN jack DC plug To the wall outlet AC Adaptor Power... setting). DC IN jack With the v mark facing to the LCD screen 4 Connect the power cord to your camcorder. POWER switch 2 Slide the POWER switch in the direction of the battery pack and your camcorder 1, then attach the battery pack and click it to the AC Adaptor and the wall outlet.
...You can charge the "InfoLITHIUM" battery pack (P series) (p. 81) after attaching it into place 2. 2 3 Connect the AC Adaptor to the DC IN jack on your camcorder. CHG (charge) lamp 1 The CHG (charge) lamp lights up and charging starts. 12 DC IN jack DC plug To the wall outlet AC Adaptor Power... setting). DC IN jack With the v mark facing to the LCD screen 4 Connect the power cord to your camcorder. POWER switch 2 Slide the POWER switch in the direction of the battery pack and your camcorder 1, then attach the battery pack and click it to the AC Adaptor and the wall outlet.

Operating Guide
Page 13
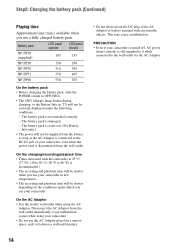
...; All times measured under the following conditions: Top: Recording with the other hand. Disconnect the AC Adaptor from the DC IN jack holding both the camcorder and the DC plug. POWER switch 1 2 V BATT (battery) release lever When storing the battery pack Fully discharge the battery before storing it for an...155 NP-FP71 170 NP-FP90 220 Recording time Approximate time (min.) available when you use an outside power source You can operate your camcorder using the power from the wall outlet by making the same connections as you do when charging the battery pack. The battery pack will not...
...; All times measured under the following conditions: Top: Recording with the other hand. Disconnect the AC Adaptor from the DC IN jack holding both the camcorder and the DC plug. POWER switch 1 2 V BATT (battery) release lever When storing the battery pack Fully discharge the battery before storing it for an...155 NP-FP71 170 NP-FP90 220 Recording time Approximate time (min.) available when you use an outside power source You can operate your camcorder using the power from the wall outlet by making the same connections as you do when charging the battery pack. The battery pack will not...
Operating Guide
Page 14
... • Times measured with any malfunction occurs while using the AC Adaptor. On the AC Adaptor • Use the nearby wall outlet when using your camcorder. • Do not use the AC Adaptor placed in a narrow space, such as between a wall and furniture. • Do not short-circuit the DC plug... of the AC Adaptor or battery terminal with the camcorder at 25 °C (77 °F). (10 to 30 °C (50 °F to 86 °F) is recommended.) • The recording and playback time will be ...
... • Times measured with any malfunction occurs while using the AC Adaptor. On the AC Adaptor • Use the nearby wall outlet when using your camcorder. • Do not use the AC Adaptor placed in a narrow space, such as between a wall and furniture. • Do not short-circuit the DC plug... of the AC Adaptor or battery terminal with the camcorder at 25 °C (77 °F). (10 to 30 °C (50 °F to 86 °F) is recommended.) • The recording and playback time will be ...
Operating Guide
Page 15
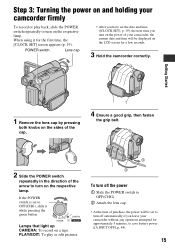
... switch is set to turn off the power 1 Slide the POWER switch to OFF(CHG). 2 Attach the lens cap. • At the time of your camcorder, the current date and time will be displayed on the LCD screen for the first time, the [CLOCK SET] screen appears (p. 19). POWER switch Lens... cap • After you have set the date and time ([CLOCK SET], p. 19), the next time you leave your camcorder firmly To record or play back, slide the POWER switch repeatedly to turn on the respective lamp. PLAY/EDIT: To play or edit pictures. 4 1 2 3 To...
... switch is set to turn off the power 1 Slide the POWER switch to OFF(CHG). 2 Attach the lens cap. • At the time of your camcorder, the current date and time will be displayed on the LCD screen for the first time, the [CLOCK SET] screen appears (p. 19). POWER switch Lens... cap • After you have set the date and time ([CLOCK SET], p. 19), the next time you leave your camcorder firmly To record or play back, slide the POWER switch repeatedly to turn on the respective lamp. PLAY/EDIT: To play or edit pictures. 4 1 2 3 To...

Operating Guide
Page 16
... view pictures using the viewfinder (p. 37). 16 Step 4: Adjusting the LCD panel and viewfinder The LCD panel Open the LCD panel 90 degrees to the camcorder (1), then rotate it until the picture is clear. • You can adjust the brightness of the LCD screen. Viewfinder lens adjustment lever Move it to... the LCD panel. • If you can close the LCD panel with the LCD screen facing out. Viewfinder 90 degrees (max.) 1 90 degrees to the camcorder • Do not press the buttons on the LCD screen is poor.
... view pictures using the viewfinder (p. 37). 16 Step 4: Adjusting the LCD panel and viewfinder The LCD panel Open the LCD panel 90 degrees to the camcorder (1), then rotate it until the picture is clear. • You can adjust the brightness of the LCD screen. Viewfinder lens adjustment lever Move it to... the LCD panel. • If you can close the LCD panel with the LCD screen facing out. Viewfinder 90 degrees (max.) 1 90 degrees to the camcorder • Do not press the buttons on the LCD screen is poor.
Operating Guide
Page 17
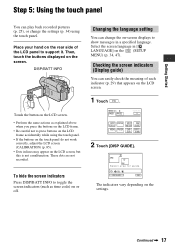
DISP/BATT INFO Touch the button on the LCD screen. • Perform the same actions as explained above when you press the buttons on the LCD frame. • Be careful not to toggle the screen indicators (such as time code) on or off. These dots are not recorded. Continued , 17 Checking the screen indicators (Display guide) You can easily check the meaning of the LCD panel to show messages in a specified language. Select area for guide. DISP GUIDE END The indicators vary depending on the screen. To hide the screen indicators Press DISP/BATT INFO to press buttons...
DISP/BATT INFO Touch the button on the LCD screen. • Perform the same actions as explained above when you press the buttons on the LCD frame. • Be careful not to toggle the screen indicators (such as time code) on or off. These dots are not recorded. Continued , 17 Checking the screen indicators (Display guide) You can easily check the meaning of the LCD panel to show messages in a specified language. Select area for guide. DISP GUIDE END The indicators vary depending on the screen. To hide the screen indicators Press DISP/BATT INFO to press buttons...
Operating Guide
Page 18
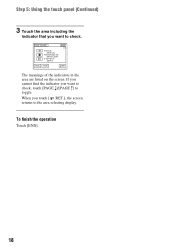
The meanings of the indicators in the area are listed on the screen. Step 5: Using the touch panel (Continued) 3 Touch the area including the indicator that you want to the area selecting display. DISP GUIDE FOCUS: MANUAL PROGRAM AE: SPOTLIGHT P EFFECT: SEPIA END 1/2 PAGE PAGE RET. If you cannot find the indicator you want to check, touch [PAGE r]/[PAGE R] to toggle. When you touch [ RET.], the screen returns to check. To finish the operation Touch [END]. 18
The meanings of the indicators in the area are listed on the screen. Step 5: Using the touch panel (Continued) 3 Touch the area including the indicator that you want to the area selecting display. DISP GUIDE FOCUS: MANUAL PROGRAM AE: SPOTLIGHT P EFFECT: SEPIA END 1/2 PAGE PAGE RET. If you cannot find the indicator you want to check, touch [PAGE r]/[PAGE R] to toggle. When you touch [ RET.], the screen returns to check. To finish the operation Touch [END]. 18
Operating Guide
Page 19
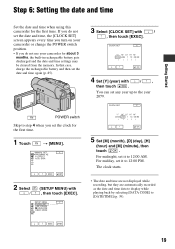
... then set any year up to 12:00 AM. Step 6: Setting the date and time Getting Started Set the date and time when using this camcorder for the first time. 1 Touch t [MENU]. CLOCK SET Y MDHM 2 0 0 6 JAN 1 12 : 0 0 AM OK 4 Set [Y] (year) with , then touch [EXEC]. You can... (day), [H] (hour) and [M] (minute), then touch . For midday, set the date and time, the [CLOCK SET] screen appears every time you turn on your camcorder for about 3 months, the built-in rechargeable battery gets discharged and the date and time settings may be cleared from the memory. The clock starts...
... then set any year up to 12:00 AM. Step 6: Setting the date and time Getting Started Set the date and time when using this camcorder for the first time. 1 Touch t [MENU]. CLOCK SET Y MDHM 2 0 0 6 JAN 1 12 : 0 0 AM OK 4 Set [Y] (year) with , then touch [EXEC]. You can... (day), [H] (hour) and [M] (minute), then touch . For midday, set the date and time, the [CLOCK SET] screen appears every time you turn on your camcorder for about 3 months, the built-in rechargeable battery gets discharged and the date and time settings may be cleared from the memory. The clock starts...
