
2008 Water Housing Cross Reference
Page 1
... part without written permission is prohibited. Sony, the Sony logo, Cyber-shot, and Handycam are trademarks of Sports pack, re...Sony. All rights reserved. In fact, selected 2008 Cyber-shot cameras feature a new "Underwater" mode to compensate for the special lighting conditions beneath the water's surface. 2008 Water Housing Cross Reference MODEL NAME MPK-THE Compatible Digital Still Camera/ Camcorder...DCR-HC26/28, DCR-HC36/38 DCR-HC46/48, DCR-HC52/54 DCR-HC62/96 DCR-DVD103/108 DCR-DVD203/308 DCR-DVD403/408 DCR-DVD508/610 DCR-DVD710/810 DCR-DVD910/92 DCR-SR200/220/220D DCR-SR300/42/45/46 DCR...
... part without written permission is prohibited. Sony, the Sony logo, Cyber-shot, and Handycam are trademarks of Sports pack, re...Sony. All rights reserved. In fact, selected 2008 Cyber-shot cameras feature a new "Underwater" mode to compensate for the special lighting conditions beneath the water's surface. 2008 Water Housing Cross Reference MODEL NAME MPK-THE Compatible Digital Still Camera/ Camcorder...DCR-HC26/28, DCR-HC36/38 DCR-HC46/48, DCR-HC52/54 DCR-HC62/96 DCR-DVD103/108 DCR-DVD203/308 DCR-DVD403/408 DCR-DVD508/610 DCR-DVD710/810 DCR-DVD910/92 DCR-SR200/220/220D DCR-SR300/42/45/46 DCR...

2008 Water Housing Cross Reference
Page 2
...... MPK-THG • Fits selected Cyber-shot® digital still cameras • Protects against dust, rain and spray • Lets users take photos at depths up to 5 feet • Fits selected Sony® Handycam® camcorders • Guards against dust, dirt, and more • Allows videos... to be taken up to 17 feet below the water's surface • Fits selected Sony® Cyber-shot® digital still cameras • Allows underwater photography up...
...... MPK-THG • Fits selected Cyber-shot® digital still cameras • Protects against dust, rain and spray • Lets users take photos at depths up to 5 feet • Fits selected Sony® Handycam® camcorders • Guards against dust, dirt, and more • Allows videos... to be taken up to 17 feet below the water's surface • Fits selected Sony® Cyber-shot® digital still cameras • Allows underwater photography up...

Operating Guide
Page 7
... from a subject coming into the lens. 7 Take pictures of a Carl Zeiss lens. * MTF stands for video cameras and offers a quality typical of the sun only in Germany, and Sony Corporation, and produces superior images. To view your recordings on a TV, you need an NTSC system-based TV. .... It adopts the MTF* measurement system for Modulation Transfer Function. • The LCD screen and the viewfinder are manufactured using your camcorder if necessary (p. 47). • Design and specifications of recording media and accessories are subject to change without any way. Doing so might ...
... from a subject coming into the lens. 7 Take pictures of a Carl Zeiss lens. * MTF stands for video cameras and offers a quality typical of the sun only in Germany, and Sony Corporation, and produces superior images. To view your recordings on a TV, you need an NTSC system-based TV. .... It adopts the MTF* measurement system for Modulation Transfer Function. • The LCD screen and the viewfinder are manufactured using your camcorder if necessary (p. 47). • Design and specifications of recording media and accessories are subject to change without any way. Doing so might ...
Operating Guide
Page 9
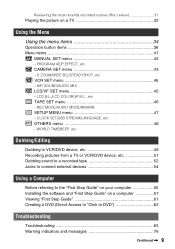
... "Click to DVD 62 Troubleshooting Troubleshooting 65 Warning indicators and messages 76 Continued , 9 HiFi SOUND/AUDIO MIX LCD/VF SET menu 45 - OTHERS menu 48 - CAMERA SET menu 43 - VCR SET menu 45 - LCD B.L./LCD COLOR/VF B.L., etc TAPE SET menu 46 - REC MODE/AUDIO MODE/REMAIN SETUP MENU menu 47...
... "Click to DVD 62 Troubleshooting Troubleshooting 65 Warning indicators and messages 76 Continued , 9 HiFi SOUND/AUDIO MIX LCD/VF SET menu 45 - OTHERS menu 48 - CAMERA SET menu 43 - VCR SET menu 45 - LCD B.L./LCD COLOR/VF B.L., etc TAPE SET menu 46 - REC MODE/AUDIO MODE/REMAIN SETUP MENU menu 47...
Operating Guide
Page 15
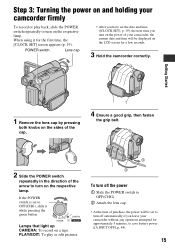
... time ([CLOCK SET], p. 19), the next time you turn on the power of your camcorder without any operation attempted for the first time, the [CLOCK SET] screen appears (p. 19). Step 3: Turning... the power on and holding your camcorder firmly To record or play or edit pictures. 4 1 2 3 To turn off the power 1 Slide the...set to turn off automatically if you leave your camcorder, the current date and time will be displayed on the LCD screen for a few seconds. 3 Hold the camcorder correctly. POWER switch Lens cap • After ...
... time ([CLOCK SET], p. 19), the next time you turn on the power of your camcorder without any operation attempted for the first time, the [CLOCK SET] screen appears (p. 19). Step 3: Turning... the power on and holding your camcorder firmly To record or play or edit pictures. 4 1 2 3 To turn off the power 1 Slide the...set to turn off automatically if you leave your camcorder, the current date and time will be displayed on the LCD screen for a few seconds. 3 Hold the camcorder correctly. POWER switch Lens cap • After ...
Operating Guide
Page 22
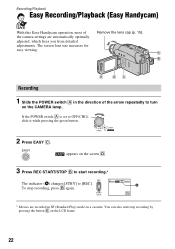
..., which frees you from detailed adjustments. A B E DC Recording 1 Slide the POWER switch A in SP (Standard Play) mode on the CAMERA lamp. Recording/Playback Easy Recording/Playback (Easy Handycam) With this Easy Handycam operation, most of the arrow repeatedly to OFF(CHG), slide it while pressing the green button. 2 Press EASY C. If the...The screen font size increases for easy viewing. To stop recording by pressing the button E on the screen D. 3 Press REC START/STOP B to [REC]. the camera settings are recorded in the direction of Remove the lens cap (p. 15).
..., which frees you from detailed adjustments. A B E DC Recording 1 Slide the POWER switch A in SP (Standard Play) mode on the CAMERA lamp. Recording/Playback Easy Recording/Playback (Easy Handycam) With this Easy Handycam operation, most of the arrow repeatedly to OFF(CHG), slide it while pressing the green button. 2 Press EASY C. If the...The screen font size increases for easy viewing. To stop recording by pressing the button E on the screen D. 3 Press REC START/STOP B to [REC]. the camera settings are recorded in the direction of Remove the lens cap (p. 15).

Operating Guide
Page 24
... is recorded with sound for 7 seconds. Movies Press REC START/STOP A (or B). Recording Lens cap Remove the lens cap by pressing both knobs on the CAMERA lamp.
... is recorded with sound for 7 seconds. Movies Press REC START/STOP A (or B). Recording Lens cap Remove the lens cap by pressing both knobs on the CAMERA lamp.
Operating Guide
Page 28
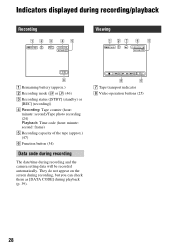
... operation buttons (25) 28 They do not appear on the screen during recording, but you can check them as [DATA CODE] during recording and the camera setting data will be recorded automatically.
... operation buttons (25) 28 They do not appear on the screen during recording, but you can check them as [DATA CODE] during recording and the camera setting data will be recorded automatically.
Operating Guide
Page 30
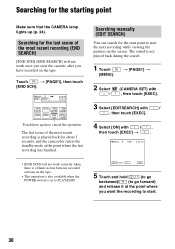
... EDIT FN 5 Touch and hold (to go backward)/ (to go forward) and release it at the point where the last recording has finished. t [PAGE1] t 2 Select / (CAMERA SET) with , then touch [EXEC]. 3 Select [EDITSEARCH] with / , then touch [EXEC]. 4 Select [ON] with / , then touch [EXEC] t . 60min STBY 0:00:... FOCUS SPOT DISP FOCUS METER GUIDE MENU FADER END EXPO- Searching manually (EDIT SEARCH) You can search for about 5 seconds, and the camcorder enters the standby mode at the point where you have recorded on the tape. The sound is not played back during the search. 1...
... EDIT FN 5 Touch and hold (to go backward)/ (to go forward) and release it at the point where the last recording has finished. t [PAGE1] t 2 Select / (CAMERA SET) with , then touch [EXEC]. 3 Select [EDITSEARCH] with / , then touch [EXEC]. 4 Select [ON] with / , then touch [EXEC] t . 60min STBY 0:00:... FOCUS SPOT DISP FOCUS METER GUIDE MENU FADER END EXPO- Searching manually (EDIT SEARCH) You can search for about 5 seconds, and the camcorder enters the standby mode at the point where you have recorded on the tape. The sound is not played back during the search. 1...

Operating Guide
Page 31
Recording/Playback Reviewing the most recently recorded scenes (Rec review) You can view a few seconds of the scene recorded just before you stopped the tape. 1 Touch [MENU]. The last few seconds of the most recently recorded scene are played back. Then, your camcorder is set to the standby. 31 t [PAGE1] t 2 Select / (CAMERA SET) with , then touch [EXEC]. 3 Select [EDITSEARCH] with / , then touch [EXEC]. 4 Select [ON] with / , then touch [EXEC] t . 60min STBY 0:00:00 EDIT FN 5 Touch .
Recording/Playback Reviewing the most recently recorded scenes (Rec review) You can view a few seconds of the scene recorded just before you stopped the tape. 1 Touch [MENU]. The last few seconds of the most recently recorded scene are played back. Then, your camcorder is set to the standby. 31 t [PAGE1] t 2 Select / (CAMERA SET) with , then touch [EXEC]. 3 Select [EDITSEARCH] with / , then touch [EXEC]. 4 Select [ON] with / , then touch [EXEC] t . 60min STBY 0:00:00 EDIT FN 5 Touch .

Operating Guide
Page 34
....] takes you do not have to touch . (Close). EXEC RET. 1 Touch t [MENU] on the respective lamp. The menu index screen appears. 2 Select the desired menu. CAMERA lamp: settings for viewing/editing 2 Touch the LCD screen to hide the menu screen. EXEC RET. Each touch of the button items, see page 42...
....] takes you do not have to touch . (Close). EXEC RET. 1 Touch t [MENU] on the respective lamp. The menu index screen appears. 2 Select the desired menu. CAMERA lamp: settings for viewing/editing 2 Touch the LCD screen to hide the menu screen. EXEC RET. Each touch of the button items, see page 42...
Operating Guide
Page 36
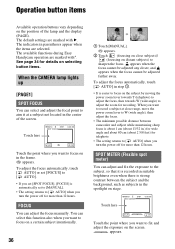
...function also when you want to focus on stage. The available functions during Easy Handycam operation are selected. Operation button items Available operation buttons vary depending on selecting button items. When the CAMERA lamp lights up [PAGE1] SPOT FOCUS You can select and adjust the focal point... to aim it is recorded in suitable brightness even when there is strong contrast between camcorder and subject while maintaining sharp focus is about 1...
...function also when you want to focus on stage. The available functions during Easy Handycam operation are selected. Operation button items Available operation buttons vary depending on selecting button items. When the CAMERA lamp lights up [PAGE1] SPOT FOCUS You can select and adjust the focal point... to aim it is recorded in suitable brightness even when there is strong contrast between camcorder and subject while maintaining sharp focus is about 1...
Operating Guide
Page 37
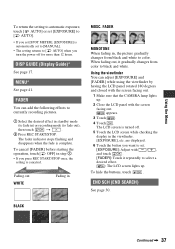
...] and [FADER] while using the viewfinder by having the LCD panel rotated 180 degrees and closed with the screen facing out. 1 Make sure that the CAMERA lamp lights up . Fading out WHITE Fading in the viewfinder. [EXPOSURE], etc. To cancel [FADER] before starting the operation, touch [ OFF] in step 1. • If...
...] and [FADER] while using the viewfinder by having the LCD panel rotated 180 degrees and closed with the screen facing out. 1 Make sure that the CAMERA lamp lights up . Fading out WHITE Fading in the viewfinder. [EXPOSURE], etc. To cancel [FADER] before starting the operation, touch [ OFF] in step 1. • If...
Operating Guide
Page 39
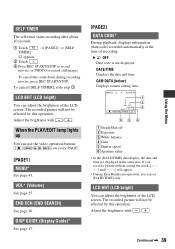
...the LCD screen. B OFF Data code is not displayed. If you record a picture without setting the clock and [--:--:--] will appear. • During Easy Handycam operation, you can use the video operation buttons ( / / / ) on every PAGE. [PAGE1] MENU* See page 41. LCD BRT (LCD bright... CODE* During playback, displays information (data code) recorded automatically at the time of recording. To cancel [SELF TIMER], redo step 1. CAM DATA (below) Displays camera setting data. 60min 0:00:00:00 AUTO 100 AWB F1. 8 9dB FN 1 2 3 654 A SteadyShot off B Exposure C White balance D Gain E Shutter...
...the LCD screen. B OFF Data code is not displayed. If you record a picture without setting the clock and [--:--:--] will appear. • During Easy Handycam operation, you can use the video operation buttons ( / / / ) on every PAGE. [PAGE1] MENU* See page 41. LCD BRT (LCD bright... CODE* During playback, displays information (data code) recorded automatically at the time of recording. To cancel [SELF TIMER], redo step 1. CAM DATA (below) Displays camera setting data. 60min 0:00:00:00 AUTO 100 AWB F1. 8 9dB FN 1 2 3 654 A SteadyShot off B Exposure C White balance D Gain E Shutter...
Operating Guide
Page 41
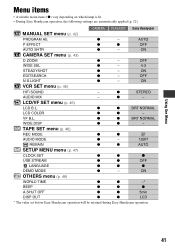
... LCD COLOR z z - Using the Menu Menu items • Available menu items (z) vary depending on which lamp is lit. • During Easy Handycam operation, the following settings are automatically applied (p. 22). ON CAMERA SET menu (p. 43) D ZOOM z - z - z z BRT NORMAL WIDE DISP z z - z STEREO AUDIO MIX - OFF WIDE SEL z - 4:3 STEADYSHOT z - ON EDITSEARCH z - VF B.L. ON OTHERS...
... LCD COLOR z z - Using the Menu Menu items • Available menu items (z) vary depending on which lamp is lit. • During Easy Handycam operation, the following settings are automatically applied (p. 22). ON CAMERA SET menu (p. 43) D ZOOM z - z - z z BRT NORMAL WIDE DISP z z - z STEREO AUDIO MIX - OFF WIDE SEL z - 4:3 STEADYSHOT z - ON EDITSEARCH z - VF B.L. ON OTHERS...
Operating Guide
Page 43
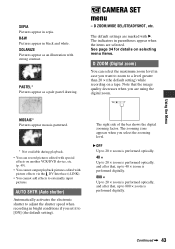
...; Up to 20 × zoom is performed optically, and after that , up to a level greater than 20 × (the default setting) while recording on a tape. CAMERA SET menu - D ZOOM/WIDE SEL/STEADYSHOT, etc. See page 34 for details on another VCR/DVD device, etc. (p. 49). • You cannot output playback pictures...
...; Up to 20 × zoom is performed optically, and after that , up to a level greater than 20 × (the default setting) while recording on a tape. CAMERA SET menu - D ZOOM/WIDE SEL/STEADYSHOT, etc. See page 34 for details on another VCR/DVD device, etc. (p. 49). • You cannot output playback pictures...
Operating Guide
Page 44
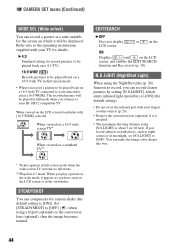
...4:3 TV). 16:9 WIDE ( ) Records pictures to be played back on a 16:9 wide TV in full screen mode. • When you record a picture to your camcorder, select [16:9 WIDE]. When viewed on a 16:9 wide screen TV* When viewed on a 16:9 wide TV connected to be played back on a standard TV** EDITSEARCH... or in moonlight, set [N.S.LIGHT] to [ON] (the default setting). • Do not cover the infrared port with your ID-1/ID-2 compatible TV. CAMERA SET menu (Continued) WIDE SEL (Wide select) You can record a picture in a ratio suitable for the screen on the LCD screen/viewfinder with [16:9...
...4:3 TV). 16:9 WIDE ( ) Records pictures to be played back on a 16:9 wide TV in full screen mode. • When you record a picture to your camcorder, select [16:9 WIDE]. When viewed on a 16:9 wide screen TV* When viewed on a 16:9 wide TV connected to be played back on a standard TV** EDITSEARCH... or in moonlight, set [N.S.LIGHT] to [ON] (the default setting). • Do not cover the infrared port with your ID-1/ID-2 compatible TV. CAMERA SET menu (Continued) WIDE SEL (Wide select) You can record a picture in a ratio suitable for the screen on the LCD screen/viewfinder with [16:9...
Operating Guide
Page 47
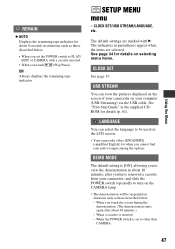
...to PLAY/ EDIT or CAMERA with B. When the POWER switch is inserted. - Using the Menu REMAIN B AUTO Displays the remaining tape indicator for about 10 minutes.) - USB STREAM You can select the language to be used on the LCD screen. • Your camcorder offers [ENG[SIMP]] ...• When you touch the screen during the demonstration. (The demonstration starts again after you cannot find your camcorder, and slide the POWER switch repeatedly to turn on the CAMERA lamp. • The demonstration will be suspended in situations such as those described below . • When you...
...to PLAY/ EDIT or CAMERA with B. When the POWER switch is inserted. - Using the Menu REMAIN B AUTO Displays the remaining tape indicator for about 10 minutes.) - USB STREAM You can select the language to be used on the LCD screen. • Your camcorder offers [ENG[SIMP]] ...• When you touch the screen during the demonstration. (The demonstration starts again after you cannot find your camcorder, and slide the POWER switch repeatedly to turn on the CAMERA lamp. • The demonstration will be suspended in situations such as those described below . • When you...
Operating Guide
Page 50
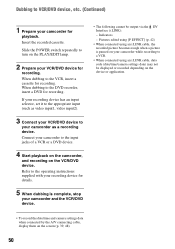
... input2). 3 Connect your VCR/DVD device to your camcorder and the VCR/DVD device. • The following cannot be displayed or recorded depending on the device or application. • To record the date/time and camera settings data when connected by the A/V connecting cable, display... to the DVD recorder, insert a DVD for playback. Connect your camcorder to the VCR, insert a cassette for recording. Pictures edited using [P EFFECT] (p. 42) • When connected using an i.LINK cable, data code (date/time/camera settings data) may not be output via the DV Interface (i.LINK):...
... input2). 3 Connect your VCR/DVD device to your camcorder and the VCR/DVD device. • The following cannot be displayed or recorded depending on the device or application. • To record the date/time and camera settings data when connected by the A/V connecting cable, display... to the DVD recorder, insert a DVD for playback. Connect your camcorder to the VCR, insert a cassette for recording. Pictures edited using [P EFFECT] (p. 42) • When connected using an i.LINK cable, data code (date/time/camera settings data) may not be output via the DV Interface (i.LINK):...
Operating Guide
Page 68
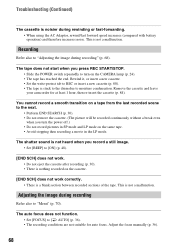
... for at least 1 hour, then re-insert the cassette (p. 84). Adjust the focus manually (p. 36). 68 Remove the cassette and leave your camcorder for auto focus. Troubleshooting (Continued) The cassette is stuck to the drum due to moisture condensation. The shutter sound is not heard when you turn... to "Adjusting the image during recording Refer also to [ON] (p. 48). [END SCH] does not work correctly. • There is nothing recorded on the CAMERA lamp (p. 24). • The tape has reached the end. Rewind it, or insert a new cassette. • Set the write-protect tab to the next...
... for at least 1 hour, then re-insert the cassette (p. 84). Adjust the focus manually (p. 36). 68 Remove the cassette and leave your camcorder for auto focus. Troubleshooting (Continued) The cassette is stuck to the drum due to moisture condensation. The shutter sound is not heard when you turn... to "Adjusting the image during recording Refer also to [ON] (p. 48). [END SCH] does not work correctly. • There is nothing recorded on the CAMERA lamp (p. 24). • The tape has reached the end. Rewind it, or insert a new cassette. • Set the write-protect tab to the next...


