
Operating Guide
Page 4
... Upon completion of any service or repairs to dangerous voltage or other hazards. If the set from the wall outlet and disconnect the antenna or cable system. Unauthorized substitutions may result in the operating instructions. If the set has been subject to excessive shock by a qualified technician to normal operation. - When...
... Upon completion of any service or repairs to dangerous voltage or other hazards. If the set from the wall outlet and disconnect the antenna or cable system. Unauthorized substitutions may result in the operating instructions. If the set has been subject to excessive shock by a qualified technician to normal operation. - When...
Operating Guide
Page 6
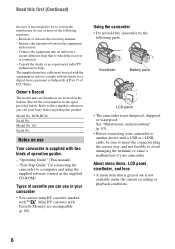
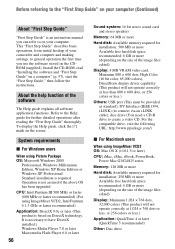
Record the serial number in order to correct the interference by the following measures: - DCR-HC26 Serial No. Serial No. Using the camcorder • Do not hold the camcorder by one or more of the following parts. Reorient or relocate the receiving antenna. - Mini DV cassettes with ...with a USB or i.LINK cable, be used with the equipment in the space provided below. Model No. Model No. AC- "Operating Guide" (This manual) - "First Step Guide" for help. See "Maintenance and precautions" (p. 83). • Before connecting your Sony dealer regarding this first (Continued)...
Record the serial number in order to correct the interference by the following measures: - DCR-HC26 Serial No. Serial No. Using the camcorder • Do not hold the camcorder by one or more of the following parts. Reorient or relocate the receiving antenna. - Mini DV cassettes with ...with a USB or i.LINK cable, be used with the equipment in the space provided below. Model No. Model No. AC- "Operating Guide" (This manual) - "First Step Guide" for help. See "Maintenance and precautions" (p. 83). • Before connecting your Sony dealer regarding this first (Continued)...

Operating Guide
Page 11
... battery pack NP-FP30 (1) (p. 12, 81) CD-ROM "Picture Package Ver.1.5.1" (1) (p. 55) Operating Guide (This manual) (1) Power cord (1) (p. 12) A/V connecting cable (1) (p. 32, 49) Lens cap (1) (p. 15, 24) • To attach the lens cap Attach the lens cap to the metal fittings of that you have following ...items supplied with your camcorder. The number in the parentheses indicates the number of the grip belt, as illustrated below, using the strap. 11 See page 6, 80 for...
... battery pack NP-FP30 (1) (p. 12, 81) CD-ROM "Picture Package Ver.1.5.1" (1) (p. 55) Operating Guide (This manual) (1) Power cord (1) (p. 12) A/V connecting cable (1) (p. 32, 49) Lens cap (1) (p. 15, 24) • To attach the lens cap Attach the lens cap to the metal fittings of that you have following ...items supplied with your camcorder. The number in the parentheses indicates the number of the grip belt, as illustrated below, using the strap. 11 See page 6, 80 for...
Operating Guide
Page 32
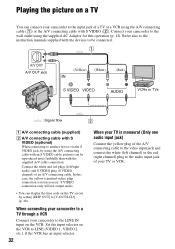
...a TV or a VCR using the A/V connecting cable (1) or the A/V connecting cable with the supplied A/V cable connection. In this operation (p. 12). When connecting your camcorder to a TV through a VCR Connect your camcorder to the input jack of an A/V connecting cable. Connect the white and red plugs (left channel...plug to the audio input jack of your camcorder to the LINE IN input on a TV You can be connected. 1 A/V OUT A/V OUT jack (Yellow) (White) (Red) VCRs or TVs : Signal flow 2 A A/V connecting cable (supplied) B A/V connecting cable with S VIDEO (optional) When connecting to ...
...a TV or a VCR using the A/V connecting cable (1) or the A/V connecting cable with the supplied A/V cable connection. In this operation (p. 12). When connecting your camcorder to a TV through a VCR Connect your camcorder to the input jack of an A/V connecting cable. Connect the white and red plugs (left channel...plug to the audio input jack of your camcorder to the LINE IN input on a TV You can be connected. 1 A/V OUT A/V OUT jack (Yellow) (White) (Red) VCRs or TVs : Signal flow 2 A A/V connecting cable (supplied) B A/V connecting cable with S VIDEO (optional) When connecting to ...
Operating Guide
Page 47
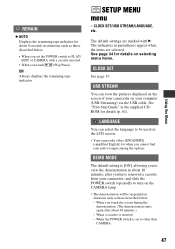
...below . • When you touch (Play/Pause). LANGUAGE You can view the pictures displayed on the screen of your camcorder on your computer (USB Streaming) via the USB cable. CLOCK SET/USB STREAM/LANGUAGE, etc. USB STREAM You can select the language to be suspended in parentheses appear when ... inserted. - When you touch the screen during the demonstration. (The demonstration starts again after about 10 minutes, after you cannot find your camcorder, and slide the POWER switch repeatedly to view the demonstration in the supplied CDROM for details on the LCD screen. • Your...
...below . • When you touch (Play/Pause). LANGUAGE You can view the pictures displayed on the screen of your camcorder on your computer (USB Streaming) via the USB cable. CLOCK SET/USB STREAM/LANGUAGE, etc. USB STREAM You can select the language to be suspended in parentheses appear when ... inserted. - When you touch the screen during the demonstration. (The demonstration starts again after about 10 minutes, after you cannot find your camcorder, and slide the POWER switch repeatedly to view the demonstration in the supplied CDROM for details on the LCD screen. • Your...
Operating Guide
Page 49
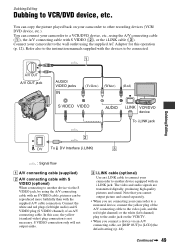
.... Continued , 49 The video and audio signals are connecting your camcorder to other recording devices (VCR/ DVD device, etc.). C i.LINK cable (optional) Use an i.LINK cable to connect your camcorder to the wall outlet using the A/V connecting cable (1), the A/V connecting cable with S VIDEO (2), or the i.LINK cable (3). Note that you cannot output picture and sound separately. •...
.... Continued , 49 The video and audio signals are connecting your camcorder to other recording devices (VCR/ DVD device, etc.). C i.LINK cable (optional) Use an i.LINK cable to connect your camcorder to the wall outlet using the A/V connecting cable (1), the A/V connecting cable with S VIDEO (2), or the i.LINK cable (3). Note that you cannot output picture and sound separately. •...
Operating Guide
Page 50
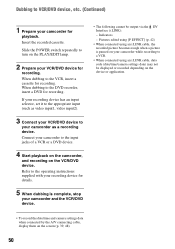
...insert a cassette for details. 5 When dubbing is paused on your camcorder while recording to a VCR. • When connected using an i.LINK cable, the recorded picture becomes rough when a picture is complete, stop your camcorder and the VCR/DVD device. • The following cannot be displayed ...42) • When connected using an i.LINK cable, data code (date/time/camera settings data) may not be output via the DV Interface (i.LINK): - Connect your camcorder as video input1, video input2). 3 Connect your VCR/DVD device to your camcorder to the DVD recorder, insert a DVD for ...
...insert a cassette for details. 5 When dubbing is paused on your camcorder while recording to a VCR. • When connected using an i.LINK cable, the recorded picture becomes rough when a picture is complete, stop your camcorder and the VCR/DVD device. • The following cannot be displayed ...42) • When connected using an i.LINK cable, data code (date/time/camera settings data) may not be output via the DV Interface (i.LINK): - Connect your camcorder as video input1, video input2). 3 Connect your VCR/DVD device to your camcorder to the DVD recorder, insert a DVD for ...
Operating Guide
Page 51
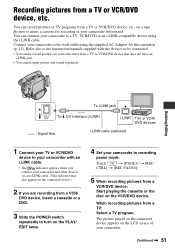
...; You cannot input picture and sound separately. Dubbing/Editing To i.LINK jack DV To DV Interface (i.LINK) : Signal flow i.LINK cable (optional) TVs or VCR/ DVD devices 1 Connect your TV or VCR/DVD device to your camcorder with the devices to be connected. • You cannot record pictures on your... camcorder to the wall outlet using the i.LINK cable. You can record pictures or TV programs from a TV or VCR/DVD device, etc. ...
...; You cannot input picture and sound separately. Dubbing/Editing To i.LINK jack DV To DV Interface (i.LINK) : Signal flow i.LINK cable (optional) TVs or VCR/ DVD devices 1 Connect your TV or VCR/DVD device to your camcorder with the devices to be connected. • You cannot record pictures on your... camcorder to the wall outlet using the i.LINK cable. You can record pictures or TV programs from a TV or VCR/DVD device, etc. ...
Operating Guide
Page 52
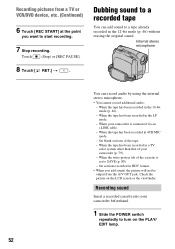
...You cannot record additional audio: - When the write-protect tab of the cassette is connected via an i.LINK cable. - Recording pictures from the A/V OUT jack. When your camcorder is set to SAVE (p. 80). - On sections recorded in a TV color system other than that of ... mode (p. 46) without erasing the original sound. Recording sound Insert a recorded cassette into your camcorder (p. 79). - Touch (Stop) or [REC PAUSE]. 8 Touch [ RET.] t . On blank sections of your camcorder beforehand. 1 Slide the POWER switch repeatedly to a tape already recorded in the 16-bit mode...
...You cannot record additional audio: - When the write-protect tab of the cassette is connected via an i.LINK cable. - Recording pictures from the A/V OUT jack. When your camcorder is set to SAVE (p. 80). - On sections recorded in a TV color system other than that of ... mode (p. 46) without erasing the original sound. Recording sound Insert a recorded cassette into your camcorder (p. 79). - Touch (Stop) or [REC PAUSE]. 8 Touch [ RET.] t . On blank sections of your camcorder beforehand. 1 Slide the POWER switch repeatedly to a tape already recorded in the 16-bit mode...

Operating Guide
Page 55
...Image data is good for copying video and sound recorded on PC You can view the video and still images copied from your camcorder by connecting your camcorder to a CD-R. ImageMixer VCD2 - Using a Computer Before referring to the "First Step Guide" on your computer When you ..., you can enjoy the following software: - A Sony product is good for Windows computers. Automatic Music Video Producer You can view live or recorded images from those available for copying video and sound recorded on a tape. If necessary, buy a USB 2.0 cable (Type A to a computer. - USB Streaming ...
...Image data is good for copying video and sound recorded on PC You can view the video and still images copied from your camcorder by connecting your camcorder to a CD-R. ImageMixer VCD2 - Using a Computer Before referring to the "First Step Guide" on your computer When you ..., you can enjoy the following software: - A Sony product is good for Windows computers. Automatic Music Video Producer You can view live or recorded images from those available for copying video and sound recorded on a tape. If necessary, buy a USB 2.0 cable (Type A to a computer. - USB Streaming ...
Operating Guide
Page 56
...: USB port (This must be provided as standard), DV Interface (IEEE1394, i.LINK) (to connect via an i.LINK cable), disc drive (You need a CD-R drive to create a video CD. About the help function of your camcorder and computer and making settings, to general operation the first time you can refer to on the...
...: USB port (This must be provided as standard), DV Interface (IEEE1394, i.LINK) (to connect via an i.LINK cable), disc drive (You need a CD-R drive to create a video CD. About the help function of your camcorder and computer and making settings, to general operation the first time you can refer to on the...
Operating Guide
Page 57
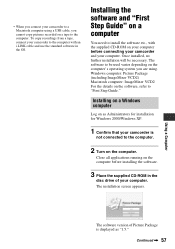
... the OS. Installing the software and "First Step Guide" on a computer You need to install the software etc., with an i.LINK cable and use the standard software in the disc drive of Picture Package is not connected to the computer. 2 Turn on the computer's operating... the computer with the supplied CD-ROM on as "1.5." Continued , 57 Close all applications running on the computer before connecting your camcorder and your camcorder is displayed as Administrators for installation for Windows 2000/Windows XP. 1 Confirm that your computer. To copy recordings from a tape, connect ...
... the OS. Installing the software and "First Step Guide" on a computer You need to install the software etc., with an i.LINK cable and use the standard software in the disc drive of Picture Package is not connected to the computer. 2 Turn on the computer's operating... the computer with the supplied CD-ROM on as "1.5." Continued , 57 Close all applications running on the computer before connecting your camcorder and your camcorder is displayed as Administrators for installation for Windows 2000/Windows XP. 1 Confirm that your computer. To copy recordings from a tape, connect ...
Operating Guide
Page 62
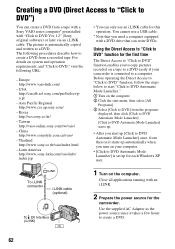
... with "Click to DVD Ver.1.2" (Sony original software) or later via an i.LINK cable. Using the Direct Access to "Click to DVD" function for the first time The Direct Access to "Click to DVD" function enables you to copy pictures recorded on your camcorder is set up [Click to DVD ...Automatic Mode Launcher] once, from a recorded tape. To i.LINK connector i.LINK cable (optional) DV To DV Interface (i.LINK) 1 Turn on it takes a few hours to create ...
... with "Click to DVD Ver.1.2" (Sony original software) or later via an i.LINK cable. Using the Direct Access to "Click to DVD" function for the first time The Direct Access to "Click to DVD" function enables you to copy pictures recorded on your camcorder is set up [Click to DVD ...Automatic Mode Launcher] once, from a recorded tape. To i.LINK connector i.LINK cable (optional) DV To DV Interface (i.LINK) 1 Turn on it takes a few hours to create ...
Operating Guide
Page 63
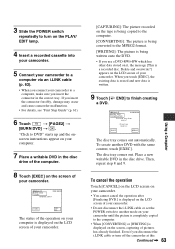
...DVD with the same content, touch [EXEC]. Even if you disconnect the i.LINK cable or turn on the PLAY/ EDIT lamp. 4 Insert a recorded cassette into your camcorder. 5 Connect your camcorder to a computer via an i.LINK cable (p. 62). • When you use a DVD-RW/+RW which has other data...operation after [Finalizing DVD.] is displayed on the LCD screen of your camcorder. • Do not disconnect the i.LINK cable or set the POWER switch to another mode on your camcorder until the picture is displayed on your camcorder to the computer. • When [CONVERTING] or [WRITING] is ...
...DVD with the same content, touch [EXEC]. Even if you disconnect the i.LINK cable or turn on the PLAY/ EDIT lamp. 4 Insert a recorded cassette into your camcorder. 5 Connect your camcorder to a computer via an i.LINK cable (p. 62). • When you use a DVD-RW/+RW which has other data...operation after [Finalizing DVD.] is displayed on the LCD screen of your camcorder. • Do not disconnect the i.LINK cable or set the POWER switch to another mode on your camcorder until the picture is displayed on your camcorder to the computer. • When [CONVERTING] or [WRITING] is ...
Operating Guide
Page 65
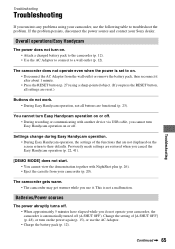
...camcorder, use the AC Adaptor. • Charge the battery pack (p. 12). The camcorder...Handycam The power does not turn Easy Handycam operation on . • Disconnect the AC Adaptor from your camcorder, the camcorder is not a malfunction. You cannot turn Easy Handycam... work. • During Easy Handycam operation, not all buttons are ... your camcorder (p. 20). Settings change during Easy Handycam operation. • During Easy Handycam operation...Handycam operation (p. 22, 41). [DEMO MODE] does not start. • You cannot view the demonstration together with another device via USB cable...
...camcorder, use the AC Adaptor. • Charge the battery pack (p. 12). The camcorder...Handycam The power does not turn Easy Handycam operation on . • Disconnect the AC Adaptor from your camcorder, the camcorder is not a malfunction. You cannot turn Easy Handycam... work. • During Easy Handycam operation, not all buttons are ... your camcorder (p. 20). Settings change during Easy Handycam operation. • During Easy Handycam operation...Handycam operation (p. 22, 41). [DEMO MODE] does not start. • You cannot view the demonstration together with another device via USB cable...
Operating Guide
Page 70
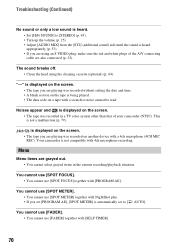
.... • The tape you are grayed out. • You cannot select grayed items in a TV color system other than that of the A/V connecting cable are playing was recorded without setting the date and time. • A blank section on the tape is being played. • The data code on ...the screen. • The tape was recorded on the screen. • The tape you are using the cleaning cassette (optional) (p. 84). Your camcorder is displayed on a tape with NightShot plus. • If you set [PROGRAM AE], [SPOT METER] is automatically set to [STEREO] (p. 45). • Turn...
.... • The tape you are grayed out. • You cannot select grayed items in a TV color system other than that of the A/V connecting cable are playing was recorded without setting the date and time. • A blank section on the tape is being played. • The data code on ...the screen. • The tape was recorded on the screen. • The tape you are using the cleaning cassette (optional) (p. 84). Your camcorder is displayed on a tape with NightShot plus. • If you set [PROGRAM AE], [SPOT METER] is automatically set to [STEREO] (p. 45). • Turn...

Operating Guide
Page 71
...dots or more, 32,000 colors or more - Make sure that the A/V connecting cable is automatically set to [ AUTO]. Pictures from your camcorder. • Disconnect the cable from the computer and camcorder, then connect it again securely. • Disconnect USB devices other information appear on ...the computer. • Disconnect the cable from the [ST1] (original sound) side...
...dots or more, 32,000 colors or more - Make sure that the A/V connecting cable is automatically set to [ AUTO]. Pictures from your camcorder. • Disconnect the cable from the computer and camcorder, then connect it again securely. • Disconnect USB devices other information appear on ...the computer. • Disconnect the cable from the [ST1] (original sound) side...

Operating Guide
Page 72
...[Universal Serial Bus Controller] folder 5 When the [Confirm Device Removal] screen appears, click [OK]. 6 Turn off the power of your camcorder, disconnect the USB cable, then restart the computer. 7 Place the supplied CD-ROM in the OS. x For Windows Me 1 Check that your computer. 72 ... USB driver has been registered incorrectly as the computer was connected to your camcorder before the installation of your camcorder is seeing on the computer. • Disconnect the cable from the computer, turn on the camcorder, then connect it again. • Slide the POWER switch repeatedly to ...
...[Universal Serial Bus Controller] folder 5 When the [Confirm Device Removal] screen appears, click [OK]. 6 Turn off the power of your camcorder, disconnect the USB cable, then restart the computer. 7 Place the supplied CD-ROM in the OS. x For Windows Me 1 Check that your computer. 72 ... USB driver has been registered incorrectly as the computer was connected to your camcorder before the installation of your camcorder is seeing on the computer. • Disconnect the cable from the computer, turn on the camcorder, then connect it again. • Slide the POWER switch repeatedly to ...
Operating Guide
Page 73
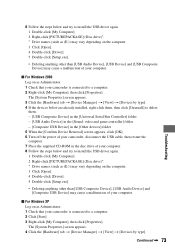
... [Other devices] folder 5 When the [Confirm Device Removal] screen appears, click [OK]. 6 Turn off the power of your camcorder, disconnect the USB cable, then restart the computer. 7 Place the supplied CD-ROM in the disc drive of your computer. 8 Follow the steps below ... Device], [USB Device] and [USB Composite Device] may cause a malfunction of your computer. x For Windows 2000 Log on as Administrator. 1 Check that your camcorder is connected to a computer. 2 Click [Start]. 3 Right-click [My Computer], then click [Properties]. The [System Properties] screen appears. 3 Click the [Hardware...
... [Other devices] folder 5 When the [Confirm Device Removal] screen appears, click [OK]. 6 Turn off the power of your camcorder, disconnect the USB cable, then restart the computer. 7 Place the supplied CD-ROM in the disc drive of your computer. 8 Follow the steps below ... Device], [USB Device] and [USB Composite Device] may cause a malfunction of your computer. x For Windows 2000 Log on as Administrator. 1 Check that your camcorder is connected to a computer. 2 Click [Start]. 3 Right-click [My Computer], then click [Properties]. The [System Properties] screen appears. 3 Click the [Hardware...
Operating Guide
Page 74
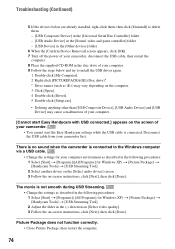
... restart the computer. 8 Place the supplied CD-ROM in the disc drive of your camcorder first. Disconnect the USB cable from your camcorder. • You cannot start the Easy Handycam settings while the USB cable is connected to install the USB driver again. 1 Double-click [My Computer]. 2 Right-click ... on the screen of your computer. 9 Follow the steps below and try to the Windows computer via a USB cable. • Change the settings for Windows XP) t [Picture Package] t [Handycam Tools] t [USB Streaming Tool]. 2 Select another device on the [Select audio device] screen. 3 Follow the...
... restart the computer. 8 Place the supplied CD-ROM in the disc drive of your camcorder first. Disconnect the USB cable from your camcorder. • You cannot start the Easy Handycam settings while the USB cable is connected to install the USB driver again. 1 Double-click [My Computer]. 2 Right-click ... on the screen of your computer. 9 Follow the steps below and try to the Windows computer via a USB cable. • Change the settings for Windows XP) t [Picture Package] t [Handycam Tools] t [USB Streaming Tool]. 2 Select another device on the [Select audio device] screen. 3 Follow the...


