
Operating Guide
Page 56
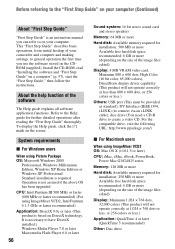
...camcorder and computer and making settings, to general operation the first time you can refer to on your computer (Continued) About "First Step Guide" "First Step Guide" is required. Install the CD-ROM, read "Installing the software and "First Step Guide" on the screen. System requirements x For Windows... functions. For the compatible drive, visit the following URL: http://www.ppackage.com/) x For Macintosh users When using Picture Package OS: Microsoft Windows 2000 Professional, Windows Millennium Edition, Windows XP Home Edition or Windows XP Professional Standard installation is...
...camcorder and computer and making settings, to general operation the first time you can refer to on your computer (Continued) About "First Step Guide" "First Step Guide" is required. Install the CD-ROM, read "Installing the software and "First Step Guide" on the screen. System requirements x For Windows... functions. For the compatible drive, visit the following URL: http://www.ppackage.com/) x For Macintosh users When using Picture Package OS: Microsoft Windows 2000 Professional, Windows Millennium Edition, Windows XP Home Edition or Windows XP Professional Standard installation is...
Operating Guide
Page 57
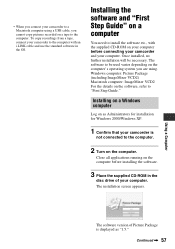
...system you are using a USB cable, you connect your camcorder to a Macintosh computer using . The installation screen appears. Installing on a Windows computer Log on as Administrators for installation for Windows 2000/Windows XP. 1 Confirm that your camcorder is displayed as "1.5." Close all applications running on the computer...the OS. Continued , 57 To copy recordings from a tape, connect your camcorder to install the software etc., with an i.LINK cable and use the standard software in the disc drive of Picture Package is not connected to the computer. Installing the software and "...
...system you are using a USB cable, you connect your camcorder to a Macintosh computer using . The installation screen appears. Installing on a Windows computer Log on as Administrators for installation for Windows 2000/Windows XP. 1 Confirm that your camcorder is displayed as "1.5." Close all applications running on the computer...the OS. Continued , 57 To copy recordings from a tape, connect your camcorder to install the software etc., with an i.LINK cable and use the standard software in the disc drive of Picture Package is not connected to the computer. Installing the software and "...
Operating Guide
Page 62
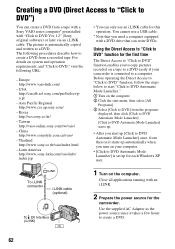
...the following procedures describe how to create a DVD from a recorded tape. The following URL: - You cannot use an i.LINK cable for each Windows XP user. Before operating the Direct Access to "Click to DVD" function, follow the steps below to start "Click to DVD Automatic Mode ...a DVD from a tape with a Sony VAIO series computer* preinstalled with a DVD drive that can only use a USB cable. * Note that you need a computer equipped with "Click to DVD Ver.1.2" (Sony original software) or later via an i.LINK cable. For details on your camcorder is connected to a computer. Latin ...
...the following procedures describe how to create a DVD from a recorded tape. The following URL: - You cannot use an i.LINK cable for each Windows XP user. Before operating the Direct Access to "Click to DVD" function, follow the steps below to start "Click to DVD Automatic Mode ...a DVD from a tape with a Sony VAIO series computer* preinstalled with a DVD drive that can only use a USB cable. * Note that you need a computer equipped with "Click to DVD Ver.1.2" (Sony original software) or later via an i.LINK cable. For details on your camcorder is connected to a computer. Latin ...

Operating Guide
Page 72
...the POWER switch repeatedly to turn on the CAMERA lamp on your camcorder, and set [USB STREAM] to [ON] (p. 47). (Only when connected to the Windows computer with an i.LINK cable and use the standard software in the disc drive of your camcorder is connected to a computer. 2 Right-click [My Computer],...the POWER switch repeatedly to turn on the PLAY/EDIT lamp on your camcorder before the installation of the USB driver was connected to your camcorder and set [USB STREAM] to [ON] (p. 47). (Only when connected to the Windows computer with the USB cable) You cannot view the video recorded on...
...the POWER switch repeatedly to turn on the CAMERA lamp on your camcorder, and set [USB STREAM] to [ON] (p. 47). (Only when connected to the Windows computer with an i.LINK cable and use the standard software in the disc drive of your camcorder is connected to a computer. 2 Right-click [My Computer],...the POWER switch repeatedly to turn on the PLAY/EDIT lamp on your camcorder before the installation of the USB driver was connected to your camcorder and set [USB STREAM] to [ON] (p. 47). (Only when connected to the Windows computer with the USB cable) You cannot view the video recorded on...
Operating Guide
Page 73
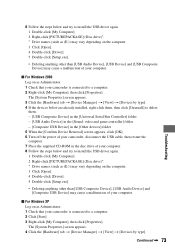
... Device Removal] screen appears, click [OK]. 6 Turn off the power of your camcorder, disconnect the USB cable, then restart the computer. 7 Place the supplied CD-ROM in the disc drive of your computer. 8 Follow the steps below and try to install the USB driver... 1 Double-click [My Computer]. 2 Right-click [PICTUREPACKAGE] (Disc drive)*. * Drive names (such as Administrator. 1 Check that your camcorder is connected to a computer. 2 Click [Start]. 3 Right-click [My Computer], then click [Properties]. Continued , 73 x For Windows XP Log on as (E:)) may vary depending on the computer. 3 ...
... Device Removal] screen appears, click [OK]. 6 Turn off the power of your camcorder, disconnect the USB cable, then restart the computer. 7 Place the supplied CD-ROM in the disc drive of your computer. 8 Follow the steps below and try to install the USB driver... 1 Double-click [My Computer]. 2 Right-click [PICTUREPACKAGE] (Disc drive)*. * Drive names (such as Administrator. 1 Check that your camcorder is connected to a computer. 2 Click [Start]. 3 Right-click [My Computer], then click [Properties]. Continued , 73 x For Windows XP Log on as (E:)) may vary depending on the computer. 3 ...
Operating Guide
Page 74
...computer. 8 Place the supplied CD-ROM in the disc drive of your camcorder. • You cannot start the Easy Handycam settings while the USB cable is connected. There is no sound when the camcorder is not smooth during USB Streaming. • Change the... procedures: 1 Select [Start] t [Programs]([All Programs] for Windows XP) t [Picture Package] t [Handycam Tools] t [USB Streaming Tool]. 2 Adjust the slider in the following procedures: 1 Select [Start] t [Programs]( [All Programs] for Windows XP) t [Picture Package] t [Handycam Tools] t [USB Streaming Tool]. 2 Select another device on ...
...computer. 8 Place the supplied CD-ROM in the disc drive of your camcorder. • You cannot start the Easy Handycam settings while the USB cable is connected. There is no sound when the camcorder is not smooth during USB Streaming. • Change the... procedures: 1 Select [Start] t [Programs]([All Programs] for Windows XP) t [Picture Package] t [Handycam Tools] t [USB Streaming Tool]. 2 Adjust the slider in the following procedures: 1 Select [Start] t [Programs]( [All Programs] for Windows XP) t [Picture Package] t [Handycam Tools] t [USB Streaming Tool]. 2 Select another device on ...


