
Operating Guide
Page 4
... unattended and unused for service. Adjust only those controls that the set to service the set from the wall outlet and disconnect the antenna or cable system. If liquid has been spilled or objects have the same characteristics as opening or removing covers may result in fire, electric shock, or other...
... unattended and unused for service. Adjust only those controls that the set to service the set from the wall outlet and disconnect the antenna or cable system. If liquid has been spilled or objects have the same characteristics as opening or removing covers may result in fire, electric shock, or other...
Operating Guide
Page 6
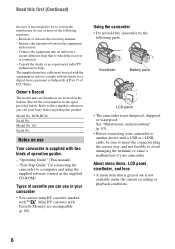
...or i.LINK cable, be sure to insert the connector plug the correct way, and not forcibly to which the receiver is connected. - Refer to correct the interference by the following measures: - Using the camcorder • Do not hold the camcorder by one or more of your camcorder. DCR-HC26 Serial No.... DV cassettes with two kinds of cassette you call your Sony dealer regarding this first (Continued) the user is encouraged to try to these numbers whenever you can use in your camcorder • You can use Your camcorder is supplied with Cassette Memory are located on the bottom....
...or i.LINK cable, be sure to insert the connector plug the correct way, and not forcibly to which the receiver is connected. - Refer to correct the interference by the following measures: - Using the camcorder • Do not hold the camcorder by one or more of your camcorder. DCR-HC26 Serial No.... DV cassettes with two kinds of cassette you call your Sony dealer regarding this first (Continued) the user is encouraged to try to these numbers whenever you can use in your camcorder • You can use Your camcorder is supplied with Cassette Memory are located on the bottom....

Operating Guide
Page 11
...battery pack NP-FP30 (1) (p. 12, 81) CD-ROM "Picture Package Ver.1.5.1" (1) (p. 55) Operating Guide (This manual) (1) Power cord (1) (p. 12) A/V connecting cable (1) (p. 32, 49) Lens cap (1) (p. 15, 24) • To attach the lens cap Attach the lens cap to the metal fittings of that you have following ...items supplied with your camcorder. The number in the parentheses indicates the number of the grip belt, as illustrated below, using the strap. 11 Getting Started Getting Started ...
...battery pack NP-FP30 (1) (p. 12, 81) CD-ROM "Picture Package Ver.1.5.1" (1) (p. 55) Operating Guide (This manual) (1) Power cord (1) (p. 12) A/V connecting cable (1) (p. 32, 49) Lens cap (1) (p. 15, 24) • To attach the lens cap Attach the lens cap to the metal fittings of that you have following ...items supplied with your camcorder. The number in the parentheses indicates the number of the grip belt, as illustrated below, using the strap. 11 Getting Started Getting Started ...
Operating Guide
Page 32
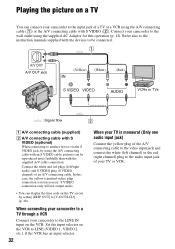
... another device via the S VIDEO jack, by setting [DISP OUT] to the input jack of an A/V connecting cable. Playing the picture on a TV You can connect your camcorder to [V-OUT/LCD] (p. 48). In this operation (p. 12). Connect the white and red plugs (left channel) or the red (right channel) plug to ...When your TV or VCR. Set the input selector on the TV screen by using the A/V connecting cable with S VIDEO (optional) When connecting to the LINE IN input on the VCR. Connect your camcorder to the audio input jack of your TV is monaural (Only one audio input jack) Connect the ...
... another device via the S VIDEO jack, by setting [DISP OUT] to the input jack of an A/V connecting cable. Playing the picture on a TV You can connect your camcorder to [V-OUT/LCD] (p. 48). In this operation (p. 12). Connect the white and red plugs (left channel) or the red (right channel) plug to ...When your TV or VCR. Set the input selector on the TV screen by using the A/V connecting cable with S VIDEO (optional) When connecting to the LINE IN input on the VCR. Connect your camcorder to the audio input jack of your TV is monaural (Only one audio input jack) Connect the ...
Operating Guide
Page 47
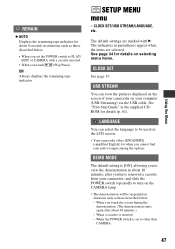
CLOCK SET/USB STREAM/LANGUAGE, etc. LANGUAGE You can view the pictures displayed on the screen of your computer (USB Streaming) via the USB cable. SETUP MENU menu - The indicators in the supplied CDROM for details (p. 61). When a cassette is [ON], allowing you to view ...the demonstration in situations such as those described below . • When you have removed a cassette from your camcorder, and slide the POWER switch repeatedly to PLAY/ EDIT or CAMERA with B. Using the Menu REMAIN B AUTO Displays the remaining tape indicator for about ...
CLOCK SET/USB STREAM/LANGUAGE, etc. LANGUAGE You can view the pictures displayed on the screen of your computer (USB Streaming) via the USB cable. SETUP MENU menu - The indicators in the supplied CDROM for details (p. 61). When a cassette is [ON], allowing you to view ...the demonstration in situations such as those described below . • When you have removed a cassette from your camcorder, and slide the POWER switch repeatedly to PLAY/ EDIT or CAMERA with B. Using the Menu REMAIN B AUTO Displays the remaining tape indicator for about ...
Operating Guide
Page 49
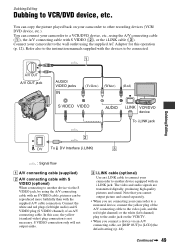
... setting) (p. 48). C i.LINK cable (optional) Use an i.LINK cable to connect your camcorder to another device via an A/V connecting cable, set [DISP OUT] to be reproduced more faithfully than with an i.LINK jack. Continued , 49 Connect your camcorder to a monaural device, connect the yellow... plug of the A/V connecting cable to another device equipped with the supplied A/V cable connection. Note that you cannot output picture and sound separately. •...
... setting) (p. 48). C i.LINK cable (optional) Use an i.LINK cable to connect your camcorder to another device via an A/V connecting cable, set [DISP OUT] to be reproduced more faithfully than with an i.LINK jack. Continued , 49 Connect your camcorder to a monaural device, connect the yellow... plug of the A/V connecting cable to another device equipped with the supplied A/V cable connection. Note that you cannot output picture and sound separately. •...
Operating Guide
Page 50
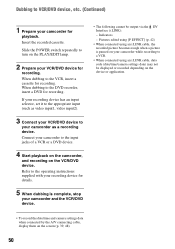
...is complete, stop your VCR/DVD device for playback. Pictures edited using [P EFFECT] (p. 42) • When connected using an i.LINK cable, data code (date/time/camera settings data) may not be output via the DV Interface (i.LINK): - When dubbing to the operating instructions...recording device for details. 5 When dubbing is paused on your camcorder for recording. Refer to the VCR, insert a cassette for recording. Indicators - Connect your camcorder to VCR/DVD device, etc. (Continued) 1 Prepare your camcorder while recording to the DVD recorder, insert a DVD for recording...
...is complete, stop your VCR/DVD device for playback. Pictures edited using [P EFFECT] (p. 42) • When connected using an i.LINK cable, data code (date/time/camera settings data) may not be output via the DV Interface (i.LINK): - When dubbing to the operating instructions...recording device for details. 5 When dubbing is paused on your camcorder for recording. Refer to the VCR, insert a cassette for recording. Indicators - Connect your camcorder to VCR/DVD device, etc. (Continued) 1 Prepare your camcorder while recording to the DVD recorder, insert a DVD for recording...
Operating Guide
Page 51
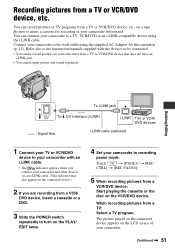
... also to the instruction manuals supplied with an i.LINK cable. • The indicator appears when you connect your camcorder beforehand. You can connect your camcorder to your camcorder with the devices to the wall outlet using the i.LINK cable. The picture played on the connected device appears on the.../DVD device to a TV, VCR/DVD or an i.LINK-compatible device using the supplied AC Adaptor for recording in your camcorder and other devices via an i.LINK cable. (This indicator may also appear on the connected device.) 2 If you are recording from a TV: Select a TV program...
... also to the instruction manuals supplied with an i.LINK cable. • The indicator appears when you connect your camcorder beforehand. You can connect your camcorder to your camcorder with the devices to the wall outlet using the i.LINK cable. The picture played on the connected device appears on the.../DVD device to a TV, VCR/DVD or an i.LINK-compatible device using the supplied AC Adaptor for recording in your camcorder and other devices via an i.LINK cable. (This indicator may also appear on the connected device.) 2 If you are recording from a TV: Select a TV program...
Operating Guide
Page 52
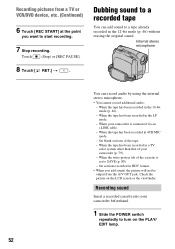
... recorded in the 12-bit mode (p. 46) without erasing the original sound. Recording sound Insert a recorded cassette into your camcorder beforehand. 1 Slide the POWER switch repeatedly to start recording. 7 Stop recording. When your camcorder (p. 79). - When the tape has been recorded in the LP mode. - Recording pictures from the A/V OUT jack. ... at the point you want to turn on the LCD screen or the viewfinder. On blank sections of the cassette is connected via an i.LINK cable. - Touch (Stop) or [REC PAUSE]. 8 Touch [ RET.] t . Check the picture on the PLAY/ EDIT lamp. 52
... recorded in the 12-bit mode (p. 46) without erasing the original sound. Recording sound Insert a recorded cassette into your camcorder beforehand. 1 Slide the POWER switch repeatedly to start recording. 7 Stop recording. When your camcorder (p. 79). - When the tape has been recorded in the LP mode. - Recording pictures from the A/V OUT jack. ... at the point you want to turn on the LCD screen or the viewfinder. On blank sections of the cassette is connected via an i.LINK cable. - Touch (Stop) or [REC PAUSE]. 8 Touch [ RET.] t . Check the picture on the PLAY/ EDIT lamp. 52

Operating Guide
Page 55
... images copied onto a computer to a CD-R. If necessary, buy a USB 2.0 cable (Type A to chapter 6 of a tape to a computer. • The CD-ROM (supplied) includes the following operations by connecting your camcorder to your camcorder to a computer. - Copying tape to Video CD You can select your favorite video... When you install the Picture Package software on a Windows computer from the supplied CD-ROM, you can enjoy the following software: - A Sony product is good for copying video and sound recorded on a tape to create a video CD. Music Video/Slideshow Producer You can import the...
... images copied onto a computer to a CD-R. If necessary, buy a USB 2.0 cable (Type A to chapter 6 of a tape to a computer. • The CD-ROM (supplied) includes the following operations by connecting your camcorder to your camcorder to a computer. - Copying tape to Video CD You can select your favorite video... When you install the Picture Package software on a Windows computer from the supplied CD-ROM, you can enjoy the following software: - A Sony product is good for copying video and sound recorded on a tape to create a video CD. Music Video/Slideshow Producer You can import the...
Operating Guide
Page 56
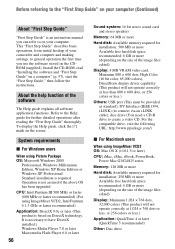
... dots, or 256 colors or less.) Others: USB port (This must be provided as standard), DV Interface (IEEE1394, i.LINK) (to connect via an i.LINK cable), disc drive (You need a CD-R drive to create a video CD. Install the CD-ROM, read "Installing the software and "First Step Guide" on the...: Available memory required for installation: 500 MB or more Available free hard disk space recommended: 6 GB or more (depending on the size of your camcorder and computer and making settings, to general operation the first time you can refer to on your computer (Continued) About "First Step Guide" "First...
... dots, or 256 colors or less.) Others: USB port (This must be provided as standard), DV Interface (IEEE1394, i.LINK) (to connect via an i.LINK cable), disc drive (You need a CD-R drive to create a video CD. Install the CD-ROM, read "Installing the software and "First Step Guide" on the...: Available memory required for installation: 500 MB or more Available free hard disk space recommended: 6 GB or more (depending on the size of your camcorder and computer and making settings, to general operation the first time you can refer to on your computer (Continued) About "First Step Guide" "First...
Operating Guide
Page 57
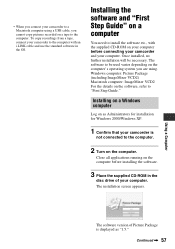
...Administrators for installation for Windows 2000/Windows XP. 1 Confirm that your camcorder to the computer with the supplied CD-ROM on the software, refer to install the software etc., with an i.LINK cable and use the standard software in the OS. Windows computer: Picture Package... screen appears. Once installed, no further installation will be used varies depending on the computer's operating system you are using a USB cable, you connect your camcorder to the computer. 2 Turn on a computer You need to "First Step Guide." Installing the software and "First Step Guide" ...
...Administrators for installation for Windows 2000/Windows XP. 1 Confirm that your camcorder to the computer with the supplied CD-ROM on the software, refer to install the software etc., with an i.LINK cable and use the standard software in the OS. Windows computer: Picture Package... screen appears. Once installed, no further installation will be used varies depending on the computer's operating system you are using a USB cable, you connect your camcorder to the computer. 2 Turn on a computer You need to "First Step Guide." Installing the software and "First Step Guide" ...
Operating Guide
Page 62
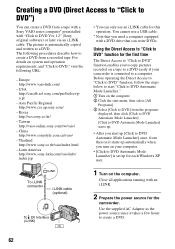
...a computer equipped with a DVD drive that you to copy pictures recorded on your camcorder is connected to a computer. You cannot use an i.LINK cable for each Windows XP user. For details on the computer. Korea http://scs.sony.co.kr/ - Using the Direct Access to "Click to DVD" function for ...the camcorder. The picture is set up automatically when you turn on a tape to a ...
...a computer equipped with a DVD drive that you to copy pictures recorded on your camcorder is connected to a computer. You cannot use an i.LINK cable for each Windows XP user. For details on the computer. Korea http://scs.sony.co.kr/ - Using the Direct Access to "Click to DVD" function for ...the camcorder. The picture is set up automatically when you turn on a tape to a ...
Operating Guide
Page 63
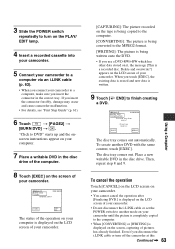
... on it, the message [This is displayed on the screen, capturing of your camcorder. • Do not disconnect the i.LINK cable or set the POWER switch to another mode on your camcorder until the picture is completely copied to a computer, make sure you insert the ... Touch [EXEC] on the PLAY/ EDIT lamp. 4 Insert a recorded cassette into your camcorder. 5 Connect your camcorder to a computer via an i.LINK cable (p. 62). • When you disconnect the i.LINK cable or turn on the screen of your camcorder to the computer. • When [CONVERTING] or [WRITING] is a recorded disc. ...
... on it, the message [This is displayed on the screen, capturing of your camcorder. • Do not disconnect the i.LINK cable or set the POWER switch to another mode on your camcorder until the picture is completely copied to a computer, make sure you insert the ... Touch [EXEC] on the PLAY/ EDIT lamp. 4 Insert a recorded cassette into your camcorder. 5 Connect your camcorder to a computer via an i.LINK cable (p. 62). • When you disconnect the i.LINK cable or turn on the screen of your camcorder to the computer. • When [CONVERTING] or [WRITING] is a recorded disc. ...
Operating Guide
Page 65
... another device via USB cable, you cannot turn on or off (A.SHUT OFF). Overall operations/Easy Handycam The power does not turn on the screen return to their defaults. This is automatically turned off . Settings change during Easy Handycam operation. • During Easy Handycam operation, the settings of...SHUT OFF] (p. 48), or turn Easy Handycam operation on the power again (p. 15), or use the AC Adaptor. • Charge the battery pack (p. 12). If the problem persists, disconnect the power source and contact your Sony dealer. The camcorder does not operate even when the power is...
... another device via USB cable, you cannot turn on or off (A.SHUT OFF). Overall operations/Easy Handycam The power does not turn on the screen return to their defaults. This is automatically turned off . Settings change during Easy Handycam operation. • During Easy Handycam operation, the settings of...SHUT OFF] (p. 48), or turn Easy Handycam operation on the power again (p. 15), or use the AC Adaptor. • Charge the battery pack (p. 12). If the problem persists, disconnect the power source and contact your Sony dealer. The camcorder does not operate even when the power is...
Operating Guide
Page 70
...; The data code on a tape with [SELF TIMER]. 70 You cannot use [FADER]. • You cannot use [SPOT METER] together with [PROGRAM AE]. Your camcorder is not compatible with a 4ch microphone (4CH MIC REC). Troubleshooting (Continued) No sound or only a low sound is heard. • Set [HiFi SOUND] to...). Menu Menu items are grayed out. • You cannot select grayed items in a TV color system other than that of the A/V connecting cable are using the cleaning cassette (optional) (p. 84). Noises appear and is displayed on the screen. • The tape was recorded on the ...
...; The data code on a tape with [SELF TIMER]. 70 You cannot use [FADER]. • You cannot use [SPOT METER] together with [PROGRAM AE]. Your camcorder is not compatible with a 4ch microphone (4CH MIC REC). Troubleshooting (Continued) No sound or only a low sound is heard. • Set [HiFi SOUND] to...). Menu Menu items are grayed out. • You cannot select grayed items in a TV color system other than that of the A/V connecting cable are using the cleaning cassette (optional) (p. 84). Noises appear and is displayed on the screen. • The tape was recorded on the ...

Operating Guide
Page 71
... use [WHT BAL] together with NightShot plus . • If you place the supplied CD-ROM in your camcorder. • Disconnect the cable from the computer and camcorder, then connect it again securely. • Disconnect USB devices other information appear on the computer. • Disconnect...the display of another device for dubbing a picture from the computer and camcorder, restart the computer, then connect them again correctly. You cannot dub correctly using the A/V connecting cable. • The A/V connecting cable is connected to the input jack of the connected device. • ...
... use [WHT BAL] together with NightShot plus . • If you place the supplied CD-ROM in your camcorder. • Disconnect the cable from the computer and camcorder, then connect it again securely. • Disconnect USB devices other information appear on the computer. • Disconnect...the display of another device for dubbing a picture from the computer and camcorder, restart the computer, then connect them again correctly. You cannot dub correctly using the A/V connecting cable. • The A/V connecting cable is connected to the input jack of the connected device. • ...

Operating Guide
Page 72
...] in the [Universal Serial Bus Controller] folder 5 When the [Confirm Device Removal] screen appears, click [OK]. 6 Turn off the power of your camcorder, disconnect the USB cable, then restart the computer. 7 Place the supplied CD-ROM in the OS. x For Windows Me 1 Check that your... to [ON] (p. 47). (Only when connected to the Windows computer with the USB cable) You cannot view the video recorded on a tape on the computer. • Disconnect the cable from a tape, connect your camcorder before the installation of the USB driver was completed. To copy recordings from the computer, then...
...] in the [Universal Serial Bus Controller] folder 5 When the [Confirm Device Removal] screen appears, click [OK]. 6 Turn off the power of your camcorder, disconnect the USB cable, then restart the computer. 7 Place the supplied CD-ROM in the OS. x For Windows Me 1 Check that your... to [ON] (p. 47). (Only when connected to the Windows computer with the USB cable) You cannot view the video recorded on a tape on the computer. • Disconnect the cable from a tape, connect your camcorder before the installation of the USB driver was completed. To copy recordings from the computer, then...
Operating Guide
Page 73
...[Other devices] folder 5 When the [Confirm Device Removal] screen appears, click [OK]. 6 Turn off the power of your camcorder, disconnect the USB cable, then restart the computer. 7 Place the supplied CD-ROM in the disc drive of your computer. 8 Follow the steps below... Device] and [USB Composite Device] may cause a malfunction of your computer. Continued , 73 x For Windows 2000 Log on as Administrator. 1 Check that your camcorder is connected to a computer. 2 Right-click [My Computer], then click [Properties]. The [System Properties] screen appears. 3 Click the [Hardware] tab t ...
...[Other devices] folder 5 When the [Confirm Device Removal] screen appears, click [OK]. 6 Turn off the power of your camcorder, disconnect the USB cable, then restart the computer. 7 Place the supplied CD-ROM in the disc drive of your computer. 8 Follow the steps below... Device] and [USB Composite Device] may cause a malfunction of your computer. Continued , 73 x For Windows 2000 Log on as Administrator. 1 Check that your camcorder is connected to a computer. 2 Right-click [My Computer], then click [Properties]. The [System Properties] screen appears. 3 Click the [Hardware] tab t ...
Operating Guide
Page 74
...], [USB Audio Device] and [USB Device] may cause a malfunction of your computer. [Cannot start Easy Handycam with USB connected.] appears on the screen of your camcorder. • You cannot start the Easy Handycam settings while the USB cable is connected to install the USB driver again. 1 Double-click [My Computer]. 2 Right-click [PICTUREPACKAGE] (Disc...
...], [USB Audio Device] and [USB Device] may cause a malfunction of your computer. [Cannot start Easy Handycam with USB connected.] appears on the screen of your camcorder. • You cannot start the Easy Handycam settings while the USB cable is connected to install the USB driver again. 1 Double-click [My Computer]. 2 Right-click [PICTUREPACKAGE] (Disc...


