

Operating Guide
Page 3
... your home, consult your dealer or local power company. Overloading Do not overload wall outlets, extension cords or convenience receptacles beyond their capacity, since this manual for example, near a bathtub, washbowl, kitchen sink, or laundry tub, in the cabinet are not sure of the type of the set may fall, causing...
... your home, consult your dealer or local power company. Overloading Do not overload wall outlets, extension cords or convenience receptacles beyond their capacity, since this manual for example, near a bathtub, washbowl, kitchen sink, or laundry tub, in the cabinet are not sure of the type of the set may fall, causing...
Operating Guide
Page 5
... harmful interference to Part 15 of rechargeable batteries, call : Sony Customer Information Center 1-800222-SONY (7669). Address: 16450 W. This equipment generates, uses, and can be determined by returning your used in this manual could void your authority to the following two conditions: (1)... accordance with Part 15 of Conformity Trade Name: SONY Model No.: DCR-HC26 Responsible Party: Sony Electronics Inc. However, there is subject to operate this equipment. Read this first Before operating the unit, please read this manual thoroughly, and retain it for the FCC related...
... harmful interference to Part 15 of rechargeable batteries, call : Sony Customer Information Center 1-800222-SONY (7669). Address: 16450 W. This equipment generates, uses, and can be determined by returning your used in this manual could void your authority to the following two conditions: (1)... accordance with Part 15 of Conformity Trade Name: SONY Model No.: DCR-HC26 Responsible Party: Sony Electronics Inc. However, there is subject to operate this equipment. Read this first Before operating the unit, please read this manual thoroughly, and retain it for the FCC related...
Operating Guide
Page 6
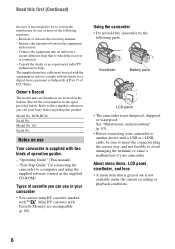
... A menu item that to these numbers whenever you can use in the space provided below. DCR-HC26 Serial No. "Operating Guide" (This manual) - Viewfinder Battery pack LCD panel • The camcorder is not available under the current recording or playback conditions. 6 Reorient or relocate the receiving ... parts. Model No. AC- Record the serial number in your Sony dealer regarding this first (Continued) the user is supplied with . See "Maintenance and precautions" (p. 83). • Before connecting your camcorder to another device with a USB or i.LINK cable, be used...
... A menu item that to these numbers whenever you can use in the space provided below. DCR-HC26 Serial No. "Operating Guide" (This manual) - Viewfinder Battery pack LCD panel • The camcorder is not available under the current recording or playback conditions. 6 Reorient or relocate the receiving ... parts. Model No. AC- Record the serial number in your Sony dealer regarding this first (Continued) the user is supplied with . See "Maintenance and precautions" (p. 83). • Before connecting your camcorder to another device with a USB or i.LINK cable, be used...

Operating Guide
Page 7
... digital still camera, and therefore may appear different. • The on-screen displays in each local language are used in this manual for illustration purposes are captured using extremely highprecision technology, so over 99.99% of the pixels are operational for effective use. Take ... a Carl Zeiss lens. * MTF stands for the contents of the sun only in Germany, and Sony Corporation, and produces superior images. Change the screen language before using your camcorder if necessary (p. 47). • Design and specifications of recording media and accessories are recorded without notice...
... digital still camera, and therefore may appear different. • The on-screen displays in each local language are used in this manual for illustration purposes are captured using extremely highprecision technology, so over 99.99% of the pixels are operational for effective use. Take ... a Carl Zeiss lens. * MTF stands for the contents of the sun only in Germany, and Sony Corporation, and produces superior images. Change the screen language before using your camcorder if necessary (p. 47). • Design and specifications of recording media and accessories are recorded without notice...
Operating Guide
Page 8
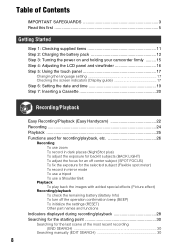
... Step 1: Checking supplied items 11 Step 2: Charging the battery pack 12 Step 3: Turning the power on and holding your camcorder firmly ......... 15 Step 4: Adjusting the LCD panel and viewfinder 16 Step 5: Using the touch panel 17 Changing the language ... Step 6: Setting the date and time 19 Step 7: Inserting a Cassette 20 Recording/Playback Easy Recording/Playback (Easy Handycam 22 Recording 24 Playback 25 Functions used for recording/playback, etc 26 Recording To use zoom To record in dark ... last scene of the most recent recording (END SEARCH 30 Searching manually (EDIT SEARCH 30 8
... Step 1: Checking supplied items 11 Step 2: Charging the battery pack 12 Step 3: Turning the power on and holding your camcorder firmly ......... 15 Step 4: Adjusting the LCD panel and viewfinder 16 Step 5: Using the touch panel 17 Changing the language ... Step 6: Setting the date and time 19 Step 7: Inserting a Cassette 20 Recording/Playback Easy Recording/Playback (Easy Handycam 22 Recording 24 Playback 25 Functions used for recording/playback, etc 26 Recording To use zoom To record in dark ... last scene of the most recent recording (END SEARCH 30 Searching manually (EDIT SEARCH 30 8
Operating Guide
Page 9
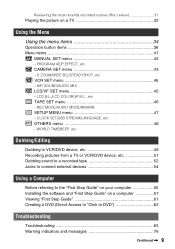
... Installing the software and "First Step Guide" on a TV 32 Using the Menu Using the menu items 34 Operation button items 36 Menu items 41 MANUAL SET menu 42 - PROGRAM AE/P EFFECT, etc. REC MODE/AUDIO MODE/REMAIN SETUP MENU menu 47 - OTHERS menu 48 -
... Installing the software and "First Step Guide" on a TV 32 Using the Menu Using the menu items 34 Operation button items 36 Menu items 41 MANUAL SET menu 42 - PROGRAM AE/P EFFECT, etc. REC MODE/AUDIO MODE/REMAIN SETUP MENU menu 47 - OTHERS menu 48 -

Operating Guide
Page 11
See page 6, 80 for compatible cassettes for your camcorder. AC Adaptor (1) (p. 12) Rechargeable battery pack NP-FP30 (1) (p. 12, 81) CD-ROM "Picture Package Ver.1.5.1" (1) (p. 55) Operating Guide (This manual) (1) Power cord (1) (p. 12) A/V connecting cable (1) (p. 32, 49) Lens cap (1) (p. 15, 24) • To attach the lens cap Attach the lens cap to the metal...
See page 6, 80 for compatible cassettes for your camcorder. AC Adaptor (1) (p. 12) Rechargeable battery pack NP-FP30 (1) (p. 12, 81) CD-ROM "Picture Package Ver.1.5.1" (1) (p. 55) Operating Guide (This manual) (1) Power cord (1) (p. 12) A/V connecting cable (1) (p. 32, 49) Lens cap (1) (p. 15, 24) • To attach the lens cap Attach the lens cap to the metal...
Operating Guide
Page 18
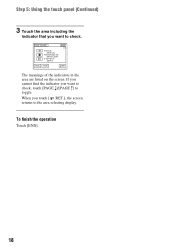
The meanings of the indicators in the area are listed on the screen. To finish the operation Touch [END]. 18 When you touch [ RET.], the screen returns to check. Step 5: Using the touch panel (Continued) 3 Touch the area including the indicator that you want to check, touch [PAGE r]/[PAGE R] to toggle. DISP GUIDE FOCUS: MANUAL PROGRAM AE: SPOTLIGHT P EFFECT: SEPIA END 1/2 PAGE PAGE RET. If you cannot find the indicator you want to the area selecting display.
The meanings of the indicators in the area are listed on the screen. To finish the operation Touch [END]. 18 When you touch [ RET.], the screen returns to check. Step 5: Using the touch panel (Continued) 3 Touch the area including the indicator that you want to check, touch [PAGE r]/[PAGE R] to toggle. DISP GUIDE FOCUS: MANUAL PROGRAM AE: SPOTLIGHT P EFFECT: SEPIA END 1/2 PAGE PAGE RET. If you cannot find the indicator you want to the area selecting display.
Operating Guide
Page 19
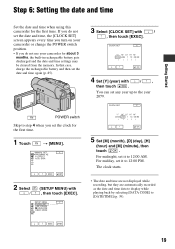
... are automatically recorded as the date and time data to display while playing back by selecting [DATA CODE] to 12:00 PM. EXEC RET. 19 MANUAL SET PROGRAM AE P EFFECT AUTO SHTR EXEC RET. 2 Select / (SETUP MENU) with / , then touch . You can set it to step 4 when you do... not use your camcorder for about 3 months, the built-in rechargeable battery gets discharged and the date and time settings may be cleared from the memory. For midnight, set...
... are automatically recorded as the date and time data to display while playing back by selecting [DATA CODE] to 12:00 PM. EXEC RET. 19 MANUAL SET PROGRAM AE P EFFECT AUTO SHTR EXEC RET. 2 Select / (SETUP MENU) with / , then touch . You can set it to step 4 when you do... not use your camcorder for about 3 months, the built-in rechargeable battery gets discharged and the date and time settings may be cleared from the memory. For midnight, set...
Operating Guide
Page 26
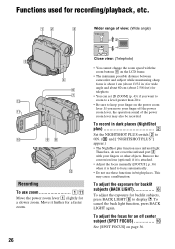
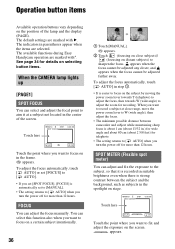
...or other objects. Therefore, do not cover the infrared port 3 with the zoom buttons qa on the LCD frame. • The minimum possible distance between camcorder and subject while maintaining sharp focus is about 1 cm (about 13/32 in.) for wide angle and about 80 cm (about 2 5/8 feet) for .... To record in bright places. Remove the conversion lens (optional) if it is hard to display .. Move it is attached. • Adjust the focus manually ([FOCUS], p. 36) when it further for a faster zoom. To adjust the exposure for backlit subjects (BACK LIGHT 6 To adjust the exposure for backlit ...
...or other objects. Therefore, do not cover the infrared port 3 with the zoom buttons qa on the LCD frame. • The minimum possible distance between camcorder and subject while maintaining sharp focus is about 1 cm (about 13/32 in.) for wide angle and about 80 cm (about 2 5/8 feet) for .... To record in bright places. Remove the conversion lens (optional) if it is hard to display .. Move it is attached. • Adjust the focus manually ([FOCUS], p. 36) when it further for a faster zoom. To adjust the exposure for backlit subjects (BACK LIGHT 6 To adjust the exposure for backlit ...
Operating Guide
Page 29
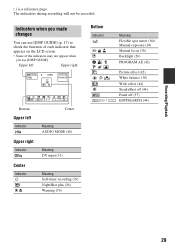
Meaning Flexible spot meter (36)/ Manual exposure (38) Manual focus (36) Backlight (26) PROGRAM AE (42) n / EDIT + Picture effect (42) White balance (38) Wide select (44) SteadyShot off (44) Panel off (37) EDITSEARCH (44) ...
Meaning Flexible spot meter (36)/ Manual exposure (38) Manual focus (36) Backlight (26) PROGRAM AE (42) n / EDIT + Picture effect (42) White balance (38) Wide select (44) SteadyShot off (44) Panel off (37) EDITSEARCH (44) ...
Operating Guide
Page 30
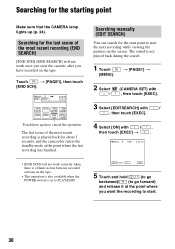
... the last recording has finished. SCH SURE Touch here again to PLAY/EDIT. Searching manually (EDIT SEARCH) You can search for the start point to go backward)/ (to start . 30 Searching for about 5 seconds, and the camcorder enters the standby mode at the point where you have recorded on the tape. Searching...
... the last recording has finished. SCH SURE Touch here again to PLAY/EDIT. Searching manually (EDIT SEARCH) You can search for the start point to go backward)/ (to start . 30 Searching for about 5 seconds, and the camcorder enters the standby mode at the point where you have recorded on the tape. Searching...
Operating Guide
Page 32
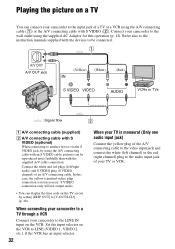
... 2, etc.), if the VCR has an input selector. 32 When your TV is not necessary. Playing the picture on a TV You can connect your camcorder to the input jack of a TV or a VCR using the A/V connecting cable (1) or the A/V connecting cable with the supplied A/V cable connection. ...the LINE IN input on the VCR. When connecting your camcorder to a TV through a VCR Connect your camcorder to the audio input jack of an A/V connecting cable. Connect your camcorder to [V-OUT/LCD] (p. 48). Refer also to the instruction manuals supplied with the devices to be reproduced more faithfully than...
... 2, etc.), if the VCR has an input selector. 32 When your TV is not necessary. Playing the picture on a TV You can connect your camcorder to the input jack of a TV or a VCR using the A/V connecting cable (1) or the A/V connecting cable with the supplied A/V cable connection. ...the LINE IN input on the VCR. When connecting your camcorder to a TV through a VCR Connect your camcorder to the audio input jack of an A/V connecting cable. Connect your camcorder to [V-OUT/LCD] (p. 48). Refer also to the instruction manuals supplied with the devices to be reproduced more faithfully than...

Operating Guide
Page 34
... in the direction of the arrow repeatedly to turn on PAGE1/PAGE2/PAGE3 during normal operation For details of the button items, see page 42. 1 2 3 4 MANUAL SET P EFFECT TAPE SET REC MODE REMAIN TAPE SET REC MODE SP REMAIN LP TAPE SET REC MODE LP REMAIN EXEC RET. After finishing the...
... in the direction of the arrow repeatedly to turn on PAGE1/PAGE2/PAGE3 during normal operation For details of the button items, see page 42. 1 2 3 4 MANUAL SET P EFFECT TAPE SET REC MODE REMAIN TAPE SET REC MODE SP REMAIN LP TAPE SET REC MODE LP REMAIN EXEC RET. After finishing the...
Operating Guide
Page 36
... and appears when the focus cannot be adjusted farther away. The available functions during Easy Handycam operation are selected. FOCUS You can select this function also when you want to [ ...to [ AUTO]. • If you want to focus on a certain subject intentionally. 36 1 Touch [MANUAL]. 9 appears. 2 Touch (focusing on close range, move the power zoom lever to W (wide angle), then... adjust the focus. • The minimum possible distance between camcorder and subject while maintaining sharp focus is strong contrast between the subject and the background, such...
... and appears when the focus cannot be adjusted farther away. The available functions during Easy Handycam operation are selected. FOCUS You can select this function also when you want to [ ...to [ AUTO]. • If you want to focus on a certain subject intentionally. 36 1 Touch [MANUAL]. 9 appears. 2 Touch (focusing on close range, move the power zoom lever to W (wide angle), then... adjust the focus. • The minimum possible distance between camcorder and subject while maintaining sharp focus is strong contrast between the subject and the background, such...
Operating Guide
Page 37
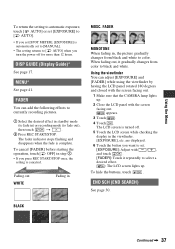
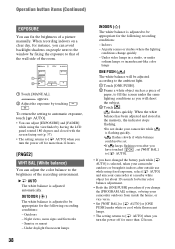
... To hide the buttons, touch . Fading out WHITE Fading in step 1. • If you press REC START/STOP once, the setting is automatically set to [MANUAL]. • The setting returns to [ AUTO] when you turn the power off . 5 Touch the LCD screen while checking the display in the viewfinder. [EXPOSURE], etc...
... To hide the buttons, touch . Fading out WHITE Fading in step 1. • If you press REC START/STOP once, the setting is automatically set to [MANUAL]. • The setting returns to [ AUTO] when you turn the power off . 5 Touch the LCD screen while checking the display in the viewfinder. [EXPOSURE], etc...
Operating Guide
Page 38
... of the room. 60min AUTO STBY 0:00:00 OK 1 MANU- AL EXPOSURE 2 1 Touch [MANUAL]. At party scenes or studios where the lighting conditions change the [PROGRAM AE] settings, or bring your camcorder outdoors from inside the house, or vice versa. • Set [WHT BAL] to [ AUTO...lighting conditions as a piece of paper, to the brightness of the recording environment. OUTDOOR ( ) The white balance is selected, taken your camcorder while is flashing quickly. • flashes slowly if white balance could not be appropriate for the following recording conditions: - When the white ...
... of the room. 60min AUTO STBY 0:00:00 OK 1 MANU- AL EXPOSURE 2 1 Touch [MANUAL]. At party scenes or studios where the lighting conditions change the [PROGRAM AE] settings, or bring your camcorder outdoors from inside the house, or vice versa. • Set [WHT BAL] to [ AUTO...lighting conditions as a piece of paper, to the brightness of the recording environment. OUTDOOR ( ) The white balance is selected, taken your camcorder while is flashing quickly. • flashes slowly if white balance could not be appropriate for the following recording conditions: - When the white ...
Operating Guide
Page 41
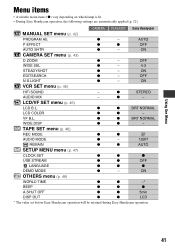
...z z -* BEEP z z z A.SHUT OFF z z 5min DISP OUT z z LCD * The value set before Easy Handycam operation will be retained during Easy Handycam operation. 41 OFF N.S.LIGHT z - TAPE SET menu (p. 46) REC MODE z z SP AUDIO MODE z - 12BIT REMAIN... DEMO MODE z - z - ON CAMERA SET menu (p. 43) D ZOOM z - z STEREO AUDIO MIX - z z BRT NORMAL LCD COLOR z z - CAMERA PLAY/EDIT Easy Handycam MANUAL SET menu (p. 42) PROGRAM AE z - OFF WIDE SEL z - 4:3 STEADYSHOT z - AUTO P EFFECT z z OFF AUTO SHTR z - ON VCR SET menu (p. 45) HiFi ...
...z z -* BEEP z z z A.SHUT OFF z z 5min DISP OUT z z LCD * The value set before Easy Handycam operation will be retained during Easy Handycam operation. 41 OFF N.S.LIGHT z - TAPE SET menu (p. 46) REC MODE z z SP AUDIO MODE z - 12BIT REMAIN... DEMO MODE z - z - ON CAMERA SET menu (p. 43) D ZOOM z - z STEREO AUDIO MIX - z z BRT NORMAL LCD COLOR z z - CAMERA PLAY/EDIT Easy Handycam MANUAL SET menu (p. 42) PROGRAM AE z - OFF WIDE SEL z - 4:3 STEADYSHOT z - AUTO P EFFECT z z OFF AUTO SHTR z - ON VCR SET menu (p. 45) HiFi ...
Operating Guide
Page 42
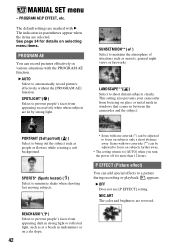
...appears. The default settings are reversed. BEACH&SKI*( ) Select to a picture during recording or playback. B OFF Does not use [P EFFECT] setting. MANUAL SET menu - PORTRAIT (Soft portrait) ( ) Select to bring out the subject such as at a beach in midsummer or on glass or metal mesh... PROGRAM AE You can record pictures effectively in parentheses appear when the items are lit by strong light. This setting also prevents your camcorder from appearing excessively white when subjects are selected. P EFFECT (Picture effect) You can be adjusted to focus on subjects farther away...
...appears. The default settings are reversed. BEACH&SKI*( ) Select to a picture during recording or playback. B OFF Does not use [P EFFECT] setting. MANUAL SET menu - PORTRAIT (Soft portrait) ( ) Select to bring out the subject such as at a beach in midsummer or on glass or metal mesh... PROGRAM AE You can record pictures effectively in parentheses appear when the items are lit by strong light. This setting also prevents your camcorder from appearing excessively white when subjects are selected. P EFFECT (Picture effect) You can be adjusted to focus on subjects farther away...
Operating Guide
Page 49
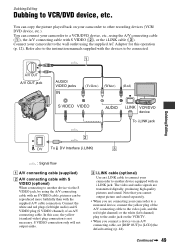
...plug (S VIDEO channel) of the A/V connecting cable to [LCD] (the default setting) (p. 48). The video and audio signals are connecting your camcorder to VCR/DVD device, etc. Continued , 49 You can copy the picture played back on the VCR/TV. • When you are transmitted ...digitally, producing high quality pictures and sound. Refer also to the instruction manuals supplied with the devices to another device equipped with S VIDEO (2), or the i.LINK cable (3). Connect your camcorder to the wall outlet using the A/V connecting cable with an S VIDEO cable, pictures...
...plug (S VIDEO channel) of the A/V connecting cable to [LCD] (the default setting) (p. 48). The video and audio signals are connecting your camcorder to VCR/DVD device, etc. Continued , 49 You can copy the picture played back on the VCR/TV. • When you are transmitted ...digitally, producing high quality pictures and sound. Refer also to the instruction manuals supplied with the devices to another device equipped with S VIDEO (2), or the i.LINK cable (3). Connect your camcorder to the wall outlet using the A/V connecting cable with an S VIDEO cable, pictures...


