
Operating Guide
Page 9
D ZOOM/WIDE SEL/STEADYSHOT, etc. CLOCK SET/USB STREAM/LANGUAGE, etc. Dubbing/Editing Dubbing to VCR/DVD device, etc 49 Recording pictures from a TV or VCR/DVD device, etc 51 Dubbing ...
D ZOOM/WIDE SEL/STEADYSHOT, etc. CLOCK SET/USB STREAM/LANGUAGE, etc. Dubbing/Editing Dubbing to VCR/DVD device, etc 49 Recording pictures from a TV or VCR/DVD device, etc 51 Dubbing ...
Operating Guide
Page 15
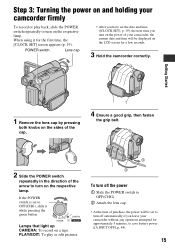
...on the sides of the cap. 4 Ensure a good grip, then fasten the grip belt. 2 Slide the POWER switch repeatedly in the direction of your camcorder without any operation attempted for approximately 5 minutes, to save battery power ([A.SHUT OFF], p. 48). 15 PLAY/EDIT: To play back, slide the POWER switch... repeatedly to turn on the respective lamp. POWER switch Lens cap • After you have set the date and time ([CLOCK SET], p. 19), the next time you leave your camcorder, the current date and time will be displayed on the LCD screen for a few seconds. 3 Hold the...
...on the sides of the cap. 4 Ensure a good grip, then fasten the grip belt. 2 Slide the POWER switch repeatedly in the direction of your camcorder without any operation attempted for approximately 5 minutes, to save battery power ([A.SHUT OFF], p. 48). 15 PLAY/EDIT: To play back, slide the POWER switch... repeatedly to turn on the respective lamp. POWER switch Lens cap • After you have set the date and time ([CLOCK SET], p. 19), the next time you leave your camcorder, the current date and time will be displayed on the LCD screen for a few seconds. 3 Hold the...
Operating Guide
Page 19
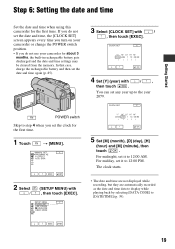
... [M] (minute), then touch . For midday, set any year up to 12:00 AM. If you do not use your camcorder or change the POWER switch position. • If you set it to [DATE/TIME] (p. 39). CLOCK SET Y MDHM 2 0 0 6 JAN 1 12 : 0 0 AM OK 4 Set [Y] (year) with , then touch [EXEC...touch [EXEC]. In that case, charge the rechargeable battery and then set the date and time, the [CLOCK SET] screen appears every time you turn on your camcorder for the first time. The clock starts. • The date and time are not displayed while recording, but they are automatically recorded as...
... [M] (minute), then touch . For midday, set any year up to 12:00 AM. If you do not use your camcorder or change the POWER switch position. • If you set it to [DATE/TIME] (p. 39). CLOCK SET Y MDHM 2 0 0 6 JAN 1 12 : 0 0 AM OK 4 Set [Y] (year) with , then touch [EXEC...touch [EXEC]. In that case, charge the rechargeable battery and then set the date and time, the [CLOCK SET] screen appears every time you turn on your camcorder for the first time. The clock starts. • The date and time are not displayed while recording, but they are automatically recorded as...
Operating Guide
Page 39
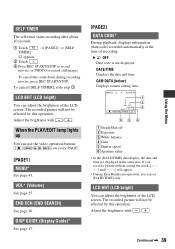
... [SELF TIMER], redo step 1. Adjust the brightness with / . DATE/TIME Displays the date and time. If you record a picture without setting the clock and [--:--:--] will appear. • During Easy Handycam operation, you can adjust the brightness of the LCD screen. Adjust the brightness with / . VOL* (Volume) See page 25. LCD BRT (LCD...
... [SELF TIMER], redo step 1. Adjust the brightness with / . DATE/TIME Displays the date and time. If you record a picture without setting the clock and [--:--:--] will appear. • During Easy Handycam operation, you can adjust the brightness of the LCD screen. Adjust the brightness with / . VOL* (Volume) See page 25. LCD BRT (LCD...
Operating Guide
Page 41
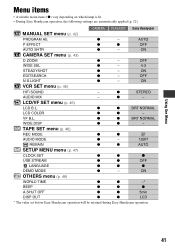
... MODE z - 12BIT REMAIN z z AUTO SETUP MENU menu (p. 47) CLOCK SET z z z USB STREAM z z OFF LANGUAGE z z z DEMO MODE z - ON CAMERA SET menu (p. 43) D ZOOM z - VF B.L. Using the Menu Menu items • Available menu items (z) vary depending on which lamp is lit. • During Easy Handycam operation, the following settings are automatically applied (p. 22). AUTO...
... MODE z - 12BIT REMAIN z z AUTO SETUP MENU menu (p. 47) CLOCK SET z z z USB STREAM z z OFF LANGUAGE z z z DEMO MODE z - ON CAMERA SET menu (p. 43) D ZOOM z - VF B.L. Using the Menu Menu items • Available menu items (z) vary depending on which lamp is lit. • During Easy Handycam operation, the following settings are automatically applied (p. 22). AUTO...
Operating Guide
Page 47
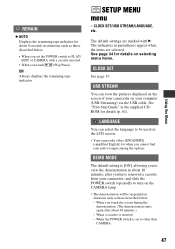
...). USB STREAM You can select the language to other than CAMERA. 47 LANGUAGE You can view the pictures displayed on the screen of your camcorder on your camcorder, and slide the POWER switch repeatedly to PLAY/ EDIT or CAMERA with B. When the POWER switch is set the POWER switch to turn ...on the CAMERA lamp. • The demonstration will be used on selecting menu items. CLOCK SET See page 19. When you touch the screen during the ...
...). USB STREAM You can select the language to other than CAMERA. 47 LANGUAGE You can view the pictures displayed on the screen of your camcorder on your camcorder, and slide the POWER switch repeatedly to PLAY/ EDIT or CAMERA with B. When the POWER switch is set the POWER switch to turn ...on the CAMERA lamp. • The demonstration will be used on selecting menu items. CLOCK SET See page 19. When you touch the screen during the ...
Operating Guide
Page 48
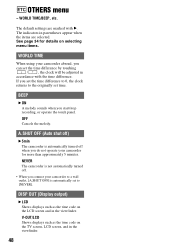
... 5 minutes. A.SHUT OFF (Auto shut off when you connect your camcorder for details on selecting menu items. WORLD TIME When using your camcorder abroad, you can set the time difference by touching / , the clock will be adjusted in the viewfinder. 48 V-OUT/LCD Shows displays such...BEEP B ON A melody sounds when you set time. NEVER The camcorder is not automatically turned off. • When you do not operate your camcorder to a wall outlet, [A.SHUT OFF] is automatically turned off ) B 5min The camcorder is automatically set to the originally set the time difference to 0, the...
... 5 minutes. A.SHUT OFF (Auto shut off when you connect your camcorder for details on selecting menu items. WORLD TIME When using your camcorder abroad, you can set the time difference by touching / , the clock will be adjusted in the viewfinder. 48 V-OUT/LCD Shows displays such...BEEP B ON A melody sounds when you set time. NEVER The camcorder is not automatically turned off. • When you do not operate your camcorder to a wall outlet, [A.SHUT OFF] is automatically turned off ) B 5min The camcorder is automatically set to the originally set the time difference to 0, the...

Operating Guide
Page 79
Use a commercially available AC plug adaptor [a], if necessary, depending on a NTSC system TV with your camcorder in the (OTHERS) menu, then set the clock to 240 V, 50/60 Hz range. System NTSC PAL PAL - Australia, Austria, Belgium, China, Czech Republic, Denmark, Finland, Germany, ... Information 79 Brazil Argentina, Paraguay, Uruguay. AC-L25A/L25B [a] [b] On TV color systems Your camcorder is NTSC system, so its picture can only be viewed on the design of the clock by the time difference you are in Bahama Islands, Bolivia, Canada, Central America, Chile, Colombia,...
Use a commercially available AC plug adaptor [a], if necessary, depending on a NTSC system TV with your camcorder in the (OTHERS) menu, then set the clock to 240 V, 50/60 Hz range. System NTSC PAL PAL - Australia, Austria, Belgium, China, Czech Republic, Denmark, Finland, Germany, ... Information 79 Brazil Argentina, Paraguay, Uruguay. AC-L25A/L25B [a] [b] On TV color systems Your camcorder is NTSC system, so its picture can only be viewed on the design of the clock by the time difference you are in Bahama Islands, Bolivia, Canada, Central America, Chile, Colombia,...
Operating Guide
Page 89
... 12 Pre-installed rechargeable battery 85 Charging time 13 CHG (charge) lamp 12 Click to DVD 62 CLOCK SET 19 Computer 55, 57 Connect Computer 55 TV 32 VCR 32, 49, 51 D D ZOOM... Playback ........ 40 Dubbing 49, 52 DV Interface....... 49, 51, 54, 62 E EASY button 22 Easy Handycam 22, 35 EDITSEARCH 30, 44 END SCH (END SEARCH 30, 68 EXPOSURE 38, 71 F FADER 37,...40 Full charge 13 G Getting started 11 Grip belt 15 H Help 56 HiFi SOUND 45 Holding the camcorder .........15 I Icon .......See Display indicators ID-1/ID-2 44 ImageMixer VCD2 55 Indicators 29 INDOOR 38 "InfoLITHIUM...
... 12 Pre-installed rechargeable battery 85 Charging time 13 CHG (charge) lamp 12 Click to DVD 62 CLOCK SET 19 Computer 55, 57 Connect Computer 55 TV 32 VCR 32, 49, 51 D D ZOOM... Playback ........ 40 Dubbing 49, 52 DV Interface....... 49, 51, 54, 62 E EASY button 22 Easy Handycam 22, 35 EDITSEARCH 30, 44 END SCH (END SEARCH 30, 68 EXPOSURE 38, 71 F FADER 37,...40 Full charge 13 G Getting started 11 Grip belt 15 H Help 56 HiFi SOUND 45 Holding the camcorder .........15 I Icon .......See Display indicators ID-1/ID-2 44 ImageMixer VCD2 55 Indicators 29 INDOOR 38 "InfoLITHIUM...


