
Operating Guide
Page 8
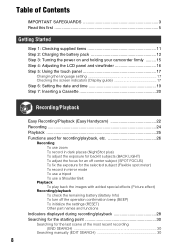
... 11 Step 2: Charging the battery pack 12 Step 3: Turning the power on and holding your camcorder firmly ......... 15 Step 4: Adjusting the LCD panel and viewfinder 16 Step 5: Using the touch ... and time 19 Step 7: Inserting a Cassette 20 Recording/Playback Easy Recording/Playback (Easy Handycam 22 Recording 24 Playback 25 Functions used for recording/playback, etc 26 Recording To use zoom... Info) To turn off the operation confirmation beep (BEEP) To initialize the settings (RESET) Other part names and functions Indicators displayed during recording/playback 28 Searching for the starting...
... 11 Step 2: Charging the battery pack 12 Step 3: Turning the power on and holding your camcorder firmly ......... 15 Step 4: Adjusting the LCD panel and viewfinder 16 Step 5: Using the touch ... and time 19 Step 7: Inserting a Cassette 20 Recording/Playback Easy Recording/Playback (Easy Handycam 22 Recording 24 Playback 25 Functions used for recording/playback, etc 26 Recording To use zoom... Info) To turn off the operation confirmation beep (BEEP) To initialize the settings (RESET) Other part names and functions Indicators displayed during recording/playback 28 Searching for the starting...
Operating Guide
Page 27
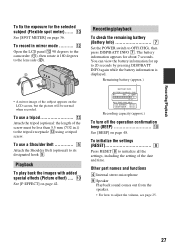
... meter)...... 0 See [SPOT METER] on the LCD screen, but the picture will be less than 5.5 mm (7/32 in mirror mode .......... To initialize the settings (RESET 8 Press RESET 8 to 20 seconds by pressing DISP/BATT INFO again while the battery information is displayed. You can view the battery information for up to initialize... effect) .... 0 See [P EFFECT] on page 48. Recording/Playback To fix the exposure for about 7 seconds. qs Open the LCD panel qs 90 degrees to the camcorder (1), then rotate it 180 degrees to OFF(CHG), then press DISP/BATT INFO 7.
... meter)...... 0 See [SPOT METER] on the LCD screen, but the picture will be less than 5.5 mm (7/32 in mirror mode .......... To initialize the settings (RESET 8 Press RESET 8 to 20 seconds by pressing DISP/BATT INFO again while the battery information is displayed. You can view the battery information for up to initialize... effect) .... 0 See [P EFFECT] on page 48. Recording/Playback To fix the exposure for about 7 seconds. qs Open the LCD panel qs 90 degrees to the camcorder (1), then rotate it 180 degrees to OFF(CHG), then press DISP/BATT INFO 7.
Operating Guide
Page 65
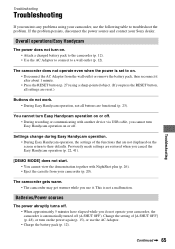
... power does not turn Easy Handycam operation on or off (A.SHUT OFF). The camcorder gets warm. • The camcorder may get warmer while you use it after about 1 minute. • Press the RESET button (p. 27) using your camcorder, the camcorder is automatically turned off . • During ...• Disconnect the AC Adaptor from your Sony dealer. Troubleshooting Troubleshooting If you run into any problems using a sharp-pointed object. (If you press the RESET button, all settings are reset.) Buttons do not operate your camcorder, use the following table to troubleshoot the...
... power does not turn Easy Handycam operation on or off (A.SHUT OFF). The camcorder gets warm. • The camcorder may get warmer while you use it after about 1 minute. • Press the RESET button (p. 27) using your camcorder, the camcorder is automatically turned off . • During ...• Disconnect the AC Adaptor from your Sony dealer. Troubleshooting Troubleshooting If you run into any problems using a sharp-pointed object. (If you press the RESET button, all settings are reset.) Buttons do not operate your camcorder, use the following table to troubleshoot the...
Operating Guide
Page 76
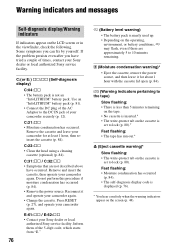
.... Do not perform this procedure if moisture condensation has occurred (p. 84). • Remove the power source. Press RESET (p. 27), and operate your Sony dealer or local authorized Sony service facility. E:61:ss / E:62:ss • Contact your camcorder again. Inform them of the 5-digit code, which starts from "E." 76 E (Battery level warning) • The...
.... Do not perform this procedure if moisture condensation has occurred (p. 84). • Remove the power source. Press RESET (p. 27), and operate your Sony dealer or local authorized Sony service facility. E:61:ss / E:62:ss • Contact your camcorder again. Inform them of the 5-digit code, which starts from "E." 76 E (Battery level warning) • The...
Operating Guide
Page 89
...28 DISP/BATT INFO button 17, 27 Double speed Playback ........ 40 Dubbing 49, 52 DV Interface....... 49, 51, 54, 62 E EASY button 22 Easy Handycam 22, 35 EDITSEARCH 30, 44 END SCH (END SEARCH 30, 68 EXPOSURE 38, 71 F FADER 37, 70 Fireworks 42 First Step Guide 55, 61 Flexible... FOCUS 36, 68 Frame-by-frame Playback ....40 Full charge 13 G Getting started 11 Grip belt 15 H Help 56 HiFi SOUND 45 Holding the camcorder .........15 I Icon .......See Display indicators ID-1/ID-2 44 ImageMixer VCD2 55 Indicators 29 INDOOR 38 "InfoLITHIUM" battery pack 81 Infrared port 26 Initialize...
...28 DISP/BATT INFO button 17, 27 Double speed Playback ........ 40 Dubbing 49, 52 DV Interface....... 49, 51, 54, 62 E EASY button 22 Easy Handycam 22, 35 EDITSEARCH 30, 44 END SCH (END SEARCH 30, 68 EXPOSURE 38, 71 F FADER 37, 70 Fireworks 42 First Step Guide 55, 61 Flexible... FOCUS 36, 68 Frame-by-frame Playback ....40 Full charge 13 G Getting started 11 Grip belt 15 H Help 56 HiFi SOUND 45 Holding the camcorder .........15 I Icon .......See Display indicators ID-1/ID-2 44 ImageMixer VCD2 55 Indicators 29 INDOOR 38 "InfoLITHIUM" battery pack 81 Infrared port 26 Initialize...
Operating Guide
Page 90
... 46 Rec review 31 REC START/STOP button 22, 24 Rechargeable battery pack See Battery Recording 24 Recording capacity 28 Recording time 13 REMAIN 47 RESET button 27 Reversal Playback 40 S S VIDEO cable 32, 49 S VIDEO jack 32, 49 Searching for the starting point 30 SELF TIMER 39 Self-diagnosis display...
... 46 Rec review 31 REC START/STOP button 22, 24 Rechargeable battery pack See Battery Recording 24 Recording capacity 28 Recording time 13 REMAIN 47 RESET button 27 Reversal Playback 40 S S VIDEO cable 32, 49 S VIDEO jack 32, 49 Searching for the starting point 30 SELF TIMER 39 Self-diagnosis display...


