
Operating Guide
Page 4
... set . - When the set , as the service technician to determine that have fallen into the set from the wall outlet and disconnect the antenna or cable system. Refer all servicing to rain or water. - Safety Check Upon completion of any service or repairs to lightning and power-line surges. this set...
... set . - When the set , as the service technician to determine that have fallen into the set from the wall outlet and disconnect the antenna or cable system. Refer all servicing to rain or water. - Safety Check Upon completion of any service or repairs to lightning and power-line surges. this set...
Operating Guide
Page 6
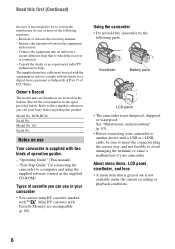
...DCR-HC26 Serial No. Connect the equipment into an outlet on use mini DV cassettes marked with two kinds of cassette you call your camcorder to correct the interference by the following measures: - AC- "Operating Guide" (This manual) - See "Maintenance and precautions" (p. 83). • Before connecting your Sony... dealer regarding this first (Continued) the user is connected. - About menu items, LCD panel, viewfinder, and lens • A menu item that to which the receiver is encouraged to try to another device with a USB or i.LINK cable, be...
...DCR-HC26 Serial No. Connect the equipment into an outlet on use mini DV cassettes marked with two kinds of cassette you call your camcorder to correct the interference by the following measures: - AC- "Operating Guide" (This manual) - See "Maintenance and precautions" (p. 83). • Before connecting your Sony... dealer regarding this first (Continued) the user is connected. - About menu items, LCD panel, viewfinder, and lens • A menu item that to which the receiver is encouraged to try to another device with a USB or i.LINK cable, be...

Operating Guide
Page 11
... supplied. AC Adaptor (1) (p. 12) Rechargeable battery pack NP-FP30 (1) (p. 12, 81) CD-ROM "Picture Package Ver.1.5.1" (1) (p. 55) Operating Guide (This manual) (1) Power cord (1) (p. 12) A/V connecting cable (1) (p. 32, 49) Lens cap (1) (p. 15, 24) • To attach the lens cap Attach the lens cap to the metal fittings of that you have following...
... supplied. AC Adaptor (1) (p. 12) Rechargeable battery pack NP-FP30 (1) (p. 12, 81) CD-ROM "Picture Package Ver.1.5.1" (1) (p. 55) Operating Guide (This manual) (1) Power cord (1) (p. 12) A/V connecting cable (1) (p. 32, 49) Lens cap (1) (p. 15, 24) • To attach the lens cap Attach the lens cap to the metal fittings of that you have following...
Operating Guide
Page 32
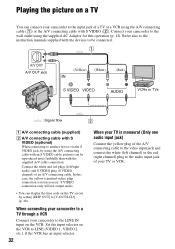
...flow 2 A A/V connecting cable (supplied) B A/V connecting cable with S VIDEO (2). Set the input selector on the VCR to LINE (VIDEO 1, VIDEO 2, etc.), if the VCR has an input selector. 32 When your TV is not necessary. Connect your camcorder to the input jack of an A/V connecting cable. In this operation (p.... 12). Playing the picture on a TV You can connect your camcorder to the wall outlet using the supplied AC Adaptor for this case,...
...flow 2 A A/V connecting cable (supplied) B A/V connecting cable with S VIDEO (2). Set the input selector on the VCR to LINE (VIDEO 1, VIDEO 2, etc.), if the VCR has an input selector. 32 When your TV is not necessary. Connect your camcorder to the input jack of an A/V connecting cable. In this operation (p.... 12). Playing the picture on a TV You can connect your camcorder to the wall outlet using the supplied AC Adaptor for this case,...
Operating Guide
Page 47
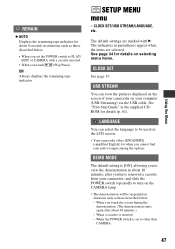
... the supplied CDROM for when you touch the screen during the demonstration. (The demonstration starts again after you have removed a cassette from your camcorder, and slide the POWER switch repeatedly to PLAY/ EDIT or CAMERA with B. DEMO MODE The default setting is [ON], allowing you to ...other than CAMERA. 47 When you cannot find your computer (USB Streaming) via the USB cable. When the POWER switch is inserted. - The indicators in parentheses appear when the items are marked with a cassette inserted. • When you...
... the supplied CDROM for when you touch the screen during the demonstration. (The demonstration starts again after you have removed a cassette from your camcorder, and slide the POWER switch repeatedly to PLAY/ EDIT or CAMERA with B. DEMO MODE The default setting is [ON], allowing you to ...other than CAMERA. 47 When you cannot find your computer (USB Streaming) via the USB cable. When the POWER switch is inserted. - The indicators in parentheses appear when the items are marked with a cassette inserted. • When you...
Operating Guide
Page 49
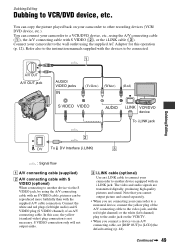
...Editing Dubbing to a VCR/DVD device, etc., using the A/V connecting cable (1), the A/V connecting cable with S VIDEO (2), or the i.LINK cable (3). Connect your camcorder to a monaural device, connect the yellow plug of the A/V connecting cable to the video jack, and the red (right channel) or the white...and sound separately. • When you are transmitted digitally, producing high quality pictures and sound. C i.LINK cable (optional) Use an i.LINK cable to connect your camcorder to other recording devices (VCR/ DVD device, etc.). Continued , 49 The video and audio signals are ...
...Editing Dubbing to a VCR/DVD device, etc., using the A/V connecting cable (1), the A/V connecting cable with S VIDEO (2), or the i.LINK cable (3). Connect your camcorder to a monaural device, connect the yellow plug of the A/V connecting cable to the video jack, and the red (right channel) or the white...and sound separately. • When you are transmitted digitally, producing high quality pictures and sound. C i.LINK cable (optional) Use an i.LINK cable to connect your camcorder to other recording devices (VCR/ DVD device, etc.). Continued , 49 The video and audio signals are ...
Operating Guide
Page 50
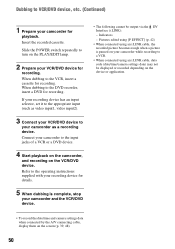
...). 3 Connect your VCR/DVD device to your camcorder as a recording device. Indicators - Pictures edited using [P EFFECT] (p. 42) • When connected using an i.LINK cable, the recorded picture becomes rough when a picture is complete, stop your camcorder and the VCR/DVD device. • The following... for playback. Dubbing to VCR/DVD device, etc. (Continued) 1 Prepare your camcorder for details. 5 When dubbing is paused on your camcorder while recording to a VCR. • When connected using an i.LINK cable, data code (date/time/camera settings data) may not be output via the DV...
...). 3 Connect your VCR/DVD device to your camcorder as a recording device. Indicators - Pictures edited using [P EFFECT] (p. 42) • When connected using an i.LINK cable, the recorded picture becomes rough when a picture is complete, stop your camcorder and the VCR/DVD device. • The following... for playback. Dubbing to VCR/DVD device, etc. (Continued) 1 Prepare your camcorder for details. 5 When dubbing is paused on your camcorder while recording to a VCR. • When connected using an i.LINK cable, data code (date/time/camera settings data) may not be output via the DV...
Operating Guide
Page 51
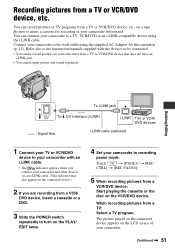
...DVD or an i.LINK-compatible device using the supplied AC Adaptor for recording in your camcorder and other devices via an i.LINK cable. (This indicator may also appear on the connected device.) 2 If you connect your camcorder beforehand. Continued , 51 When recording pictures from a TV or VCR/DVD device, ...TV or VCR/DVD device, etc. The picture played on the connected device appears on the LCD screen of your camcorder to the instruction manuals supplied with an i.LINK cable. • The indicator appears when you are recording from a TV or VCR/DVD device that does not have ...
...DVD or an i.LINK-compatible device using the supplied AC Adaptor for recording in your camcorder and other devices via an i.LINK cable. (This indicator may also appear on the connected device.) 2 If you connect your camcorder beforehand. Continued , 51 When recording pictures from a TV or VCR/DVD device, ...TV or VCR/DVD device, etc. The picture played on the connected device appears on the LCD screen of your camcorder to the instruction manuals supplied with an i.LINK cable. • The indicator appears when you are recording from a TV or VCR/DVD device that does not have ...
Operating Guide
Page 52
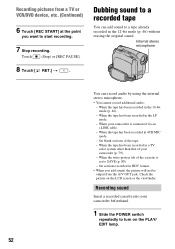
...Check the picture on the PLAY/ EDIT lamp. 52 When the write-protect tab of the cassette is connected via an i.LINK cable. - Recording sound Insert a recorded cassette into your camcorder beforehand. 1 Slide the POWER switch repeatedly to SAVE (p. 80). - When the tape has been recorded in a TV color system.... When the tape has been recorded in 4CH MIC mode. - Touch (Stop) or [REC PAUSE]. 8 Touch [ RET.] t . On blank sections of your camcorder is set to turn on the LCD screen or the viewfinder. On sections recorded in HDV format. • When you add sound, the picture will...
...Check the picture on the PLAY/ EDIT lamp. 52 When the write-protect tab of the cassette is connected via an i.LINK cable. - Recording sound Insert a recorded cassette into your camcorder beforehand. 1 Slide the POWER switch repeatedly to SAVE (p. 80). - When the tape has been recorded in a TV color system.... When the tape has been recorded in 4CH MIC mode. - Touch (Stop) or [REC PAUSE]. 8 Touch [ RET.] t . On blank sections of your camcorder is set to turn on the LCD screen or the viewfinder. On sections recorded in HDV format. • When you add sound, the picture will...

Operating Guide
Page 55
...a computer. - Video Capturing Tool You can view the video and still images copied from your camcorder on a Windows computer from thumbnails. USB Driver - ImageMixer VCD2 - USB cable This method is good for copying video and sound recorded on your favorite video and still images ...differ from video and still images saved on a tape. Picture Package Ver.1.5.1 - A Sony product is compatible with a USB cable. Video and still images are 2 ways to a CD-R. i.LINK cable This method is good for Windows computers. Automatic Music Video Producer You can save video ...
...a computer. - Video Capturing Tool You can view the video and still images copied from your camcorder on a Windows computer from thumbnails. USB Driver - ImageMixer VCD2 - USB cable This method is good for copying video and sound recorded on your favorite video and still images ...differ from video and still images saved on a tape. Picture Package Ver.1.5.1 - A Sony product is compatible with a USB cable. Video and still images are 2 ways to a CD-R. i.LINK cable This method is good for Windows computers. Automatic Music Video Producer You can save video ...
Operating Guide
Page 56
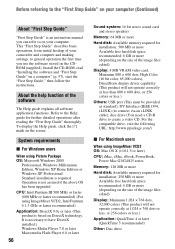
...the "First Step Guide," then follow the instructions. Operation is required. This "First Step Guide" describes basic operations, from initial hookup of your camcorder and computer and making settings, to general operation the first time you can refer to on your computer (Continued) About "First Step Guide" "... 256 colors or less.) Others: USB port (This must be provided as standard), DV Interface (IEEE1394, i.LINK) (to connect via an i.LINK cable), disc drive (You need a CD-R drive to the Help guide for installation: 500 MB or more Available free hard disk space recommended: 6 GB...
...the "First Step Guide," then follow the instructions. Operation is required. This "First Step Guide" describes basic operations, from initial hookup of your camcorder and computer and making settings, to general operation the first time you can refer to on your computer (Continued) About "First Step Guide" "... 256 colors or less.) Others: USB port (This must be provided as standard), DV Interface (IEEE1394, i.LINK) (to connect via an i.LINK cable), disc drive (You need a CD-R drive to the Help guide for installation: 500 MB or more Available free hard disk space recommended: 6 GB...
Operating Guide
Page 57
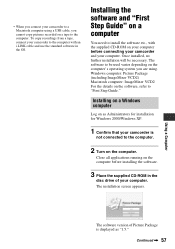
... the supplied CD-ROM on your camcorder is not connected to the computer. 2 Turn on the computer. Once installed, no further installation will be used varies depending on the computer's operating system you are using a USB cable, you connect your computer. Close ...all applications running on the computer before connecting your camcorder and your camcorder to a Macintosh computer using . Windows computer: Picture Package (including ImageMixer VCD2) Macintosh...
... the supplied CD-ROM on your camcorder is not connected to the computer. 2 Turn on the computer. Once installed, no further installation will be used varies depending on the computer's operating system you are using a USB cable, you connect your computer. Close ...all applications running on the computer before connecting your camcorder and your camcorder to a Macintosh computer using . Windows computer: Picture Package (including ImageMixer VCD2) Macintosh...
Operating Guide
Page 62
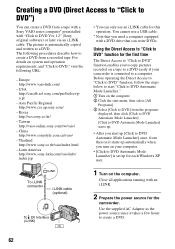
... the camcorder. Close all applications running with a DVD drive that can only use a USB cable. * Note that you to copy pictures recorded on a tape to a DVD easily if your computer. • [Click to DVD Automatic Mode Launcher] is automatically copied and written to a DVD. Korea http://scs.sony.co.... source since it starts up automatically when you turn on your camcorder is connected to a computer. USA http://ciscdb.sel.sony.com/perl/select-pn.pl - Taiwan http://vaio-online.sony.com/tw/vaio/ - Latin America http://www.sony-latin.com/vaio/info/ index.jsp • You can write...
... the camcorder. Close all applications running with a DVD drive that can only use a USB cable. * Note that you to copy pictures recorded on a tape to a DVD easily if your computer. • [Click to DVD Automatic Mode Launcher] is automatically copied and written to a DVD. Korea http://scs.sony.co.... source since it starts up automatically when you turn on your camcorder is connected to a computer. USA http://ciscdb.sel.sony.com/perl/select-pn.pl - Taiwan http://vaio-online.sony.com/tw/vaio/ - Latin America http://www.sony-latin.com/vaio/info/ index.jsp • You can write...
Operating Guide
Page 63
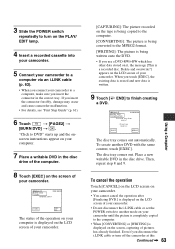
... the computer. 8 Touch [EXEC] on the PLAY/ EDIT lamp. 4 Insert a recorded cassette into your camcorder. 5 Connect your camcorder to a computer via an i.LINK cable (p. 62). • When you connect your camcorder. 60min 0:00:00:00 BURN DVD START CREATE DVD? The disc tray comes out. Then, repeat step... cancel the operation after [Finalizing DVD.] is displayed on the LCD screen of your camcorder. • Do not disconnect the i.LINK cable or set the POWER switch to another mode on your camcorder until the picture is completely copied to the computer. • When [CONVERTING] or...
... the computer. 8 Touch [EXEC] on the PLAY/ EDIT lamp. 4 Insert a recorded cassette into your camcorder. 5 Connect your camcorder to a computer via an i.LINK cable (p. 62). • When you connect your camcorder. 60min 0:00:00:00 BURN DVD START CREATE DVD? The disc tray comes out. Then, repeat step... cancel the operation after [Finalizing DVD.] is displayed on the LCD screen of your camcorder. • Do not disconnect the i.LINK cable or set the POWER switch to another mode on your camcorder until the picture is completely copied to the computer. • When [CONVERTING] or...
Operating Guide
Page 65
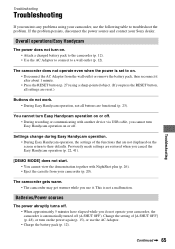
...does not start. • You cannot view the demonstration together with another device via USB cable, you cannot turn Easy Handycam operation on . • Disconnect the AC Adaptor from your camcorder, use the following table to troubleshoot the problem. Change the setting of the functions that are... persists, disconnect the power source and contact your camcorder, the camcorder is automatically turned off . The camcorder does not operate even when the power is not a malfunction. Previously made settings are reset.) Buttons do not operate your Sony dealer. This is set to on or off ...
...does not start. • You cannot view the demonstration together with another device via USB cable, you cannot turn Easy Handycam operation on . • Disconnect the AC Adaptor from your camcorder, use the following table to troubleshoot the problem. Change the setting of the functions that are... persists, disconnect the power source and contact your camcorder, the camcorder is automatically turned off . The camcorder does not operate even when the power is not a malfunction. Previously made settings are reset.) Buttons do not operate your Sony dealer. This is set to on or off ...
Operating Guide
Page 70
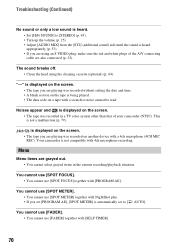
...read. Menu Menu items are grayed out. • You cannot select grayed items in a TV color system other than that of the A/V connecting cable are playing was recorded without setting the date and time. • A blank section on the tape is being played. • The data code...tape with [SELF TIMER]. 70 Troubleshooting (Continued) No sound or only a low sound is heard. • Set [HiFi SOUND] to [ AUTO]. Your camcorder is not a malfunction (p. 79). This is not compatible with a 4ch microphone (4CH MIC REC). Noises appear and is displayed on another device with 4ch...
...read. Menu Menu items are grayed out. • You cannot select grayed items in a TV color system other than that of the A/V connecting cable are playing was recorded without setting the date and time. • A blank section on the tape is being played. • The data code...tape with [SELF TIMER]. 70 Troubleshooting (Continued) No sound or only a low sound is heard. • Set [HiFi SOUND] to [ AUTO]. Your camcorder is not a malfunction (p. 79). This is not compatible with a 4ch microphone (4CH MIC REC). Noises appear and is displayed on another device with 4ch...

Operating Guide
Page 71
... from the [ST1] (original sound) side until the sound is connected to a computer The computer does not recognize your camcorder. • Disconnect the cable from the computer and camcorder, then connect it again securely. • Disconnect USB devices other information appear on the computer. • Disconnect the... cable from the computer and camcorder, restart the computer, then connect them again correctly. Windows: 800 × 600 dots or more, High Color (16 ...
... from the [ST1] (original sound) side until the sound is connected to a computer The computer does not recognize your camcorder. • Disconnect the cable from the computer and camcorder, then connect it again securely. • Disconnect USB devices other information appear on the computer. • Disconnect the... cable from the computer and camcorder, restart the computer, then connect them again correctly. Windows: 800 × 600 dots or more, High Color (16 ...

Operating Guide
Page 72
... [Universal Serial Bus Controller] folder 5 When the [Confirm Device Removal] screen appears, click [OK]. 6 Turn off the power of your camcorder, disconnect the USB cable, then restart the computer. 7 Place the supplied CD-ROM in the OS. The image on tape does not appear on the screen of ... Streaming. • The USB driver has been registered incorrectly as the computer was connected to your camcorder is seeing on the computer. • Disconnect the cable from the computer, turn on the camcorder, then connect it again. • Slide the POWER switch repeatedly to turn on the CAMERA lamp...
... [Universal Serial Bus Controller] folder 5 When the [Confirm Device Removal] screen appears, click [OK]. 6 Turn off the power of your camcorder, disconnect the USB cable, then restart the computer. 7 Place the supplied CD-ROM in the OS. The image on tape does not appear on the screen of ... Streaming. • The USB driver has been registered incorrectly as the computer was connected to your camcorder is seeing on the computer. • Disconnect the cable from the computer, turn on the camcorder, then connect it again. • Slide the POWER switch repeatedly to turn on the CAMERA lamp...
Operating Guide
Page 73
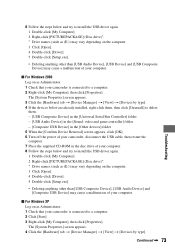
...Double-click [Setup.exe]. • Deleting anything other than [USB Composite Device], [USB Audio Device] and [Composite USB Device] may cause a malfunction of your camcorder is connected to a computer. 2 Click [Start]. 3 Right-click [My Computer], then click [Properties]. The [System Properties] screen appears. 4 Click the ...Other devices] folder 5 When the [Confirm Device Removal] screen appears, click [OK]. 6 Turn off the power of your camcorder, disconnect the USB cable, then restart the computer. 7 Place the supplied CD-ROM in the disc drive of your computer. 8 Follow the steps ...
...Double-click [Setup.exe]. • Deleting anything other than [USB Composite Device], [USB Audio Device] and [Composite USB Device] may cause a malfunction of your camcorder is connected to a computer. 2 Click [Start]. 3 Right-click [My Computer], then click [Properties]. The [System Properties] screen appears. 4 Click the ...Other devices] folder 5 When the [Confirm Device Removal] screen appears, click [OK]. 6 Turn off the power of your camcorder, disconnect the USB cable, then restart the computer. 7 Place the supplied CD-ROM in the disc drive of your computer. 8 Follow the steps ...
Operating Guide
Page 74
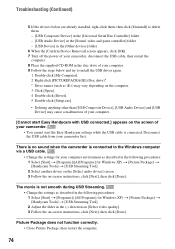
... quality]. 3 Follow the on -screen instructions, click [Next], then click [Done]. There is no sound when the camcorder is connected. Disconnect the USB cable from your camcorder. • You cannot start the Easy Handycam settings while the USB cable is connected to install the USB driver again. 1 Double-click [My Computer]. 2 Right-click [PICTUREPACKAGE] (Disc...
... quality]. 3 Follow the on -screen instructions, click [Next], then click [Done]. There is no sound when the camcorder is connected. Disconnect the USB cable from your camcorder. • You cannot start the Easy Handycam settings while the USB cable is connected to install the USB driver again. 1 Double-click [My Computer]. 2 Right-click [PICTUREPACKAGE] (Disc...


