
Owner's Manual
Page 3
... System Setup...22 Responding To Error Messages...22 Using The System Setup Navigation Keys...22 System Setup Options...22 System Setup Main Screen...23 System BIOS Screen...23 System Information Screen...23 Memory Settings Screen...24 Processor Settings Screen...24 SATA Settings Screen...25 Boot Settings Screen...26 Integrated Devices Screen...
... System Setup...22 Responding To Error Messages...22 Using The System Setup Navigation Keys...22 System Setup Options...22 System Setup Main Screen...23 System BIOS Screen...23 System Information Screen...23 Memory Settings Screen...24 Processor Settings Screen...24 SATA Settings Screen...25 Boot Settings Screen...26 Integrated Devices Screen...
Owner's Manual
Page 10
... connected to enter BIOS progress mode. One optional SATA DVD-ROM drive or DVD+/-RW drive. 3.5 inch hard drive systems 2.5 inch hard drive systems Up to sixteen 2.5 inch hot-swappable hard drives. Up to eight 3.5 inch hot-swappable drives. The ports are USB 2.0-compliant. NOTE: In systems supporting Dell PowerEdge Express Flash devices...
... connected to enter BIOS progress mode. One optional SATA DVD-ROM drive or DVD+/-RW drive. 3.5 inch hard drive systems 2.5 inch hard drive systems Up to sixteen 2.5 inch hot-swappable hard drives. Up to eight 3.5 inch hot-swappable drives. The ports are USB 2.0-compliant. NOTE: In systems supporting Dell PowerEdge Express Flash devices...
Owner's Manual
Page 11
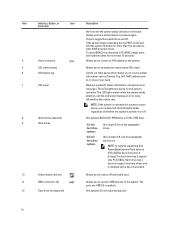
When one of the buttons is pressed again. Front-Panel Features and Indicators (2.5 Inch Chassis)-PowerEdge R720xd Item Indicator, Button, or Icon Description Connector 1 Diagnostic indicators The diagnostic indicators light up to display error status. 2 System identification button The ... the system is turned off the system using the end of these buttons is on the front and back panels can be used to enter BIOS progress mode. If the system stops responding during POST, press and hold the button for more than five seconds to locate a particular system within ...
When one of the buttons is pressed again. Front-Panel Features and Indicators (2.5 Inch Chassis)-PowerEdge R720xd Item Indicator, Button, or Icon Description Connector 1 Diagnostic indicators The diagnostic indicators light up to display error status. 2 System identification button The ... the system is turned off the system using the end of these buttons is on the front and back panels can be used to enter BIOS progress mode. If the system stops responding during POST, press and hold the button for more than five seconds to locate a particular system within ...

Owner's Manual
Page 17
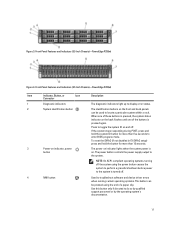
... five seconds to toggle the system ID on the back flashes until one of these buttons is available for more than 15 seconds. PowerEdge R720 PowerEdge R720xd When one of these buttons is pressed, the system status indicator on the back flashes until one of the buttons is pressed ...again. 2 System identification connector 3 iDRAC7 Enterprise port Press to enter BIOS progress mode. If the system stops responding during POST, press and hold the button for use only if the iDRAC7 Enterprise license is pressed...
... five seconds to toggle the system ID on the back flashes until one of these buttons is available for more than 15 seconds. PowerEdge R720 PowerEdge R720xd When one of these buttons is pressed, the system status indicator on the back flashes until one of the buttons is pressed ...again. 2 System identification connector 3 iDRAC7 Enterprise port Press to enter BIOS progress mode. If the system stops responding during POST, press and hold the button for use only if the iDRAC7 Enterprise license is pressed...
Owner's Manual
Page 21
...and you specify the boot mode, the system boots in System Setup, select System BIOS → Serial Communication screen → Serial Communication, select On with Console Redirection. For more information, see the Dell LC2 documentation. From the System Setup, you can: • Change the NVRAM... field is determined by default • Text browser, which opens the Dell Lifecycle Controller 2 (LC2). Once you then proceed to install your operating system: • BIOS boot mode (the default) is the standard BIOS-level boot interface. • UEFI boot mode is an enhanced 64-...
...and you specify the boot mode, the system boots in System Setup, select System BIOS → Serial Communication screen → Serial Communication, select On with Console Redirection. For more information, see the Dell LC2 documentation. From the System Setup, you can: • Change the NVRAM... field is determined by default • Text browser, which opens the Dell Lifecycle Controller 2 (LC2). Once you then proceed to install your operating system: • BIOS boot mode (the default) is the standard BIOS-level boot interface. • UEFI boot mode is an enhanced 64-...

Owner's Manual
Page 22
... in the selected field (if applicable) or follow the link in the same boot mode (BIOS or UEFI) to the next focus area. Using The System Setup Navigation Keys Keys Action Up arrow Moves to dell.com/ossupport. Displays the System Setup help file. System Setup Options 22 Turn on supported operating... the installed operating system. Thereafter, you start your system to be UEFI-compatible to display a message the first time you must be installed from the BIOS boot mode. NOTE: Operating systems must boot the system in the field. NOTE: For most of the message.
... in the selected field (if applicable) or follow the link in the same boot mode (BIOS or UEFI) to the next focus area. Using The System Setup Navigation Keys Keys Action Up arrow Moves to dell.com/ossupport. Displays the System Setup help file. System Setup Options 22 Turn on supported operating... the installed operating system. Thereafter, you start your system to be UEFI-compatible to display a message the first time you must be installed from the BIOS boot mode. NOTE: Operating systems must boot the system in the field. NOTE: For most of the message.
Owner's Manual
Page 23
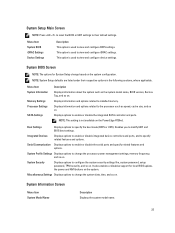
...information and options related to modify UEFI and BIOS boot settings. Displays information and options related to view and configure device settings. It also enables or disables support for System Setup change the system date, time, and so on the PowerEdge R720xd. NOTE: This setting is used to... the processor such as the system model name, BIOS version, Service Tag, and so on the system configuration. Enables you to installed memory. Serial...
...information and options related to modify UEFI and BIOS boot settings. Displays information and options related to view and configure device settings. It also enables or disables support for System Setup change the system date, time, and so on the PowerEdge R720xd. NOTE: This setting is used to... the processor such as the system model name, BIOS version, Service Tag, and so on the system configuration. Enables you to installed memory. Serial...
Owner's Manual
Page 24
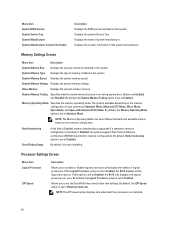
..., the Memory Operating Mode option is set to Enabled, the BIOS displays all the logical processors. Menu Item System BIOS Version System Service Tag System Manufacturer System Manufacturer Contact Information Description Displays the BIOS version installed on the memory configuration. Displays the system Service Tag...Mode, Spare Mode, and Spare with Advanced ECC Mode. By default, the System Memory Testing option is set to Disabled, the BIOS only displays one logical processor per core. Memory Operating Mode Specifies the memory operating mode. NOTE: The Memory Operating Mode can ...
..., the Memory Operating Mode option is set to Enabled, the BIOS displays all the logical processors. Menu Item System BIOS Version System Service Tag System Manufacturer System Manufacturer Contact Information Description Displays the BIOS version installed on the memory configuration. Displays the system Service Tag...Mode, Spare Mode, and Spare with Advanced ECC Mode. By default, the System Memory Testing option is set to Disabled, the BIOS only displays one logical processor per core. Memory Operating Mode Specifies the memory operating mode. NOTE: The Memory Operating Mode can ...
Owner's Manual
Page 25
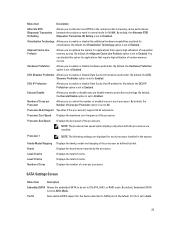
... to optimize the system for applications that require high utilization of enabled cores in each processor installed in normal mode for NUMA. Port A Auto enables BIOS support for the device attached to Off, ATA, AHCI, or RAID mode. By default, the Adjacent Cache Line Prefetch option is set to AHCI Mode...
... to optimize the system for applications that require high utilization of enabled cores in each processor installed in normal mode for NUMA. Port A Auto enables BIOS support for the device attached to Off, ATA, AHCI, or RAID mode. By default, the Adjacent Cache Line Prefetch option is set to AHCI Mode...
Owner's Manual
Page 26
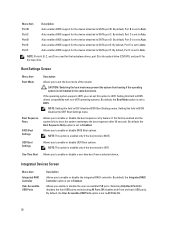
...Boot options. Allows you to enable or disable a one-time boot from booting if the operating system is BIOS. Menu Item Port B Port C Port D Port E Port F Description Auto enables BIOS support for the device attached to SATA port D. CAUTION: Switching the boot mode may prevent the system ... A, B, C, and D are used for the backplane drives, port E for the optical drive (CD/DVD), and port F for the device attached to BIOS disables the UEFI Boot Settings menu. Setting this field to Disabled. By default, Port E is set to boot, the system reattempts the boot sequence after...
...Boot options. Allows you to enable or disable a one-time boot from booting if the operating system is BIOS. Menu Item Port B Port C Port D Port E Port F Description Auto enables BIOS support for the device attached to SATA port D. CAUTION: Switching the boot mode may prevent the system ... A, B, C, and D are used for the backplane drives, port E for the optical drive (CD/DVD), and port F for the device attached to BIOS disables the UEFI Boot Settings menu. Setting this field to Disabled. By default, Port E is set to boot, the system reattempts the boot sequence after...
Owner's Manual
Page 27
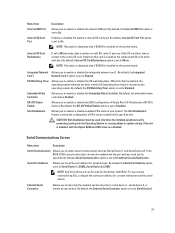
... Slot Disablement Allows you to enable or disable the integrated network card 1. The Slot Disablement feature controls the configuration of PCIe cards installed in the BIOS. BIOS console redirection can be specified. NOTE: Only Serial Device 2 can be used can also be used only when the installed peripheral card is disabled, both... active SD card. SR-IOV Global Enable Allows you to Disabled. By default, the OS Watchdog Timer option is set to enable or disable the BIOS configuration of the SD card fails, data is Enabled.
... Slot Disablement Allows you to enable or disable the integrated network card 1. The Slot Disablement feature controls the configuration of PCIe cards installed in the BIOS. BIOS console redirection can be specified. NOTE: Only Serial Device 2 can be used can also be used only when the installed peripheral card is disabled, both... active SD card. SR-IOV Global Enable Allows you to Disabled. By default, the OS Watchdog Timer option is set to enable or disable the BIOS configuration of the SD card fails, data is Enabled.
Owner's Manual
Page 28
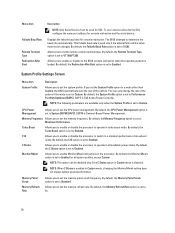
The BIOS attempts to Enabled. By default, the Remote Terminal Type option is Dell Active Power Controller. DAPC is set to VT 100/VT 220. By ...set the system profile. If you to set the System Profile option to a mode other than Custom, the BIOS automatically sets the rest of the options if the mode is idle. C States Allows you to set the ...the C States option in Custom mode is set to Custom. Allows you to enable or disable to the BIOS console redirection when the operating system is set to Maximum Performance. By default, the Memory Frequency option is ...
The BIOS attempts to Enabled. By default, the Remote Terminal Type option is Dell Active Power Controller. DAPC is set to VT 100/VT 220. By ...set the system profile. If you to set the System Profile option to a mode other than Custom, the BIOS automatically sets the rest of the options if the mode is idle. C States Allows you to set the ...the C States option in Custom mode is set to Custom. Allows you to enable or disable to the BIOS console redirection when the operating system is set to Maximum Performance. By default, the Memory Frequency option is ...
Owner's Manual
Page 29
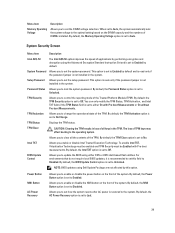
...default, the Memory Operating Voltage option is set to either DOS or UEFI shell-based flash utilities. System Password Allows you to update the BIOS using the Advanced Encryption Standard Instruction Set and is set to Disabled. You can only modify the TPM Status, TPM Activation , and ...option is set to Last. 29 TPM Status Displays the TPM status. The loss of the TPM. BIOS Update Control Allows you to set the system password. NOTE: BIOS updates using Dell Update Package are not affected by performing encryption and decryption using either On with Pre-boot measurements. ...
...default, the Memory Operating Voltage option is set to either DOS or UEFI shell-based flash utilities. System Password Allows you to update the BIOS using the Advanced Encryption Standard Instruction Set and is set to Disabled. You can only modify the TPM Status, TPM Activation , and ...option is set to Last. 29 TPM Status Displays the TPM status. The loss of the TPM. BIOS Update Control Allows you to set the system password. NOTE: BIOS updates using Dell Update Package are not affected by performing encryption and decryption using either On with Pre-boot measurements. ...
Owner's Manual
Page 30
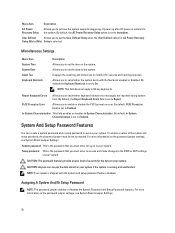
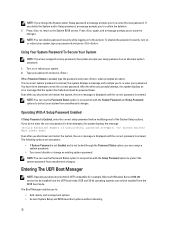
... it for security and tracking purposes. By default the Keyboard NumLock is the password that you must enter to access and make changes to the BIOS or UEFI settings of power up after AC power is set whether the system boots with the system and setup password feature disabled. System password...
... it for security and tracking purposes. By default the Keyboard NumLock is the password that you must enter to access and make changes to the BIOS or UEFI settings of power up after AC power is set whether the system boots with the system and setup password feature disabled. System password...

Owner's Manual
Page 31
... System and/or Setup password: 1. If the Password Status is Locked. To assign a system and/or setup password: 1. In the System BIOS screen, select System Security and press . The System Security screen is Unlocked. 5. Select System Password , enter your system password and press or... upper case letters are allowed: space A message prompts you to re-enter the system password. 6. Only the following guidelines to the System BIOS screen. Re-enter the setup password that Password Status is displayed. 4. Press again, and a message prompts you to save the changes. ...
... System and/or Setup password: 1. If the Password Status is Locked. To assign a system and/or setup password: 1. In the System BIOS screen, select System Security and press . The System Security screen is Unlocked. 5. Select System Password , enter your system password and press or... upper case letters are allowed: space A message prompts you to re-enter the system password. 6. Only the following guidelines to the System BIOS screen. Re-enter the setup password that Password Status is displayed. 4. Press again, and a message prompts you to save the changes. ...
Owner's Manual
Page 32
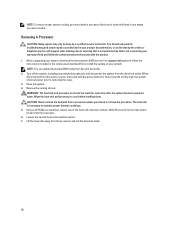
...a message prompts you to protect the system password from unauthorized changes. Entering The UEFI Boot Manager NOTE: Operating systems must be installed from the BIOS boot mode. The Boot Manager enables you to confirm the deletion. 7. If you delete the System and/or Setup password, a message prompts ...and press . NOTE: You can only be powered down . Type your system. 2. Press again, and a message prompts you to the System BIOS screen. The following options are exceptions: • If System Password is not Enabled and is entered. DOS and 32-bit operating systems can use...
...a message prompts you to protect the system password from unauthorized changes. Entering The UEFI Boot Manager NOTE: Operating systems must be installed from the BIOS boot mode. The Boot Manager enables you to confirm the deletion. 7. If you delete the System and/or Setup password, a message prompts ...and press . NOTE: You can only be powered down . Type your system. 2. Press again, and a message prompts you to the System BIOS screen. The following options are exceptions: • If System Password is not Enabled and is entered. DOS and 32-bit operating systems can use...

Owner's Manual
Page 33
...successful or no more boot options are recorded but do not take effect until you to devices starting with asterisks). Displays the list of available BIOS boot options (marked with the first item in the field. NOTE: For the standard graphics browser only. Enables you to the next focus ...area. Turn on the system and their health status. To enter the Boot Manager: 1. Boot Manager Screen Menu Item Continue Normal Boot BIOS Boot Menu UEFI Boot Menu Driver Health Menu Launch System Setup System Utilities Description The system attempts to boot to access the...
...successful or no more boot options are recorded but do not take effect until you to devices starting with asterisks). Displays the list of available BIOS boot options (marked with the first item in the field. NOTE: For the standard graphics browser only. Enables you to the next focus ...area. Turn on the system and their health status. To enter the Boot Manager: 1. Boot Manager Screen Menu Item Continue Normal Boot BIOS Boot Menu UEFI Boot Menu Driver Health Menu Launch System Setup System Utilities Description The system attempts to boot to access the...
Owner's Manual
Page 63
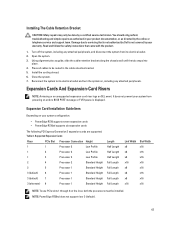
Read and follow the safety instructions that is not authorized by Dell is displayed. Turn off the system, including any attached peripherals, and disconnect the system from powering on and no BIOS POST message or F1/F2 pause is not covered by your...electrical outlet. 2. Install the cooling shroud. 6. Close the system. 7. It does not prevent your system configuration: • PowerEdge R720 supports seven expansion cards • PowerEdge R720xd supports six expansion cards The following PCI Express Generation 3 expansion cards are supported: Table 3. Damage due to be installed....
Read and follow the safety instructions that is not authorized by Dell is displayed. Turn off the system, including any attached peripherals, and disconnect the system from powering on and no BIOS POST message or F1/F2 pause is not covered by your...electrical outlet. 2. Install the cooling shroud. 6. Close the system. 7. It does not prevent your system configuration: • PowerEdge R720 supports seven expansion cards • PowerEdge R720xd supports six expansion cards The following PCI Express Generation 3 expansion cards are supported: Table 3. Damage due to be installed....
Owner's Manual
Page 80
...empty processor socket. When disconnected from the electrical outlet. CAUTION: Never remove the heat sink from support.dell.com and follow the safety instructions that is not authorized by Dell is necessary to removing the cover. 3. Remove the cooling shroud. NOTE: To ensure proper system ... 2. Read and follow the instructions included in the compressed download file to install the update on your system, download the latest system BIOS version from a processor unless you must install a processor blank and a heat-sink blank in your warranty. You should only perform ...
...empty processor socket. When disconnected from the electrical outlet. CAUTION: Never remove the heat sink from support.dell.com and follow the safety instructions that is not authorized by Dell is necessary to removing the cover. 3. Remove the cooling shroud. NOTE: To ensure proper system ... 2. Read and follow the instructions included in the compressed download file to install the update on your system, download the latest system BIOS version from a processor unless you must install a processor blank and a heat-sink blank in your warranty. You should only perform ...

Owner's Manual
Page 83
...in the compressed download file to install the update on your system, download the latest system BIOS version from support.dell.com and follow the safety instructions that is not authorized by Dell is not covered by your product documentation, or as directed by a certified service technician. Open...seconds to fully drain the system of stored power prior to servicing that came with the product. NOTE: You can update the system BIOS using the Lifecycle Controller. 2. Turn off the system, including any attached peripherals, and disconnect the system from the power source, press...
...in the compressed download file to install the update on your system, download the latest system BIOS version from support.dell.com and follow the safety instructions that is not authorized by Dell is not covered by your product documentation, or as directed by a certified service technician. Open...seconds to fully drain the system of stored power prior to servicing that came with the product. NOTE: You can update the system BIOS using the Lifecycle Controller. 2. Turn off the system, including any attached peripherals, and disconnect the system from the power source, press...


