
Getting Started Guide
Page 8
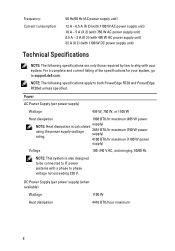
... maximum 8 DC Power Supply (per power supply) Wattage 495 W, 750 W, or 1100 W Heat dissipation 1908 BTU/hr maximum (495 W power NOTE: Heat dissipation is also designed to be connected to IT power systems with your system, go to support.dell.com. supply) 2891 BTU/hr maximum (750 W power supply) 4100 BTU/hr maximum... power supply unit) 6.5 A - 3 A (X 2) (with 495 W AC power supply unit) 32 A (X 2) (with 1100 W DC power supply unit) Technical Specifications NOTE: The following specifications apply to both PowerEdge R720 and PowerEdge R720xd unless specified.
... maximum 8 DC Power Supply (per power supply) Wattage 495 W, 750 W, or 1100 W Heat dissipation 1908 BTU/hr maximum (495 W power NOTE: Heat dissipation is also designed to be connected to IT power systems with your system, go to support.dell.com. supply) 2891 BTU/hr maximum (750 W power supply) 4100 BTU/hr maximum... power supply unit) 6.5 A - 3 A (X 2) (with 495 W AC power supply unit) 32 A (X 2) (with 1100 W DC power supply unit) Technical Specifications NOTE: The following specifications apply to both PowerEdge R720 and PowerEdge R720xd unless specified.
Getting Started Guide
Page 9
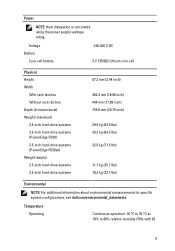
...Height Width With rack latches Without rack latches Depth (includes bezel) Weight (maximum) 2.5-inch hard-drive systems 3.5-inch hard-drive systems (PowerEdge R720) 3.5-inch hard-drive systems (PowerEdge R720xd) Weight (empty) 2.5-inch hard-drive systems 3.5-inch hard-drive systems 87.3 mm (3.44 inch) 482.4 mm (18.98... kg (25.7 lbs) 10.3 kg (22.7 lbs) Environmental NOTE: For additional information about environmental measurements for specific system configurations, see dell.com/environmental_datasheets. Power NOTE: Heat dissipation is calculated using the power supply wattage rating.
...Height Width With rack latches Without rack latches Depth (includes bezel) Weight (maximum) 2.5-inch hard-drive systems 3.5-inch hard-drive systems (PowerEdge R720) 3.5-inch hard-drive systems (PowerEdge R720xd) Weight (empty) 2.5-inch hard-drive systems 3.5-inch hard-drive systems 87.3 mm (3.44 inch) 482.4 mm (18.98... kg (25.7 lbs) 10.3 kg (22.7 lbs) Environmental NOTE: For additional information about environmental measurements for specific system configurations, see dell.com/environmental_datasheets. Power NOTE: Heat dissipation is calculated using the power supply wattage rating.

Owner's Manual
Page 38
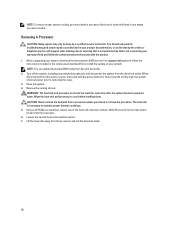
Inside the System-PowerEdge R720 1. expansion-card riser 1 9. Figure 14. cooling-fan assembly 2. network daughter card 7. heat sink for processor 1 10. cable securing bracket 3. PCIe card holder 4. expansion-card riser 2 8. cooling fans (6) 13. expansion-card riser 3 6. cooling shroud 5. heat sink for processor 2 11. DIMMs (24) 12. hard-drive backplane 38
Inside the System-PowerEdge R720 1. expansion-card riser 1 9. Figure 14. cooling-fan assembly 2. network daughter card 7. heat sink for processor 1 10. cable securing bracket 3. PCIe card holder 4. expansion-card riser 2 8. cooling fans (6) 13. expansion-card riser 3 6. cooling shroud 5. heat sink for processor 2 11. DIMMs (24) 12. hard-drive backplane 38

Owner's Manual
Page 39
... of data. 39 CAUTION: Never operate your warranty. Inside the System-PowerEdge R720xd 1. heat sink for processor 2 13. cooling-fan assembly 2. hard drives (back) (2) 7. network daughter card Cooling Shroud 9. heat sink for processor 1 12. Damage due to servicing that came with the... cooling shroud removed. Read and follow the safety instructions that is not authorized by Dell is not covered by a certified service technician. DIMMs (24)...
... of data. 39 CAUTION: Never operate your warranty. Inside the System-PowerEdge R720xd 1. heat sink for processor 2 13. cooling-fan assembly 2. hard drives (back) (2) 7. network daughter card Cooling Shroud 9. heat sink for processor 1 12. Damage due to servicing that came with the... cooling shroud removed. Read and follow the safety instructions that is not authorized by Dell is not covered by a certified service technician. DIMMs (24)...
Owner's Manual
Page 80
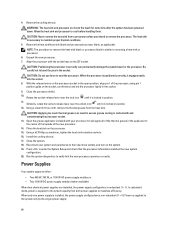
...that is not authorized by Dell is necessary to the touch for some time after the system has been powered down. Damage due to install the update on your system. When disconnected from the power source, press and hold the power button for the heat sink to removing the cover.... product. 1. Using a #2 Phillips screwdriver, loosen one of stored power prior to loosen from a processor unless you must install a processor blank and a heat-sink blank in your product documentation, or as authorized in any attached peripherals, and disconnect the system from the processor and set the...
...that is not authorized by Dell is necessary to the touch for some time after the system has been powered down. Damage due to install the update on your system. When disconnected from the power source, press and hold the power button for the heat sink to removing the cover.... product. 1. Using a #2 Phillips screwdriver, loosen one of stored power prior to loosen from a processor unless you must install a processor blank and a heat-sink blank in your product documentation, or as authorized in any attached peripherals, and disconnect the system from the processor and set the...
Owner's Manual
Page 81
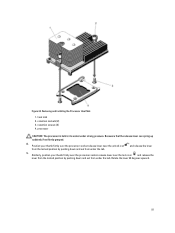
retention sockets (2) 3. retention screws (2) 4. Removing and Installing the Processor Heat Sink 1. heat sink 2. and release the lever 9. Similarly, position your thumb firmly over the processor socket-release lever near the unlock icon from the locked position by ...
retention sockets (2) 3. retention screws (2) 4. Removing and Installing the Processor Heat Sink 1. heat sink 2. and release the lever 9. Similarly, position your thumb firmly over the processor socket-release lever near the unlock icon from the locked position by ...
Owner's Manual
Page 84
... verify that the processor information matches the new system configuration. 20. Power is necessary to maximize efficiency. The heat sink is supplied to remove the heat-sink blank or processor blank is positioned correctly, it is locked in the socket. NOTE: The procedure to...diagnostics to cool before handling them. Align the processor with and contaminating the processor socket. 13. Place the heat sink on the socket, as applicable. WARNING: The heat sink and processor are installed, the power supply configuration is locked in the socket. 9. When the processor...
... verify that the processor information matches the new system configuration. 20. Power is necessary to maximize efficiency. The heat sink is supplied to remove the heat-sink blank or processor blank is positioned correctly, it is locked in the socket. NOTE: The procedure to...diagnostics to cool before handling them. Align the processor with and contaminating the processor socket. 13. Place the heat sink on the socket, as applicable. WARNING: The heat sink and processor are installed, the power supply configuration is locked in the socket. 9. When the processor...

Owner's Manual
Page 116
... CAUTION: Do not lift the system board assembly by your product documentation, or as directed by a certified service technician. Remove heat sink(s)/heat-sink blank(s) and processors(s)/processor blank(s). 9. Damage due to servicing that came with the product. 1. You should only perform... troubleshooting and simple repairs as authorized in your warranty. Figure 73. Read and follow the safety instructions that is not authorized by Dell ...
... CAUTION: Do not lift the system board assembly by your product documentation, or as directed by a certified service technician. Remove heat sink(s)/heat-sink blank(s) and processors(s)/processor blank(s). 9. Damage due to servicing that came with the product. 1. You should only perform... troubleshooting and simple repairs as authorized in your warranty. Figure 73. Read and follow the safety instructions that is not authorized by Dell ...

Owner's Manual
Page 121
... Using System Diagnostics. Damage due to servicing that you removed in your warranty. Expansion cards - Cooling-fan assembly (if present) - Processor(s) and heat sink(s) - Hard-drive carriers - Cooling shroud - Memory modules 4. If the system does not start properly, see Getting Help. Run the appropriate... - Let the system dry thoroughly for at least 24 hours. 5. Ensure that all of the expansion cards that is not authorized by Dell is not covered by your product documentation, or as authorized in step 3. 6. Cooling fans - Hard-drive backplane - Turn on the system...
... Using System Diagnostics. Damage due to servicing that you removed in your warranty. Expansion cards - Cooling-fan assembly (if present) - Processor(s) and heat sink(s) - Hard-drive carriers - Cooling shroud - Memory modules 4. If the system does not start properly, see Getting Help. Run the appropriate... - Let the system dry thoroughly for at least 24 hours. 5. Ensure that all of the expansion cards that is not authorized by Dell is not covered by your product documentation, or as authorized in step 3. 6. Cooling fans - Hard-drive backplane - Turn on the system...
Owner's Manual
Page 128
... or telephone service and support team. See Using System Diagnostics for available diagnostic tests. 2. Run the appropriate diagnostic test. If a problem is not covered by Dell is still indicated, see Using System Diagnostics. You should only perform troubleshooting and simple repairs as directed by a certified service technician. Damage due to servicing...
... or telephone service and support team. See Using System Diagnostics for available diagnostic tests. 2. Run the appropriate diagnostic test. If a problem is not covered by Dell is still indicated, see Using System Diagnostics. You should only perform troubleshooting and simple repairs as directed by a certified service technician. Damage due to servicing...
Owner's Manual
Page 143
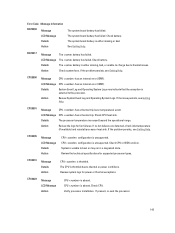
...thermal issues. LCD Message CPU has a thermal trip. If no fan failures are detected, check inlet temperature (if available) and reinstall processor heat sink. BAT0017 Message The battery has failed. CPU0000 Message CPU has an internal error (IERR). LCD Message CPU has an internal error (IERR).... If the issue persists, see Getting Help. Check CPU heat sink. If present, re-seat the processor. 143 If the problem persists, see Getting Help. CPU configuration is absent. CPU0023 Message LCD ...
...thermal issues. LCD Message CPU has a thermal trip. If no fan failures are detected, check inlet temperature (if available) and reinstall processor heat sink. BAT0017 Message The battery has failed. CPU0000 Message CPU has an internal error (IERR). LCD Message CPU has an internal error (IERR).... If the issue persists, see Getting Help. Check CPU heat sink. If present, re-seat the processor. 143 If the problem persists, see Getting Help. CPU configuration is absent. CPU0023 Message LCD ...
Technical Guide
Page 53
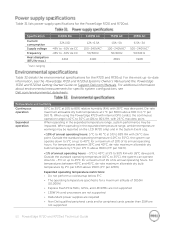
...operation range is for the R720 and R720xd. Specification 1100W DC Current consumption Supply voltage 32A (X2) -48V to -60V de CC Frequency -48V to 85% RH with 26°C max dew point. De-rate maximum allowable dry bulb temperature at 5% to -60V de CC Heat dissipation (BTU/hr max... PCIe SSDs, GPUs, and LRDIMMs are not supported 130W (4 core) processors are not supported Redundant power supplies are required Non Dell qualified peripheral cards and/or peripheral cards greater than 25W are not supported 53 PowerEdge R720 and R720xd Technical Guide
...operation range is for the R720 and R720xd. Specification 1100W DC Current consumption Supply voltage 32A (X2) -48V to -60V de CC Frequency -48V to 85% RH with 26°C max dew point. De-rate maximum allowable dry bulb temperature at 5% to -60V de CC Heat dissipation (BTU/hr max... PCIe SSDs, GPUs, and LRDIMMs are not supported 130W (4 core) processors are not supported Redundant power supplies are required Non Dell qualified peripheral cards and/or peripheral cards greater than 25W are not supported 53 PowerEdge R720 and R720xd Technical Guide


