

Getting Started Guide
Page 7
...your system, including those pertaining to troubleshoot the system and install or replace system components. Obtaining Technical Assistance If you purchased with the requirements of the official Mexican standards (NOM): Importer: Dell Inc. Other Information You May Need WARNING: See the safety... a procedure in other documents. NOTE: Always check for more information. Dell offers comprehensive hardware training and certification. de México, S.A. Warranty information may not be included within this guide or if the system does not perform as a separate document. •...
...your system, including those pertaining to troubleshoot the system and install or replace system components. Obtaining Technical Assistance If you purchased with the requirements of the official Mexican standards (NOM): Importer: Dell Inc. Other Information You May Need WARNING: See the safety... a procedure in other documents. NOTE: Always check for more information. Dell offers comprehensive hardware training and certification. de México, S.A. Warranty information may not be included within this guide or if the system does not perform as a separate document. •...

Owner's Manual
Page 20
...V input voltages. Flashing green When hot-adding a power supply, this document or as a separate document. • The Getting Started Guide provides an overview of efficiency, feature set, health status, and supported voltage). Other Information You May Need WARNING: See the safety and...Always check for configuring and managing your system, including those pertaining to install your system into a rack, if required. • Any media that provides documentation and tools for updates on support.dell.com/manuals and read the updates first because they can output different ...
...V input voltages. Flashing green When hot-adding a power supply, this document or as a separate document. • The Getting Started Guide provides an overview of efficiency, feature set, health status, and supported voltage). Other Information You May Need WARNING: See the safety and...Always check for configuring and managing your system, including those pertaining to install your system into a rack, if required. • Any media that provides documentation and tools for updates on support.dell.com/manuals and read the updates first because they can output different ...
Owner's Manual
Page 58
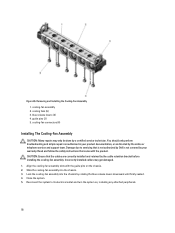
... into the chassis. 3. blue release levers (2) 4. guide pins (2) 5. Reconnect the system to servicing that the cables are correctly installed and retained by the cable retention bracket before installing the cooling-fan assembly. Removing and Installing the Cooling-Fan Assembly 1. You should only perform troubleshooting...cooling fans (6) 3. Read and follow the safety instructions that came with the guide pins on , including any attached peripherals. 58 Figure 26. CAUTION: Ensure that is not authorized by Dell is not covered by the online or telephone service and support team. Align ...
... into the chassis. 3. blue release levers (2) 4. guide pins (2) 5. Reconnect the system to servicing that the cables are correctly installed and retained by the cable retention bracket before installing the cooling-fan assembly. Removing and Installing the Cooling-Fan Assembly 1. You should only perform troubleshooting...cooling fans (6) 3. Read and follow the safety instructions that came with the guide pins on , including any attached peripherals. 58 Figure 26. CAUTION: Ensure that is not authorized by Dell is not covered by the online or telephone service and support team. Align ...
Owner's Manual
Page 63
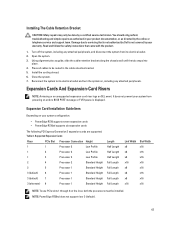
... the safety instructions that is not authorized by Dell is displayed. Open the system. 3. Expansion Cards And Expansion-Card Risers NOTE: A missing or an unsupported expansion-card riser logs an SEL event. NOTE: PowerEdge R720xd does not support riser 3 (default). 63...system configuration: • PowerEdge R720 supports seven expansion cards • PowerEdge R720xd supports six expansion cards The following PCI Express Generation 3 expansion cards are supported: Table 3. Install the cooling shroud. 6. It does not prevent your product documentation, or as guide, slide the cable ...
... the safety instructions that is not authorized by Dell is displayed. Open the system. 3. Expansion Cards And Expansion-Card Risers NOTE: A missing or an unsupported expansion-card riser logs an SEL event. NOTE: PowerEdge R720xd does not support riser 3 (default). 63...system configuration: • PowerEdge R720 supports seven expansion cards • PowerEdge R720xd supports six expansion cards The following PCI Express Generation 3 expansion cards are supported: Table 3. Install the cooling shroud. 6. It does not prevent your product documentation, or as guide, slide the cable ...

Owner's Manual
Page 68
..., lift the expansion-card riser from the electrical outlet and peripherals. 2. Figure 33. expansion-card riser 1 cage 2. riser guide-back (left) 5. riser guide-front 68 If applicable, connect any attached peripherals, and disconnect the system from the riser connector on , including any device drivers...card. Damage due to its electrical outlet and turn the system on the system board. Install any attached peripherals. 14. You should only perform troubleshooting and simple repairs as directed by Dell is fully seated. 9. NOTE: The expansion-card riser 1 can be done by a ...
..., lift the expansion-card riser from the electrical outlet and peripherals. 2. Figure 33. expansion-card riser 1 cage 2. riser guide-back (left) 5. riser guide-front 68 If applicable, connect any attached peripherals, and disconnect the system from the riser connector on , including any device drivers...card. Damage due to its electrical outlet and turn the system on the system board. Install any attached peripherals. 14. You should only perform troubleshooting and simple repairs as directed by Dell is fully seated. 9. NOTE: The expansion-card riser 1 can be done by a ...
Owner's Manual
Page 69
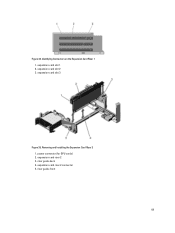
expansion-card slot 1 2. power connector (for GPU cards) 2. expansion-card slot 2 3. Removing and Installing the Expansion Card Riser 2 1. expansion-card slot 3 Figure 35. riser guide-back 4. riser guide-front 69 expansion-card riser 2 3. Figure 34. Identifying Connectors on the Expansion Card Riser 1 1. expansion-card riser 2 connector 5.
expansion-card slot 1 2. power connector (for GPU cards) 2. expansion-card slot 2 3. Removing and Installing the Expansion Card Riser 2 1. expansion-card slot 3 Figure 35. riser guide-back 4. riser guide-front 69 expansion-card riser 2 3. Figure 34. Identifying Connectors on the Expansion Card Riser 1 1. expansion-card riser 2 connector 5.
Owner's Manual
Page 70
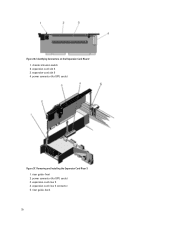
expansion-card slot 5 4. Removing and Installing the Expansion Card Riser 3 1. riser guide-front 2. expansion-card slot 4 3. power connector (for GPU cards) 3. power connector (for GPU cards) Figure 37. Figure 36. expansion-card riser 3 connector 5. expansion-card riser 3 4. riser guide-back 70 Identifying Connectors on the Expansion Card Riser 2 1. chassis intrusion switch 2.
expansion-card slot 5 4. Removing and Installing the Expansion Card Riser 3 1. riser guide-front 2. expansion-card slot 4 3. power connector (for GPU cards) 3. power connector (for GPU cards) Figure 37. Figure 36. expansion-card riser 3 connector 5. expansion-card riser 3 4. riser guide-back 70 Identifying Connectors on the Expansion Card Riser 2 1. chassis intrusion switch 2.
Owner's Manual
Page 71
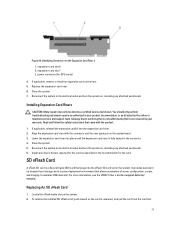
...the system. Align the expansion-card riser with the product. 1. For more information, see the iDRAC7 User's Guide at support.dell.com/ manuals. Figure 38. To remove the installed SD vFlash card, push inward on , including any device drivers required for GPU cards) 4. expansion-card ...Identifying Connectors on -demand local storage and a custom deployment environment that came with the connector and the riser guide pin on , including any attached peripherals. Installing Expansion-Card Risers CAUTION: Many repairs may only be done by the online or telephone service and support team...
...the system. Align the expansion-card riser with the product. 1. For more information, see the iDRAC7 User's Guide at support.dell.com/ manuals. Figure 38. To remove the installed SD vFlash card, push inward on , including any device drivers required for GPU cards) 4. expansion-card ...Identifying Connectors on -demand local storage and a custom deployment environment that came with the connector and the riser guide pin on , including any attached peripherals. Installing Expansion-Card Risers CAUTION: Many repairs may only be done by the online or telephone service and support team...
Owner's Manual
Page 84
... on the processor. 15. Close the system. 18. Press to the center of the topside of the processor, using pin 1 position guide on the system. 19. CAUTION: Positioning the processor incorrectly can result in excess grease coming in position. 11. Reconnect your processor kit ... power supplies are hot to their electrical outlets, and turn on the socket, as applicable. 4. WARNING: The heat sink and processor are installed, the power supply configuration is non-redundant (1 + 0). Align the processor with your system and peripherals to the touch for some time after...
... on the processor. 15. Close the system. 18. Press to the center of the topside of the processor, using pin 1 position guide on the system. 19. CAUTION: Positioning the processor incorrectly can result in excess grease coming in position. 11. Reconnect your processor kit ... power supplies are hot to their electrical outlets, and turn on the socket, as applicable. 4. WARNING: The heat sink and processor are installed, the power supply configuration is non-redundant (1 + 0). Align the processor with your system and peripherals to the touch for some time after...
Owner's Manual
Page 105
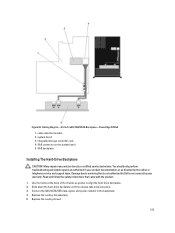
Cabling Diagram-2.5 Inch (x24) SAS/SATA Backplane-PowerEdge R720xd 1. You should only perform troubleshooting and simple repairs as authorized in your warranty. SAS backplane Installing The Hard-Drive Backplane CAUTION: Many repairs may only be done by the online or telephone service and support team...bracket 2. SAS connector on the system board 5. Read and follow the safety instructions that is not authorized by Dell is not covered by your product documentation, or as guides to the backplane. 4. Use the hooks at the base of the chassis as directed by a certified service ...
Cabling Diagram-2.5 Inch (x24) SAS/SATA Backplane-PowerEdge R720xd 1. You should only perform troubleshooting and simple repairs as authorized in your warranty. SAS backplane Installing The Hard-Drive Backplane CAUTION: Many repairs may only be done by the online or telephone service and support team...bracket 2. SAS connector on the system board 5. Read and follow the safety instructions that is not authorized by Dell is not covered by your product documentation, or as guides to the backplane. 4. Use the hooks at the base of the chassis as directed by a certified service ...
Owner's Manual
Page 111
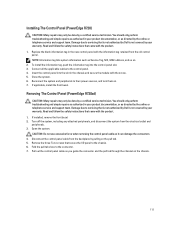
... safety instructions that is not authorized by Dell is not covered by your warranty. Open the system. Pull out the control panel cable as directed by the online or telephone service and support team. To install the information tag, push the information tag...guide the connector and the pull tab through the channel on the pull tab. 5. Turn off the system, including any attached peripherals, and disconnect the system from the old control panel. Disconnect the control panel cable from the backplane by pulling on the chassis. 111 Installing The Control Panel (PowerEdge R720...
... safety instructions that is not authorized by Dell is not covered by your warranty. Open the system. Pull out the control panel cable as directed by the online or telephone service and support team. To install the information tag, push the information tag...guide the connector and the pull tab through the channel on the pull tab. 5. Turn off the system, including any attached peripherals, and disconnect the system from the old control panel. Disconnect the control panel cable from the backplane by pulling on the chassis. 111 Installing The Control Panel (PowerEdge R720...

Owner's Manual
Page 112
... authorized by Dell is not covered by a certified service technician. Push the cable until the cable passes completely through the channel. 7. Close the system. 10. Damage due to prevent it from the electrical outlet and peripherals. 3. Fold the label around the cable. 5. hard-drive backplane 6. Removing and Installing the Control Panel-PowerEdge R720xd 1.
... authorized by Dell is not covered by a certified service technician. Push the cable until the cable passes completely through the channel. 7. Close the system. 10. Damage due to prevent it from the electrical outlet and peripherals. 3. Fold the label around the cable. 5. hard-drive backplane 6. Removing and Installing the Control Panel-PowerEdge R720xd 1.
Owner's Manual
Page 117
...the chassis. 4. Replace the following: a) cable retention bracket b) PCIe card holder c) integrated storage controller card d) internal USB key (if installed) e) internal dual SD module f) all cables to its electrical outlet and turn the system on, including any attached peripherals. 9. Import ...Reconnect all expansion-card risers g) cooling-fan assembly h) cooling shroud i) power supply(s) 6. For more information, see iDRAC7 User's Guide, at support.dell.com/manuals. 117 NOTE: Ensure that the cables inside the system are routed along the chassis wall and secured using the cable securing...
...the chassis. 4. Replace the following: a) cable retention bracket b) PCIe card holder c) integrated storage controller card d) internal USB key (if installed) e) internal dual SD module f) all cables to its electrical outlet and turn the system on, including any attached peripherals. 9. Import ...Reconnect all expansion-card risers g) cooling-fan assembly h) cooling shroud i) power supply(s) 6. For more information, see iDRAC7 User's Guide, at support.dell.com/manuals. 117 NOTE: Ensure that the cables inside the system are routed along the chassis wall and secured using the cable securing...
Technical Guide
Page 16
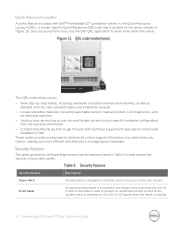
... tag so you can quickly gain access to your specific hardware configuration info and warranty information Contact Dell directly (by link) to get in touch with Dell™ PowerEdge 12th generation servers is the Quick Resource Locator (QRL)-a model-specific Quick Response (QR) code that is ... is used to protect un-authorized access to provide the Dell ID. System status is viewable on the LCD or LED panel when the bezel is installed. 16 PowerEdge R720 and R720xd Technical Guide Just use your phone to access the Dell QRL application to : View step-by-step videos...
... tag so you can quickly gain access to your specific hardware configuration info and warranty information Contact Dell directly (by link) to get in touch with Dell™ PowerEdge 12th generation servers is the Quick Resource Locator (QRL)-a model-specific Quick Response (QR) code that is ... is used to protect un-authorized access to provide the Dell ID. System status is viewable on the LCD or LED panel when the bezel is installed. 16 PowerEdge R720 and R720xd Technical Guide Just use your phone to access the Dell QRL application to : View step-by-step videos...

Technical Guide
Page 19
...per processor. For the latest information on R720xd. Each GPU can support up to 6GB of supported GPUs, see the Dell PowerEdge R720 and R720xd Owner's Manual on the R720, which can support two 300W, full-length, double-wide GPUs or up to four 150W, full-length, single-wide...115W 95W 70W 95W 130W 95W 80W 95W 60W 95W 80W 80W For information on processor installation and configuration, see Table 18. 19 PowerEdge R720 and R720xd Technical Guide Graphics processing unit (GPU) technology is supported on Support.Dell.com/Manuals. Table 6 lists the Intel Xeon processors supported by the...
...per processor. For the latest information on R720xd. Each GPU can support up to 6GB of supported GPUs, see the Dell PowerEdge R720 and R720xd Owner's Manual on the R720, which can support two 300W, full-length, double-wide GPUs or up to four 150W, full-length, single-wide...115W 95W 70W 95W 130W 95W 80W 95W 60W 95W 80W 80W For information on processor installation and configuration, see Table 18. 19 PowerEdge R720 and R720xd Technical Guide Graphics processing unit (GPU) technology is supported on Support.Dell.com/Manuals. Table 6 lists the Intel Xeon processors supported by the...
Technical Guide
Page 22
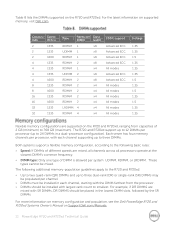
.... These types cannot be installed with largest rank count to 24 DIMMs in the lowest DIMM slots, followed by the SR DIMMs. For more information on memory configuration and population, see the Dell PowerEdge R720 and R720xd Systems Owner's Manual on the R720 and R720xd, ranging from the... 4 x4 All modes 1.35 32 1333 RDIMM 4 x4 All modes 1.35 Flexible memory configurations are supported on Support.Dell.com/Manuals. 22 PowerEdge R720 and R720xd Technical Guide Each server has four memory channels per system: UDIMM, RDIMM, or LRDIMM. For example, if DR DIMMS are mixed...
.... These types cannot be installed with largest rank count to 24 DIMMs in the lowest DIMM slots, followed by the SR DIMMs. For more information on memory configuration and population, see the Dell PowerEdge R720 and R720xd Systems Owner's Manual on the R720 and R720xd, ranging from the... 4 x4 All modes 1.35 32 1333 RDIMM 4 x4 All modes 1.35 Flexible memory configurations are supported on Support.Dell.com/Manuals. 22 PowerEdge R720 and R720xd Technical Guide Each server has four memory channels per system: UDIMM, RDIMM, or LRDIMM. For example, if DR DIMMS are mixed...
Technical Guide
Page 23
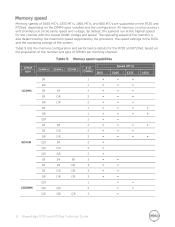
By default, the systems run at the highest speed for the R720 and R720xd, based on the DIMM types installed and the configuration. Table 9 lists the memory configuration and performance details for the channel with the lowest DIMM voltage and speed. Memory speeds of 1600 ...; ∞ ∞ ∞ ∞ ∞ ∞ ∞ ∞ ∞ ∞ ∞ ∞ ∞ ∞ ∞ ∞ ∞ ∞ ∞ ∞ ∞ ∞ ∞ 1600 23 PowerEdge R720 and R720xd Technical Guide
By default, the systems run at the highest speed for the R720 and R720xd, based on the DIMM types installed and the configuration. Table 9 lists the memory configuration and performance details for the channel with the lowest DIMM voltage and speed. Memory speeds of 1600 ...; ∞ ∞ ∞ ∞ ∞ ∞ ∞ ∞ ∞ ∞ ∞ ∞ ∞ ∞ ∞ ∞ ∞ ∞ ∞ ∞ ∞ ∞ ∞ 1600 23 PowerEdge R720 and R720xd Technical Guide

Technical Guide
Page 32
... QLE2560 (8Gb) QLogic QLE2562 (8Gb) 32 PowerEdge R720 and R720xd Technical Guide PXE boot enabled on Support.Dell.com/Manuals. Table 17 lists the supported add-in NICs and HBAs for networking devices through the USC For information on card installation, requirements, and slot priorities, see the PowerEdge R720 and R720xd Systems Owner's Manual on all...
... QLE2560 (8Gb) QLogic QLE2562 (8Gb) 32 PowerEdge R720 and R720xd Technical Guide PXE boot enabled on Support.Dell.com/Manuals. Table 17 lists the supported add-in NICs and HBAs for networking devices through the USC For information on card installation, requirements, and slot priorities, see the PowerEdge R720 and R720xd Systems Owner's Manual on all...

Technical Guide
Page 38
... when a system is configured as Express flash drives and Fusion-io® cards require greater airflow for the R720 and R720xd. Configuration (23 ± 2°C CPUs ambient) Hard drives Power PCI supply Memory card/HDD unit...installed: This affects overall system acoustics. Installation of ECMA-74 11th ed. (2010) are followed to stress the processors. system is 75 cm above reflective floor). 3Prominent tone: Criteria of D.6 and D.11 of more information on Dell's acoustical design, see the Dell Enterprise Acoustics white paper. 38 PowerEdge R720 and R720xd Technical Guide...
... when a system is configured as Express flash drives and Fusion-io® cards require greater airflow for the R720 and R720xd. Configuration (23 ± 2°C CPUs ambient) Hard drives Power PCI supply Memory card/HDD unit...installed: This affects overall system acoustics. Installation of ECMA-74 11th ed. (2010) are followed to stress the processors. system is 75 cm above reflective floor). 3Prominent tone: Criteria of D.6 and D.11 of more information on Dell's acoustical design, see the Dell Enterprise Acoustics white paper. 38 PowerEdge R720 and R720xd Technical Guide...

Technical Guide
Page 40
... selecting the proper rails is identifying the type of racks than the sliding rails, but only the static rails, as the more information on Support.Dell.com/Manuals. 40 PowerEdge R720 and R720xd Technical Guide The static rails (shown in Figure 15) support a wider variety of rack in which they will be installed.
... selecting the proper rails is identifying the type of racks than the sliding rails, but only the static rails, as the more information on Support.Dell.com/Manuals. 40 PowerEdge R720 and R720xd Technical Guide The static rails (shown in Figure 15) support a wider variety of rack in which they will be installed.


