
Getting Started Guide
Page 9
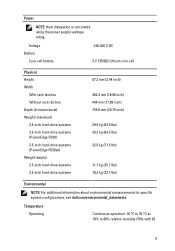
...Lithium coin cell Physical Height Width With rack latches Without rack latches Depth (includes bezel) Weight (maximum) 2.5-inch hard-drive systems 3.5-inch hard-drive systems (PowerEdge R720) 3.5-inch hard-drive systems (PowerEdge R720xd) Weight (empty) 2.5-inch hard-drive systems 3.5-inch hard-drive systems 87.3...22.7 lbs) Environmental NOTE: For additional information about environmental measurements for specific system configurations, see dell.com/environmental_datasheets. Temperature Operating Continuous operation: 10 °C to 35 °C at 10% to 80% relative humidity (RH), with ...
...Lithium coin cell Physical Height Width With rack latches Without rack latches Depth (includes bezel) Weight (maximum) 2.5-inch hard-drive systems 3.5-inch hard-drive systems (PowerEdge R720) 3.5-inch hard-drive systems (PowerEdge R720xd) Weight (empty) 2.5-inch hard-drive systems 3.5-inch hard-drive systems 87.3...22.7 lbs) Environmental NOTE: For additional information about environmental measurements for specific system configurations, see dell.com/environmental_datasheets. Temperature Operating Continuous operation: 10 °C to 35 °C at 10% to 80% relative humidity (RH), with ...
Owner's Manual
Page 50
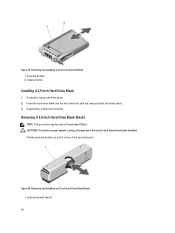
... slots must have drive blanks installed. If installed, remove the front bezel. 2. If applicable, install the front bezel. hard-drive blank (back) 50 Removing and Installing a 2.5 Inch Hard-Drive Blank (Back) 1. Figure 19. release button Installing A 2.5 Inch Hard-Drive Blank 1. Removing A 2.5 Inch Hard-Drive Blank (Back) NOTE: This procedure applies only to PowerEdge R720xd.
... slots must have drive blanks installed. If installed, remove the front bezel. 2. If applicable, install the front bezel. hard-drive blank (back) 50 Removing and Installing a 2.5 Inch Hard-Drive Blank (Back) 1. Figure 19. release button Installing A 2.5 Inch Hard-Drive Blank 1. Removing A 2.5 Inch Hard-Drive Blank (Back) NOTE: This procedure applies only to PowerEdge R720xd.
Owner's Manual
Page 51
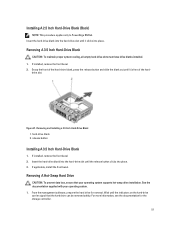
...slot until it clicks into place. Figure 21. Removing and Installing a 3.5 Inch Hard-Drive Blank 1. If installed, remove the front bezel. 2. See the documentation supplied with your operating system supports hot-swap drive installation. Grasp the front of the hard-drive blank, ...software, prepare the hard drive for the storage controller. 51 Installing A 2.5 Inch Hard-Drive Blank (Back) NOTE: This procedure applies only to PowerEdge R720xd. Removing A Hot-Swap Hard Drive CAUTION: To prevent data loss, ensure that the hard drive can be removed safely. Removing A 3.5 Inch ...
...slot until it clicks into place. Figure 21. Removing and Installing a 3.5 Inch Hard-Drive Blank 1. If installed, remove the front bezel. 2. See the documentation supplied with your operating system supports hot-swap drive installation. Grasp the front of the hard-drive blank, ...software, prepare the hard drive for the storage controller. 51 Installing A 2.5 Inch Hard-Drive Blank (Back) NOTE: This procedure applies only to PowerEdge R720xd. Removing A Hot-Swap Hard Drive CAUTION: To prevent data loss, ensure that the hard drive can be removed safely. Removing A 3.5 Inch ...
Owner's Manual
Page 93
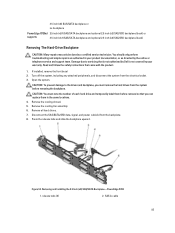
... Backplane-PowerEdge R720 1. release tabs (2) 2. CAUTION: To prevent damage to servicing that is not authorized by Dell is not covered by a certified service technician. Disconnect the SAS/SATA/SSD data, signal, and power cable(s) from the system before removal so that came with the product. 1. 3.5 inch (x8) SAS/SATA backplane or no backplane PowerEdge R720xd...
... Backplane-PowerEdge R720 1. release tabs (2) 2. CAUTION: To prevent damage to servicing that is not authorized by Dell is not covered by a certified service technician. Disconnect the SAS/SATA/SSD data, signal, and power cable(s) from the system before removal so that came with the product. 1. 3.5 inch (x8) SAS/SATA backplane or no backplane PowerEdge R720xd...
Owner's Manual
Page 106
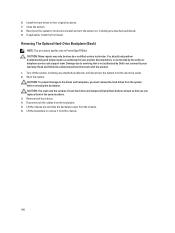
...3. Close the system. 8. Removing The Optional Hard-Drive Backplane (Back) NOTE: This procedure applies only to servicing that is not authorized by Dell is not covered by your product documentation, or as directed by a certified service technician. Turn off the system, including any attached peripherals. 9....must note the number of each hard drive and temporarily label them in their original locations. 7. Damage due to PowerEdge R720xd. If applicable, install the front bezel. 6. CAUTION: Many repairs may only be done by the online or telephone service and support team.
...3. Close the system. 8. Removing The Optional Hard-Drive Backplane (Back) NOTE: This procedure applies only to servicing that is not authorized by Dell is not covered by your product documentation, or as directed by a certified service technician. Turn off the system, including any attached peripherals. 9....must note the number of each hard drive and temporarily label them in their original locations. 7. Damage due to PowerEdge R720xd. If applicable, install the front bezel. 6. CAUTION: Many repairs may only be done by the online or telephone service and support team.
Owner's Manual
Page 111
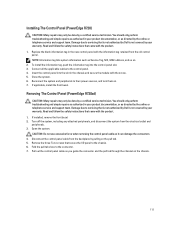
... on the pull tab. 5. Insert the control panel into the control-panel slot. 3. If applicable, install the front bezel. Removing The Control Panel (PowerEdge R720xd) CAUTION: Many repairs may only be done by the online or telephone service and support team. You should only perform ...cable from the electrical outlet and peripherals. 3. Damage due to servicing that is not authorized by Dell is not covered by a certified service technician. Installing The Control Panel (PowerEdge R720) CAUTION: Many repairs may only be done by your warranty. Pull out the control panel ...
... on the pull tab. 5. Insert the control panel into the control-panel slot. 3. If applicable, install the front bezel. Removing The Control Panel (PowerEdge R720xd) CAUTION: Many repairs may only be done by the online or telephone service and support team. You should only perform ...cable from the electrical outlet and peripherals. 3. Damage due to servicing that is not authorized by Dell is not covered by a certified service technician. Installing The Control Panel (PowerEdge R720) CAUTION: Many repairs may only be done by your warranty. Pull out the control panel ...

Owner's Manual
Page 112
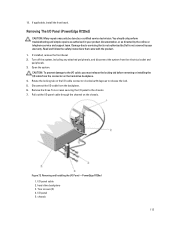
connector 5. If installed, remove the front bezel. 2. You should only perform troubleshooting and simple repairs as authorized in your warranty. Fold the pull tab close to the chassis. Removing and Installing the Control Panel-PowerEdge R720xd 1. Torx screws (3) 2. Open the system. 4. Push the cable ... Reconnect the system to servicing that came with the product. 1. Read and follow the safety instructions that is not authorized by Dell is not covered by pushing on the center of the connector. 9. control panel 3. Connect the cable connector on , including ...
connector 5. If installed, remove the front bezel. 2. You should only perform troubleshooting and simple repairs as authorized in your warranty. Fold the pull tab close to the chassis. Removing and Installing the Control Panel-PowerEdge R720xd 1. Torx screws (3) 2. Open the system. 4. Push the cable ... Reconnect the system to servicing that came with the product. 1. Read and follow the safety instructions that is not authorized by Dell is not covered by pushing on the center of the connector. 9. control panel 3. Connect the cable connector on , including ...
Owner's Manual
Page 113
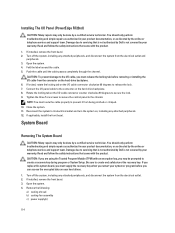
Read and follow the safety instructions that is not authorized by Dell is not covered by your product documentation, or as directed by a certified service technician. CAUTION: To prevent damage to servicing that came with the product.... and simple repairs as authorized in your warranty. Disconnect the I /O Panel (PowerEdge R720xd) CAUTION: Many repairs may only be done by the online or telephone service and support team. 11. If applicable, install the front bezel. If installed, remove the front bezel. 2. Figure 72. chassis 113 I /O cable connector clockwise 90 degrees to ...
Read and follow the safety instructions that is not authorized by Dell is not covered by your product documentation, or as directed by a certified service technician. CAUTION: To prevent damage to servicing that came with the product.... and simple repairs as authorized in your warranty. Disconnect the I /O Panel (PowerEdge R720xd) CAUTION: Many repairs may only be done by the online or telephone service and support team. 11. If applicable, install the front bezel. If installed, remove the front bezel. 2. Figure 72. chassis 113 I /O cable connector clockwise 90 degrees to ...
Owner's Manual
Page 114
...degrees to the I/O cable, you must release the locking tab before you may be prompted to servicing that is not authorized by Dell is not covered by the online or telephone service and support team. Tighten the three Torx screws to secure the control panel to... program before removing or installing the I/O cable from being pinched or crimped. 10. Open the system. 4. If applicable, install the front bezel. Installing The I/O Panel (PowerEdge R720xd) CAUTION: Many repairs may only be done by a certified service technician. Fold the label around the cable. 5. NOTE: You must supply...
...degrees to the I/O cable, you must release the locking tab before you may be prompted to servicing that is not authorized by Dell is not covered by the online or telephone service and support team. Tighten the three Torx screws to secure the control panel to... program before removing or installing the I/O cable from being pinched or crimped. 10. Open the system. 4. If applicable, install the front bezel. Installing The I/O Panel (PowerEdge R720xd) CAUTION: Many repairs may only be done by a certified service technician. Fold the label around the cable. 5. NOTE: You must supply...

Technical Guide
Page 4
... Table 9. PCIe expansion slots...32 Table 17. iDRAC7 with bezel) ...11 Figure 2. Environmental specifications ...53 Table 33. Additional resources ...57 Figure 1. R720xd front view (2.5-inch chassis without bezel 11 Figure 3. R720 LCD control panel...15 Figure 10. Rack network daughter card (NDC)...30 iv PowerEdge R720 and R720xd Technical Guide Appendix B. Memory speed capabilities ...23 Table 10...
... Table 9. PCIe expansion slots...32 Table 17. iDRAC7 with bezel) ...11 Figure 2. Environmental specifications ...53 Table 33. Additional resources ...57 Figure 1. R720xd front view (2.5-inch chassis without bezel 11 Figure 3. R720 LCD control panel...15 Figure 10. Rack network daughter card (NDC)...30 iv PowerEdge R720 and R720xd Technical Guide Appendix B. Memory speed capabilities ...23 Table 10...
Technical Guide
Page 9
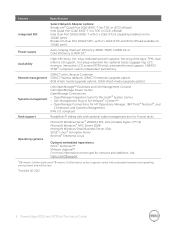
..., redundant power supplies; TPM; ECC memory, interactive LCD screen (R720 only); actual capacity varies with preloaded material and operating environment and will be less 2Available Q2 2012 9 PowerEdge R720 and R720xd Technical Guide dual internal SD support; Feature Specification Integrated NIC Select... 2 x 1GbE (TOE and iSCSI offload available on the specific versions and additions, visit Dell.com/OSsupport. 1GB means 1 billion bytes and TB means 1 trillion bytes; optional bezel; extended thermal support; hot-plug drive bays; luggage-tag; ENERGY STAR® compliant;
..., redundant power supplies; TPM; ECC memory, interactive LCD screen (R720 only); actual capacity varies with preloaded material and operating environment and will be less 2Available Q2 2012 9 PowerEdge R720 and R720xd Technical Guide dual internal SD support; Feature Specification Integrated NIC Select... 2 x 1GbE (TOE and iSCSI offload available on the specific versions and additions, visit Dell.com/OSsupport. 1GB means 1 billion bytes and TB means 1 trillion bytes; optional bezel; extended thermal support; hot-plug drive bays; luggage-tag; ENERGY STAR® compliant;
Technical Guide
Page 11
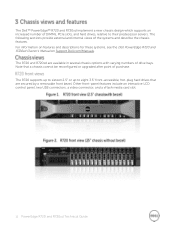
... descriptions for these systems, see the Dell PowerEdge R720 and R720xd Owner's Manual on Support.Dell.com/Manuals. The R720 supports up to sixteen 2.5" or up to their predecessor servers. The R720 and R720xd are secured by a removable front bezel. The following sections provide external and ...interactive LCD control panel, two USB connectors, a video connector, and a vFlash media card slot. 11 PowerEdge R720 and R720xd Technical Guide The Dell™ PowerEdge™ R720 and R720xd implement a new chassis design which supports an increased number of DIMMs, PCIe slots, and hard drives, ...
... descriptions for these systems, see the Dell PowerEdge R720 and R720xd Owner's Manual on Support.Dell.com/Manuals. The R720 supports up to sixteen 2.5" or up to their predecessor servers. The R720 and R720xd are secured by a removable front bezel. The following sections provide external and ...interactive LCD control panel, two USB connectors, a video connector, and a vFlash media card slot. 11 PowerEdge R720 and R720xd Technical Guide The Dell™ PowerEdge™ R720 and R720xd implement a new chassis design which supports an increased number of DIMMs, PCIe slots, and hard drives, ...
Technical Guide
Page 12
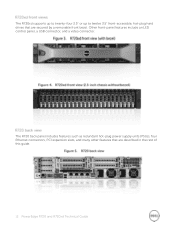
The R720 back panel includes features such as redundant hot-plug power supply units (PSUs), four Ethernet connectors, PCI expansion slots, and many other features that are described in the rest of this guide. 12 PowerEdge R720 and R720xd Technical Guide Other front-panel features include an LED control panel, a USB connector, and a video connector. The R720xd supports up to twenty-four 2.5" or up to twelve 3.5" front-accessible, hot-plug hard drives that are secured by a removable front bezel.
The R720 back panel includes features such as redundant hot-plug power supply units (PSUs), four Ethernet connectors, PCI expansion slots, and many other features that are described in the rest of this guide. 12 PowerEdge R720 and R720xd Technical Guide Other front-panel features include an LED control panel, a USB connector, and a video connector. The R720xd supports up to twenty-four 2.5" or up to twelve 3.5" front-accessible, hot-plug hard drives that are secured by a removable front bezel.
Technical Guide
Page 16
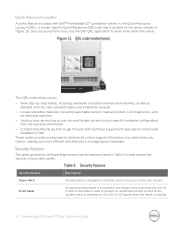
... specific hardware configuration info and warranty information Contact Dell directly (by link) to get in touch with Dell™ PowerEdge 12th generation servers is the Quick Resource Locator (QRL)-a model-specific Quick Response (QR) code that is located on the bezel is installed. 16 PowerEdge R720 and R720xd Technical Guide A lock on the server (shown in...
... specific hardware configuration info and warranty information Contact Dell directly (by link) to get in touch with Dell™ PowerEdge 12th generation servers is the Quick Resource Locator (QRL)-a model-specific Quick Response (QR) code that is located on the bezel is installed. 16 PowerEdge R720 and R720xd Technical Guide A lock on the server (shown in...

Technical Guide
Page 52
... Y 482.4mm 444.0mm 87.3mm Za Za (with bezel) (without bezel) Zb Zc 32.0mm 18.0mm 684.0mm 723.0mm Table 30 lists the weight of the R720 and R720xd chassis at maximum configuration as well as empty of the Dell™ PowerEdge™ R720 and R720xd chassis. Figure 18 details the dimensions of any hardware...
... Y 482.4mm 444.0mm 87.3mm Za Za (with bezel) (without bezel) Zb Zc 32.0mm 18.0mm 684.0mm 723.0mm Table 30 lists the weight of the R720 and R720xd chassis at maximum configuration as well as empty of the Dell™ PowerEdge™ R720 and R720xd chassis. Figure 18 details the dimensions of any hardware...


