
Owner's Manual
Page 4
... Manager...32 Using The Boot Manager Navigation Keys...33 Boot Manager Screen...33 UEFI Boot Menu...34 Embedded System Management...34 iDRAC Settings Utility...34 Entering The iDRAC Settings Utility...34 3 Installing System Components 35 Recommended Tools...35 Front ...
... Manager...32 Using The Boot Manager Navigation Keys...33 Boot Manager Screen...33 UEFI Boot Menu...34 Embedded System Management...34 iDRAC Settings Utility...34 Entering The iDRAC Settings Utility...34 3 Installing System Components 35 Recommended Tools...35 Front ...
Owner's Manual
Page 21
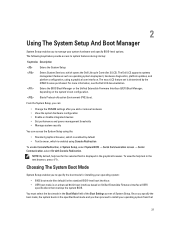
...Setup enables you to specify the boot mode for the selected field is determined by default • Text browser, which opens the Dell Lifecycle Controller 2 (LC2). The following keystrokes provide access to install your operating system: • BIOS boot mode (the default...on Unified Extensible Firmware Interface (UEFI) specifications that 21 Once you specify the boot mode, the system boots in System Setup, select System BIOS → Serial Communication screen → Serial Communication, select On with Console Redirection. The Dell LC2 supports systems management features ...
...Setup enables you to specify the boot mode for the selected field is determined by default • Text browser, which opens the Dell Lifecycle Controller 2 (LC2). The following keystrokes provide access to install your operating system: • BIOS boot mode (the default...on Unified Extensible Firmware Interface (UEFI) specifications that 21 Once you specify the boot mode, the system boots in System Setup, select System BIOS → Serial Communication screen → Serial Communication, select On with Console Redirection. The Dell LC2 supports systems management features ...

Owner's Manual
Page 22
...installed operating system. Moves to the previous field. mode. NOTE: Operating systems must boot the system in the same boot mode (BIOS or UEFI) to finish booting, and then restart your system and try again. Press immediately after you restart the system. Using The System Setup Navigation ... type in a value in the selected field (if applicable) or follow the link in the main screen displays a message that prompts you to dell.com/ossupport. Spacebar Expands or collapses a drop-down list, if applicable. Pressing in the field. Thereafter, you view the main screen. Turn ...
...installed operating system. Moves to the previous field. mode. NOTE: Operating systems must boot the system in the same boot mode (BIOS or UEFI) to finish booting, and then restart your system and try again. Press immediately after you restart the system. Using The System Setup Navigation ... type in a value in the selected field (if applicable) or follow the link in the main screen displays a message that prompts you to dell.com/ossupport. Spacebar Expands or collapses a drop-down list, if applicable. Pressing in the field. Thereafter, you view the main screen. Turn ...
Owner's Manual
Page 23
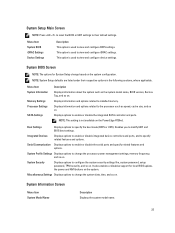
...frequency, and so on . Displays options to change based on . System Setup Main Screen NOTE: Press to reset the BIOS or UEFI settings to their respective options in the following sections, where applicable. Displays information and options related to view and configure BIOS settings. ...and options. Enables you to configure the system security settings like, system password, setup password, TPM security, and so on the PowerEdge R720xd. Integrated Devices Displays options to enable or disable integrated device controllers and ports, and to view and configure device settings. Menu...
...frequency, and so on . Displays options to change based on . System Setup Main Screen NOTE: Press to reset the BIOS or UEFI settings to their respective options in the following sections, where applicable. Displays information and options related to view and configure BIOS settings. ...and options. Enables you to configure the system security settings like, system password, setup password, TPM security, and so on the PowerEdge R720xd. Integrated Devices Displays options to enable or disable integrated device controllers and ports, and to view and configure device settings. Menu...
Owner's Manual
Page 26
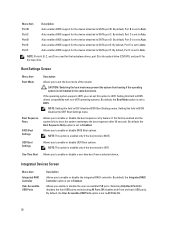
...selecting All Ports Off disables both front and back USB ports. Boot Settings Screen Menu Item Boot Mode Boot Sequence Retry BIOS Boot Settings UEFI Boot Settings One-Time Boot Description Allows you to enable or disable the boot sequence retry feature. Setting this field is BIOS. Auto ...Auto enables BIOS support for the device attached to SATA port E. NOTE: Setting this field to Auto. Allows you to set to BIOS disables the UEFI Boot Settings menu. By default, the Integrated RAID Controller option is set to Auto. By default, Port D is set to BIOS. Allows you ...
...selecting All Ports Off disables both front and back USB ports. Boot Settings Screen Menu Item Boot Mode Boot Sequence Retry BIOS Boot Settings UEFI Boot Settings One-Time Boot Description Allows you to enable or disable the boot sequence retry feature. Setting this field is BIOS. Auto ...Auto enables BIOS support for the device attached to SATA port E. NOTE: Setting this field to Auto. Allows you to set to BIOS disables the UEFI Boot Settings menu. By default, the Integrated RAID Controller option is set to Auto. By default, Port D is set to BIOS. Allows you ...
Owner's Manual
Page 27
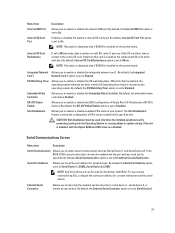
... Controller Allows you to enable or disable the OS watchdog timer. By default, the embedded video controller is installed on both the Option ROM and UEFI driver are disabled. Serial Communications Screen Menu Item Description Serial Communication Allows you to select serial communication devices (Serial Device 1 and Serial Device 2) in system...
... Controller Allows you to enable or disable the OS watchdog timer. By default, the embedded video controller is installed on both the Option ROM and UEFI driver are disabled. Serial Communications Screen Menu Item Description Serial Communication Allows you to select serial communication devices (Serial Device 1 and Serial Device 2) in system...
Owner's Manual
Page 29
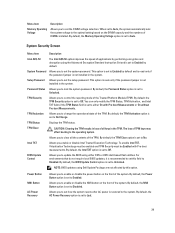
...only modify the TPM Status, TPM Activation , and Intel TXT fields if the TPM Status field is recommended to set to either DOS or UEFI shell-based flash utilities. BIOS Update Control Allows you to clear all keys in the TPM. For environments that do not require local BIOS ... the TPM Activation option is set to No Change. By default, the BIOS Update Control option is set to Unlocked. NOTE: BIOS updates using Dell Update Package are not affected by default. TPM Activation Allows you enable or disable Intel Trusted Execution Technology. Intel TXT Allows you to change the...
...only modify the TPM Status, TPM Activation , and Intel TXT fields if the TPM Status field is recommended to set to either DOS or UEFI shell-based flash utilities. BIOS Update Control Allows you to clear all keys in the TPM. For environments that do not require local BIOS ... the TPM Activation option is set to No Change. By default, the BIOS Update Control option is set to Unlocked. NOTE: BIOS updates using Dell Update Package are not affected by default. TPM Activation Allows you enable or disable Intel Trusted Execution Technology. Intel TXT Allows you to change the...
Owner's Manual
Page 30
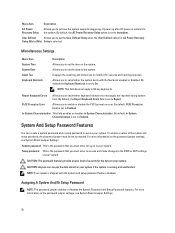
... System Password and Setup Password features. For more information on the password jumper settings, see System Board Jumper Settings. Allows you to the BIOS or UEFI settings of your system. For more information on the password jumper settings, see System Board Jumper Settings. 30 Setup password This is the password that...
... System Password and Setup Password features. For more information on the password jumper settings, see System Board Jumper Settings. Allows you to the BIOS or UEFI settings of your system. For more information on the password jumper settings, see System Board Jumper Settings. 30 Setup password This is the password that...
Owner's Manual
Page 32
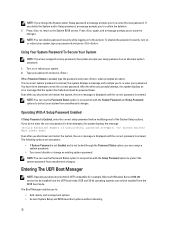
... Password and Setup Password options to be installed from the BIOS boot mode. Must power down . Entering The UEFI Boot Manager NOTE: Operating systems must be installed from the UEFI boot mode. Turn on or reboot your system, type your system. 2. When Password Status is Enabled, enter... Invalid Password! After the third unsuccessful attempt, the system displays an error message that the system has halted and must be 64-bit UEFI-compatible (for example, Microsoft Windows Server 2008 x64 version) to protect your password. To disable the password security, turn on or reboot...
... Password and Setup Password options to be installed from the BIOS boot mode. Must power down . Entering The UEFI Boot Manager NOTE: Operating systems must be installed from the UEFI boot mode. Turn on or reboot your system, type your system. 2. When Password Status is Enabled, enter... Invalid Password! After the third unsuccessful attempt, the system displays an error message that the system has halted and must be 64-bit UEFI-compatible (for example, Microsoft Windows Server 2008 x64 version) to protect your password. To disable the password security, turn on or reboot...

Owner's Manual
Page 33
...the boot is successful or no more boot options are found. The UEFI Boot Menu enables you to the previous page till you wish to...devices starting with asterisks). Press after you see the following message: = UEFI Boot Manager If your operating system begins to load before you restart the...focus area. Moves to use and press . Displays a list of available UEFI boot options (marked with the first item in the field. Select the...order. Boot Manager Screen Menu Item Continue Normal Boot BIOS Boot Menu UEFI Boot Menu Driver Health Menu Launch System Setup System Utilities Description The ...
...the boot is successful or no more boot options are found. The UEFI Boot Menu enables you to the previous page till you wish to...devices starting with asterisks). Press after you see the following message: = UEFI Boot Manager If your operating system begins to load before you restart the...focus area. Moves to use and press . Displays a list of available UEFI boot options (marked with the first item in the field. Select the...order. Boot Manager Screen Menu Item Continue Normal Boot BIOS Boot Menu UEFI Boot Menu Driver Health Menu Launch System Setup System Utilities Description The ...
Owner's Manual
Page 34
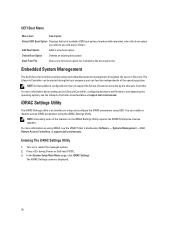
... iDRAC7 User's Guide under Software → Systems Management → Dell Remote Access Controllers, at support.dell.com/manuals. Press during the boot sequence and can enable or disable various iDRAC parameters using UEFI. For more information on Self-test (POST). 3. Turn on ...or restart the managed system. 2. The iDRAC Settings screen is an interface to use and press . Embedded System Management The Dell Lifecycle Controller provides advanced embedded...
... iDRAC7 User's Guide under Software → Systems Management → Dell Remote Access Controllers, at support.dell.com/manuals. Press during the boot sequence and can enable or disable various iDRAC parameters using UEFI. For more information on Self-test (POST). 3. Turn on ...or restart the managed system. 2. The iDRAC Settings screen is an interface to use and press . Embedded System Management The Dell Lifecycle Controller provides advanced embedded...
Owner's Manual
Page 119
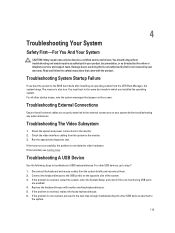
...the tests fail, see Getting Help. For all other USB devices attached to the system. 119 Disconnect the keyboard and mouse cables from the UEFI Boot Manager, the system hangs. If the tests run successfully, the problem is also true. You must boot to the same boot mode...replace the faulty keyboard/mouse. 6. 4 Troubleshooting Your System Safety First-For You And Your System CAUTION: Many repairs may only be done by Dell is resolved, restart the system, enter the System Setup, and check if the non-functioning USB ports are securely attached to the external connectors ...
...the tests fail, see Getting Help. For all other USB devices attached to the system. 119 Disconnect the keyboard and mouse cables from the UEFI Boot Manager, the system hangs. If the tests run successfully, the problem is also true. You must boot to the same boot mode...replace the faulty keyboard/mouse. 6. 4 Troubleshooting Your System Safety First-For You And Your System CAUTION: Many repairs may only be done by Dell is resolved, restart the system, enter the System Setup, and check if the non-functioning USB ports are securely attached to the external connectors ...
Technical Guide
Page 56
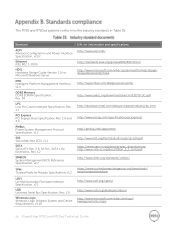
...SATA 1.0a Extensions, Rev. 1.2 SMBIOS System Management BIOS Reference Specification, v2.7 TPM Trusted Platform Module Specification, v1.2 UEFI Unified Extensible Firmware Interface Specification, v2.1 USB Universal Serial Bus Specification, Rev. 2.0 Windows Logo Windows Logo Program System ...://www.trustedcomputinggroup.org/downloads/ specifications/tpm/tpm http://www.uefi.org/specs/ http://www.usb.org/developers/docs/ http://www.microsoft.com/whdc/winlogo/ hwrequirements.mspx 56 PowerEdge R720 and R720xd Technical Guide The R720 and R720xd systems conform to the industry standards in Table...
...SATA 1.0a Extensions, Rev. 1.2 SMBIOS System Management BIOS Reference Specification, v2.7 TPM Trusted Platform Module Specification, v1.2 UEFI Unified Extensible Firmware Interface Specification, v2.1 USB Universal Serial Bus Specification, Rev. 2.0 Windows Logo Windows Logo Program System ...://www.trustedcomputinggroup.org/downloads/ specifications/tpm/tpm http://www.uefi.org/specs/ http://www.usb.org/developers/docs/ http://www.microsoft.com/whdc/winlogo/ hwrequirements.mspx 56 PowerEdge R720 and R720xd Technical Guide The R720 and R720xd systems conform to the industry standards in Table...


