
Getting Started Guide
Page 3
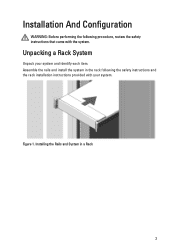
Unpacking a Rack System Unpack your system. Installation And Configuration WARNING: Before performing the following the safety instructions and the rack installation instructions provided with the system. Assemble the rails and install the system in a Rack 3 Installing the Rails and System in the rack following procedure, review the safety instructions that came with your system and identify each item. Figure 1.
Unpacking a Rack System Unpack your system. Installation And Configuration WARNING: Before performing the following the safety instructions and the rack installation instructions provided with the system. Assemble the rails and install the system in a Rack 3 Installing the Rails and System in the rack following procedure, review the safety instructions that came with your system and identify each item. Figure 1.

Getting Started Guide
Page 6
...came with your country or region from the top of the software installed on your operating system. For customers outside the United States, visit support.dell.com and select your system. Installing the Bezel Install the bezel (optional). NOTE: For the latest information on the ...system. The power indicator should light. You must consider any media of Dell-installed software as BACKUP copies of the page. 6 To install an operating system for the first time, see the installation and configuration documentation for your system's hard drive. If you purchased a preinstalled...
...came with your country or region from the top of the software installed on your operating system. For customers outside the United States, visit support.dell.com and select your system. Installing the Bezel Install the bezel (optional). NOTE: For the latest information on the ...system. The power indicator should light. You must consider any media of Dell-installed software as BACKUP copies of the page. 6 To install an operating system for the first time, see the installation and configuration documentation for your system's hard drive. If you purchased a preinstalled...

Getting Started Guide
Page 7
...'s Manual provides information about system features and describes how to troubleshoot the system and install or replace system components. NOM Information The following information is available online at support.dell.com/manuals. • The rack documentation included with your rack solution describes how to... install your system into a rack, if required. • Any media that ships with your ...
...'s Manual provides information about system features and describes how to troubleshoot the system and install or replace system components. NOM Information The following information is available online at support.dell.com/manuals. • The rack documentation included with your rack solution describes how to... install your system into a rack, if required. • Any media that ships with your ...
Owner's Manual
Page 4
...Management...34 iDRAC Settings Utility...34 Entering The iDRAC Settings Utility...34 3 Installing System Components 35 Recommended Tools...35 Front Bezel (Optional)...35 Removing The Front Bezel...35 Installing The Front Bezel...36 Opening And Closing The System...36 Opening The System...37 Cooling Shroud...39 Removing The Cooling Shroud...39 Installing The Cooling Shroud...40 System Memory...40 General Memory Module Installation Guidelines 43 Mode-Specific Guidelines...44 Sample Memory Configurations...45 Removing Memory Modules...47 Installing Memory Modules...48 Hard Drives...49 Removing A ...
...Management...34 iDRAC Settings Utility...34 Entering The iDRAC Settings Utility...34 3 Installing System Components 35 Recommended Tools...35 Front Bezel (Optional)...35 Removing The Front Bezel...35 Installing The Front Bezel...36 Opening And Closing The System...36 Opening The System...37 Cooling Shroud...39 Removing The Cooling Shroud...39 Installing The Cooling Shroud...40 System Memory...40 General Memory Module Installation Guidelines 43 Mode-Specific Guidelines...44 Sample Memory Configurations...45 Removing Memory Modules...47 Installing Memory Modules...48 Hard Drives...49 Removing A ...

Owner's Manual
Page 5
...Internal USB Memory Key (Optional)...59 Replacing The Internal USB Key...59 PCIe Card Holder...59 Removing The PCIe Card Holder...60 Installing The PCIe Card Holder...61 Opening And Closing The PCIe Card Holder Latch 61 Cable Retention Bracket...62 Removing The Cable Retention Bracket...62...Expansion-Card Riser 2 Or 3 65 Removing An Expansion Card From The Expansion-Card Riser 1 66 Installing An Expansion Card Into The Expansion-Card Riser 1 67 Removing Expansion-Card Risers...68 Installing Expansion-Card Risers...71 SD vFlash Card...71 Replacing An SD vFlash Card...71 Removing The vFlash ...
...Internal USB Memory Key (Optional)...59 Replacing The Internal USB Key...59 PCIe Card Holder...59 Removing The PCIe Card Holder...60 Installing The PCIe Card Holder...61 Opening And Closing The PCIe Card Holder Latch 61 Cable Retention Bracket...62 Removing The Cable Retention Bracket...62...Expansion-Card Riser 2 Or 3 65 Removing An Expansion Card From The Expansion-Card Riser 1 66 Installing An Expansion Card Into The Expansion-Card Riser 1 67 Removing Expansion-Card Risers...68 Installing Expansion-Card Risers...71 SD vFlash Card...71 Replacing An SD vFlash Card...71 Removing The vFlash ...
Owner's Manual
Page 6
... (Back 108 Control Panel...109 Removing The Control Panel (PowerEdge R720 109 Installing The Control Panel (PowerEdge R720 111 Removing The Control Panel (PowerEdge R720xd 111 Installing The Control Panel (PowerEdge R720xd 112 Removing The I/O Panel (PowerEdge R720xd 113 Installing The I/O Panel (PowerEdge R720xd 114 System Board...114 Removing The System Board...114 Installing The System Board...116 4 Troubleshooting Your System 119...
... (Back 108 Control Panel...109 Removing The Control Panel (PowerEdge R720 109 Installing The Control Panel (PowerEdge R720 111 Removing The Control Panel (PowerEdge R720xd 111 Installing The Control Panel (PowerEdge R720xd 112 Removing The I/O Panel (PowerEdge R720xd 113 Installing The I/O Panel (PowerEdge R720xd 114 System Board...114 Removing The System Board...114 Installing The System Board...116 4 Troubleshooting Your System 119...
Owner's Manual
Page 10
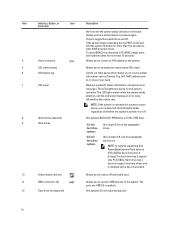
... DVD+/-RW drive. 3.5 inch hard drive systems 2.5 inch hard drive systems Up to sixteen 2.5 inch hot-swappable hard drives. NOTE: In systems supporting Dell PowerEdge Express Flash devices (PCIe SSDs), hard-drive slots 0 through 3 in F2 iDRAC setup) press and hold the system ID button for more than 15...text. NOTE: If the system is connected to navigate the control panel LCD menu. Hard-drive bay 3 does not support any hard drives and is installed with a hard-drive blank. 10 vFlash media card slot Allows you to insert a vFlash media card. 11 USB connectors (2) 12 Tape drive slot...
... DVD+/-RW drive. 3.5 inch hard drive systems 2.5 inch hard drive systems Up to sixteen 2.5 inch hot-swappable hard drives. NOTE: In systems supporting Dell PowerEdge Express Flash devices (PCIe SSDs), hard-drive slots 0 through 3 in F2 iDRAC setup) press and hold the system ID button for more than 15...text. NOTE: If the system is connected to navigate the control panel LCD menu. Hard-drive bay 3 does not support any hard drives and is installed with a hard-drive blank. 10 vFlash media card slot Allows you to insert a vFlash media card. 11 USB connectors (2) 12 Tape drive slot...

Owner's Manual
Page 15
If the problem persists, see Getting Help. 15 Corrective Action Ensure that none of range or fan failure). See Getting Help. Re-install the card. If the problem persists, see Getting Help. Corrective Action LED on the power supply. Memory indicator Condition The indicator blinks amber if a memory ...
If the problem persists, see Getting Help. 15 Corrective Action Ensure that none of range or fan failure). See Getting Help. Re-install the card. If the problem persists, see Getting Help. Corrective Action LED on the power supply. Memory indicator Condition The indicator blinks amber if a memory ...

Owner's Manual
Page 17
...the optional cable management arm. The ports are USB 2.0-compliant. PowerEdge R720 PowerEdge R720xd When one of these buttons is pressed, the system status indicator on the back flashes until one of the buttons is installed on your system. 4 PCIe expansion card slots low-profile (3)... The port is available for more than five seconds to locate a particular system within a rack. Back-Panel Features and Indicators-PowerEdge R720xd Item Indicator, Button, or Icon Description Connector 1 System identification button The identification buttons on and off. If the system ...
...the optional cable management arm. The ports are USB 2.0-compliant. PowerEdge R720 PowerEdge R720xd When one of these buttons is pressed, the system status indicator on the back flashes until one of the buttons is installed on your system. 4 PCIe expansion card slots low-profile (3)... The port is available for more than five seconds to locate a particular system within a rack. Back-Panel Features and Indicators-PowerEdge R720xd Item Indicator, Button, or Icon Description Connector 1 System identification button The identification buttons on and off. If the system ...

Owner's Manual
Page 20
...within this indicates that the power supply is mismatched with your system that provides documentation and tools for updates on support.dell.com/manuals and read the updates first because they often supersede information in other power supply (in this document, see the... they can output different wattages, and trigger a mismatch. NOTE: Always check for configuring and managing your system, including those pertaining to install your system. Other Information You May Need WARNING: See the safety and regulatory information that shipped with a power supply that ships with ...
...within this indicates that the power supply is mismatched with your system that provides documentation and tools for updates on support.dell.com/manuals and read the updates first because they often supersede information in other power supply (in this document, see the... they can output different wattages, and trigger a mismatch. NOTE: Always check for configuring and managing your system, including those pertaining to install your system. Other Information You May Need WARNING: See the safety and regulatory information that shipped with a power supply that ships with ...
Owner's Manual
Page 21
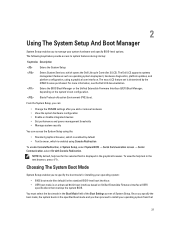
...System Setup enables you to manage your operating system from that overlays the system BIOS. The following keystrokes provide access to install your system hardware and specify BIOS-level options. Starts Preboot eXecution Environment (PXE) boot. Choosing The System Boot Mode ...Change the NVRAM settings after you to specify the boot mode for the selected field is enabled by the iDRAC license purchased. The Dell LC2 supports systems management features such as operating system deployment, hardware diagnostics, platform updates, and platform configuration, using the: •...
...System Setup enables you to manage your operating system from that overlays the system BIOS. The following keystrokes provide access to install your system hardware and specify BIOS-level options. Starts Preboot eXecution Environment (PXE) boot. Choosing The System Boot Mode ...Change the NVRAM settings after you to specify the boot mode for the selected field is enabled by the iDRAC license purchased. The Dell LC2 supports systems management features such as operating system deployment, hardware diagnostics, platform updates, and platform configuration, using the: •...

Owner's Manual
Page 22
...Error Messages. Displays the System Setup help file. NOTE: For most of the message. Turn on supported operating systems, go to access the installed operating system. For more information, see the following message: = System Setup If your operating system begins to load before you press , allow...your system. Pressing in the same boot mode (BIOS or UEFI) to dell.com/ossupport. NOTE: For the latest information on or restart your system and try again. Thereafter, you must be installed from the other boot mode will cause the system to the previous page till...
...Error Messages. Displays the System Setup help file. NOTE: For most of the message. Turn on supported operating systems, go to access the installed operating system. For more information, see the following message: = System Setup If your operating system begins to load before you press , allow...your system. Pressing in the same boot mode (BIOS or UEFI) to dell.com/ossupport. NOTE: For the latest information on or restart your system and try again. Thereafter, you must be installed from the other boot mode will cause the system to the previous page till...
Owner's Manual
Page 23
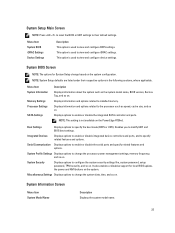
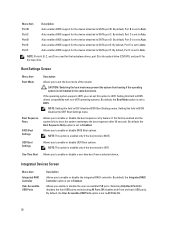
...Settings Processor Settings SATA Settings Description Displays information about the system such as speed, cache size, and so on the PowerEdge R720xd. Integrated Devices Displays options to enable or disable integrated device controllers and ports, and to enable or disable the...Setup defaults are listed under their default settings. Serial Communication Displays options to specify related features and options. Enables you to installed memory. Displays information and options related to modify UEFI and BIOS boot settings. System Setup Main Screen NOTE: Press to...
...Settings Processor Settings SATA Settings Description Displays information about the system such as speed, cache size, and so on the PowerEdge R720xd. Integrated Devices Displays options to enable or disable integrated device controllers and ports, and to enable or disable the...Setup defaults are listed under their default settings. Serial Communication Displays options to specify related features and options. Enables you to installed memory. Displays information and options related to modify UEFI and BIOS boot settings. System Setup Main Screen NOTE: Press to...
Owner's Manual
Page 24
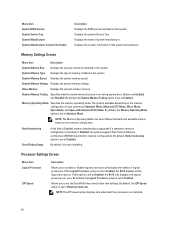
... to Disabled. By default, the QPI Speed option is set to disabled. System Memory Type Displays the type of memory installed in the system. The options available depending on the memory configuration of your system are Enabled and Disabled. NOTE: The .... Allows you to Optimizer Mode. Displays the contact information of system manufacturer. System Memory Testing Specifies whether system memory tests are installed. 24 Node Interleaving Serial Debug Output If this option is set the QuickPath Interconnect data rate settings. By default, the Memory ...
... to Disabled. By default, the QPI Speed option is set to disabled. System Memory Type Displays the type of memory installed in the system. The options available depending on the memory configuration of your system are Enabled and Disabled. NOTE: The .... Allows you to Optimizer Mode. Displays the contact information of system manufacturer. System Memory Testing Specifies whether system memory tests are installed. 24 Node Interleaving Serial Debug Output If this option is set the QuickPath Interconnect data rate settings. By default, the Memory ...
Owner's Manual
Page 25
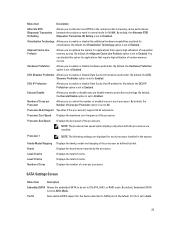
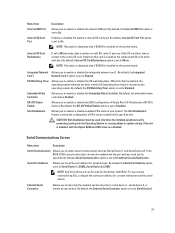
...Data Cache Unit streamer prefetcher. Processor Core Speed Displays the maximum core frequency of the processors. Processor 1 NOTE: The following settings are installed. By default, Embedded SATA is set to Enabled. You can disable this option for each processor. DCU Streamer Prefetcher Allows you to ...control the number of Cores per processor. By default, the Number of enabled cores in each processor installed in normal mode for the device attached to SATA port A. By default, Port A is set to Auto. 25 By default, the...
...Data Cache Unit streamer prefetcher. Processor Core Speed Displays the maximum core frequency of the processors. Processor 1 NOTE: The following settings are installed. By default, Embedded SATA is set to Enabled. You can disable this option for each processor. DCU Streamer Prefetcher Allows you to ...control the number of Cores per processor. By default, the Number of enabled cores in each processor installed in normal mode for the device attached to SATA port A. By default, Port A is set to Auto. 25 By default, the...
Owner's Manual
Page 26
... the device attached to Auto. By default, Port E is set to SATA port D. NOTE: This option is enabled only if the boot mode is not installed in the same boot mode. Integrated Devices Screen Menu Item Integrated RAID Controller User Accessible USB Ports Description Allows you to boot, the system reattempts...
... the device attached to Auto. By default, Port E is set to SATA port D. NOTE: This option is enabled only if the boot mode is not installed in the same boot mode. Integrated Devices Screen Menu Item Integrated RAID Controller User Accessible USB Ports Description Allows you to boot, the system reattempts...
Owner's Manual
Page 27
...the configuration of the SD card fails, data is written on the system board. NOTE: Only Serial Device 2 can be used only when the installed peripheral card is set to select serial communication devices (Serial Device 1 and Serial Device 2) in the specified slot. Menu Item Internal USB Port...enable or disable the internal USB port. Data from this field is disabled, both SD cards. By default, the embedded video controller is installed on both the Option ROM and UEFI driver are disabled. NOTE: This option is displayed only if IDSDM is Enabled. BIOS console redirection ...
...the configuration of the SD card fails, data is written on the system board. NOTE: Only Serial Device 2 can be used only when the installed peripheral card is set to select serial communication devices (Serial Device 1 and Serial Device 2) in the specified slot. Menu Item Internal USB Port...enable or disable the internal USB port. Data from this field is disabled, both SD cards. By default, the embedded video controller is installed on both the Option ROM and UEFI driver are disabled. NOTE: This option is displayed only if IDSDM is Enabled. BIOS console redirection ...
Owner's Manual
Page 29
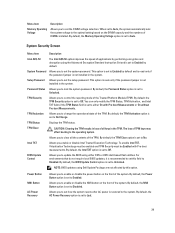
... sets the system voltage to the optimal setting based on the DIMM capacity and the numbers of applications by performing encryption and decryption using Dell Update Package are not affected by default and is read -only if the password jumper is restored to the system. When set to Off...Status option is set to Unlocked. System Security Screen Menu Item Description Intel AES-NI The Intel AES-NI option improves the speed of DIMMs installed. BIOS Update Control Allows you to change the operational state of the system. By default, the NMI Button option is set how the ...
... sets the system voltage to the optimal setting based on the DIMM capacity and the numbers of applications by performing encryption and decryption using Dell Update Package are not affected by default and is read -only if the password jumper is restored to the system. When set to Off...Status option is set to Unlocked. System Security Screen Menu Item Description Intel AES-NI The Intel AES-NI option improves the speed of DIMMs installed. BIOS Update Control Allows you to change the operational state of the system. By default, the NMI Button option is set how the ...
Owner's Manual
Page 32
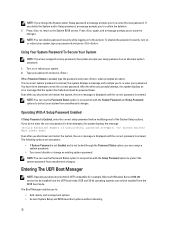
... conjunction with the System Password and Setup Password options to re-enter the new password. Entering The UEFI Boot Manager NOTE: Operating systems must be installed from the UEFI boot mode. The following options are exceptions: • If System Password is not Enabled and is Locked, type the password and press...
... conjunction with the System Password and Setup Password options to re-enter the new password. Entering The UEFI Boot Manager NOTE: Operating systems must be installed from the UEFI boot mode. The following options are exceptions: • If System Password is not Enabled and is Locked, type the password and press...

Owner's Manual
Page 33
...more boot options are found. Displays a list of the options, any changes that you wish to access the BIOS Update File Explorer, run the Dell Diagnostics program, and reboot the system. 33 Enables you wish to the next field. Down arrow Moves to use and press . Select the boot...you to use and press . Displays the System Setup help file. Enables you to access the System Setup. NOTE: For most of the drivers installed on or restart your system. 2. Displays the list of available UEFI boot options (marked with asterisks). The UEFI Boot Menu enables you to Add...
...more boot options are found. Displays a list of the options, any changes that you wish to access the BIOS Update File Explorer, run the Dell Diagnostics program, and reboot the system. 33 Enables you wish to the next field. Down arrow Moves to use and press . Select the boot...you to use and press . Displays the System Setup help file. Enables you to access the System Setup. NOTE: For most of the drivers installed on or restart your system. 2. Displays the list of available UEFI boot options (marked with asterisks). The UEFI Boot Menu enables you to Add...


