Network Users Manual - English
Page 37
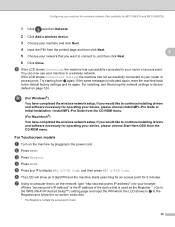
..., AES) Network key: (Encryption key, WEP key, Passphrase) Example Infrastructure HELLO WPA2-PSK AES 12345678 b Turn on the machine's control panel. d Press a or b to choose Setup Wizard. Record the current wireless ...configure your access point or wireless router. Configuring your machine for a wireless network (Not available for MFC-5490CN and MFC-5890CN) Configuring your machine for further information. e Press a or b to installation. For Touchscreen ...you are going to connect your Brother machine to your system administrator prior to choose WLAN. Press OK.
..., AES) Network key: (Encryption key, WEP key, Passphrase) Example Infrastructure HELLO WPA2-PSK AES 12345678 b Turn on the machine's control panel. d Press a or b to choose Setup Wizard. Record the current wireless ...configure your access point or wireless router. Configuring your machine for a wireless network (Not available for MFC-5490CN and MFC-5890CN) Configuring your machine for further information. e Press a or b to installation. For Touchscreen ...you are going to connect your Brother machine to your system administrator prior to choose WLAN. Press OK.

Network Users Manual - English
Page 39
... (if needed) „ WPA-PSK Encryption (TKIP or AES) „ WPA-PSK password (if needed) b Turn on page 179.) Go to p. If your network. h Choose using a or b. Go to k. If you... chose Shared Key, go to continue installing drivers and software necessary for MFC-5490CN and MFC-5890CN) (For Windows®) You have completed the wireless network setup. Go to k. If you... the SSID, you chose None, go to j. e Press WLAN. If the machine finds more than one network use a or b key to choose your access point is set to r. Go to h. Configuring...
... (if needed) „ WPA-PSK Encryption (TKIP or AES) „ WPA-PSK password (if needed) b Turn on page 179.) Go to p. If your network. h Choose using a or b. Go to k. If you... chose Shared Key, go to continue installing drivers and software necessary for MFC-5490CN and MFC-5890CN) (For Windows®) You have completed the wireless network setup. Go to k. If you... the SSID, you chose None, go to j. e Press WLAN. If the machine finds more than one network use a or b key to choose your access point is set to r. Go to h. Configuring...
Network Users Manual - English
Page 41
...to access one -push ... MFC-5490CN and MFC-...5890CN) Using the SES/WPS/AOSS control panel menu to configure your machine for a wireless network 3 If your wireless access point supports either SecureEasySetup™, Wi-Fi Protected Setup™ (PBC 1) or AOSS™ (one... -push mode. 1 Push Button Configuration Note Routers or access points that support SecureEasySetup™, Wi-Fi Protected Setup™ or AOSS™ have the appropriate symbols shown below. c Press a or b to choose SES/WPS/AOSS. e Press a or b to choose Network. Your Brother...Method of the Brother machine. d Press...
...to access one -push ... MFC-5490CN and MFC-...5890CN) Using the SES/WPS/AOSS control panel menu to configure your machine for a wireless network 3 If your wireless access point supports either SecureEasySetup™, Wi-Fi Protected Setup™ (PBC 1) or AOSS™ (one... -push mode. 1 Push Button Configuration Note Routers or access points that support SecureEasySetup™, Wi-Fi Protected Setup™ or AOSS™ have the appropriate symbols shown below. c Press a or b to choose SES/WPS/AOSS. e Press a or b to choose Network. Your Brother...Method of the Brother machine. d Press...
Network Users Manual - English
Page 43
... WPS or Connecting AOSS), then Connection Failed, the machine has not successfully connected to factory default on page 124. The machine has detected more than one router or access point has SecureEasySetup™, Wi-Fi Protected Setup™ mode or AOSS™ mode enabled and try again. For resetting, see ...Restoring the network settings to your access point. Configuring your machine for a wireless network (Not available for MFC-5490CN and MFC-5890CN) For Touchscreen models 3 a Turn on the machine by your access point.
... WPS or Connecting AOSS), then Connection Failed, the machine has not successfully connected to factory default on page 124. The machine has detected more than one router or access point has SecureEasySetup™, Wi-Fi Protected Setup™ mode or AOSS™ mode enabled and try again. For resetting, see ...Restoring the network settings to your access point. Configuring your machine for a wireless network (Not available for MFC-5490CN and MFC-5890CN) For Touchscreen models 3 a Turn on the machine by your access point.

Network Users Manual - English
Page 45
...an 8 digit PIN and the machine starts searching for an access point for MFC-5490CN and MFC-5890CN) Using the PIN Method of Wi-Fi Protected Setup™ 3 If...Press OK. If you can configure the machine easily without a computer. Note The setting page is one of the device that manages the wireless LAN), you are using your machine) to the Registrar ...the instructions below . See the instruction manual that came with your access point / router. a Turn on the brand of the Brother machine. d Press a or b to choose Network. See the instruction manual that came with ...
...an 8 digit PIN and the machine starts searching for an access point for MFC-5490CN and MFC-5890CN) Using the PIN Method of Wi-Fi Protected Setup™ 3 If...Press OK. If you can configure the machine easily without a computer. Note The setting page is one of the device that manages the wireless LAN), you are using your machine) to the Registrar ...the instructions below . See the instruction manual that came with your access point / router. a Turn on the brand of the Brother machine. d Press a or b to choose Network. See the instruction manual that came with ...
Network Users Manual - English
Page 46
...default on page 124. (For Windows®) You have completed the wireless network setup. Configuring your machine for a wireless network (Not available for MFC-5490CN and MFC-5890CN) 1 Click and then Network. 2 Click Add a wireless device. 3 Choose your machine and click Next. 4 Input the PIN from ...type "http://access points IP address/" into your device, please choose Start Here OSX from the CD-ROM menu. For Touchscreen models 3 a Turn on the machine by plugging in f to the default factory settings and try again. d Press WLAN. If the LCD shows Connection Failed, the...
...default on page 124. (For Windows®) You have completed the wireless network setup. Configuring your machine for a wireless network (Not available for MFC-5490CN and MFC-5890CN) 1 Click and then Network. 2 Click Add a wireless device. 3 Choose your machine and click Next. 4 Input the PIN from ...type "http://access points IP address/" into your device, please choose Start Here OSX from the CD-ROM menu. For Touchscreen models 3 a Turn on the machine by plugging in f to the default factory settings and try again. d Press WLAN. If the LCD shows Connection Failed, the...

Network Users Manual - English
Page 49
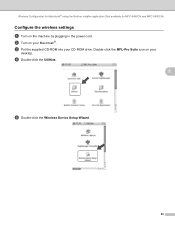
Wireless configuration for Windows® using the Brother installer application (Not available for MFC-5490CN and MFC-5890CN) Configure the wireless settings 4 a Turn on your computer. e Click Wireless LAN Setup Wizard. 39 b Turn on the machine by plugging in the power cord. If the language screen appears, choose your machine... • If this window does not appear, use Windows® Explorer to run the start.exe program from the root folder of the Brother CD-ROM. • The screen on your machine may vary depending on your CD-ROM drive. d The CD-ROM main menu will ...
Wireless configuration for Windows® using the Brother installer application (Not available for MFC-5490CN and MFC-5890CN) Configure the wireless settings 4 a Turn on your computer. e Click Wireless LAN Setup Wizard. 39 b Turn on the machine by plugging in the power cord. If the language screen appears, choose your machine... • If this window does not appear, use Windows® Explorer to run the start.exe program from the root folder of the Brother CD-ROM. • The screen on your machine may vary depending on your CD-ROM drive. d The CD-ROM main menu will ...

Network Users Manual - English
Page 55
...Brother installer application (Not available for MFC-5490CN and MFC-5890CN) Configuration using Windows® Firewall or a firewall function of the machine, you must reset the network LAN settings before you can configure the wireless settings again. b Press Menu. Press a or b to choose Network, press 4 OK. Press Network. c Turn... on the machine by plugging in the power cord. d Put the supplied CD-ROM into your machine. Once you are using the SES/WPS/AOSS control panel menu (One-Push method) 4 Before configuring the wireless ...
...Brother installer application (Not available for MFC-5490CN and MFC-5890CN) Configuration using Windows® Firewall or a firewall function of the machine, you must reset the network LAN settings before you can configure the wireless settings again. b Press Menu. Press a or b to choose Network, press 4 OK. Press Network. c Turn... on the machine by plugging in the power cord. d Put the supplied CD-ROM into your machine. Once you are using the SES/WPS/AOSS control panel menu (One-Push method) 4 Before configuring the wireless ...
Network Users Manual - English
Page 60
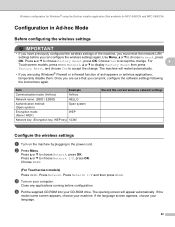
...(Encryption key, WEP key) 12345 Record the current wireless network settings Configure the wireless settings 4 a Turn on your language. 50 Press Network I /F, press OK. Press a or b to choose Network, ...Choose Yes to choose Network I /F and then press WLAN. Once you are using the Brother installer application (Not available for Windows® using Windows® Firewall or a firewall function.... Press a or b to accept the change . Wireless configuration for MFC-5490CN and MFC-5890CN) Configuration in the power cord. Close any applications running before you...
...(Encryption key, WEP key) 12345 Record the current wireless network settings Configure the wireless settings 4 a Turn on your language. 50 Press Network I /F, press OK. Press a or b to choose Network, ...Choose Yes to choose Network I /F and then press WLAN. Once you are using the Brother installer application (Not available for Windows® using Windows® Firewall or a firewall function.... Press a or b to accept the change . Wireless configuration for MFC-5490CN and MFC-5890CN) Configuration in the power cord. Close any applications running before you...
Network Users Manual - English
Page 69
d Double-click the Utilities. 5 e Double-click the Wireless Device Setup Wizard. 59 Double-click the MFL-Pro Suite icon on your CD-ROM drive. c Put the supplied CD-ROM into your desktop. b Turn on the machine by plugging in the power cord. Wireless Configuration for Macintosh® using the Brother installer application (Not available for MFC-5490CN and MFC-5890CN) Configure the wireless settings 5 a Turn on your Macintosh®.
d Double-click the Utilities. 5 e Double-click the Wireless Device Setup Wizard. 59 Double-click the MFL-Pro Suite icon on your CD-ROM drive. c Put the supplied CD-ROM into your desktop. b Turn on the machine by plugging in the power cord. Wireless Configuration for Macintosh® using the Brother installer application (Not available for MFC-5490CN and MFC-5890CN) Configure the wireless settings 5 a Turn on your Macintosh®.

Network Users Manual - English
Page 75
... or b to accept the change . e Double-click the Utilities. 65 Double-click the MFL-Pro Suite icon on your Macintosh®. c Turn on the machine by plugging in the power cord. For Touchscreen models, press MENU, Network, a or b to display Factory Reset then press ...Yes to choose Network, press OK. Wireless Configuration for Macintosh® using the Brother installer application (Not available for MFC-5490CN and MFC-5890CN) Configuration using the SES/WPS/AOSS control panel menu (One-Push method) 5 Before configuring the wireless settings 5 IMPORTANT If you have previously ...
... or b to accept the change . e Double-click the Utilities. 65 Double-click the MFL-Pro Suite icon on your Macintosh®. c Turn on the machine by plugging in the power cord. For Touchscreen models, press MENU, Network, a or b to display Factory Reset then press ...Yes to choose Network, press OK. Wireless Configuration for Macintosh® using the Brother installer application (Not available for MFC-5490CN and MFC-5890CN) Configuration using the SES/WPS/AOSS control panel menu (One-Push method) 5 Before configuring the wireless settings 5 IMPORTANT If you have previously ...

Network Users Manual - English
Page 79
Press Network I /F, press OK. Wireless Configuration for Macintosh® using the Brother installer application (Not available for MFC-5490CN and MFC-5890CN) Configuration in the power cord. Press a or b to accept the change . b Press Menu. Choose WLAN. (For Touchscreen models...Open system) Open system Encryption mode: (None / WEP) WEP Network key: (Encryption key, WEP key) 12345 Configure the wireless settings 5 a Turn on the machine by plugging in Ad-hoc Mode 5 Before configuring the wireless settings 5 IMPORTANT If you have previously configured the wireless settings of the...
Press Network I /F, press OK. Wireless Configuration for Macintosh® using the Brother installer application (Not available for MFC-5490CN and MFC-5890CN) Configuration in the power cord. Press a or b to accept the change . b Press Menu. Choose WLAN. (For Touchscreen models...Open system) Open system Encryption mode: (None / WEP) WEP Network key: (Encryption key, WEP key) 12345 Configure the wireless settings 5 a Turn on the machine by plugging in Ad-hoc Mode 5 Before configuring the wireless settings 5 IMPORTANT If you have previously configured the wireless settings of the...

Network Users Manual - English
Page 144
... Click Add. (For Mac OS® X 10.2.4 to 10.3.x) Go to f. (For Mac OS® X 10.4.x or greater) Go to 10.4.x a Turn on Mac OS® X 10.2.4 or greater. b From the Go menu, choose Applications. c Open the Utilities folder. 9 Network printing from a Macintosh®...; 9 Overview 9 This chapter explains how to print from a Macintosh®, visit the Brother Solutions Center at: http://solutions.brother.com. For updated information on printing from a Macintosh® on a Network using the Simple Network Configuration capabilities on the machine...
... Click Add. (For Mac OS® X 10.2.4 to 10.3.x) Go to f. (For Mac OS® X 10.4.x or greater) Go to 10.4.x a Turn on Mac OS® X 10.2.4 or greater. b From the Go menu, choose Applications. c Open the Utilities folder. 9 Network printing from a Macintosh®...; 9 Overview 9 This chapter explains how to print from a Macintosh®, visit the Brother Solutions Center at: http://solutions.brother.com. For updated information on printing from a Macintosh® on a Network using the Simple Network Configuration capabilities on the machine...
Network Users Manual - English
Page 145
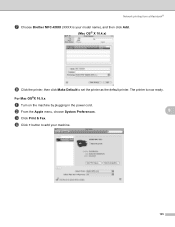
c Click Print & Fax. b From the Apple menu, choose System Preferences. Network printing from a Macintosh® g Choose Brother MFC-XXXX (XXXX is now ready. d Click + button to set the printer as the default printer. For Mac OS®X 10.5.x a Turn on the machine by plugging in the power cord. The printer is your model name), and then click Add. (Mac OS® X 10.4.x) 9 h Click the printer, then click Make Default to add your machine. 9 9 135
c Click Print & Fax. b From the Apple menu, choose System Preferences. Network printing from a Macintosh® g Choose Brother MFC-XXXX (XXXX is now ready. d Click + button to set the printer as the default printer. For Mac OS®X 10.5.x a Turn on the machine by plugging in the power cord. The printer is your model name), and then click Add. (Mac OS® X 10.4.x) 9 h Click the printer, then click Make Default to add your machine. 9 9 135
Network Users Manual - English
Page 181
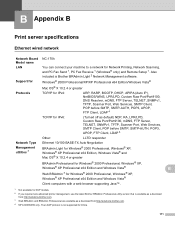
... SNMPv1, TFTP, Scanner Port, Web Services, SMTP Client, POP before SMTP, SMTP-AUTH, POP3, APOP, FTP Client, LDAP 4 TCP/IP for IPv6: (Turned off as default) NDP, RA, LPR/LPD, Custom Raw Port/Port9100, mDNS, FTP Server, TELNET, SNMPv1, TFTP, Scanner Port, Web Services, SMTP Client,...;. 1 Not available for China. 171 Also included is available as a download from http://solutions.brother.com. 3 Web BRAdmin and BRAdmin Professional are available as a download from http://solutions.brother.com. 4 MFC-6890CDW only. The LDAP protocol is not supported for DCP models. 2 If you require more ...
... SNMPv1, TFTP, Scanner Port, Web Services, SMTP Client, POP before SMTP, SMTP-AUTH, POP3, APOP, FTP Client, LDAP 4 TCP/IP for IPv6: (Turned off as default) NDP, RA, LPR/LPD, Custom Raw Port/Port9100, mDNS, FTP Server, TELNET, SNMPv1, TFTP, Scanner Port, Web Services, SMTP Client,...;. 1 Not available for China. 171 Also included is available as a download from http://solutions.brother.com. 3 Web BRAdmin and BRAdmin Professional are available as a download from http://solutions.brother.com. 4 MFC-6890CDW only. The LDAP protocol is not supported for DCP models. 2 If you require more ...

Network Users Manual - English
Page 182
..., FTP Server, TELNET, SNMPv1, TFTP, Scanner Port, Web Services, SMTP Client, POP before SMTP, SMTP-AUTH, POP3, APOP, FTP Client, LDAP 4 TCP/IP for IPv6: (Turned off as default) NDP, RA, LPR/LPD, Custom Raw Port/Port9100, mDNS, FTP Server, TELNET, SNMPv1, TFTP, Scanner Port, Web Services, SMTP Client, POP before... Vista® Web BRAdmin 3 for Network Printing, Network Scanning, and PC Fax Send 1, PC Fax Receive 1 (Windows® only) and Remote Setup 1. Also included is Brother BRAdmin Light 2 Network Management software.
..., FTP Server, TELNET, SNMPv1, TFTP, Scanner Port, Web Services, SMTP Client, POP before SMTP, SMTP-AUTH, POP3, APOP, FTP Client, LDAP 4 TCP/IP for IPv6: (Turned off as default) NDP, RA, LPR/LPD, Custom Raw Port/Port9100, mDNS, FTP Server, TELNET, SNMPv1, TFTP, Scanner Port, Web Services, SMTP Client, POP before... Vista® Web BRAdmin 3 for Network Printing, Network Scanning, and PC Fax Send 1, PC Fax Receive 1 (Windows® only) and Remote Setup 1. Also included is Brother BRAdmin Light 2 Network Management software.
Quick Setup Guide - English
Page 5
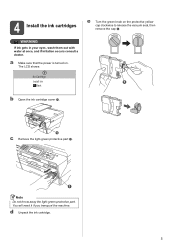
4 Install the ink cartridges e Turn the green knob on . The LCD shows: No Cartridge Install Ink 1 Black b Open the ink cartridge cover a. 1 c Remove the light-green protective part a. 1 Note Do not throw away the light-green protective part. WARNING If ink gets in your eyes, wash them out with water at once, and if irritation occurs consult a doctor. a Make sure that the power is turned on the protective yellow cap clockwise to release the vacuum seal, then remove the cap a. d Unpack the ink cartridge. 5 You will need it if you transport the machine.
4 Install the ink cartridges e Turn the green knob on . The LCD shows: No Cartridge Install Ink 1 Black b Open the ink cartridge cover a. 1 c Remove the light-green protective part a. 1 Note Do not throw away the light-green protective part. WARNING If ink gets in your eyes, wash them out with water at once, and if irritation occurs consult a doctor. a Make sure that the power is turned on the protective yellow cap clockwise to release the vacuum seal, then remove the cap a. d Unpack the ink cartridge. 5 You will need it if you transport the machine.
Quick Setup Guide - English
Page 6
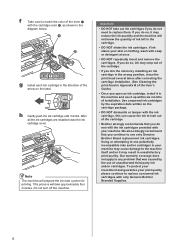
...approximately four minutes. We also strongly recommend that you do so, it may seep out of the cartridge. • If you mix the colors by installing an ink cartridge in the wrong position, clean the print head several times after correcting the cartridge installation. (See Cleaning the ...it up within six months of installation. To protect your investment and guarantee your skin or clothing, wash with only Genuine Brother Branded Supplies. 6 Do not turn off the machine. Our warranty coverage does not apply to any problem that was caused by the expiration date written on ...
...approximately four minutes. We also strongly recommend that you do so, it may seep out of the cartridge. • If you mix the colors by installing an ink cartridge in the wrong position, clean the print head several times after correcting the cartridge installation. (See Cleaning the ...it up within six months of installation. To protect your investment and guarantee your skin or clothing, wash with only Genuine Brother Branded Supplies. 6 Do not turn off the machine. Our warranty coverage does not apply to any problem that was caused by the expiration date written on ...
Quick Setup Guide - English
Page 30
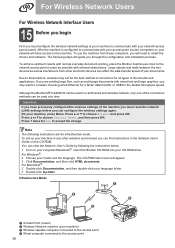
To use the machine from other wireless environment you can find instructions in a both wired and wireless network, only one of your machine) c Wireless capable computer connected to the access point d Wired computer connected to the network access point (router) as ... methods can view the Network User's Guide by following the instructions below. 1 Turn on the CD-ROM. On your model and the language. For Windows®: 2 Choose your machine, press Menu. Although the Brother MFC-6490CW can configure the wireless settings again. To set up your network access point (router...
To use the machine from other wireless environment you can find instructions in a both wired and wireless network, only one of your machine) c Wireless capable computer connected to the access point d Wired computer connected to the network access point (router) as ... methods can view the Network User's Guide by following the instructions below. 1 Turn on the CD-ROM. On your model and the language. For Windows®: 2 Choose your machine, press Menu. Although the Brother MFC-6490CW can configure the wireless settings again. To set up your network access point (router...
Software Users Manual - English
Page 3
... ...10 Copies ...11 Automatic Duplex Printing (MFC-6890CDW only 12 Advanced tab...14 Color/Grayscale ...15 Color Settings ...15 Use Watermark...16 Watermark Settings ...17 Other Print Options...19 Support ...28 Using FaceFilter Studio for photo printing by REALLUSION 30 Starting FaceFilter Studio with your Brother machine turned On 31 Starting FaceFilter Studio when your...
... ...10 Copies ...11 Automatic Duplex Printing (MFC-6890CDW only 12 Advanced tab...14 Color/Grayscale ...15 Color Settings ...15 Use Watermark...16 Watermark Settings ...17 Other Print Options...19 Support ...28 Using FaceFilter Studio for photo printing by REALLUSION 30 Starting FaceFilter Studio with your Brother machine turned On 31 Starting FaceFilter Studio when your...


