
Quick Setup Guide - English
Page 2
... out of the paper. Important Do not push the paper in the tray. Check that the triangular marks c on the paper side guides a and paper ... edges of the machine. 1 c With both hands. e Gently put the paper into paper tray#1 print side down and top edge first. b Open the paper tray cover a. 1 2 f Gently adjust the paper side guides to the paper with the mark...hold the universal guide release button a as you slide out the front of paper tray#1. • When you load a different paper size in tray#1 or tray#2, you will need to change the paper size setting in the machine at the same...
... out of the paper. Important Do not push the paper in the tray. Check that the triangular marks c on the paper side guides a and paper ... edges of the machine. 1 c With both hands. e Gently put the paper into paper tray#1 print side down and top edge first. b Open the paper tray cover a. 1 2 f Gently adjust the paper side guides to the paper with the mark...hold the universal guide release button a as you slide out the front of paper tray#1. • When you load a different paper size in tray#1 or tray#2, you will need to change the paper size setting in the machine at the same...

Quick Setup Guide - English
Page 3
g Close the paper tray cover. Check that the paper is flat in Chapter 2 of the User's Guide. 3 i While holding the paper tray in place, pull out the paper support a until it clicks, and then unfold the paper support flap b. 2 1 Note For information about tray#2, see Loading paper in paper tray #2 in the tray and below the maximum paper mark a. 1 h Slowly push the paper tray completely into the machine.
g Close the paper tray cover. Check that the paper is flat in Chapter 2 of the User's Guide. 3 i While holding the paper tray in place, pull out the paper support a until it clicks, and then unfold the paper support flap b. 2 1 Note For information about tray#2, see Loading paper in paper tray #2 in the tray and below the maximum paper mark a. 1 h Slowly push the paper tray completely into the machine.

Quick Setup Guide - English
Page 7
... setup. d Press a or b to b. 6 Choose your language. 5 Check the print quality Important Make sure you put paper in the upper tray for both black and color, the LCD shows: Start Cleaning? a When the preparation process has finished, the LCD shows this message . Set Paper and Press Start Press... Color Start. b Check the quality of the four color blocks a on the sheet. (black/yellow/cyan/magenta) 1 c If all lines are clear and visible, press 1 (Yes)...
... setup. d Press a or b to b. 6 Choose your language. 5 Check the print quality Important Make sure you put paper in the upper tray for both black and color, the LCD shows: Start Cleaning? a When the preparation process has finished, the LCD shows this message . Set Paper and Press Start Press... Color Start. b Check the quality of the four color blocks a on the sheet. (black/yellow/cyan/magenta) 1 c If all lines are clear and visible, press 1 (Yes)...
Software Users Manual - English
Page 15
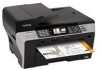
Note Check Slow Drying Paper when printing with plain paper on models with Paper Tray#2) e Click OK (6) to apply your setting for Slow Drying Paper, Media Type and Quality (1). This setting may cause some slight blurring of Copies ... Duplex/Booklet (3) if you want to the default settings, click Default (5), then OK (6). b Choose Borderless, Paper Size, Color Mode, Orientation, number of text. To return to use the Duplex (two-sided) printing feature. (Available on MFC-6890CDW) d Select the Paper Source (4). (Available on which ink dries slowly. Basic tab Printing 1 1 1 7 2 3 4 5 6 a...
Note Check Slow Drying Paper when printing with plain paper on models with Paper Tray#2) e Click OK (6) to apply your setting for Slow Drying Paper, Media Type and Quality (1). This setting may cause some slight blurring of Copies ... Duplex/Booklet (3) if you want to the default settings, click Default (5), then OK (6). b Choose Borderless, Paper Size, Color Mode, Orientation, number of text. To return to use the Duplex (two-sided) printing feature. (Available on MFC-6890CDW) d Select the Paper Source (4). (Available on which ink dries slowly. Basic tab Printing 1 1 1 7 2 3 4 5 6 a...
Software Users Manual - English
Page 20
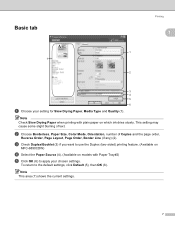
... it may wrinkle. „ If the paper is curled, flatten it and then put it back in the paper tray. „ If the paper is not feeding properly, it . In this mode, the machine prints on both sides...Duplex/Booklet function supports Plain Paper for printing on both sides of the paper automatically. Guidelines for the Media Type and Tray 1 as the Paper Source only. „ If the paper is thin, it may be curled. Check Duplex/... to use the duplex (two-sided) printing feature. Printing Automatic Duplex Printing (MFC-6890CDW only) 1 1 The supplied printer driver supports duplex printing.
... it may wrinkle. „ If the paper is curled, flatten it and then put it back in the paper tray. „ If the paper is not feeding properly, it . In this mode, the machine prints on both sides...Duplex/Booklet function supports Plain Paper for printing on both sides of the paper automatically. Guidelines for the Media Type and Tray 1 as the Paper Source only. „ If the paper is thin, it may be curled. Check Duplex/... to use the duplex (two-sided) printing feature. Printing Automatic Duplex Printing (MFC-6890CDW only) 1 1 The supplied printer driver supports duplex printing.

Software Users Manual - English
Page 30
Printing Photo Bypass Tray Help 1 Set the Photo Bypass Tray Help to On to display help instructions on how to use the photo paper tray when 1 you select Photo or Photo L paper. (Available on Photo Bypass Tray models) 22
Printing Photo Bypass Tray Help 1 Set the Photo Bypass Tray Help to On to display help instructions on how to use the photo paper tray when 1 you select Photo or Photo L paper. (Available on Photo Bypass Tray models) 22
Software Users Manual - English
Page 33
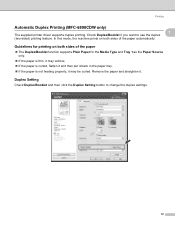
... machine pauses during the printing process. You can choose to the Basic tab and Advanced tab and then click Default. (For models with two paper trays) Paper Tray #2 suppourts Print All Pages only. 25 Note • The print speed of copies you want and check Collate in collated format. The error message... print the even-numbered pages only. The Print Odd Pages and Print Even Pages settings only support Letter for Paper Size and Plain Paper for MFC-6890CDW) You can print multiple copies in the Basic tab. Print Order (Not available for Media Type.
... machine pauses during the printing process. You can choose to the Basic tab and Advanced tab and then click Default. (For models with two paper trays) Paper Tray #2 suppourts Print All Pages only. 25 Note • The print speed of copies you want and check Collate in collated format. The error message... print the even-numbered pages only. The Print Odd Pages and Print Even Pages settings only support Letter for Paper Size and Plain Paper for MFC-6890CDW) You can print multiple copies in the Basic tab. Print Order (Not available for Media Type.
Software Users Manual - English
Page 34
.... Do not add the printed pages to the next step, make sure the printed pages are completely flat before putting them back in the paper tray, with the side to be printed on 5 sheets of paper, you must set the printer driver options to print all oddnumbered pages in reverse order... Even Pages settings. 1 1 If you want to print a 10 pages file on (the blank side) face down and the top page first. e Empty the paper tray. d After the machine prints the odd-numbered pages, remove the printed pages from the output paper...
.... Do not add the printed pages to the next step, make sure the printed pages are completely flat before putting them back in the paper tray, with the side to be printed on 5 sheets of paper, you must set the printer driver options to print all oddnumbered pages in reverse order... Even Pages settings. 1 1 If you want to print a 10 pages file on (the blank side) face down and the top page first. e Empty the paper tray. d After the machine prints the odd-numbered pages, remove the printed pages from the output paper...

Software Users Manual - English
Page 35
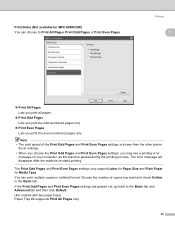
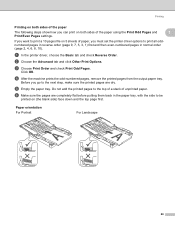
Guidelines for printing on the other side of the paper „ If the paper is thin, it may be curled. Remove the paper and straighten it may wrinkle. „ If the paper is curled, flatten it and then put it back in the paper tray. „ If the paper is not feeding properly, it . Printing 1 1 27 g In the printer driver, choose the Basic tab and un-check Reverse Order. Click OK. i Choose Print Order and check Print Even Pages. h Choose the Advanced tab and click Other Print Options. j The machine will print all the even-numbered pages on both sides of the paper.
Guidelines for printing on the other side of the paper „ If the paper is thin, it may be curled. Remove the paper and straighten it may wrinkle. „ If the paper is curled, flatten it and then put it back in the paper tray. „ If the paper is not feeding properly, it . Printing 1 1 27 g In the printer driver, choose the Basic tab and un-check Reverse Order. Click OK. i Choose Print Order and check Print Even Pages. h Choose the Advanced tab and click Other Print Options. j The machine will print all the even-numbered pages on both sides of the paper.

Software Users Manual - English
Page 168
... back in the following way: Media Type: Plain Paper Paper Size: A4/US Letter/Executive/JB5/A5/A6/Postcard 1 Borderless: Postcard 1 Paper Source: Auto Select/Tray 1 For Mac OS® X 10.2.x a Select Duplex. Remove the paper and straighten it may wrinkle. „ If the paper is not feeding properly, it . b Check... for printing on Short Edge. 9 9 160 In this mode, the machine prints on both sides of the paper automatically. Printing and Faxing Automatic Duplex Printing (MFC-6890CDW only) 9 The supplied printer driver supports duplex (two-sided) printing.
... back in the following way: Media Type: Plain Paper Paper Size: A4/US Letter/Executive/JB5/A5/A6/Postcard 1 Borderless: Postcard 1 Paper Source: Auto Select/Tray 1 For Mac OS® X 10.2.x a Select Duplex. Remove the paper and straighten it may wrinkle. „ If the paper is not feeding properly, it . b Check... for printing on Short Edge. 9 9 160 In this mode, the machine prints on both sides of the paper automatically. Printing and Faxing Automatic Duplex Printing (MFC-6890CDW only) 9 The supplied printer driver supports duplex (two-sided) printing.
Software Users Manual - English
Page 171
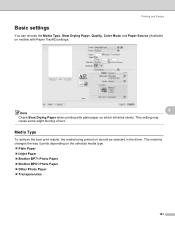
... the Media Type, Slow Drying Paper, Quality, Color Mode and Paper Source (Available on models with Paper Tray#2) settings. 9 Note Check Slow Drying Paper when printing with plain paper on the selected media type. „ Plain Paper „ Inkjet Paper „ Brother BP71 Photo Paper „ Brother BP61 Photo Paper „ Other Photo Paper „...
... the Media Type, Slow Drying Paper, Quality, Color Mode and Paper Source (Available on models with Paper Tray#2) settings. 9 Note Check Slow Drying Paper when printing with plain paper on the selected media type. „ Plain Paper „ Inkjet Paper „ Brother BP71 Photo Paper „ Brother BP61 Photo Paper „ Other Photo Paper „...

Users Manual - English
Page 9
...User's Guide 2 Viewing Documentation 2 Accessing Brother Support (For Windows 5 MFC-6490CW Control panel overview 6 LCD screen...8 Basic Operations 8 2 Loading paper and documents 9 Loading paper and other print media 9 Loading paper in paper tray #1 9 Loading paper in paper tray #2 (MFC-6490CW only 12 Loading envelopes and post cards ...Mode Timer...26 Paper settings...26 Paper Size and Type (MFC-5890CN only 26 Paper Size and Type (MFC-6490CW only 27 Tray use in Copy mode (MFC-6490CW only 28 Tray use in Fax mode (MFC-6490CW only 28 Secure Paper Feed mode for Ledger size Short ...
...User's Guide 2 Viewing Documentation 2 Accessing Brother Support (For Windows 5 MFC-6490CW Control panel overview 6 LCD screen...8 Basic Operations 8 2 Loading paper and documents 9 Loading paper and other print media 9 Loading paper in paper tray #1 9 Loading paper in paper tray #2 (MFC-6490CW only 12 Loading envelopes and post cards ...Mode Timer...26 Paper settings...26 Paper Size and Type (MFC-5890CN only 26 Paper Size and Type (MFC-6490CW only 27 Tray use in Copy mode (MFC-6490CW only 28 Tray use in Fax mode (MFC-6490CW only 28 Secure Paper Feed mode for Ledger size Short ...

Users Manual - English
Page 11
... the Receiving Priority 54 Receiving a fax at the end of a conversation 55 Printing a fax from the memory 55 Receiving faxes into memory when the paper tray is empty 55 Memory Receive (Black & White only 56 Fax Forwarding 56 Paging ...57 Fax Storage 58 PC Fax Receive 58 Changing the destination PC...
... the Receiving Priority 54 Receiving a fax at the end of a conversation 55 Printing a fax from the memory 55 Receiving faxes into memory when the paper tray is empty 55 Memory Receive (Black & White only 56 Fax Forwarding 56 Paging ...57 Fax Storage 58 PC Fax Receive 58 Changing the destination PC...

Users Manual - English
Page 24
... Status (MFC-6490CW only) A four level indicator shows the current wireless signal strength if you are in the machine. d Press a or b to choose General Setup. b Press a or b to choose Mode Timer. Basic Operations 1 The following steps show that more than one fax job has been received. a Press Menu. General Setup Mode Timer Tray Setting...
... Status (MFC-6490CW only) A four level indicator shows the current wireless signal strength if you are in the machine. d Press a or b to choose General Setup. b Press a or b to choose Mode Timer. Basic Operations 1 The following steps show that more than one fax job has been received. a Press Menu. General Setup Mode Timer Tray Setting...

Users Manual - English
Page 25
... to Auto Select you are using A5 or smaller size paper, make sure that the paper tray is open, close it, and then close the paper support. Loading paper in paper tray #2 (MFC-6490CW only) on page 12. • If the tray used for Fax mode is set to reset the machine after refilling paper... tray#1. Note • When you are using Legal, Ledger or A3 size paper, press and hold the universal...
... to Auto Select you are using A5 or smaller size paper, make sure that the paper tray is open, close it, and then close the paper support. Loading paper in paper tray #2 (MFC-6490CW only) on page 12. • If the tray used for Fax mode is set to reset the machine after refilling paper... tray#1. Note • When you are using Legal, Ledger or A3 size paper, press and hold the universal...
Users Manual - English
Page 26
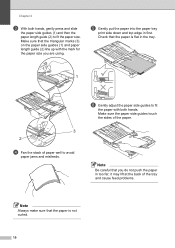
Check that you are using. Make sure the paper side guides touch the sides of the tray and cause feed problems. Note Always make sure that the triangular marks (3) on the paper side guides (1) and ... fit the paper size. Note Be careful that the paper is not curled. 10 Make sure that the paper is flat in the tray. 1 3 2 d Fan the stack of paper well to fit the paper with the mark for the paper size you do not.... f Gently adjust the paper side guides to avoid paper jams and misfeeds. e Gently put the paper into the paper tray print side down and top edge in too far;
Check that you are using. Make sure the paper side guides touch the sides of the tray and cause feed problems. Note Always make sure that the triangular marks (3) on the paper side guides (1) and ... fit the paper size. Note Be careful that the paper is not curled. 10 Make sure that the paper is flat in the tray. 1 3 2 d Fan the stack of paper well to fit the paper with the mark for the paper size you do not.... f Gently adjust the paper side guides to avoid paper jams and misfeeds. e Gently put the paper into the paper tray print side down and top edge in too far;

Users Manual - English
Page 27
...machine too quickly. i While holding the paper tray in slowly. Then shorten the tray by trapping it clicks, and then unfold the paper support flap (2). 2 1 11 Please push Tray #1 in place, 2 pull out the paper support (1) until it between Tray #1 and Tray #2. Doing this may cause injury to your... (1). 2 Adjust the paper length guide (2) to fit the paper size you shorten tray#1, take the paper out of tray. g Close the output paper tray cover. Check that the paper is flat in the tray and below the maximum paper mark (1). 1 Loading paper and documents Note When you ...
...machine too quickly. i While holding the paper tray in slowly. Then shorten the tray by trapping it clicks, and then unfold the paper support flap (2). 2 1 11 Please push Tray #1 in place, 2 pull out the paper support (1) until it between Tray #1 and Tray #2. Doing this may cause injury to your... (1). 2 Adjust the paper length guide (2) to fit the paper size you shorten tray#1, take the paper out of tray. g Close the output paper tray cover. Check that the paper is flat in the tray and below the maximum paper mark (1). 1 Loading paper and documents Note When you ...

Users Manual - English
Page 28
c With both hands, gently press and slide the paper side guides (1) and then the paper length guide (2) to fit the paper size. Make sure that the triangular marks (3) on the paper side guides (1) and paper length guide (2) line up with the mark for the paper size you are using. 1 b Take off the paper tray cover (1). 3 1 2 12 Chapter 2 Loading paper in paper tray #2 (MFC-6490CW only) 2 Note You can only use plain paper sizes Ledger, Letter, Legal, Executive, A3 or A4 in Tray #2. a Pull the paper tray completely out of the machine.
c With both hands, gently press and slide the paper side guides (1) and then the paper length guide (2) to fit the paper size. Make sure that the triangular marks (3) on the paper side guides (1) and paper length guide (2) line up with the mark for the paper size you are using. 1 b Take off the paper tray cover (1). 3 1 2 12 Chapter 2 Loading paper in paper tray #2 (MFC-6490CW only) 2 Note You can only use plain paper sizes Ledger, Letter, Legal, Executive, A3 or A4 in Tray #2. a Pull the paper tray completely out of the machine.

Users Manual - English
Page 29
... and top edge in first. Check that the paper is not curled. Note Always make sure that you slide out the front of the paper tray. 1 Loading paper and documents f Gently adjust the paper side guides with both hands to avoid paper jams and misfeeds. it may lift at the back... into the machine. 1 13 Make sure the paper side guides touch the sides of the paper. 2 d Fan the stack of the tray and cause feed problems. g Put on the paper tray cover. Note Be careful that the paper is flat in too far; Note If you are using Ledger, Legal or A3...
... and top edge in first. Check that the paper is not curled. Note Always make sure that you slide out the front of the paper tray. 1 Loading paper and documents f Gently adjust the paper side guides with both hands to avoid paper jams and misfeeds. it may lift at the back... into the machine. 1 13 Make sure the paper side guides touch the sides of the paper. 2 d Fan the stack of the tray and cause feed problems. g Put on the paper tray cover. Note Be careful that the paper is flat in too far; Note If you are using Ledger, Legal or A3...

Users Manual - English
Page 30
... and adjust the paper length guide (1) for the paper. 2 1 14 l Slowly close the paper tray cover and push the paper tray into the machine. j Pull tray #1 out of the paper tray. Pull out the paper support (1) until it clicks and unfold the paper support flap (2). 2 1 Note If you are using Letter size paper, go...; If you are finished using Ledger, Legal or A3 size paper and want to use a smaller paper size, take the paper out of the tray. Chapter 2 i Do one of the following: „ If you are using Ledger, Legal or A3 size paper, go to step l. Adjust the paper length guide (2) to fit...
... and adjust the paper length guide (1) for the paper. 2 1 14 l Slowly close the paper tray cover and push the paper tray into the machine. j Pull tray #1 out of the paper tray. Pull out the paper support (1) until it clicks and unfold the paper support flap (2). 2 1 Note If you are using Letter size paper, go...; If you are finished using Ledger, Legal or A3 size paper and want to use a smaller paper size, take the paper out of the tray. Chapter 2 i Do one of the following: „ If you are using Ledger, Legal or A3 size paper, go to step l. Adjust the paper length guide (2) to fit...


