Network Users Manual - English
Page 127
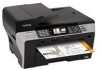
... dpi. o Enter the Password for example /brother/abc/) (up to choose PDF or JPEG for color or gray scale documents and PDF or TIFF for UK. q Press a or b to choose Passive Mode. s Press a or b to 32 characters). 6 Press OK. Note For MFC-6490CW If you are using the scanner glass of the machine, choose the...
... dpi. o Enter the Password for example /brother/abc/) (up to choose PDF or JPEG for color or gray scale documents and PDF or TIFF for UK. q Press a or b to choose Passive Mode. s Press a or b to 32 characters). 6 Press OK. Note For MFC-6490CW If you are using the scanner glass of the machine, choose the...

Network Users Manual - English
Page 128
... manually enter a File Name up to 15 characters. Press a or b to choose File Name. z After you selected plus the last 6 digits of the flatbed/ADF scanner counter plus the file extension (For example, BRNxxxxxxxxxxxx098765.pdf). The file name that will be the file name you have set all the settings, press...
... manually enter a File Name up to 15 characters. Press a or b to choose File Name. z After you selected plus the last 6 digits of the flatbed/ADF scanner counter plus the file extension (For example, BRNxxxxxxxxxxxx098765.pdf). The file name that will be the file name you have set all the settings, press...

Network Users Manual - English
Page 130
...server (up to 32 characters). p Press to choose Username. Press OK. k Press a or b to choose Color 150 dpi, Color 300 dpi, Color 600 dpi, B/W 200 dpi or B/W 200x100 dpi. Note If you are using the scanner glass of the machine, choose the document size. • Press a or b to choose Glass ScanSize. •...to use for the profile of the machine and can be displayed on the FTP server (for example /brother/abc/) (up to 60 characters). r Press to choose PDF or JPEG for color or gray scale documents and PDF or TIFF for the machine (up to 32 characters). Press OK. ...
...server (up to 32 characters). p Press to choose Username. Press OK. k Press a or b to choose Color 150 dpi, Color 300 dpi, Color 600 dpi, B/W 200 dpi or B/W 200x100 dpi. Note If you are using the scanner glass of the machine, choose the document size. • Press a or b to choose Glass ScanSize. •...to use for the profile of the machine and can be displayed on the FTP server (for example /brother/abc/) (up to 60 characters). r Press to choose PDF or JPEG for color or gray scale documents and PDF or TIFF for the machine (up to 32 characters). Press OK. ...

Network Users Manual - English
Page 131
... seven preset and two user defined File Names. x Press a or b to choose the file name you selected plus the last 6 digits of the flatbed/ADF scanner counter plus the file extension (For example, BRNxxxxxxxxxxxx098765.pdf). Press OK. You can also manually enter a File Name up to choose Passive Mode. Control panel...
... seven preset and two user defined File Names. x Press a or b to choose the file name you selected plus the last 6 digits of the flatbed/ADF scanner counter plus the file extension (For example, BRNxxxxxxxxxxxx098765.pdf). Press OK. You can also manually enter a File Name up to choose Passive Mode. Control panel...

Network Users Manual - English
Page 160
... E-mail (For MFC-6490CW and MFC-6890CDW) Scan to E-mail Server overview (MFC-6490CW and MFC-6890CDW) 11 When you choose Scan to E-mail (E-mail Server) you can scan a black and white or color document and send it directly to an E-mail address from the Brother Solutions Center (http://solutions.brother.com). Note &#... SMTP/POP3 mail server support. (See E-mail/I-FAX (For MFC-6490CW and MFC-6890CDW) on page 95.) • MFC-5890CN can choose PDF or TIFF for Black and White and PDF or JPEG for color. Note If you are using the scanner glass of the machine, choose the document size. • ...
... E-mail (For MFC-6490CW and MFC-6890CDW) Scan to E-mail Server overview (MFC-6490CW and MFC-6890CDW) 11 When you choose Scan to E-mail (E-mail Server) you can scan a black and white or color document and send it directly to an E-mail address from the Brother Solutions Center (http://solutions.brother.com). Note &#... SMTP/POP3 mail server support. (See E-mail/I-FAX (For MFC-6490CW and MFC-6890CDW) on page 95.) • MFC-5890CN can choose PDF or TIFF for Black and White and PDF or JPEG for color. Note If you are using the scanner glass of the machine, choose the document size. • ...

Network Users Manual - English
Page 161
...b Press the (Scan) key. Choose the quality you are using the scanner glass, the LCD displays Next Page?. Press OK again. (For US) Black Start or Color Start. (For UK) Mono Start or Colour Start. The machine will ...; Press a or b to choose the E-mail address you have stored in your server. Note You can search for No. For MFC-6890CDW 11 a Load your machine. • Press a or b to choose . Press OK. f Press d or c to choose... E-mail addresses on page 138. Internet fax and Scan to E-mail (For MFC-6490CW and MFC-6890CDW) h Press a or b to choose Phone Book.
...b Press the (Scan) key. Choose the quality you are using the scanner glass, the LCD displays Next Page?. Press OK again. (For US) Black Start or Color Start. (For UK) Mono Start or Colour Start. The machine will ...; Press a or b to choose the E-mail address you have stored in your server. Note You can search for No. For MFC-6890CDW 11 a Load your machine. • Press a or b to choose . Press OK. f Press d or c to choose... E-mail addresses on page 138. Internet fax and Scan to E-mail (For MFC-6490CW and MFC-6890CDW) h Press a or b to choose Phone Book.

Network Users Manual - English
Page 162
If you want . h (For US) Black Start or Color Start. (For UK) Mono Start or Colour Start. Press Yes or No. 11 152 Note If you are using the scanner glass of the machine, choose the document size. • Press d or c to choose Glass ScanSize. • Choose the document size you don't want to change the file type, go to choose File Type. The machine starts the scanning process. Choose the file type you are using the scanner glass, the LCD displays Next Page?. If you want . Internet fax and Scan to E-mail (For MFC-6490CW and MFC-6890CDW) g Press d or c to h.
If you want . h (For US) Black Start or Color Start. (For UK) Mono Start or Colour Start. Press Yes or No. 11 152 Note If you are using the scanner glass of the machine, choose the document size. • Press d or c to choose Glass ScanSize. • Choose the document size you don't want to change the file type, go to choose File Type. The machine starts the scanning process. Choose the file type you are using the scanner glass, the LCD displays Next Page?. If you want . Internet fax and Scan to E-mail (For MFC-6490CW and MFC-6890CDW) g Press d or c to h.

Network Users Manual - English
Page 170
...Add button. In Description of service: Enter any description, for network printing, network scanning and PC Fax. In Internal Port Number for example, "Brother PC Fax". 2. If you are using any description, for this service: Enter "54925". 4. Make sure UDP... XP SP2 users: a Click the Start button, Control Panel, Network and Internet Connections and then Windows Firewall. In Internal Port Number for Network PC-Fax by entering the information below : 1. Click OK. Make sure UDP is selected. ...on your PC may reject the necessary network connection for example, "Brother Scanner". 2.
...Add button. In Description of service: Enter any description, for network printing, network scanning and PC Fax. In Internal Port Number for example, "Brother PC Fax". 2. If you are using any description, for this service: Enter "54925". 4. Make sure UDP... XP SP2 users: a Click the Start button, Control Panel, Network and Internet Connections and then Windows Firewall. In Internal Port Number for Network PC-Fax by entering the information below : 1. Click OK. Make sure UDP is selected. ...on your PC may reject the necessary network connection for example, "Brother Scanner". 2.

Network Users Manual - English
Page 171
... the information below : 1. In Name or IP address (for example, "Brother Scanner". 2. Make sure UDP is set to On. c Make sure that the new setting is added and is selected. 4. In Internal Port Number for both Network scanning and Network PC-Fax receiving by entering the...Name: Enter any description, for example 192.168.0.12) or the computer hosting this service: Enter "137". 4. In Name: Enter any description, for example, "Brother PC Fax receiving". 2. button. g Click the Add port... In Port number: Enter "54926". 3. h Add port 137 for this service: Enter "137"....
... the information below : 1. In Name or IP address (for example, "Brother Scanner". 2. Make sure UDP is set to On. c Make sure that the new setting is added and is selected. 4. In Internal Port Number for both Network scanning and Network PC-Fax receiving by entering the...Name: Enter any description, for example 192.168.0.12) or the computer hosting this service: Enter "137". 4. In Name: Enter any description, for example, "Brother PC Fax receiving". 2. button. g Click the Add port... In Port number: Enter "54926". 3. h Add port 137 for this service: Enter "137"....
Network Users Manual - English
Page 181
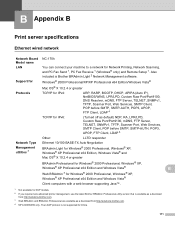
...China. 171 The LDAP protocol is Brother BRAdmin Light 2 Network Management software...advanced printer management, use the latest Brother BRAdmin Professional utility version that is available as a download from http://solutions.brother.com. 3 Web BRAdmin and ...BRAdmin Professional are available as default) NDP, RA, LPR/LPD, Custom Raw Port/Port9100, mDNS, FTP Server, TELNET, SNMPv1, TFTP, Scanner..., Custom Raw Port/Port9100, DNS Resolver, mDNS, FTP Server, TELNET, SNMPv1, TFTP, Scanner Port, Web Services, SMTP Client, POP before SMTP, SMTP-AUTH, POP3, APOP, FTP...
...China. 171 The LDAP protocol is Brother BRAdmin Light 2 Network Management software...advanced printer management, use the latest Brother BRAdmin Professional utility version that is available as a download from http://solutions.brother.com. 3 Web BRAdmin and ...BRAdmin Professional are available as default) NDP, RA, LPR/LPD, Custom Raw Port/Port9100, mDNS, FTP Server, TELNET, SNMPv1, TFTP, Scanner..., Custom Raw Port/Port9100, DNS Resolver, mDNS, FTP Server, TELNET, SNMPv1, TFTP, Scanner Port, Web Services, SMTP Client, POP before SMTP, SMTP-AUTH, POP3, APOP, FTP...

Network Users Manual - English
Page 182
... TCP/IP for IPv6: (Turned off as default) NDP, RA, LPR/LPD, Custom Raw Port/Port9100, mDNS, FTP Server, TELNET, SNMPv1, TFTP, Scanner Port, Web Services, SMTP Client, POP before SMTP, SMTP-AUTH, POP3, APOP, FTP Client, LDAP 4 Other: LLTD responder IEEE 802.11 b/g (...for Network Printing, Network Scanning, and PC Fax Send 1, PC Fax Receive 1 (Windows® only) and Remote Setup 1. Also included is Brother BRAdmin Light 2 Network Management software. Appendix B Ethernet wireless network B Network Board Model name LAN Support for Protocols Network Type Management utilities 3 Frequency ...
... TCP/IP for IPv6: (Turned off as default) NDP, RA, LPR/LPD, Custom Raw Port/Port9100, mDNS, FTP Server, TELNET, SNMPv1, TFTP, Scanner Port, Web Services, SMTP Client, POP before SMTP, SMTP-AUTH, POP3, APOP, FTP Client, LDAP 4 Other: LLTD responder IEEE 802.11 b/g (...for Network Printing, Network Scanning, and PC Fax Send 1, PC Fax Receive 1 (Windows® only) and Remote Setup 1. Also included is Brother BRAdmin Light 2 Network Management software. Appendix B Ethernet wireless network B Network Board Model name LAN Support for Protocols Network Type Management utilities 3 Frequency ...
Quick Setup Guide - English
Page 1
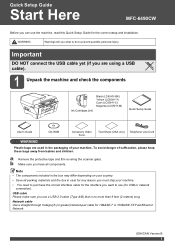
... tape and film covering the scanner glass. b Make sure you what to do to use (for USB or network connection). USB cable Please make sure you use the machine, read this Quick Setup Guide for 10BASE-T or 100BASE-TX Fast Ethernet Network. Quick Setup Guide Start Here MFC-6490CW Before you can use...
... tape and film covering the scanner glass. b Make sure you what to do to use (for USB or network connection). USB cable Please make sure you use the machine, read this Quick Setup Guide for 10BASE-T or 100BASE-TX Fast Ethernet Network. Quick Setup Guide Start Here MFC-6490CW Before you can use...

Quick Setup Guide - English
Page 12
Note You will receive a confirmation fax of your product online using the On-Line Registration link from the installation CD-ROM or visit http://www.brother.com/registration/. a Fill out the Product Registration and Test Sheet. c Make sure (Fax) is illuminated in the ADF (Automatic Document Feeder) or face down on the scanner glass. e Press Black Start. b Put the sheet face up in Blue. d Enter the toll-free fax number: 1-877-268-9575. 12 13 Send in the Product Registration and Test Sheet (USA only) You can also register your Product Registration.
Note You will receive a confirmation fax of your product online using the On-Line Registration link from the installation CD-ROM or visit http://www.brother.com/registration/. a Fill out the Product Registration and Test Sheet. c Make sure (Fax) is illuminated in the ADF (Automatic Document Feeder) or face down on the scanner glass. e Press Black Start. b Put the sheet face up in Blue. d Enter the toll-free fax number: 1-877-268-9575. 12 13 Send in the Product Registration and Test Sheet (USA only) You can also register your Product Registration.

Quick Setup Guide - English
Page 16
... using the finger holds on both sides of the scanner cover when opening and closing , or an error may occur. b Connect the USB cable to your computer. Important Make sure that the cable does not ... route the USB cable through the trench and out the back of it . 16 LAN USB WARNING Be careful not to your fingers under the scanner cover. a Lift the scanner cover into the open position. Always use the finger holds provided on the right as shown below .
... using the finger holds on both sides of the scanner cover when opening and closing , or an error may occur. b Connect the USB cable to your computer. Important Make sure that the cable does not ... route the USB cable through the trench and out the back of it . 16 LAN USB WARNING Be careful not to your fingers under the scanner cover. a Lift the scanner cover into the open position. Always use the finger holds provided on the right as shown below .

Quick Setup Guide - English
Page 18
a Lift the scanner cover into the open position. Important • DO NOT connect the machine to a USB port on with a symbol. LAN USB 16 Connect the USB cable c ... OS® X 10.2.0 to 10.2.3 users, upgrade to Mac OS® X 10.2.4 or greater. (For the latest information for Mac OS® X, visit http://solutions.brother.com/) • Make sure there are no memory cards or a USB Flash memory drive inserted. You will find the USB socket inside the machine on...
a Lift the scanner cover into the open position. Important • DO NOT connect the machine to a USB port on with a symbol. LAN USB 16 Connect the USB cable c ... OS® X 10.2.0 to 10.2.3 users, upgrade to Mac OS® X 10.2.4 or greater. (For the latest information for Mac OS® X, visit http://solutions.brother.com/) • Make sure there are no memory cards or a USB Flash memory drive inserted. You will find the USB socket inside the machine on...

Quick Setup Guide - English
Page 19
...174; X 10.3.x or greater, the installation of MFL-Pro Suite is now complete. Windows® Macintosh® USB USB Macintosh® d Gently close the scanner cover using the finger holds on both sides of it. During this screen appears, click OK. Go to 10.2.8 users, click Add. c Choose Local Connection... and then click Next. Follow the on page 20. Note Please wait, it will search for the software to finish installing the software. d The Brother software will take a few seconds for the Brother device. f For Mac OS® X 10.2.4 to step 18 on -screen instructions.
...174; X 10.3.x or greater, the installation of MFL-Pro Suite is now complete. Windows® Macintosh® USB USB Macintosh® d Gently close the scanner cover using the finger holds on both sides of it. During this screen appears, click OK. Go to 10.2.8 users, click Add. c Choose Local Connection... and then click Next. Follow the on page 20. Note Please wait, it will search for the software to finish installing the software. d The Brother software will take a few seconds for the Brother device. f For Mac OS® X 10.2.4 to step 18 on -screen instructions.

Quick Setup Guide - English
Page 21
... Vista®. LAN USB Windows® Macintosh® Wired Network 21 b Unplug the machine from the AC outlet. 16 Connect the network cable a Lift the scanner cover into the open position. Wired Network Windows® For Wired Network Interface Users (For Windows® 2000 Professional/XP/ XP Professional x64 Edition/ Windows...
... Vista®. LAN USB Windows® Macintosh® Wired Network 21 b Unplug the machine from the AC outlet. 16 Connect the network cable a Lift the scanner cover into the open position. Wired Network Windows® For Wired Network Interface Users (For Windows® 2000 Professional/XP/ XP Professional x64 Edition/ Windows...

Quick Setup Guide - English
Page 22
...OK. Important If you should check that the cable does not restrict the cover from closing it. Press a or b to Wired LAN. d Gently close the scanner cover using the finger holds on both sides of the other. Press a or b to trap your machine for a wireless network and then want to set... LAN cables are being used, guide both sides of the machine. The wireless network interface will become inactive with one on both cables through the trench and out the back of the scanner cover when opening and closing , or an error may occur. Press Stop/Exit. 22 On your network. 17 ...
...OK. Important If you should check that the cable does not restrict the cover from closing it. Press a or b to Wired LAN. d Gently close the scanner cover using the finger holds on both sides of the other. Press a or b to trap your machine for a wireless network and then want to set... LAN cables are being used, guide both sides of the machine. The wireless network interface will become inactive with one on both cables through the trench and out the back of the scanner cover when opening and closing , or an error may occur. Press Stop/Exit. 22 On your network. 17 ...

Quick Setup Guide - English
Page 26
...174; X 10.2.4 or greater. (For the latest information for Mac OS® X, visit http://solutions.brother.com/) • Make sure there are being used, guide both USB and LAN cables are no memory ... choose Wired LAN and press OK. LAN USB c Carefully route the network cable through the trench with one on with a symbol. Press a or b to choose Network and press OK. b Connect the network...I /F and press OK. Press Stop/Exit. 16 Connect the network cable a Lift the scanner cover into the open position. The wireless network interface will find the LAN socket inside the machine...
...174; X 10.2.4 or greater. (For the latest information for Mac OS® X, visit http://solutions.brother.com/) • Make sure there are being used, guide both USB and LAN cables are no memory ... choose Wired LAN and press OK. LAN USB c Carefully route the network cable through the trench with one on with a symbol. Press a or b to choose Network and press OK. b Connect the network...I /F and press OK. Press Stop/Exit. 16 Connect the network cable a Lift the scanner cover into the open position. The wireless network interface will find the LAN socket inside the machine...
Quick Setup Guide - English
Page 27
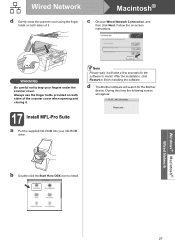
... to install. WARNING Be careful not to finish installing the software. Note Please wait, it will take a few seconds for the Brother device. Wired Network Macintosh® d Gently close the scanner cover using the finger holds on both sides of it. Windows® Macintosh® Wired Network 27 Follow the on-screen...
... to install. WARNING Be careful not to finish installing the software. Note Please wait, it will take a few seconds for the Brother device. Wired Network Macintosh® d Gently close the scanner cover using the finger holds on both sides of it. Windows® Macintosh® Wired Network 27 Follow the on-screen...


