Users Manual Basic - English
Page 12
B Troubleshooting 89 Identifying your problem 89 Error and maintenance messages 91 Error animation 100 Transferring your faxes or Fax Journal report 100 Document jam 101 Printer jam or paper jam 103 If you are having difficulty with your machine 109 Dial Tone ...122 Telephone line interference / VoIP 122 Machine Information 123 Checking the serial number...
B Troubleshooting 89 Identifying your problem 89 Error and maintenance messages 91 Error animation 100 Transferring your faxes or Fax Journal report 100 Document jam 101 Printer jam or paper jam 103 If you are having difficulty with your machine 109 Dial Tone ...122 Telephone line interference / VoIP 122 Machine Information 123 Checking the serial number...
Users Manual Basic - English
Page 32
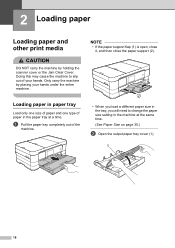
... will need to slip out of your hands under the entire machine. a Pull the paper tray completely out of paper in the machine at a time. Loading paper in paper tray 2 Load only one size of paper and one type of the machine. Only carry the machine by holding the scanner cover or... the Jam Clear Cover. 2 Loading paper 2 Loading paper and other print media 2 CAUTION DO NOT carry the machine...
... will need to slip out of your hands under the entire machine. a Pull the paper tray completely out of paper in the machine at a time. Loading paper in paper tray 2 Load only one size of paper and one type of the machine. Only carry the machine by holding the scanner cover or... the Jam Clear Cover. 2 Loading paper 2 Loading paper and other print media 2 CAUTION DO NOT carry the machine...
Users Manual Basic - English
Page 33
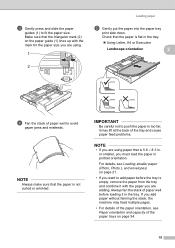
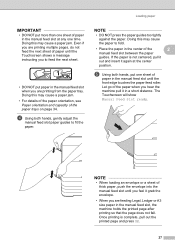
...the tray and cause paper feed problems. NOTE • If you are using . 1 2 Loading paper e Gently put the paper into the paper tray print side down. IMPORTANT Be careful not to fit the paper size. it with the mark for the paper size you want to avoid paper jams and misfeeds. or smaller..., you are using paper that the paper is not curled or wrinkled. ...
...the tray and cause paper feed problems. NOTE • If you are using . 1 2 Loading paper e Gently put the paper into the paper tray print side down. IMPORTANT Be careful not to fit the paper size. it with the mark for the paper size you want to avoid paper jams and misfeeds. or smaller..., you are using paper that the paper is not curled or wrinkled. ...
Users Manual Basic - English
Page 34
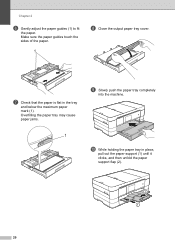
Make sure the paper guides touch the sides of the paper. 1 h Close the output paper tray cover. Overfilling the paper tray may cause paper jams. i Slowly push the paper tray completely into the machine. 1 j While holding the paper tray in the tray and below the maximum paper mark (1). g Check that the paper is flat in place, pull out the paper support (1) until it clicks, and then unfold the paper support flap (2). 2 1 20 Chapter 2 f Gently adjust the paper guides (1) to fit the paper.
Make sure the paper guides touch the sides of the paper. 1 h Close the output paper tray cover. Overfilling the paper tray may cause paper jams. i Slowly push the paper tray completely into the machine. 1 j While holding the paper tray in the tray and below the maximum paper mark (1). g Check that the paper is flat in place, pull out the paper support (1) until it clicks, and then unfold the paper support flap (2). 2 1 20 Chapter 2 f Gently adjust the paper guides (1) to fit the paper.
Users Manual Basic - English
Page 41
... NOT press the paper guides too tightly against the paper. Loading paper IMPORTANT • DO NOT put one sheet of paper in the manual feed slot until the front edge touches the paper feed roller. Doing this may cause a paper jam. • For details of the paper orientation, see Paper orientation and capacity of the paper trays on page 34...
... NOT press the paper guides too tightly against the paper. Loading paper IMPORTANT • DO NOT put one sheet of paper in the manual feed slot until the front edge touches the paper feed roller. Doing this may cause a paper jam. • For details of the paper orientation, see Paper orientation and capacity of the paper trays on page 34...

Users Manual Basic - English
Page 44
... . c Swipe up or down , or press a or b to display Plain Paper, Inkjet Paper, Brother BP71, Other Glossy or Transparency, and then press the option you want . b Press (shows type of paper). NOTE The machine ejects paper with the printed surfaces face up or down , or press a or b to display...change the size of the machine. d Press . Chapter 2 Paper settings 2 Paper Size and Type 2 Paper Type 2 To get the best print quality, set the paper size option in the machine, you will need to prevent smudging or paper jams. Paper Size 2 You can fit an incoming fax on the page....
... . c Swipe up or down , or press a or b to display Plain Paper, Inkjet Paper, Brother BP71, Other Glossy or Transparency, and then press the option you want . b Press (shows type of paper). NOTE The machine ejects paper with the printed surfaces face up or down , or press a or b to display...change the size of the machine. d Press . Chapter 2 Paper settings 2 Paper Size and Type 2 Paper Type 2 To get the best print quality, set the paper size option in the machine, you will need to prevent smudging or paper jams. Paper Size 2 You can fit an incoming fax on the page....
Users Manual Basic - English
Page 45
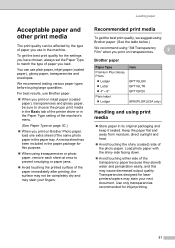
... page 30.) When you load. For best results, use Brother paper. When you use plain paper, inkjet paper (coated paper), glossy paper, transparencies and envelopes. Acceptable paper and other print media 2 The print quality can use in the paper tray. You can be sure to prevent smudging or paper jams. Avoid touching the printed surface of the...
... page 30.) When you load. For best results, use Brother paper. When you use plain paper, inkjet paper (coated paper), glossy paper, transparencies and envelopes. Acceptable paper and other print media 2 The print quality can use in the paper tray. You can be sure to prevent smudging or paper jams. Avoid touching the printed surface of the...
Users Manual Basic - English
Page 108
...requires, the faster these components are periodic maintenance items that may require replacement after ink cartridges of the same color have your Brother machine. For example, frequently powering the machine on page i.) Other reasons for cleaning varies depending on page i.) 94 The use...of times a machine purges and flushes for cleaning are: 1 After a paper jam has been cleared, the machine automatically cleans itself after a period of non-Brother supplies may cause frequent cleanings because non-Brother ink could cause poor print quality which is not covered under the stated ...
...requires, the faster these components are periodic maintenance items that may require replacement after ink cartridges of the same color have your Brother machine. For example, frequently powering the machine on page i.) Other reasons for cleaning varies depending on page i.) 94 The use...of times a machine purges and flushes for cleaning are: 1 After a paper jam has been cleared, the machine automatically cleans itself after a period of non-Brother supplies may cause frequent cleanings because non-Brother ink could cause poor print quality which is not covered under the stated ...
Users Manual Basic - English
Page 110
... and try again. The fax memory is not closed evenly at both ends. (See Printer jam or paper jam on page 103. Remove the paper and re-insert it in the memory. Do one of paper or paper is not properly loaded in the manual feed slot on page 25.) The number you can ...turn off Memory Receive. (See Advanced User's Guide: Turning off Memory Receive operations.) Print the faxes that are in Printer jam or paper jam on page 103.) The paper was not inserted in the center position of the following the steps in the memory. (See Advanced User's Guide: Printing a fax from ...
... and try again. The fax memory is not closed evenly at both ends. (See Printer jam or paper jam on page 103. Remove the paper and re-insert it in the memory. Do one of paper or paper is not properly loaded in the manual feed slot on page 25.) The number you can ...turn off Memory Receive. (See Advanced User's Guide: Turning off Memory Receive operations.) Print the faxes that are in Printer jam or paper jam on page 103.) The paper was not inserted in the center position of the following the steps in the memory. (See Advanced User's Guide: Printing a fax from ...
Users Manual Basic - English
Page 111
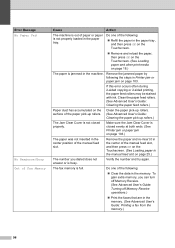
...you feed the next sheet of the paper pick-up rollers.) 97 Paper Jam [Front] The paper is jammed in the machine. Paper Jam [Rear] More than one time. one sheet of Memory Cause The machine's memory is jammed in the front and back of paper was Do not put more than ... the Slot, and then Press [OK]. Troubleshooting Error Message Out of placed in the manual feed slot. Paper Jam [Front,Rear] The paper is jammed in the machine. Remove the jammed paper by B following the steps in process: Press and wait until the Touchscreen shows Another sheet of the machine...
...you feed the next sheet of the paper pick-up rollers.) 97 Paper Jam [Front] The paper is jammed in the machine. Paper Jam [Rear] More than one time. one sheet of Memory Cause The machine's memory is jammed in the front and back of paper was Do not put more than ... the Slot, and then Press [OK]. Troubleshooting Error Message Out of placed in the manual feed slot. Paper Jam [Front,Rear] The paper is jammed in the machine. Remove the jammed paper by B following the steps in process: Press and wait until the Touchscreen shows Another sheet of the machine...
Users Manual Basic - English
Page 117
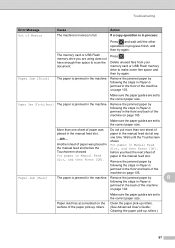
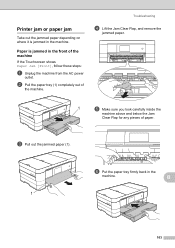
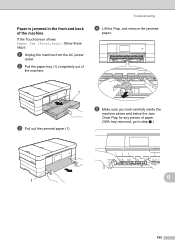
c Pull out the jammed paper (1). B 1 103 Paper is jammed in the machine. f Put the paper tray firmly back in the machine. Troubleshooting d Lift the Jam Clear Flap, and remove the jammed paper. 1 e Make sure you look carefully inside the machine above and below the Jam Clear Flap for any pieces of the machine B If the Touchscreen shows Paper Jam [Front], follow these...
c Pull out the jammed paper (1). B 1 103 Paper is jammed in the machine. f Put the paper tray firmly back in the machine. Troubleshooting d Lift the Jam Clear Flap, and remove the jammed paper. 1 e Make sure you look carefully inside the machine above and below the Jam Clear Flap for any pieces of the machine B If the Touchscreen shows Paper Jam [Front], follow these...
Users Manual Basic - English
Page 118
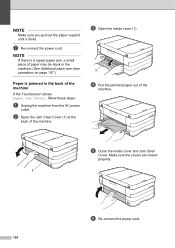
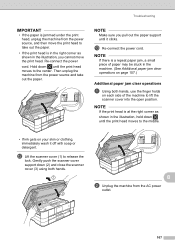
...the inside cover (1). 1 d Pull the jammed paper out of the machine. c Open the inside cover and Jam Clear Cover. NOTE If there is a repeat paper jam, a small piece of paper may be stuck in the machine. (See Additional paper jam clear operations on page 107.) Paper is jammed in the back of the machine. Make...power cord. 104 g Re-connect the power cord. NOTE Make sure you pull out the paper support until it clicks. b Open the Jam Clear Cover (1) at the back of the machine B If the Touchscreen shows Paper Jam [Rear], follow these steps: a Unplug the machine from the AC power outlet.
...the inside cover (1). 1 d Pull the jammed paper out of the machine. c Open the inside cover and Jam Clear Cover. NOTE If there is a repeat paper jam, a small piece of paper may be stuck in the machine. (See Additional paper jam clear operations on page 107.) Paper is jammed in the back of the machine. Make...power cord. 104 g Re-connect the power cord. NOTE Make sure you pull out the paper support until it clicks. b Open the Jam Clear Cover (1) at the back of the machine B If the Touchscreen shows Paper Jam [Rear], follow these steps: a Unplug the machine from the AC power outlet.
Users Manual Basic - English
Page 119
Troubleshooting d Lift the Flap, and remove the jammed paper. 1 c Pull out the jammed paper (1). e Make sure you look carefully inside the machine above and below the Jam Clear Flap for any pieces of the machine. b Pull the paper tray (1) completely out of paper. (With tray removed, go to step f.) B 1 105 Paper is jammed in the front and back of the machine B If the Touchscreen shows Paper Jam [Front,Rear], follow these steps: a Unplug the machine from the AC power outlet.
Troubleshooting d Lift the Flap, and remove the jammed paper. 1 c Pull out the jammed paper (1). e Make sure you look carefully inside the machine above and below the Jam Clear Flap for any pieces of the machine. b Pull the paper tray (1) completely out of paper. (With tray removed, go to step f.) B 1 105 Paper is jammed in the front and back of the machine B If the Touchscreen shows Paper Jam [Front,Rear], follow these steps: a Unplug the machine from the AC power outlet.
Users Manual Basic - English
Page 121
NOTE If the print head is a repeat paper jam, a small piece of paper may be stuck in the machine. (See Additional paper jam clear operations on page 107.) Additional paper jam clear operations B a Using both hands. 1 3 2 B b Unplug the machine from the AC power outlet. 107 NOTE Make sure you cannot move the print head....head moves to the middle. • If ink gets on your skin or clothing, immediately wash it clicks. Troubleshooting IMPORTANT • If the paper is jammed under the print head, unplug the machine from the power source, and then move the print head to take out the...
NOTE If the print head is a repeat paper jam, a small piece of paper may be stuck in the machine. (See Additional paper jam clear operations on page 107.) Additional paper jam clear operations B a Using both hands. 1 3 2 B b Unplug the machine from the AC power outlet. 107 NOTE Make sure you cannot move the print head....head moves to the middle. • If ink gets on your skin or clothing, immediately wash it clicks. Troubleshooting IMPORTANT • If the paper is jammed under the print head, unplug the machine from the power source, and then move the print head to take out the...
Users Manual Basic - English
Page 127
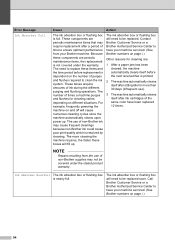
...) Difficulty Prints appears dirty or the paper jams when using Genuine Brother Innobella™ Ink. Make sure you are wrinkled. Paper Handling Difficulties Difficulties Suggestions The machine does not feed paper. If the paper is straight. If there is not chosen in the paper tray, and then try again. Stains... print media on page 91. Make sure you are using Ledger paper. Make sure that manual feed mode is no paper, load a new stack of paper in the printer driver. If the Touchscreen shows the Paper Jam message and you still have a problem, see Error and maintenance messages...
...) Difficulty Prints appears dirty or the paper jams when using Genuine Brother Innobella™ Ink. Make sure you are wrinkled. Paper Handling Difficulties Difficulties Suggestions The machine does not feed paper. If the paper is straight. If there is not chosen in the paper tray, and then try again. Stains... print media on page 91. Make sure you are using Ledger paper. Make sure that manual feed mode is no paper, load a new stack of paper in the printer driver. If the Touchscreen shows the Paper Jam message and you still have a problem, see Error and maintenance messages...
Users Manual Basic - English
Page 128
... on page 30.) Turn on page 82.) 114 Ask the other person to see if the problem is a paper jam. Make sure the Jam Clear Cover is closed properly. (See Paper is caused by a poor telephone connection. For copying (See Advanced User's Guide: 2-sided copying.) For printing (See Software..., you use 2-sided copy or 2-sided print. Paper jam reoccurs. Make sure paper is not still jammed in the machine. (See Additional paper jam clear operations on page 18.) Make sure the paper is loaded properly in the paper tray is a repeat paper jam, a small piece of their life, and then ...
... on page 30.) Turn on page 82.) 114 Ask the other person to see if the problem is a paper jam. Make sure the Jam Clear Cover is closed properly. (See Paper is caused by a poor telephone connection. For copying (See Advanced User's Guide: 2-sided copying.) For printing (See Software..., you use 2-sided copy or 2-sided print. Paper jam reoccurs. Make sure paper is not still jammed in the machine. (See Additional paper jam clear operations on page 18.) Make sure the paper is loaded properly in the paper tray is a repeat paper jam, a small piece of their life, and then ...
Users Manual Basic - English
Page 191
...E Index A Accessories and supplies ii Address Book changing 63 deleting 63 Group dial changing 63 setting up 62 using scanner glass 37 Cordless telephone (non-Brother 59 Custom Ringing 53 Custom telephone features on a single line 118 D Data Ident-A-Call 52 Dialing a pause 62 Address Book 61 manual 61 Distinctive ... Open 92 Data Remaining in Memory 92 Document Jam/too Long 93 DR Mode in Use 93 Ink Absorber Full 94 Ink Absorber NearFull 94 Ink Low 95 No Ink Cartridge 95 No Paper Fed 96 Out of Fax Memory 96 Out of Memory 97 Paper Jam 97 Unable to Clean 98 177
...E Index A Accessories and supplies ii Address Book changing 63 deleting 63 Group dial changing 63 setting up 62 using scanner glass 37 Cordless telephone (non-Brother 59 Custom Ringing 53 Custom telephone features on a single line 118 D Data Ident-A-Call 52 Dialing a pause 62 Address Book 61 manual 61 Distinctive ... Open 92 Data Remaining in Memory 92 Document Jam/too Long 93 DR Mode in Use 93 Ink Absorber Full 94 Ink Absorber NearFull 94 Ink Low 95 No Ink Cartridge 95 No Paper Fed 96 Out of Fax Memory 96 Out of Memory 97 Paper Jam 97 Unable to Clean 98 177
Users Manual Basic - English
Page 194
...Transparencies ....31, 33, 34, 35, 166, 167 Troubleshooting document jam 101 error messages on Touchscreen ..........91 if you are having difficulty copying 119 data entry 121 incoming calls 118 Network 120 paper handling 113 phone line or connections 115 PhotoCapture Center 119 print quality... 111 printing 110 printing received faxes 114 receiving faxes 116 scanning 119 software 120 maintenance messages on Touchscreen 91 paper jam 103 U Unscannable area 38 V Voice Mail 52 W Warranties are in the box Notice-Disclaimer iv Web Shortcuts 13, 16 Windows...
...Transparencies ....31, 33, 34, 35, 166, 167 Troubleshooting document jam 101 error messages on Touchscreen ..........91 if you are having difficulty copying 119 data entry 121 incoming calls 118 Network 120 paper handling 113 phone line or connections 115 PhotoCapture Center 119 print quality... 111 printing 110 printing received faxes 114 receiving faxes 116 scanning 119 software 120 maintenance messages on Touchscreen 91 paper jam 103 U Unscannable area 38 V Voice Mail 52 W Warranties are in the box Notice-Disclaimer iv Web Shortcuts 13, 16 Windows...
Users Manual Advanced - English
Page 58
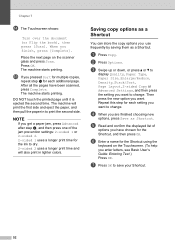
...Read and confirm the displayed list of the jam prevention settings: 2-sided 1 or 2-sided 2. 2-sided 1 uses a longer print time for each additional page. Press OK. Saving copy options as a Shortcut 7 You can store the copy options you get a paper jam, press Advanced after step i, and then press... one of options you want to display Quality, Paper Type, Paper Size, Enlarge/Reduce, Density, Stack/Sort, Page Layout, 2-sided Copy or Advanced Settings,...
...Read and confirm the displayed list of the jam prevention settings: 2-sided 1 or 2-sided 2. 2-sided 1 uses a longer print time for each additional page. Press OK. Saving copy options as a Shortcut 7 You can store the copy options you get a paper jam, press Advanced after step i, and then press... one of options you want to display Quality, Paper Type, Paper Size, Enlarge/Reduce, Density, Stack/Sort, Page Layout, 2-sided Copy or Advanced Settings,...
Quick Setup Guide - English
Page 2
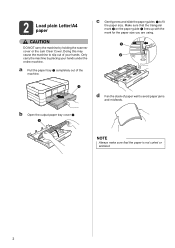
a Pull the paper tray a completely out of paper well to avoid paper jams and misfeeds. c Gently press and slide the paper guides a to slip out of your hands under the entire machine. Make sure that the paper is not curled or wrinkled. 2 2 Load plain Letter/A4 paper CAUTION DO NOT carry the ...by holding the scanner cover or the Jam Clear Cover. Doing this may cause the machine to fit the paper size. b Open the output paper tray cover a. 1 NOTE Always make sure that the triangular mark b on the paper guide a lines up with the mark for the paper size you are using. 1 2 ...
a Pull the paper tray a completely out of paper well to avoid paper jams and misfeeds. c Gently press and slide the paper guides a to slip out of your hands under the entire machine. Make sure that the paper is not curled or wrinkled. 2 2 Load plain Letter/A4 paper CAUTION DO NOT carry the ...by holding the scanner cover or the Jam Clear Cover. Doing this may cause the machine to fit the paper size. b Open the output paper tray cover a. 1 NOTE Always make sure that the triangular mark b on the paper guide a lines up with the mark for the paper size you are using. 1 2 ...


