Users Manual Basic - English
Page 10
... Ring Time (Fax/Tel mode only 47 Easy Receive 48 Fax Preview (Black & White only 49 How to preview a received fax 49 Turning off Fax Preview 51 6 Telephone services and external devices 52 Telephone services 52 Voice Mail ...52 Distinctive Ring 53 Connecting an external TAD (telephone... (PBX 58 External and extension telephones 58 Connecting an external or extension telephone 58 Using external and extension telephones 59 Using a non-Brother cordless external telephone 59 Using remote codes 59 7 Dialing and storing numbers 61 How to dial ...61 Manual dialing 61 Dialing from ...
... Ring Time (Fax/Tel mode only 47 Easy Receive 48 Fax Preview (Black & White only 49 How to preview a received fax 49 Turning off Fax Preview 51 6 Telephone services and external devices 52 Telephone services 52 Voice Mail ...52 Distinctive Ring 53 Connecting an external TAD (telephone... (PBX 58 External and extension telephones 58 Connecting an external or extension telephone 58 Using external and extension telephones 59 Using a non-Brother cordless external telephone 59 Using remote codes 59 7 Dialing and storing numbers 61 How to dial ...61 Manual dialing 61 Dialing from ...
Users Manual Basic - English
Page 16
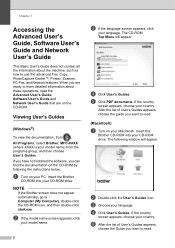
... d Click User's Guides. If the country screen appears, choose your language. The following the instructions below: a Turn on your country. c Choose your country. Insert the Brother CD-ROM into your CD-ROM drive. Viewing User's Guides 1 (Windows®) 1 To view the documentation, ...Guide 1 This Basic User's Guide does not contain all the information about these operations, read . (Macintosh) 1 a Turn on your language. Insert the Brother CD-ROM into your model name) from , All Programs, select Brother, MFC-XXXX (where XXXX is your CD-ROM drive. d Click User's Guides.
... d Click User's Guides. If the country screen appears, choose your language. The following the instructions below: a Turn on your country. c Choose your country. Insert the Brother CD-ROM into your CD-ROM drive. Viewing User's Guides 1 (Windows®) 1 To view the documentation, ...Guide 1 This Basic User's Guide does not contain all the information about these operations, read . (Macintosh) 1 a Turn on your language. Insert the Brother CD-ROM into your model name) from , All Programs, select Brother, MFC-XXXX (where XXXX is your CD-ROM drive. d Click User's Guides.
Users Manual Basic - English
Page 21
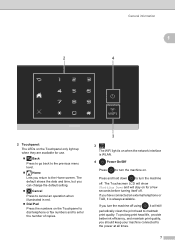
... light is on when the network interface is always available. The default shows the date and time, but you turn the machine off using , it is WLAN. 4 Power On/Off Press to turn the machine off. If you have connected an external telephone or TAD, it will stay on for use. ...; Back Press to go back to the previous menu level. Home Lets you should keep your machine connected to turn the machine on. Press and hold down to the power at all times. 7 To prolong print head life, provide better ink efficiency, and maintain print...
... light is on when the network interface is always available. The default shows the date and time, but you turn the machine off using , it is WLAN. 4 Power On/Off Press to turn the machine off. If you have connected an external telephone or TAD, it will stay on for use. ...; Back Press to go back to the previous menu level. Home Lets you should keep your machine connected to turn the machine on. Press and hold down to the power at all times. 7 To prolong print head life, provide better ink efficiency, and maintain print...
Users Manual Basic - English
Page 22
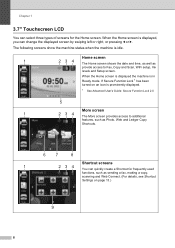
... Photo, Web and Ledger Copy Shortcuts. 67 8 Shortcut screens 1 1 234 You can quickly create a Shortcut for the Home screen. If Secure Function Lock 1 has been turned on page 13.) 9 8
... Photo, Web and Ledger Copy Shortcuts. 67 8 Shortcut screens 1 1 234 You can quickly create a Shortcut for the Home screen. If Secure Function Lock 1 has been turned on page 13.) 9 8

Users Manual Basic - English
Page 24
... Mode. Fax (Fax Only) Fax/Tel (Fax/Tel) External TAD (External TAD) Manual (Manual) NOTE When the Distinctive Ring feature is turned on page 53. 3 Wi-Fi Lets you are used. You can check and access all the machine's settings from the following screen. 12 3 4 When Fax...
... Mode. Fax (Fax Only) Fax/Tel (Fax/Tel) External TAD (External TAD) Manual (Manual) NOTE When the Distinctive Ring feature is turned on page 53. 3 Wi-Fi Lets you are used. You can check and access all the machine's settings from the following screen. 12 3 4 When Fax...

Users Manual Basic - English
Page 39
Use the manual feed slot to print or copy on the short edge, close the paper support flap. 25 NOTE • The machine automatically turns on Manual Feed mode when you put paper in the manual feed slot. • If you are using paper that is longer than Letter size ...
Use the manual feed slot to print or copy on the short edge, close the paper support flap. 25 NOTE • The machine automatically turns on Manual Feed mode when you put paper in the manual feed slot. • If you are using paper that is longer than Letter size ...

Users Manual Basic - English
Page 43
Loading paper Unprintable area 2 The printable area depends on the settings in . (3 mm) NOTE The Borderless print feature is available and turned on cut-sheet paper and envelopes. The figures below show the unprintable areas on . (See Software User's Guide: Printing (Windows®).) 2 (See Software User's Guide: ...
Loading paper Unprintable area 2 The printable area depends on the settings in . (3 mm) NOTE The Borderless print feature is available and turned on cut-sheet paper and envelopes. The figures below show the unprintable areas on . (See Software User's Guide: Printing (Windows®).) 2 (See Software User's Guide: ...
Users Manual Basic - English
Page 59
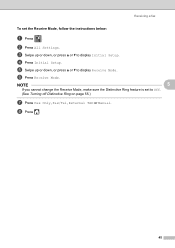
e Swipe up or down , or press a or b to display Initial Setup. c Swipe up or down , or press a or b to display Receive Mode. d Press Initial Setup. b Press All Settings. f Press Receive Mode. NOTE 5 If you cannot change the Receive Mode, make sure the Distinctive Ring feature is set the Receive Mode, follow the instructions below: a Press . Receiving a fax To set to Off. (See Turning off Distinctive Ring on page 55.) g Press Fax Only, Fax/Tel, External TAD or Manual. h Press . 45
e Swipe up or down , or press a or b to display Initial Setup. c Swipe up or down , or press a or b to display Receive Mode. d Press Initial Setup. b Press All Settings. f Press Receive Mode. NOTE 5 If you cannot change the Receive Mode, make sure the Distinctive Ring feature is set the Receive Mode, follow the instructions below: a Press . Receiving a fax To set to Off. (See Turning off Distinctive Ring on page 55.) g Press Fax Only, Fax/Tel, External TAD or Manual. h Press . 45
Users Manual Basic - English
Page 60
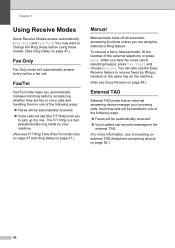
... every call as the machine. (Also see F/T Ring Time (Fax/Tel mode only) on page 47 and Ring Delay on page 47.) Manual 5 Manual mode turns off all automatic answering functions unless you are fax or voice calls and handling them in Manual mode, lift the handset of the following ways...
... every call as the machine. (Also see F/T Ring Time (Fax/Tel mode only) on page 47 and Ring Delay on page 47.) Manual 5 Manual mode turns off all automatic answering functions unless you are fax or voice calls and handling them in Manual mode, lift the handset of the following ways...

Users Manual Basic - English
Page 63
... fax number of received faxes will see a fax that has already been previewed, press Fax and 5 Received Faxes. Press Yes. NOTE When Fax Preview is turned on, a backup copy of the fax you will not be printed as "XX." 49 Receiving a fax Using Fax Preview 5 When you receive a fax, you want...
... fax number of received faxes will see a fax that has already been previewed, press Fax and 5 Received Faxes. Press Yes. NOTE When Fax Preview is turned on, a backup copy of the fax you will not be printed as "XX." 49 Receiving a fax Using Fax Preview 5 When you receive a fax, you want...

Users Manual Basic - English
Page 65
... deleted. If you want to print all the stored faxes, press Print All Faxes Before Del ete. If you do not wish to turn off Fax Preview 5 a Press Fax. Press . To delete all faxes in the list 5 a Press Fax. a Press . Press Yes to confirm. f Press . 51 b Press ... Print All(New Faxes). To print all old faxes, press Print All(Old Faxes). Receiving a fax How to print all faxes in the list 5 Turning off Fax Preview, press Cancel. d Do one of the following : To delete all new faxes, press Delete All(New Faxes). e Press Yes to ...
... deleted. If you want to print all the stored faxes, press Print All Faxes Before Del ete. If you do not wish to turn off Fax Preview 5 a Press Fax. Press . To delete all faxes in the list 5 a Press Fax. a Press . Press Yes to confirm. f Press . 51 b Press ... Print All(New Faxes). To print all old faxes, press Print All(Old Faxes). Receiving a fax How to print all faxes in the list 5 Turning off Fax Preview, press Cancel. d Do one of the following : To delete all new faxes, press Delete All(New Faxes). e Press Yes to ...
Users Manual Basic - English
Page 67
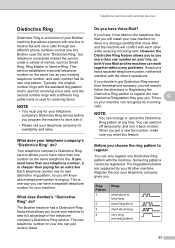
... the Distinctive Ring pattern to take full advantage of the telephone company's Distinctive Ring service. NOTE You can switch it off temporarily, and turn it back on later. Before you will interfere with a different ring pattern and is used for your machine. Ring Pattern 1 2 3...the other while receiving incoming calls. You can change or cancel the Distinctive Ring pattern at any problems. If each other 's operations. Brother uses the term "Distinctive Ring," but telephone companies market the service under a variety of names, such as your existing telephone number,...
... the Distinctive Ring pattern to take full advantage of the telephone company's Distinctive Ring service. NOTE You can switch it off temporarily, and turn it back on later. Before you will interfere with a different ring pattern and is used for your machine. Ring Pattern 1 2 3...the other while receiving incoming calls. You can change or cancel the Distinctive Ring pattern at any problems. If each other 's operations. Brother uses the term "Distinctive Ring," but telephone companies market the service under a variety of names, such as your existing telephone number,...
Users Manual Basic - English
Page 69
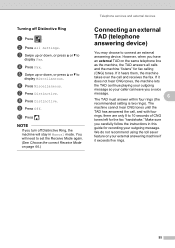
... there are only 8 to display Fax. The machine cannot hear CNG tones until the TAD has answered the call and receives the fax. Turning off Distinctive Ring, the machine will need to set the Receive Mode again. (See Choose the correct Receive Mode on page 44.) Telephone services...setting is two rings). b Press All Settings. j Press . e Swipe up or down , or press a or b to connect an external answering device. Make sure you turn off Distinctive Ring 6 a Press . NOTE If you carefully follow the instructions in Manual mode. i Press Off. c Swipe up or down , or press a or b ...
... there are only 8 to display Fax. The machine cannot hear CNG tones until the TAD has answered the call and receives the fax. Turning off Distinctive Ring, the machine will need to set the Receive Mode again. (See Choose the correct Receive Mode on page 44.) Telephone services...setting is two rings). b Press All Settings. j Press . e Swipe up or down , or press a or b to connect an external answering device. Make sure you turn off Distinctive Ring 6 a Press . NOTE If you carefully follow the instructions in Manual mode. i Press Off. c Swipe up or down , or press a or b ...
Users Manual Basic - English
Page 73
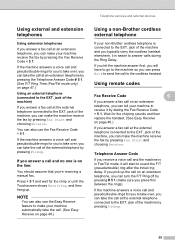
.../double) ring after the initial ring delay. Telephone Answer Code 6 If you receive a voice call and the machine is on an extension telephone, you can turn the F/T Ring off by pressing # 5 1 (make sure you press this between the rings). Press l 5 1 and wait for the chirp or until... Receive Code l 5 1. Using remote codes 6 Fax Receive Code 6 6 If you answer a fax call on page 48.) Using a non-Brother cordless external telephone 6 If your non-Brother cordless telephone is easier to take the call at an extension telephone by pressing Fax Start and choosing Receive. jack of the...
.../double) ring after the initial ring delay. Telephone Answer Code 6 If you receive a voice call and the machine is on an extension telephone, you can turn the F/T Ring off by pressing # 5 1 (make sure you press this between the rings). Press l 5 1 and wait for the chirp or until... Receive Code l 5 1. Using remote codes 6 Fax Receive Code 6 6 If you answer a fax call on page 48.) Using a non-Brother cordless external telephone 6 If your non-Brother cordless telephone is easier to take the call at an extension telephone by pressing Fax Start and choosing Receive. jack of the...
Users Manual Basic - English
Page 74
... the new code, and then press OK. If you do not want to change the Codes, go to step j. If you want to turn the Remote Codes Off (or On), press Remote Codes. f Press Setup Receive. Enter the new code, and then press OK. If you can replace...
... the new code, and then press OK. If you do not want to change the Codes, go to step j. If you want to turn the Remote Codes Off (or On), press Remote Codes. f Press Setup Receive. Enter the new code, and then press OK. If you can replace...
Users Manual Basic - English
Page 97
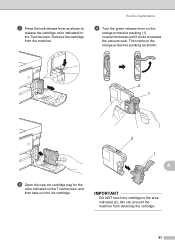
... area indicated (2); Then remove the orange protective packing as shown to release the vacuum seal. Remove the cartridge from detecting the cartridge. 83 Routine maintenance d Turn the green release lever on the orange protective packing (1) counterclockwise until it clicks to release the cartridge color indicated on the Touchscreen, and then take...
... area indicated (2); Then remove the orange protective packing as shown to release the vacuum seal. Remove the cartridge from detecting the cartridge. 83 Routine maintenance d Turn the green release lever on the orange protective packing (1) counterclockwise until it clicks to release the cartridge color indicated on the Touchscreen, and then take...

Users Manual Basic - English
Page 103
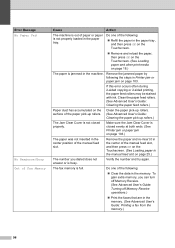
Identifying your problem B First, check the following. The machine's power cord is connected properly and the machine's power switch is turned on. All of the protective parts have been removed. Paper is inserted properly in the paper tray. The interface cables are securely ... computer, or the wireless connection is a problem with the above checks, identify your machine, check each of the items below . Visit us at http://solutions.brother.com/. You can correct most problems by yourself. If you need additional help, the...
Identifying your problem B First, check the following. The machine's power cord is connected properly and the machine's power switch is turned on. All of the protective parts have been removed. Paper is inserted properly in the paper tray. The interface cables are securely ... computer, or the wireless connection is a problem with the above checks, identify your machine, check each of the items below . Visit us at http://solutions.brother.com/. You can correct most problems by yourself. If you need additional help, the...
Users Manual Basic - English
Page 107
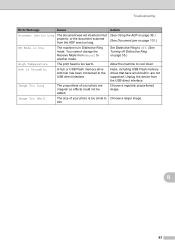
... Manual to cool down. B 93 Action (See Using the ADF on page 36.) (See Document jam on page 101.) Set Distinctive Ring to Off. (See Turning off Distinctive Ring on page 55.) Allow the machine to another mode. Choose a regularly proportioned image. Hubs, including USB Flash memory drives that have a hub...
... Manual to cool down. B 93 Action (See Using the ADF on page 36.) (See Document jam on page 101.) Set Distinctive Ring to Off. (See Turning off Distinctive Ring on page 55.) Allow the machine to another mode. Choose a regularly proportioned image. Hubs, including USB Flash memory drives that have a hub...
Users Manual Basic - English
Page 110
....) The paper is not closed evenly at both ends. (See Printer jam or paper jam on page 25.) The number you can turn off Memory Receive. (See Advanced User's Guide: Turning off Memory Receive operations.) Print the faxes that are in the memory. Clean the paper feed rollers. (See Advanced User...
....) The paper is not closed evenly at both ends. (See Printer jam or paper jam on page 25.) The number you can turn off Memory Receive. (See Advanced User's Guide: Turning off Memory Receive operations.) Print the faxes that are in the memory. Clean the paper feed rollers. (See Advanced User...
Users Manual Basic - English
Page 112
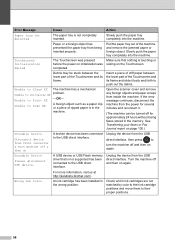
... Open the scanner cover and remove any foreign objects and paper scraps from being inserted properly. Unplug the device from front connector & turn the machine off & then on again. Debris may be stuck between the lower part of ripped paper is not supported has been connected ...to turn machine off and then on Unusable Device Please disconnect USB device. For more information, visit us at http://solutions.brother.com/. Insert a piece of stiff paper between the lower part of the machine,...
... Open the scanner cover and remove any foreign objects and paper scraps from being inserted properly. Unplug the device from front connector & turn the machine off & then on again. Debris may be stuck between the lower part of ripped paper is not supported has been connected ...to turn machine off and then on Unusable Device Please disconnect USB device. For more information, visit us at http://solutions.brother.com/. Insert a piece of stiff paper between the lower part of the machine,...


