Users Manual Basic - English
Page 5
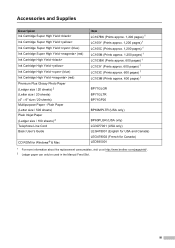
... (Prints approx. 600 pages) 1 LC103Y (Prints approx. 600 pages) 1 LC103C (Prints approx. 600 pages) 1 LC103M (Prints approx. 600 pages) 1 BP71GLGR BP71GLTR BP71GP20 BP60MPLTR (USA only) BP60PLGR (USA only) LG3077001 (USA only) LEG478001 (English for USA and Canada) LEG478002 (French for Canada) LED935001 1 For more information about the replacement consumables, visit us at http://www.brother...
... (Prints approx. 600 pages) 1 LC103Y (Prints approx. 600 pages) 1 LC103C (Prints approx. 600 pages) 1 LC103M (Prints approx. 600 pages) 1 BP71GLGR BP71GLTR BP71GP20 BP60MPLTR (USA only) BP60PLGR (USA only) LG3077001 (USA only) LEG478001 (English for USA and Canada) LEG478002 (French for Canada) LED935001 1 For more information about the replacement consumables, visit us at http://www.brother...
Users Manual Basic - English
Page 8
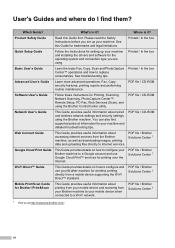
... from a mobile device supporting the Wi-Fi Direct™ standard. Where is it ? See troubleshooting tips. PDF file / Brother Solutions Center 1 Mobile Print/Scan Guide for your machine and detailed troubleshooting tips. vi You can also find them? PDF file...provides details on how to configure and use Google Cloud Print™ services for the operating system and connection type you set up your Brother machine for wireless printing directly from the Brother machine, as well as downloading images, printing data and uploading files directly to replace consumables. See ...
... from a mobile device supporting the Wi-Fi Direct™ standard. Where is it ? See troubleshooting tips. PDF file / Brother Solutions Center 1 Mobile Print/Scan Guide for your machine and detailed troubleshooting tips. vi You can also find them? PDF file...provides details on how to configure and use Google Cloud Print™ services for the operating system and connection type you set up your Brother machine for wireless printing directly from the Brother machine, as well as downloading images, printing data and uploading files directly to replace consumables. See ...
Users Manual Basic - English
Page 9
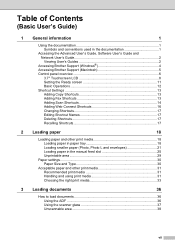
...the documentation 1 Accessing the Advanced User's Guide, Software User's Guide and Network User's Guide 2 Viewing User's Guides 2 Accessing Brother Support (Windows 4 Accessing Brother Support (Macintosh 5 Control panel overview 6 3.7" Touchscreen LCD 8 Setting the Ready screen 11 Basic Operations 12 Shortcut Settings 13 ...Changing Shortcuts 17 Editing Shortcut Names 17 Deleting Shortcuts 17 Recalling Shortcuts 17 2 Loading paper 18 Loading paper and other print media 18 Loading paper in paper tray 18 Loading smaller paper (Photo, Photo L and envelopes 21 Loading paper in...
...the documentation 1 Accessing the Advanced User's Guide, Software User's Guide and Network User's Guide 2 Viewing User's Guides 2 Accessing Brother Support (Windows 4 Accessing Brother Support (Macintosh 5 Control panel overview 6 3.7" Touchscreen LCD 8 Setting the Ready screen 11 Basic Operations 12 Shortcut Settings 13 ...Changing Shortcuts 17 Editing Shortcut Names 17 Deleting Shortcuts 17 Recalling Shortcuts 17 2 Loading paper 18 Loading paper and other print media 18 Loading paper in paper tray 18 Loading smaller paper (Photo, Photo L and envelopes 21 Loading paper in...
Users Manual Basic - English
Page 11
... to copy ...64 Stop copying 64 Copy preset settings 65 Copy options...66 Paper Type ...66 Paper Size ...67 9 PhotoCapture Center™: Printing photos from a memory card or USB Flash memory drive 68 PhotoCapture Center™ operations (PHOTO mode 68 Using a memory card or USB Flash memory ...drive 68 Getting started ...69 Print Images...71 View Photos 71 PhotoCapture Center™ print settings 72 How to scan to a memory card or USB Flash memory drive 72 10 How to...
... to copy ...64 Stop copying 64 Copy preset settings 65 Copy options...66 Paper Type ...66 Paper Size ...67 9 PhotoCapture Center™: Printing photos from a memory card or USB Flash memory drive 68 PhotoCapture Center™ operations (PHOTO mode 68 Using a memory card or USB Flash memory ...drive 68 Getting started ...69 Print Images...71 View Photos 71 PhotoCapture Center™ print settings 72 How to scan to a memory card or USB Flash memory drive 72 10 How to...
Users Manual Basic - English
Page 12
... Settings Tables 124 Memory Storage 124 Settings tables 125 Features tables 140 Entering Text ...163 Inserting spaces 163 Making corrections 163 D Specifications 164 General ...164 Print media...166 Fax ...168 Copy ...169 PhotoCapture Center 170 PictBridge ...171 Scanner ...172 Printer ...173 Interfaces ...174 Network ...174 Computer requirements 175 Consumable items 176...
... Settings Tables 124 Memory Storage 124 Settings tables 125 Features tables 140 Entering Text ...163 Inserting spaces 163 Making corrections 163 D Specifications 164 General ...164 Print media...166 Fax ...168 Copy ...169 PhotoCapture Center 170 PictBridge ...171 Scanner ...172 Printer ...173 Interfaces ...174 Network ...174 Computer requirements 175 Consumable items 176...

Users Manual Basic - English
Page 13
... from a memory card or USB Flash memory drive PhotoCapture Center™ operations Print Images PhotoCapture Center™ print settings Scan to a memory card or USB Flash memory drive 9 Printing photos from a camera Printing photos directly from a PictBridge camera Printing photos directly from a digital camera (without PictBridge) A Routine maintenance Cleaning and checking the machine Packing and...
... from a memory card or USB Flash memory drive PhotoCapture Center™ operations Print Images PhotoCapture Center™ print settings Scan to a memory card or USB Flash memory drive 9 Printing photos from a camera Printing photos directly from a PictBridge camera Printing photos directly from a digital camera (without PictBridge) A Routine maintenance Cleaning and checking the machine Packing and...
Users Manual Basic - English
Page 21
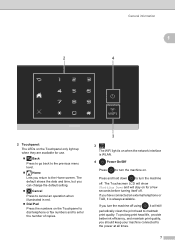
... to the power at all times. 7 If you should keep your machine connected to maintain print quality. To prolong print head life, provide better ink efficiency, and maintain print quality, you turn the machine off. If you can change the default setting. Cancel Press to cancel an operation when illuminated in red...
... to the power at all times. 7 If you should keep your machine connected to maintain print quality. To prolong print head life, provide better ink efficiency, and maintain print quality, you turn the machine off. If you can change the default setting. Cancel Press to cancel an operation when illuminated in red...
Users Manual Basic - English
Page 32
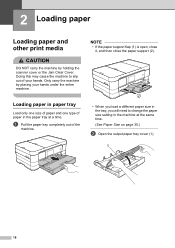
... in paper tray 2 Load only one size of paper and one type of paper in the machine at a time. 2 Loading paper 2 Loading paper and other print media 2 CAUTION DO NOT carry the machine by placing your hands. NOTE • If the paper support flap (1) is open, close it, and then close...
... in paper tray 2 Load only one size of paper and one type of paper in the machine at a time. 2 Loading paper 2 Loading paper and other print media 2 CAUTION DO NOT carry the machine by placing your hands. NOTE • If the paper support flap (1) is open, close it, and then close...
Users Manual Basic - English
Page 33
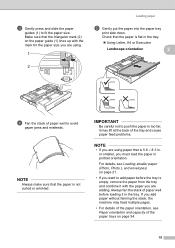
... paper you are adding. it with the mark for the paper size you are using . 1 2 Loading paper e Gently put the paper into the paper tray print side down. NOTE Always make sure that is flat in the tray. Using Letter, A4 or Executive Landscape orientation 2 2 d Fan the stack of the...
... paper you are adding. it with the mark for the paper size you are using . 1 2 Loading paper e Gently put the paper into the paper tray print side down. NOTE Always make sure that is flat in the tray. Using Letter, A4 or Executive Landscape orientation 2 2 d Fan the stack of the...

Users Manual Basic - English
Page 35
... cause paper feed problems. 21 it may experience paper feed problems caused by the thickness, size and flap shape of the envelopes you are pre-printed on the short edge, close the paper support flap. Make sure you may lift at the back of a baggy construction. • That have windows. •... the flap on the inside. Loading smaller paper (Photo, Photo L and envelopes) 2 Portrait orientation (5.8 8.3 in the application. Glue Double flaps Occasionally you 2 do a test print first before printing many envelopes. IMPORTANT Be careful not to be set in .
... cause paper feed problems. 21 it may experience paper feed problems caused by the thickness, size and flap shape of the envelopes you are pre-printed on the short edge, close the paper support flap. Make sure you may lift at the back of a baggy construction. • That have windows. •... the flap on the inside. Loading smaller paper (Photo, Photo L and envelopes) 2 Portrait orientation (5.8 8.3 in the application. Glue Double flaps Occasionally you 2 do a test print first before printing many envelopes. IMPORTANT Be careful not to be set in .
Users Manual Basic - English
Page 37
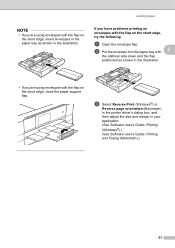
... in the printer driver's dialog box, and then adjust the size and margin in your application. (See Software User's Guide: Printing (Windows®).) (See Software User's Guide: Printing and Faxing (Macintosh).) 23 b Put the envelope into the paper tray with 2 the address side down and the flap positioned as... shown in the illustration. Loading paper If you have problems printing on envelopes with the flap on the short edge, try the following: 2 a Open the envelope flap. NOTE • If you are ...
... in the printer driver's dialog box, and then adjust the size and margin in your application. (See Software User's Guide: Printing (Windows®).) (See Software User's Guide: Printing and Faxing (Macintosh).) 23 b Put the envelope into the paper tray with 2 the address side down and the flap positioned as... shown in the illustration. Loading paper If you have problems printing on envelopes with the flap on the short edge, try the following: 2 a Open the envelope flap. NOTE • If you are ...
Users Manual Basic - English
Page 38
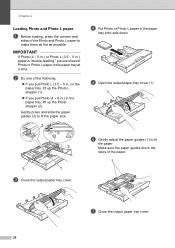
..., press the corners and sides of the Photo and Photo L paper to fit the paper size. 2 d Put Photo or Photo L paper in the paper tray print side down. Gently press and slide the paper guides (3) to make them as flat as possible. f Gently adjust the paper guides (1) to fit the paper.
..., press the corners and sides of the Photo and Photo L paper to fit the paper size. 2 d Put Photo or Photo L paper in the paper tray print side down. Gently press and slide the paper guides (3) to make them as flat as possible. f Gently adjust the paper guides (1) to fit the paper.

Users Manual Basic - English
Page 39
Loading paper Loading paper in .). Use the manual feed slot to print or copy on the short edge, close the paper support flap. 25 NOTE • The machine automatically turns on Manual Feed mode when you put ... L (3.5 5 in.), Photo 2L (5 7 in.) and Index Card (5 8 in the manual feed slot 2 a Open the manual feed slot cover. You can load special print media into this slot one sheet at a time.
Loading paper Loading paper in .). Use the manual feed slot to print or copy on the short edge, close the paper support flap. 25 NOTE • The machine automatically turns on Manual Feed mode when you put ... L (3.5 5 in.), Photo 2L (5 7 in.) and Index Card (5 8 in the manual feed slot 2 a Open the manual feed slot cover. You can load special print media into this slot one sheet at a time.
Users Manual Basic - English
Page 40
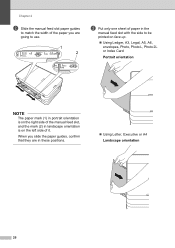
..., and the mark (2) in these positions. Using Letter, Executive or A4 Landscape orientation 2 26 Chapter 2 b Slide the manual feed slot paper guides to be printed on face up. Using Ledger, A3, Legal, A5, A6, envelopes, Photo, Photo L, Photo 2L or Index Card Portrait orientation 2 NOTE The paper mark (1) in...
..., and the mark (2) in these positions. Using Letter, Executive or A4 Landscape orientation 2 26 Chapter 2 b Slide the manual feed slot paper guides to be printed on face up. Using Ledger, A3, Legal, A5, A6, envelopes, Photo, Photo L, Photo 2L or Index Card Portrait orientation 2 NOTE The paper mark (1) in...
Users Manual Basic - English
Page 41
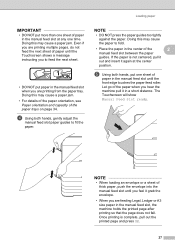
...slot until you feel it grab the envelope. • When you hear the machine pull it again at any one time. Even if you are printing multiple pages, do not feed the next sheet of paper until the front edge touches the paper feed roller. e Using both hands, gently adjust the... until the Touchscreen shows a message instructing you are feeding Legal, Ledger or A3 size paper in the manual feed slot, the machine holds the printed page after printing so that the page does not fall. Doing this may cause a paper jam. • For details of the paper orientation, see Paper orientation ...
...slot until you feel it grab the envelope. • When you hear the machine pull it again at any one time. Even if you are printing multiple pages, do not feed the next sheet of paper until the front edge touches the paper feed roller. e Using both hands, gently adjust the... until the Touchscreen shows a message instructing you are feeding Legal, Ledger or A3 size paper in the manual feed slot, the machine holds the printed page after printing so that the page does not fall. Doing this may cause a paper jam. • For details of the paper orientation, see Paper orientation ...
Users Manual Basic - English
Page 42
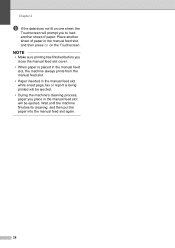
... then put the paper into the manual feed slot again. 28 Chapter 2 f If the data does not fit on the Touchscreen. NOTE • Make sure printing has finished before you close the manual feed slot cover. • When paper is placed in the manual feed slot, the machine always... prints from the manual feed slot. • Paper inserted in the manual feed slot while a test page, fax or report is being printed will be ejected. • During the machine's cleaning process, paper you to load another...
... then put the paper into the manual feed slot again. 28 Chapter 2 f If the data does not fit on the Touchscreen. NOTE • Make sure printing has finished before you close the manual feed slot cover. • When paper is placed in the manual feed slot, the machine always... prints from the manual feed slot. • Paper inserted in the manual feed slot while a test page, fax or report is being printed will be ejected. • During the machine's cleaning process, paper you to load another...

Users Manual Basic - English
Page 43
... the shaded areas of cut -sheet paper and envelopes. Loading paper Unprintable area 2 The printable area depends on . (See Software User's Guide: Printing (Windows®).) 2 (See Software User's Guide: Printing and Faxing (Macintosh).) Cut-Sheet Paper Envelopes 1 1 2 4 2 4 3 3 Cut-Sheet Envelopes Top (1) 0.12 in. (3 mm) 0.87 in. (22 mm) Left (2) 0.... (3 mm) 0.12 in the application you are using. The figures below show the unprintable areas on cut -sheet paper only when the Borderless print feature is available and turned on the settings in . (3 mm) NOTE The Borderless...
... the shaded areas of cut -sheet paper and envelopes. Loading paper Unprintable area 2 The printable area depends on . (See Software User's Guide: Printing (Windows®).) 2 (See Software User's Guide: Printing and Faxing (Macintosh).) Cut-Sheet Paper Envelopes 1 1 2 4 2 4 3 3 Cut-Sheet Envelopes Top (1) 0.12 in. (3 mm) 0.87 in. (22 mm) Left (2) 0.... (3 mm) 0.12 in the application you are using. The figures below show the unprintable areas on cut -sheet paper only when the Borderless print feature is available and turned on the settings in . (3 mm) NOTE The Borderless...

Users Manual Basic - English
Page 44
... you want . Chapter 2 Paper settings 2 Paper Size and Type 2 Paper Type 2 To get the best print quality, set the paper size option in the machine, you will need to display Plain Paper, Inkjet Paper, Brother BP71, Other Glossy or Transparency, and then press the option you copy using . c Swipe up onto... or 4"x6", and then press the option you are using Ledger, Legal or A3 size paper, set the machine for printing faxes: Letter or A4. NOTE The machine ejects paper with the printed surfaces face up or down , or press a or b to prevent smudging or paper jams. Paper Size 2 You can...
... you want . Chapter 2 Paper settings 2 Paper Size and Type 2 Paper Type 2 To get the best print quality, set the paper size option in the machine, you will need to display Plain Paper, Inkjet Paper, Brother BP71, Other Glossy or Transparency, and then press the option you copy using . c Swipe up onto... or 4"x6", and then press the option you are using Ledger, Legal or A3 size paper, set the machine for printing faxes: Letter or A4. NOTE The machine ejects paper with the printed surfaces face up or down , or press a or b to prevent smudging or paper jams. Paper Size 2 You can...
Users Manual Basic - English
Page 45
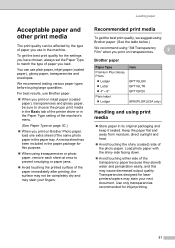
... remove each sheet at once to match the type of the paper immediately after printing; To get the best print quality, we suggest using Brother paper. (See the table below.) We recommend using print media 2 Store paper in the paper package for the settings you ... chosen, always set the Paper Type to prevent smudging or paper jams. Avoid touching the printed surface of paper you load. For best results, use Brother paper. When you print on transparencies. 2 Brother paper Paper Type Premium Plus Glossy Photo Ledger Letter 4" ...
... remove each sheet at once to match the type of the paper immediately after printing; To get the best print quality, we suggest using Brother paper. (See the table below.) We recommend using print media 2 Store paper in the paper package for the settings you ... chosen, always set the Paper Type to prevent smudging or paper jams. Avoid touching the printed surface of paper you load. For best results, use Brother paper. When you print on transparencies. 2 Brother paper Paper Type Premium Plus Glossy Photo Ledger Letter 4" ...
Users Manual Basic - English
Page 47
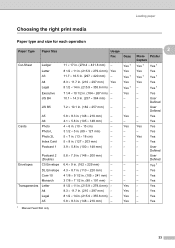
...; 257 mm) - - - Yes A4 8.3 11.7 in . (10 15 cm) - Yes Cards Photo 4 6 in . (210 297 mm) - Loading paper Choosing the right print media 2 Paper type and size for each operation 2 Paper Type Paper Size Usage 2 Fax Copy Photo Printer Capture Cut-Sheet Ledger 11 17 in...
...; 257 mm) - - - Yes A4 8.3 11.7 in . (10 15 cm) - Yes Cards Photo 4 6 in . (210 297 mm) - Loading paper Choosing the right print media 2 Paper type and size for each operation 2 Paper Type Paper Size Usage 2 Fax Copy Photo Printer Capture Cut-Sheet Ledger 11 17 in...


