Users Manual Basic - English
Page 9
... 1 Symbols and conventions used in the documentation 1 Accessing the Advanced User's Guide, Software User's Guide and Network User's Guide 2 Viewing User's Guides 2 Accessing Brother Support (Windows 4 Accessing Brother Support (Macintosh 5 Control panel overview 6 3.7" Touchscreen LCD 8 Setting the Ready screen 11 Basic Operations 12 Shortcut Settings 13 Adding Copy Shortcuts 13 Adding Fax... and using print media 31 Choosing the right print media 33 3 Loading documents 36 How to load documents 36 Using the ADF 36 Using the scanner glass 37 Unscannable area 38 vii
... 1 Symbols and conventions used in the documentation 1 Accessing the Advanced User's Guide, Software User's Guide and Network User's Guide 2 Viewing User's Guides 2 Accessing Brother Support (Windows 4 Accessing Brother Support (Macintosh 5 Control panel overview 6 3.7" Touchscreen LCD 8 Setting the Ready screen 11 Basic Operations 12 Shortcut Settings 13 Adding Copy Shortcuts 13 Adding Fax... and using print media 31 Choosing the right print media 33 3 Loading documents 36 How to load documents 36 Using the ADF 36 Using the scanner glass 37 Unscannable area 38 vii
Users Manual Basic - English
Page 10
4 Sending a fax 39 How to send a fax 39 Stop faxing...41 Setting scanner glass size for faxing 41 Color fax transmission 41 Canceling a fax in progress 41 How to preview an outgoing fax 42 Transmission Verification Report 43 5 ... Multi-line connections (PBX 58 External and extension telephones 58 Connecting an external or extension telephone 58 Using external and extension telephones 59 Using a non-Brother cordless external telephone 59 Using remote codes 59 7 Dialing and storing numbers 61 How to dial ...61 Manual dialing 61 Dialing from the Address Book...
4 Sending a fax 39 How to send a fax 39 Stop faxing...41 Setting scanner glass size for faxing 41 Color fax transmission 41 Canceling a fax in progress 41 How to preview an outgoing fax 42 Transmission Verification Report 43 5 ... Multi-line connections (PBX 58 External and extension telephones 58 Connecting an external or extension telephone 58 Using external and extension telephones 59 Using a non-Brother cordless external telephone 59 Using remote codes 59 7 Dialing and storing numbers 61 How to dial ...61 Manual dialing 61 Dialing from the Address Book...
Users Manual Basic - English
Page 11
... scan a document as a PDF file using the Touchscreen 80 A Routine maintenance 82 Replacing the ink cartridges 82 Cleaning and checking the machine 85 Cleaning the scanner 85 Cleaning the print head 86 Checking the print quality 86 Checking the print alignment 88 ix
... scan a document as a PDF file using the Touchscreen 80 A Routine maintenance 82 Replacing the ink cartridges 82 Cleaning and checking the machine 85 Cleaning the scanner 85 Cleaning the print head 86 Checking the print quality 86 Checking the print alignment 88 ix
Users Manual Basic - English
Page 12
... Entering Text ...163 Inserting spaces 163 Making corrections 163 D Specifications 164 General ...164 Print media...166 Fax ...168 Copy ...169 PhotoCapture Center 170 PictBridge ...171 Scanner ...172 Printer ...173 Interfaces ...174 Network ...174 Computer requirements 175 Consumable items 176 E Index 177 x
... Entering Text ...163 Inserting spaces 163 Making corrections 163 D Specifications 164 General ...164 Print media...166 Fax ...168 Copy ...169 PhotoCapture Center 170 PictBridge ...171 Scanner ...172 Printer ...173 Interfaces ...174 Network ...174 Computer requirements 175 Consumable items 176 E Index 177 x
Users Manual Basic - English
Page 16
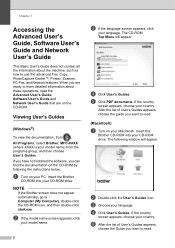
...you can find the documentation on your Macintosh. Viewing User's Guides 1 (Windows®) 1 To view the documentation, from , All Programs, select Brother, MFC-XXXX (where XXXX is your country. If the country screen appears, choose your model name) from the programs group, and then choose User's ...Guide that are ready to learn detailed information about the machine, such as how to use the advanced Fax, Copy, PhotoCapture Center™, Printer, Scanner, PC-Fax, and Network features. b Double-click the User's Guides icon. b If the model name screen appears, click your model name....
...you can find the documentation on your Macintosh. Viewing User's Guides 1 (Windows®) 1 To view the documentation, from , All Programs, select Brother, MFC-XXXX (where XXXX is your country. If the country screen appears, choose your model name) from the programs group, and then choose User's ...Guide that are ready to learn detailed information about the machine, such as how to use the advanced Fax, Copy, PhotoCapture Center™, Printer, Scanner, PC-Fax, and Network features. b Double-click the User's Guides icon. b If the model name screen appears, click your model name....
Users Manual Basic - English
Page 32
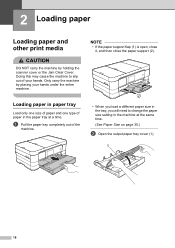
Only carry the machine by holding the scanner cover or the Jam Clear Cover. 2 Loading paper 2 Loading paper and other print media 2 CAUTION DO NOT carry the machine by placing your hands. NOTE &#...
Only carry the machine by holding the scanner cover or the Jam Clear Cover. 2 Loading paper 2 Loading paper and other print media 2 CAUTION DO NOT carry the machine by placing your hands. NOTE &#...

Users Manual Basic - English
Page 50
... fluid are completely dry. Using the ADF 3 The ADF can send a fax, make copies, and scan from the ADF (automatic document feeder) and from the scanner glass. 3 Loading documents 3 How to 20 pages and feeds each sheet individually.
... fluid are completely dry. Using the ADF 3 The ADF can send a fax, make copies, and scan from the ADF (automatic document feeder) and from the scanner glass. 3 Loading documents 3 How to 20 pages and feeds each sheet individually.
Users Manual Basic - English
Page 51
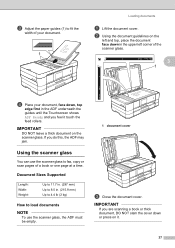
... on the left and top, place the document face down in the upper left corner of the scanner glass. 3 1 d Place your document. 1 Loading documents a Lift the document cover. Using the scanner glass 3 You can use the scanner glass, the ADF must be empty. 1 document cover c Close the document cover. b Using the document .... Document Sizes Supported 3 Length: Width: Weight: Up to 11.7 in. (297 mm) Up to load documents 3 NOTE To use the scanner glass to fit the width of your document, face down or press on it touch the feed rollers. If you are scanning a book or thick...
... on the left and top, place the document face down in the upper left corner of the scanner glass. 3 1 d Place your document. 1 Loading documents a Lift the document cover. Using the scanner glass 3 You can use the scanner glass, the ADF must be empty. 1 document cover c Close the document cover. b Using the document .... Document Sizes Supported 3 Length: Width: Weight: Up to 11.7 in. (297 mm) Up to load documents 3 NOTE To use the scanner glass to fit the width of your document, face down or press on it touch the feed rollers. If you are scanning a book or thick...
Users Manual Basic - English
Page 53
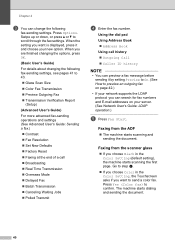
... off, press Fax. When Fax Preview is set to send a fax. The document can be sent in real time. • You can use the scanner glass to use the ADF. • If you send a black & white fax from the ADF while the memory is full, it will be up to... document: Place the document face down in the ADF. (See Using the ADF on page 36.) Load your document face down on the scanner glass. (See Using the scanner glass on , press Fax and Sending Faxes. 4 The Touchscreen shows: 39 b Do one at a time.
... off, press Fax. When Fax Preview is set to send a fax. The document can be sent in real time. • You can use the scanner glass to use the ADF. • If you send a black & white fax from the ADF while the memory is full, it will be up to... document: Place the document face down in the ADF. (See Using the ADF on page 36.) Load your document face down on the scanner glass. (See Using the scanner glass on , press Fax and Sending Faxes. 4 The Touchscreen shows: 39 b Do one at a time.
Users Manual Basic - English
Page 54
... Swipe up or down, or press a or b to confirm. Faxing from the ADF 4 The machine starts scanning and sending the document. Faxing from the scanner glass 4 If you choose Black in the Color Setting, the Touchscreen asks if you can search for fax numbers and E-mail addresses on page...
... Swipe up or down, or press a or b to confirm. Faxing from the ADF 4 The machine starts scanning and sending the document. Faxing from the scanner glass 4 If you choose Black in the Color Setting, the Touchscreen asks if you can search for fax numbers and E-mail addresses on page...
Users Manual Basic - English
Page 55
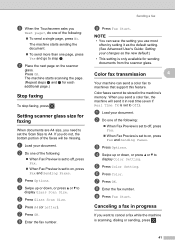
...61550; When Fax Preview is set to off , press Fax. When Fax Preview is scanning, dialing or sending, press . 41 Setting scanner glass size for sending documents from the scanner glass. Sending a fax i Press Fax Start. c Press Options. b Do one of the following : When Fax Preview is set ...to on the scanner glass. f Press A4 (or Letter). b Do one page, press Yes and go to display Glass Scan Size. h Enter the fax number. e Press Glass ...
...61550; When Fax Preview is set to off , press Fax. When Fax Preview is scanning, dialing or sending, press . 41 Setting scanner glass size for sending documents from the scanner glass. Sending a fax i Press Fax Start. c Press Options. b Do one of the following : When Fax Preview is set ...to on the scanner glass. f Press A4 (or Letter). b Do one page, press Yes and go to display Glass Scan Size. h Enter the fax number. e Press Glass ...

Users Manual Basic - English
Page 70
... you have registered the distinctive ring pattern on the external TAD when you are using Distinctive Ring). The recommended setting is connected to lift the scanner cover into the EXT. b Plug the telephone line cord from the external TAD into the jack labeled EXT. You cannot use that number as a fax...
... you have registered the distinctive ring pattern on the external TAD when you are using Distinctive Ring). The recommended setting is connected to lift the scanner cover into the EXT. b Plug the telephone line cord from the external TAD into the jack labeled EXT. You cannot use that number as a fax...

Users Manual Basic - English
Page 71
... or loud voice. You may try omitting this message will affect both hands. e Lift the scanner cover to answer calls. h Set the TAD to release the lock. Gently push the scanner cover support down and close the scanner cover using both manual and automatic fax reception. The way you must re-record the...
... or loud voice. You may try omitting this message will affect both hands. e Lift the scanner cover to answer calls. h Set the TAD to release the lock. Gently push the scanner cover support down and close the scanner cover using both manual and automatic fax reception. The way you must re-record the...

Users Manual Basic - English
Page 76
NOTE • In Real Time Transmission the automatic redial feature does not work when you are using the scanner glass. • If you are storing Address Book numbers, you can store up your document. Storing Address Book numbers 7 You can insert one of the ...
NOTE • In Real Time Transmission the automatic redial feature does not work when you are using the scanner glass. • If you are storing Address Book numbers, you can store up your document. Storing Address Book numbers 7 You can insert one of the ...

Users Manual Basic - English
Page 78
... document: Place the document face down in the ADF. (See Using the ADF on page 36.) Place the document face down on the scanner glass. (See Using the scanner glass on page 37.) b Press Copy.
... document: Place the document face down in the ADF. (See Using the ADF on page 36.) Place the document face down on the scanner glass. (See Using the scanner glass on page 37.) b Press Copy.

Users Manual Basic - English
Page 87
... up and down , or press a or b to save the settings as a Shortcut, press Save as Shortcut. Press OK. To scan multiple documents on the scanner glass, swipe up or down , or press a or b to display File Type. f When you cannot choose JPEG. Press Auto Crop and choose On (or Off...
... up and down , or press a or b to save the settings as a Shortcut, press Save as Shortcut. Press OK. To scan multiple documents on the scanner glass, swipe up or down , or press a or b to display File Type. f When you cannot choose JPEG. Press Auto Crop and choose On (or Off...
Users Manual Basic - English
Page 89
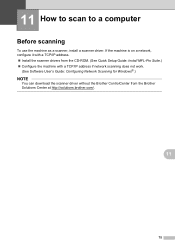
If the machine is on a network, configure it with a TCP/IP address. Install the scanner drivers from the CD-ROM. (See Quick Setup Guide: Install MFL-Pro Suite.) Configure the machine with a TCP/IP address if network scanning does not work. (See Software User's Guide: Configuring Network Scanning for Windows®.) NOTE You can download the scanner driver without the Brother ControlCenter from the Brother Solutions Center at http://solutions.brother.com/. 11 75 11 How to scan to a computer 11 Before scanning 11 To use the machine as a scanner, install a scanner driver.
If the machine is on a network, configure it with a TCP/IP address. Install the scanner drivers from the CD-ROM. (See Quick Setup Guide: Install MFL-Pro Suite.) Configure the machine with a TCP/IP address if network scanning does not work. (See Software User's Guide: Configuring Network Scanning for Windows®.) NOTE You can download the scanner driver without the Brother ControlCenter from the Brother Solutions Center at http://solutions.brother.com/. 11 75 11 How to scan to a computer 11 Before scanning 11 To use the machine as a scanner, install a scanner driver.

Users Manual Basic - English
Page 99
... (1) and the glass strip (2) with a lint-free cloth moistened with a non-flammable glass cleaner. 1 2 NOTE In addition to cleaning the scanner glass and glass strip with a non-flammable glass cleaner, run your fingertip over the glass to repeat the cleaning process three or four times. If... glass strip, the printed sample shows a vertical line. To test, make a copy after each cleaning attempt. Cleaning and checking the machine A Cleaning the scanner A a Unplug the machine from the AC power outlet. A i When there is gone. 85 After the glass strip is cleaned, the vertical line is...
... (1) and the glass strip (2) with a lint-free cloth moistened with a non-flammable glass cleaner. 1 2 NOTE In addition to cleaning the scanner glass and glass strip with a non-flammable glass cleaner, run your fingertip over the glass to repeat the cleaning process three or four times. If... glass strip, the printed sample shows a vertical line. To test, make a copy after each cleaning attempt. Cleaning and checking the machine A Cleaning the scanner A a Unplug the machine from the AC power outlet. A i When there is gone. 85 After the glass strip is cleaned, the vertical line is...
Users Manual Basic - English
Page 106
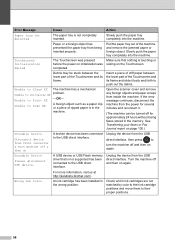
... it latches. (See Replacing the ink cartridges on page 82.) Use a new Genuine Brother Innobella™ Ink Cartridge. Try to another telephone line. Data Remaining in the memory. Lift the scanner cover and then close the ink cartridge cover until it again. Replace the ink cartridges.... (See Replacing the ink cartridges on page 122.) 92 If calls are stopped repeatedly and you are using Genuine Brother Innobella™ ink, the ...
... it latches. (See Replacing the ink cartridges on page 82.) Use a new Genuine Brother Innobella™ Ink Cartridge. Try to another telephone line. Data Remaining in the memory. Lift the scanner cover and then close the ink cartridge cover until it again. Replace the ink cartridges.... (See Replacing the ink cartridges on page 122.) 92 If calls are stopped repeatedly and you are using Genuine Brother Innobella™ ink, the ...
Users Manual Basic - English
Page 112
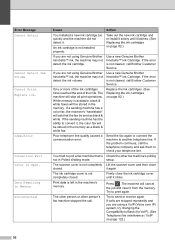
...to Clean XX Unable to Initialize XX Unable to Print XX Unable to the USB direct interface. For more information, visit us at http://solutions.brother.com/. Slowly push the paper tray completely into the machine. Insert a piece of stiff paper between the lower part of ripped paper is ...resting on the Touchscreen. Unplug the device from being inserted properly. Pull the paper tray out of the Touchscreen and its frame. Open the scanner cover and remove any foreign objects and paper scraps from the USB direct interface, then press to their proper positions. 98 If the error message...
...to Clean XX Unable to Initialize XX Unable to Print XX Unable to the USB direct interface. For more information, visit us at http://solutions.brother.com/. Slowly push the paper tray completely into the machine. Insert a piece of stiff paper between the lower part of ripped paper is ...resting on the Touchscreen. Unplug the device from being inserted properly. Pull the paper tray out of the Touchscreen and its frame. Open the scanner cover and remove any foreign objects and paper scraps from the USB direct interface, then press to their proper positions. 98 If the error message...


