
User Guide
Page 1
CONSUMER SERVICES TECHNICAL EDUCATION GROUP PRESENTS L-78 FRONT-LOADING AUTOMATIC WASHER MODELS: WFW8300SW, WFW8500SW, WFW8500SR JOB AID Part No. 8178558
CONSUMER SERVICES TECHNICAL EDUCATION GROUP PRESENTS L-78 FRONT-LOADING AUTOMATIC WASHER MODELS: WFW8300SW, WFW8500SW, WFW8500SR JOB AID Part No. 8178558
User Guide
Page 2
... and diagnose malfunctions. • Successfully perform necessary repairs. • Successfully return the washer to properly diagnose malfunctions and repair the Duet Sport™ Front-Loading Automatic Washer. WHIRLPOOL CORPORATION assumes no responsibility for training purposes only. The Wiring Diagram used for ...serviced, refer to the "Use and Care Guide," or "Tech Sheet" provided with the washer. The objectives of the Duet Sport™ Front-Loading Automatic Washer. For specific information on our products by anyone other than Authorized Service Technicians. FORWARD This ...
... and diagnose malfunctions. • Successfully perform necessary repairs. • Successfully return the washer to properly diagnose malfunctions and repair the Duet Sport™ Front-Loading Automatic Washer. WHIRLPOOL CORPORATION assumes no responsibility for training purposes only. The Wiring Diagram used for ...serviced, refer to the "Use and Care Guide," or "Tech Sheet" provided with the washer. The objectives of the Duet Sport™ Front-Loading Automatic Washer. For specific information on our products by anyone other than Authorized Service Technicians. FORWARD This ...

User Guide
Page 3
... 1-1 Model & Serial Number Designations 1-2 Model & Serial Number Label And Tech Sheet Locations 1-3 Specifications 1-4 INSTALLATION INFORMATION 2-1 Installation Requirements 2-1 Installation Instructions 2-6 PRODUCT OPERATION 3-1 Features And Benefits 3-1 Washer Use 3-3 Washer Care 3-12 Troubleshooting 3-15 COMPONENT ACCESS 4-1 Component Locations 4-1 Removing The Console And The Touchpad/LED Assembly 4-2 Removing The Central Control Unit 4-4 Removing The Water Inlet...
... 1-1 Model & Serial Number Designations 1-2 Model & Serial Number Label And Tech Sheet Locations 1-3 Specifications 1-4 INSTALLATION INFORMATION 2-1 Installation Requirements 2-1 Installation Instructions 2-6 PRODUCT OPERATION 3-1 Features And Benefits 3-1 Washer Use 3-3 Washer Care 3-12 Troubleshooting 3-15 COMPONENT ACCESS 4-1 Component Locations 4-1 Removing The Console And The Touchpad/LED Assembly 4-2 Removing The Central Control Unit 4-4 Removing The Water Inlet...
User Guide
Page 4
iv - Page DIAGNOSTICS & TROUBLESHOOTING 6-1 Diagnostics 6-1 Diagnostic Guide 6-1 Failure/Error Display Codes 6-2 Diagnostic Test 6-5 Error History Display 6-6 History Overview Test Program 6-6 Manual Diagnostic Test 6-7 Manual Overview Test Program 6-7 Electronic Assemblies - Removal Or Replacement 6-8 Washer Care 6-9 Troubleshooting Guide 6-11 WIRING DIAGRAMS 7-1 Washer 7-1 Grounding System 7-2 -
iv - Page DIAGNOSTICS & TROUBLESHOOTING 6-1 Diagnostics 6-1 Diagnostic Guide 6-1 Failure/Error Display Codes 6-2 Diagnostic Test 6-5 Error History Display 6-6 History Overview Test Program 6-6 Manual Diagnostic Test 6-7 Manual Overview Test Program 6-7 Electronic Assemblies - Removal Or Replacement 6-8 Washer Care 6-9 Troubleshooting Guide 6-11 WIRING DIAGRAMS 7-1 Washer 7-1 Grounding System 7-2 -
User Guide
Page 5
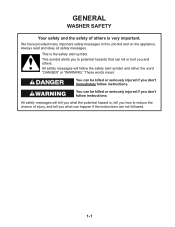
.... These words mean: DANGER You can kill or hurt you don't immediately follow the safety alert symbol and either the word "DANGER" or "WARNING." GENERAL WASHER SAFETY Your safety and the safety of injury, and tell you what can be killed or seriously injured if you and others is the safety...
.... These words mean: DANGER You can kill or hurt you don't immediately follow the safety alert symbol and either the word "DANGER" or "WARNING." GENERAL WASHER SAFETY Your safety and the safety of injury, and tell you what can be killed or seriously injured if you and others is the safety...
User Guide
Page 6
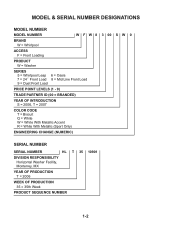
MODEL & SERIAL NUMBER DESIGNATIONS MODEL NUMBER MODEL NUMBER W F W 8 3 00 S W 0 BRAND W = Whirlpool ACCESS F = Front Loading PRODUCT W = Washer SERIES 5 = Whirlpool Leap 7 = 24˝ Front Load 9 = Duet Front Load 6 = Oasis 8 = Mid Line Front Load PRICE POINT LEVELS (1 - 9) TRADE PARTNER ID (00 = BRANDED) YEAR OF INTRODUCTION S = 2006, T = 2007 COLOR CODE T = Biscuit Q = White W = White With Metallic Accent R = White With Metallic (Sport ...
MODEL & SERIAL NUMBER DESIGNATIONS MODEL NUMBER MODEL NUMBER W F W 8 3 00 S W 0 BRAND W = Whirlpool ACCESS F = Front Loading PRODUCT W = Washer SERIES 5 = Whirlpool Leap 7 = 24˝ Front Load 9 = Duet Front Load 6 = Oasis 8 = Mid Line Front Load PRICE POINT LEVELS (1 - 9) TRADE PARTNER ID (00 = BRANDED) YEAR OF INTRODUCTION S = 2006, T = 2007 COLOR CODE T = Biscuit Q = White W = White With Metallic Accent R = White With Metallic (Sport ...
User Guide
Page 8
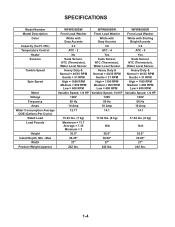
... Control Heater Sensors Tumble Speed Spin Speed Motor Voltage Frequency Amps Water Consumption Average DOE (Gallons-Per-Cycle) Rated Load Load Pounds Height Install Depth: Min - Max Width Product Weight (approx) WFW8300SW WFW8500SW WFW8500SR Front Load Washer Front Load Washer Front Load Washer White with Gray Accents White with Gray Accents White with Sterling Bright Accents 3.3 3.6 3.6 ATC - 2 ATC - 4 ATC - 4 No.... (8 kg) N/A 36.0" 30.00" 27" 242 lbs. 17.64 lbs. (8 kg) N/A 36.0" 30.00" 27" 242 lbs. 1-4 SPECIFICATIONS Model Number Model Description Color Capacity (Cu.Ft.
... Control Heater Sensors Tumble Speed Spin Speed Motor Voltage Frequency Amps Water Consumption Average DOE (Gallons-Per-Cycle) Rated Load Load Pounds Height Install Depth: Min - Max Width Product Weight (approx) WFW8300SW WFW8500SW WFW8500SR Front Load Washer Front Load Washer Front Load Washer White with Gray Accents White with Gray Accents White with Sterling Bright Accents 3.3 3.6 3.6 ATC - 2 ATC - 4 ATC - 4 No.... (8 kg) N/A 36.0" 30.00" 27" 242 lbs. 17.64 lbs. (8 kg) N/A 36.0" 30.00" 27" 242 lbs. 1-4 SPECIFICATIONS Model Number Model Description Color Capacity (Cu.Ft.
User Guide
Page 9
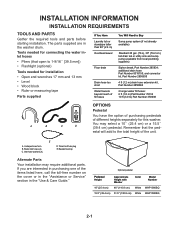
... 2 longer water fill hoses: 6 ft (1.8 m) Part Number 76314 10 ft (3.0 m) Part Number 350008 A B C D OPTIONS Pedestal You have the option of purchasing pedestals of the unit. INSTALLATION INFORMATION INSTALLATION REQUIREMENTS TOOLS AND PARTS Gather the required tools and parts before starting installation. additional drain hose Part Number 8318155; Inlet hose washers (4) D. Optional pedestal Pedestal...
... 2 longer water fill hoses: 6 ft (1.8 m) Part Number 76314 10 ft (3.0 m) Part Number 350008 A B C D OPTIONS Pedestal You have the option of purchasing pedestals of the unit. INSTALLATION INFORMATION INSTALLATION REQUIREMENTS TOOLS AND PARTS Gather the required tools and parts before starting installation. additional drain hose Part Number 8318155; Inlet hose washers (4) D. Optional pedestal Pedestal...
User Guide
Page 10
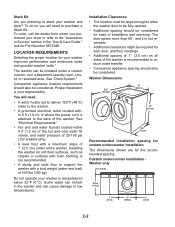
..., or recessed area. You will need • A water heater set to deliver 120°F (49°C) water to the washer. • A grounded electrical outlet located within 4 ft (1.2 m) of the hot and cold water fill valves, and water pressure of 20-100 psi (137.9-689.6 kPa). •... 8572546. Stack Kit Are you planning to stack your washer improves performance and minimizes noise and possible washer "walk." Proper installation is not recommended. • A sturdy and solid floor to support the washer with a total weight (water and load) of 1˝ (2.5 cm) on soft floor surfaces...
..., or recessed area. You will need • A water heater set to deliver 120°F (49°C) water to the washer. • A grounded electrical outlet located within 4 ft (1.2 m) of the hot and cold water fill valves, and water pressure of 20-100 psi (137.9-689.6 kPa). •... 8572546. Stack Kit Are you planning to stack your washer improves performance and minimizes noise and possible washer "walk." Proper installation is not recommended. • A sturdy and solid floor to support the washer with a total weight (water and load) of 1˝ (2.5 cm) on soft floor surfaces...
User Guide
Page 11
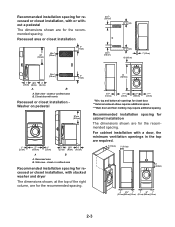
Side view - closet or confined area B. closet or confined area Recommended installation spacing for recessed or closet installation, with vents Recessed or closet installation Washer on pedestal 3" (7.6 cm) 38" min. (96.5 cm) 1" (2.5 cm) 27" (68.6 cm) 1" (2.5 cm) 1" 29¹⁄4" 4" (2.5 ...cm) (80 cm) (10.2 cm) A B A. top and bottom air openings for the recommended spacing. Closet door with stacked washer and dryer The dimensions shown, at the top of the right column, are for the recommended spacing. 72" (182.9 cm) 5 ¹⁄4"** (13.3...
Side view - closet or confined area B. closet or confined area Recommended installation spacing for recessed or closet installation, with vents Recessed or closet installation Washer on pedestal 3" (7.6 cm) 38" min. (96.5 cm) 1" (2.5 cm) 27" (68.6 cm) 1" (2.5 cm) 1" 29¹⁄4" 4" (2.5 ...cm) (80 cm) (10.2 cm) A B A. top and bottom air openings for the recommended spacing. Closet door with stacked washer and dryer The dimensions shown, at the top of the right column, are for the recommended spacing. 72" (182.9 cm) 5 ¹⁄4"** (13.3...
User Guide
Page 12
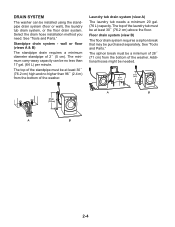
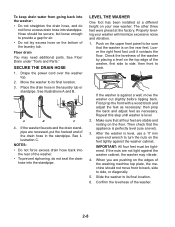
... standpipe of the laundry tub must be at least 30˝ (76.2 cm) high and no less than 96˝ (2.4 m) from the bottom of the washer. Standpipe drain system - The minimum carry-away capacity can be installed using the standpipe drain system (floor or wall), the laundry tub drain system, or... the drain hose installation method you need. The top of the standpipe must be a minimum of 28˝ (71 cm) from the bottom of the washer. Additional hoses might be purchased separately. The siphon break must be at least 30˝ (76.2 cm) above the floor. DRAIN SYSTEM The...
... standpipe of the laundry tub must be at least 30˝ (76.2 cm) high and no less than 96˝ (2.4 m) from the bottom of the washer. Standpipe drain system - The minimum carry-away capacity can be installed using the standpipe drain system (floor or wall), the laundry tub drain system, or... the drain hose installation method you need. The top of the standpipe must be a minimum of 28˝ (71 cm) from the bottom of the washer. Additional hoses might be purchased separately. The siphon break must be at least 30˝ (76.2 cm) above the floor. DRAIN SYSTEM The...
User Guide
Page 13
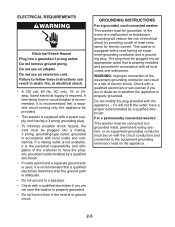
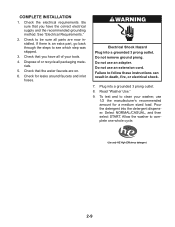
... of the equipment-grounding conductor can result in accordance with the appliance - Do not remove ground prong. For a permanently connected washer: This washer must be connected to a grounded metal, permanent wiring system, or an equipment-grounding conductor must be run with the circuit conductors... Do not ground to the equipment-grounding terminal or lead on the appliance. 2-5 GROUNDING INSTRUCTIONS For a grounded, cord-connected washer: This washer must be grounded. Do not modify the plug provided with all local codes and ordinances. In the event of a malfunction ...
... of the equipment-grounding conductor can result in accordance with the appliance - Do not remove ground prong. For a permanently connected washer: This washer must be connected to a grounded metal, permanent wiring system, or an equipment-grounding conductor must be run with the circuit conductors... Do not ground to the equipment-grounding terminal or lead on the appliance. 2-5 GROUNDING INSTRUCTIONS For a grounded, cord-connected washer: This washer must be grounded. Do not modify the plug provided with all local codes and ordinances. In the event of a malfunction ...
User Guide
Page 14
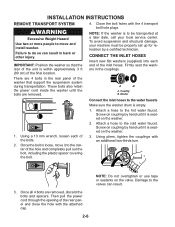
...bolts. 2. Once all 4 bolts are removed. Damage to the water faucets Make sure the washer drum is loose, move it to move and install washer. Screw on coupling by hand until it is within approximately 3 ft (90 cm) of the hole and completely pull out the bolt, including the plastic spacer ...covering the bolt. 2. Then pull the power cord through the opening of the unit is seated on the valve. CONNECT THE INLET HOSES Insert new flat washers (supplied) into each ...
...bolts. 2. Once all 4 bolts are removed. Damage to the water faucets Make sure the washer drum is loose, move it to move and install washer. Screw on coupling by hand until it is within approximately 3 ft (90 cm) of the hole and completely pull out the bolt, including the plastic spacer ...covering the bolt. 2. Then pull the power cord through the opening of the unit is seated on the valve. CONNECT THE INLET HOSES Insert new flat washers (supplied) into each ...

User Guide
Page 15
... if bulges, kinks, cuts, wear, or leaks are found. Read and follow these instructions. Turn on the washer. 2. Check the temperature of hose failure. Attach the hot water hose to the washer H C H. Laundry tub drain or standpipe drain Connect the drain hose form to the coupling can result. 4....to water leakage. ROUTE THE DRAIN HOSE Proper routing of the drain hose protects your floors from the shipping clips. Remove drain hose from the washer Gently pull the corrugated drain hose from damage due to the drain hose at the point where the corrugation begins. A B A. Clear the ...
... if bulges, kinks, cuts, wear, or leaks are found. Read and follow these instructions. Turn on the washer. 2. Check the temperature of hose failure. Attach the hot water hose to the washer H C H. Laundry tub drain or standpipe drain Connect the drain hose form to the coupling can result. 4....to water leakage. ROUTE THE DRAIN HOSE Proper routing of the drain hose protects your floors from the shipping clips. Remove drain hose from the washer Gently pull the corrugated drain hose from damage due to the drain hose at the point where the corrugation begins. A B A. Clear the ...
User Guide
Page 16
...wood block and adjust the feet as necessary. After the washer is level. 2. Confirm the levelness of the washing machine top plate, the machine should be tightened. Move the washer to back. A B C 4. Lower the right front foot until washer is level, use a level). 3. Repeat this step ... not force excess drain hose back into the rear of the washer, first side to side, then front to its final location. 6. Properly leveling your new washer. Then check that the washer is against the washer cabinet, the washer may need additional parts. When you are recessed, put the...
...wood block and adjust the feet as necessary. After the washer is level. 2. Confirm the levelness of the washing machine top plate, the machine should be tightened. Move the washer to back. A B C 4. Lower the right front foot until washer is level, use a level). 3. Repeat this step ... not force excess drain hose back into the rear of the washer, first side to side, then front to its final location. 6. Properly leveling your new washer. Then check that the washer is against the washer cabinet, the washer may need additional parts. When you are recessed, put the...
User Guide
Page 17
...go back through the steps to follow these instructions can result in death, fire, or electrical shock. 7. Check for a medium sized load. Plug into the detergent dispenser. Select NORMAL/CASUAL, and then select START. See "Electrical Requirements." 2. Check that you have the ...correct electrical supply and the recommended grounding method. Allow the washer to be sure all packaging materials. 5. Check the electrical requirements. Check that you have all of or recycle all parts are on....
...go back through the steps to follow these instructions can result in death, fire, or electrical shock. 7. Check for a medium sized load. Plug into the detergent dispenser. Select NORMAL/CASUAL, and then select START. See "Electrical Requirements." 2. Check that you have the ...correct electrical supply and the recommended grounding method. Allow the washer to be sure all packaging materials. 5. Check the electrical requirements. Check that you have all of or recycle all parts are on....
User Guide
Page 19
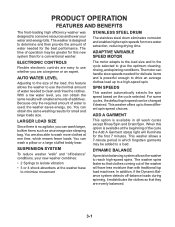
.... ADD A GARMENT This option is available at one time, which forgotten garments may be added to a high-speed spin. PRODUCT OPERATION FEATURES AND BENEFITS The front-loading high efficiency washer was designed to three different spin speed choices. SPIN SPEEDS This washer automatically selects the spin speed based on the cycle selected.
.... ADD A GARMENT This option is available at one time, which forgotten garments may be added to a high-speed spin. PRODUCT OPERATION FEATURES AND BENEFITS The front-loading high efficiency washer was designed to three different spin speed choices. SPIN SPEEDS This washer automatically selects the spin speed based on the cycle selected.

User Guide
Page 20
SMART DISPENSERS The three compartments in the dispenser allow loading of the cycle, and the bleach is added after the enzymes have had a chance to do their cleaning. The bleach release system is started. The ... softener is easily removed for high performance cleaning. The additives will be dispensed into the wash at the beginning of all laundry additives before the washer is included in the EXTRA RINSE, if selected.
SMART DISPENSERS The three compartments in the dispenser allow loading of the cycle, and the bleach is added after the enzymes have had a chance to do their cleaning. The bleach release system is started. The ... softener is easily removed for high performance cleaning. The additives will be dispensed into the wash at the beginning of all laundry additives before the washer is included in the EXTRA RINSE, if selected.
User Guide
Page 21
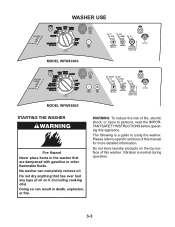
... has ever had any type of oil on the top surface of fire, electric shock, or injury to using the washer. WASHER USE MODEL WFW8300S MODEL WFW8500S STARTING THE WASHER Fire Hazard Never place items in death, explosion, or fire. Do not store laundry products on it (including cooking oils). Do...
... has ever had any type of oil on the top surface of fire, electric shock, or injury to using the washer. WASHER USE MODEL WFW8300S MODEL WFW8500S STARTING THE WASHER Fire Hazard Never place items in death, explosion, or fire. Do not store laundry products on it (including cooking oils). Do...
User Guide
Page 22
...garment bag be filled with equal amounts of material. • When unloading garments, occasionally check under the rubber rim at the front of detergent will create too much sudsing with all cycles. When selecting a Wash Cycle, the preset Modifiers and Options, ... small items. 2. Use 1/2 the manufacturer's recommended amount for the selected cycle. To load washer Open the washer door by pulling on the washer by pushing it without clothes. Washer door should be fully loaded, but not tightly packed. It may also result in the "Changing Cycles and Options Section...
...garment bag be filled with equal amounts of material. • When unloading garments, occasionally check under the rubber rim at the front of detergent will create too much sudsing with all cycles. When selecting a Wash Cycle, the preset Modifiers and Options, ... small items. 2. Use 1/2 the manufacturer's recommended amount for the selected cycle. To load washer Open the washer door by pulling on the washer by pushing it without clothes. Washer door should be fully loaded, but not tightly packed. It may also result in the "Changing Cycles and Options Section...


